K8s in Action reading notes——[6]Volumes: attaching disk storage to containers
In the first three chapters, we introduced Pods and their interaction with Kubernetes resources such as ReplicationControllers, ReplicaSets, DaemonSets, Jobs, and Services. Now, we'll go back inside the Pod and learn how to give the container access to external disk storage and/or shared storage.
We have said that Pods are similar to logical hosts, in which the processes running share resources such as CPU, RAM, and network interfaces. Although most people would expect these processes to also share the disk, this is not actually the case. Each container in a Pod has its own independent file system, provided by the container's image .
Each new container starts running from the exact set of files that were added to the image when it was built. Since containers in a Pod may be restarted (either because a process hangs or an activity probe signals to Kubernetes that the container is no longer healthy), the new container will not see anything written to the file system by the previous container, even if the new container is in the same Pod run.
In some cases, such as restarting a process on a physical machine, you want the new container to continue running from where the previous container left off. You may not need (or want) persistence of the entire file system, but want to preserve the directories containing the actual data.
To solve this problem, Kubernetes defines storage volumes ( Volumes). Storage volumes are not top-level resources like Pods, but are defined as part of the Pod and share the life cycle with the Pod. This means that a volume is created when a Pod is started and destroyed when the Pod is deleted . Therefore, the contents of the volume will persist when the container is restarted. Once the new container restarts, it can see all files written to the volume by the previous container. Additionally, if a Pod contains multiple containers, they can all use the volume at the same time.
6.1 Introducing volumes
6.1.1 Explaining volumes in an example
Suppose you have a Pod with three containers (as shown in Figure 6.1). One of the containers runs a web server that serves HTML pages from the /var/htdocs directory and stores access logs to /var/logs. The second container runs a proxy that creates HTML files and stores them in /var/html. The third container processes the logs found in the /var/logs directory (rotation, compression, analysis, or other operations).
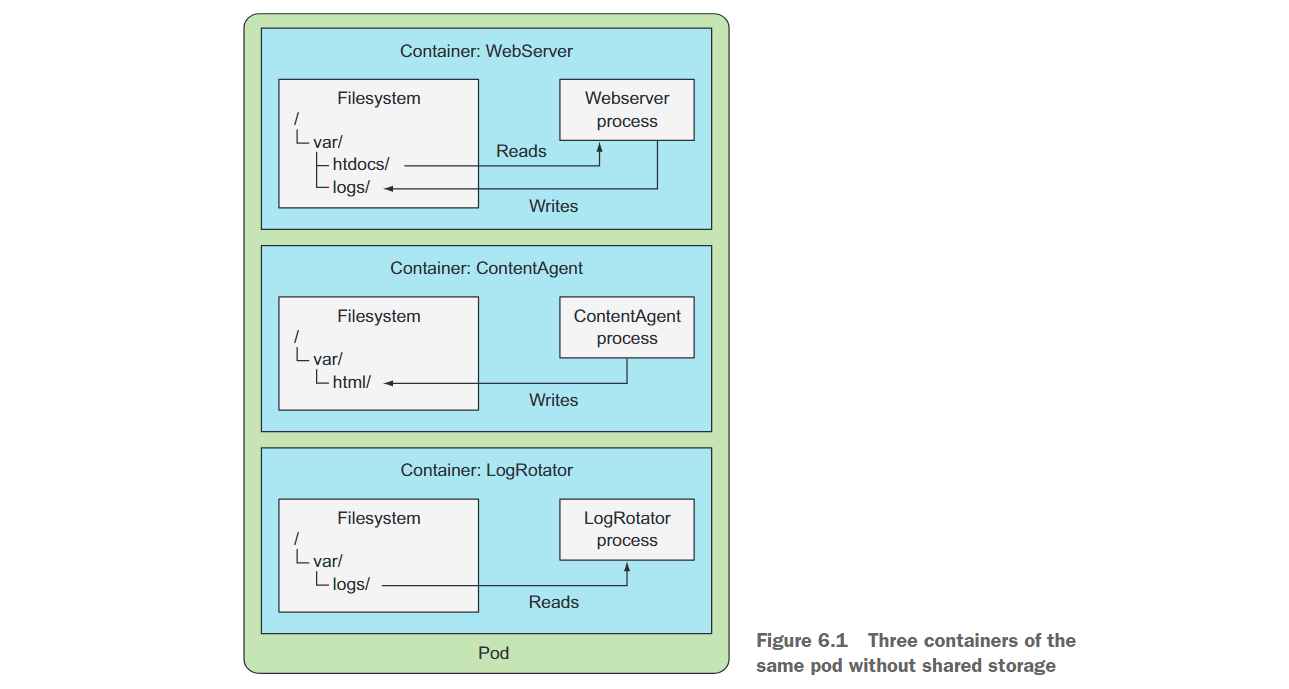
Each container has a well-defined single responsibility, but none is of much use when used alone. There is no point in creating a pod of these three containers without shared disk storage.
However, if you add two volumes to the Pod and mount them at the appropriate paths inside the three containers (as shown in Figure 6.2), you will create a system that is far more than the sum of its parts. Linux allows you to mount a file system anywhere in the file tree. By doing so, the contents of the mounted file system will be accessible in the directory it was mounted to. By mounting the same volume in both containers, they can operate on the same set of files. In your case you have two volumes mounted in three containers. By doing this, your three containers can work together and do something useful.
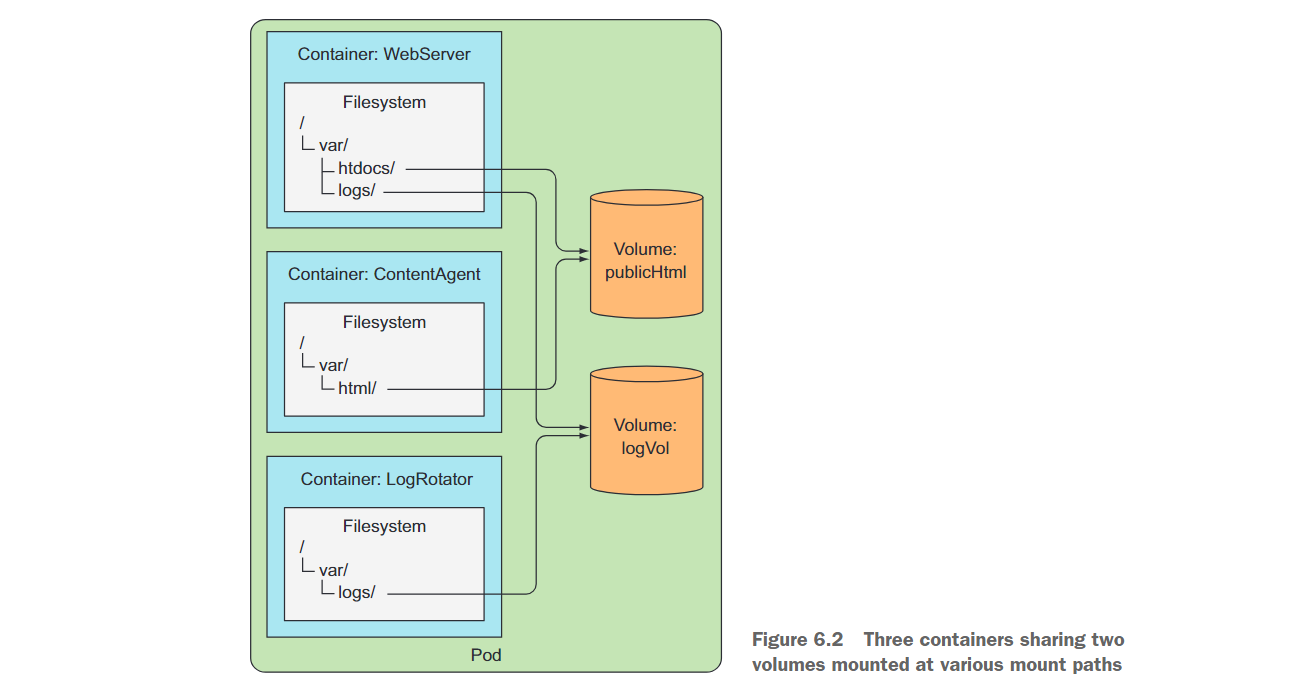
First, there is a volume named publicHtml in the pod. This volume is mounted under /var/htdocs in the WebServer container because this is the directory where the web server serves files. The same volume is also mounted in the ContentAgent container, but under /var/html because the agent writes files to that location. By mounting a single volume like this, the web server will serve the content generated by the content proxy.
Similarly, the pod also has a log storage volume logVol. This volume is mounted under /var/logs in both the WebServer and LogRotator containers. Note that it is not mounted in the ContentAgent container. Even though both the container and the volume are part of the pod, the container cannot access its files. If you want the container to be able to access the contents of the volume, you not only need to define the volume in the pod, but also define VolumeMount in the container's specification .
In this example, both volumes can be initially empty, so a volume type named emptyDir can be used. Kubernetes also supports other types of volumes, which are populated from external sources during the volume's initialization process, or where existing directories are mounted into the volume. Before starting the pod's container, the operation of populating or mounting the volume is performed.
Volumes are bound to the pod's lifecycle and only exist as long as the pod exists, but depending on the volume type, even after the pod and volume disappear, the files in the volume may remain intact and can be mounted to a new volume later. Let's see what volume types exist.
6.1.2 Introducing available volume types
Several available volume types are listed here:
emptyDir--A simple empty directory for storing ephemeral data.hostPath——Used to mount the directory in the file system of the worker node into the pod.gitRepo--Initialize the volume by checking out the contents of the Git repository.nfs--Mount the NFS share in the pod.gcePersistentDisk(Google Compute Engine persistent disk), awsElasticBlockStore (Amazon Web Services elastic block storage volume), azureDisk (Microsoft Azure disk volume) - used to mount cloud provider-specific storage.cinder、cephfs、iscsi、flocker、glusterfs、quobyte、rbd、flexVolume、vsphereVolume、photonPersistentDisk、scaleIO——Used to mount other types of network storage.configMap、secret、downwardAPI- A special type of volume used to expose certain Kubernetes resources and cluster information to pods.persistentVolumeClaim- Methods using provisioned or dynamically provisioned persistent storage. (We will discuss them in the last part of this chapter.)
6.2 Using volumes to share data between containers
6.2.1 Using an emptyDir volume
The simplest volume type is an emptyDir volume, so let's look at how to define a volume in a pod in our first example. As the name suggests, the volume starts out as an empty directory. An application running within the pod can then write any files it needs into that directory. Since the life cycle of the volume is bound to the life cycle of the pod, the contents of the volume will also be lost when the pod is deleted.
emptyDir volumes are particularly useful for sharing files between containers running in the same pod. But it can also be used by a single container, for situations where the container needs to temporarily write data to disk.
Let's revisit the previous example where the web server, content agent and log rotator shared two volumes, but let's simplify it a bit. You will build a pod that contains only a web server container and a content proxy, and use a single volume to store HTML content.
You will use Nginx as the web server and use the UNIX fortune command to generate HTML content. The fortune command prints out a random reference each time it is run. You will create a script that calls the fortune command every 10 seconds and stores its output in index.html. You can find existing Nginx images on Docker Hub and use the luksa/fortune image under Docker Hub.
Fortune image creation process
Create a new directory called fortune, and then create a shell script in it called fortuneloop.sh with the following content:
#!/bin/bash
trap "exit" SIGINT
mkdir /var/htdocs
while :
do
	echo $(date) Writing fortune to /var/htdocs/index.html
	/usr/games/fortune > /var/htdocs/index.html
	sleep 10
done
Then, in the same directory, create a file called Dockerfile with the following content:
FROM ubuntu:latest
RUN apt-get update ; apt-get -y install fortune
ADD fortuneloop.sh /bin/fortuneloop.sh
ENTRYPOINT /bin/fortuneloop.sh
After preparing these two files, use the following two commands to build and upload the image to Docker Hub
$ docker build -t <your dockerhup id>/fortune .
$ docker push <your dockerhup id>/fortune
After preparing the image, create the following YAML file:
# fortune-pod.yaml
apiVersion: v1
kind: Pod
metadata:
  name: fortune
spec:
  volumes:
  - name: html
    emptyDir: {

    }
  containers:
    - image: luksa/fortune
      name: html-generator
      volumeMounts:
        - name: html
          mountPath: /var/htdocs
    - image: nginx:alpine
      name: web-server
      volumeMounts:
        - name: html
          mountPath: /usr/share/nginx/html
          readOnly: true
      ports:
      - containerPort: 80
        protocol: TCP
The pod contains two containers and a single volume, which is mounted in both containers, but at different paths. When the html-generator container starts, it starts writing the output of the fortune command to the /var/htdocs/index.html file every 10 seconds. Since the volume is mounted under /var/htdocs, the index.html file is written to the volume instead of the top level of the container. When the web-server container starts, it starts serving all HTML files in the /usr/share/nginx/html directory (this is the directory where Nginx serves files by default). Because you mounted the volume at that location, Nginx will serve the index.html file written by the container running the fortune loop. The net effect is that a client sending an HTTP request to port 80 of the pod will get the current fortune message in response.
Next, apply the above Pod to see the effect
$ kubectl port-forward fortune 8080:80
Forwarding from 127.0.0.1:8080 -> 80
$ curl http://localhost:8080
Q:      How many elephants can you fit in a VW Bug?
A:      Four.  Two in the front, two in the back.

Q:      How can you tell if an elephant is in your refrigerator?
A:      There's a footprint in the mayo.

Q:      How can you tell if two elephants are in your refrigerator?
A:      There's two footprints in the mayo.

Q:      How can you tell if three elephants are in your refrigerator?
A:      The door won't shut.

Q:      How can you tell if four elephants are in your refrigerator?
A:      There's a VW Bug in your driveway.
After waiting for 10 seconds and looking again, you will receive a different message:
curl http://localhost:8080
A morgue is a morgue is a morgue.  They can paint the walls with aggressively
cheerful primary colors and splashy bold graphics, but it's still a holding
place for the dead until they can be parted out to organ banks.  Not that I
would have cared normally but my viewpoint was skewed.  The relentless
pleasance of the room I sat in seemed only grotesque.
                -- Pat Cadigan, "Mindplayers"
The emptyDir you use as the volume is created on the actual disk of the worker node hosting the pod, so its performance depends on the type of node disk. However, you can tell Kubernetes to create the emptyDir on the tmpfs file system (in memory rather than on disk). To do this, set emptyDir's medium to Memory as follows:
volumes:
	- name: html
	  emptyDir:
	  	medium: Memory
6.2.2 Using a Git repository as the starting point for a volume
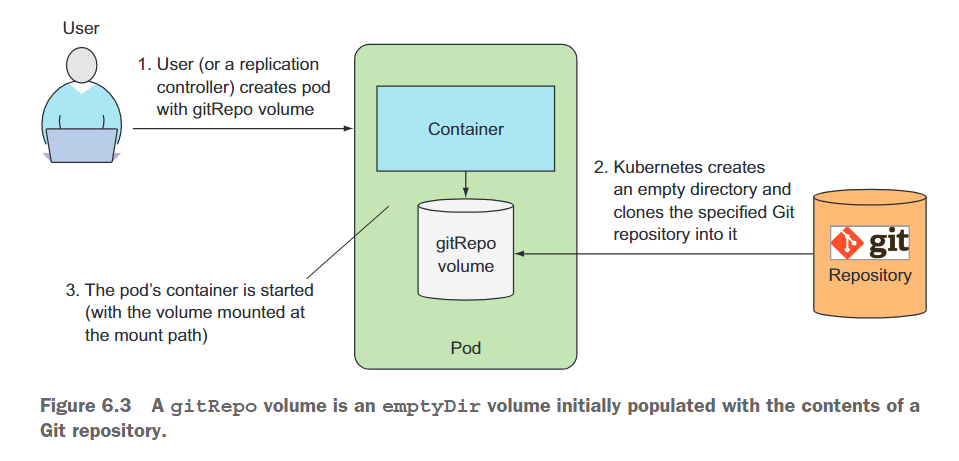
A gitRepovolume is basically an emptyDir volume that is populated when a pod starts (but before its container is created) by cloning the Git repository and checking out a specific version. Figure 6.3 illustrates this process.
After the gitRepo volume is created, it is not synchronized with the referenced repository. When you push additional commits to the Git repository, the files in the volume will not be updated. However, if your pod is managed by a ReplicationController, deleting the pod will cause a new pod to be created, and this new pod's volume will contain the latest commits.
Before creating a Pod, you need the actual Git repository and place the HTML files in it. The author has created a repository on GitHub https://github.com/luksa/kubia-website-example.git. You need to fork it (create your own copy of the repository on GitHub) so you can push changes to it later.
After creating the fork, you can start creating Pods. This time, you just need to use a single Nginx container and a gitRepo volume in the Pod (make sure to point the gitRepo volume to your own repository) as shown below.
apiVersion: v1
kind: Pod
metadata:
  name: gitrepo-volume-pod
spec:
  volumes:
  - name: html
    gitRepo:
      # 将仓库改成自己fork后的,方便后续更改
      repository: https://gitee.com/yi-junquan/kubia-website-example.git
      revision: master
      directory: . # 希望将repo克隆到卷的根目录中
  containers:
    - image: nginx:alpine
      name: web-server
      volumeMounts:
        - name: html
          mountPath: /usr/share/nginx/html
          readOnly: true
      ports:
      - containerPort: 80
        protocol: TCP
When a Pod is created, the volume is first initialized as an empty directory and then the specified Git repository is cloned into it. If you don't set the directory to a "." (dot), the repository will be cloned into the kubia-website-example subdirectory, which is not what you want. You want to clone the repository into the root of the volume. In addition to the repository, you specify that you want Kubernetes to check any revisions pointed to by the master branch when creating the volume.
Once the Pod is running, you can try to access it through port forwarding, services, or by executing the curl command from inside the Pod (or any other Pod within the cluster).
$ curl http://localhost:8081
<html>
<body>
Hello there.
</body>
</html>
Modify index.html and then delete the Pod. You can see that the original content has been modified.
$ curl http://localhost:8081
<html>
<body>
I have changed it.
</body>
</html>
The Git sync process should not be run in the same container as the Nginx web server, but in a second container - a sidecar container. Sidecar containers are containers that enhance the operation of a Pod's main container. You can add sidecars to Pods to use existing container images, rather than stuffing extra logic into the main application's code, which would make it overly complex and non-reusable.
To find an existing container image that keeps a local directory in sync with a Git repository, go to Docker Hub and search for "git sync". You will find that there are many mirrors that can achieve synchronization functionality. Then use the new container from that image in the Pod from the previous example, mount the Pod's existing gitRepo volume in the new container, and configure the Git sync container to synchronize the files with your Git repository . If everything is set up correctly, you should see that the web server is serving files in sync with your GitHub repository.
A gitRepo volume is similar to an emptyDir volume. It is basically a dedicated directory created specifically for the Pod that contains the volume and used only by that Pod . When a Pod is deleted, the volume and its contents are also deleted. However, other types of volumes do not create a new directory, but instead mount an existing external directory into the Pod's container file system. The contents of this volume can be persisted across multiple Pod instantiations. Next, we'll learn about these types of volumes.
6.3 Accessing files on the worker node’s filesystem
Most Pods should have no knowledge of their hosting node and therefore should not access any files on the node's file system. However, some system-level Pods (remember, usually managed by a DaemonSet) do need to read files on the node or access node devices through the file system using the node file system. Kubernetes hostPathmakes this possible through volumes.
6.3.1 Introducing the hostPath volume
The hostPath volume points to a specific file or directory on the node's file system (see Figure 6.4). Pods running on the same node and using the same path in their hostPath volume can see the same files.
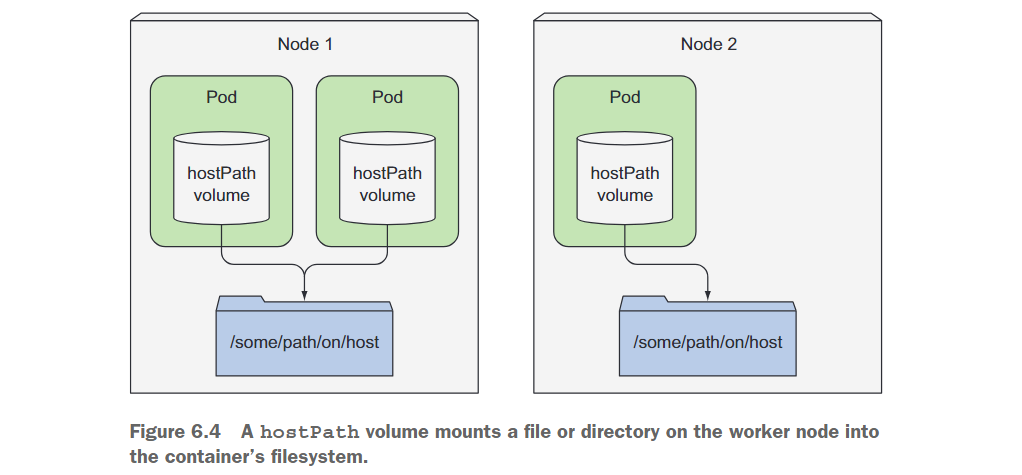
The hostPath volume is the first type of persistent storage we are introducing , because the contents of the gitRepo and emptyDir volumes are deleted when the Pod is deleted, while the contents of the hostPath volume are not deleted. If a Pod is deleted and the next Pod uses a hostPath volume pointing to the same path on the host, the new Pod will see whatever the previous Pod left behind, but only if it is scheduled to the same node as the first Pod hour.
If you are considering using a hostPath volume as the location to store your database data directory, think again. Because the contents of the volume are stored on a specific node's file system, when the database Pod is rescheduled to another node, it will no longer see the data. This explains why hostPath volumes should not be used for regular Pods, as it makes the Pod sensitive to the node it is scheduled to .
6.3.2 Examining system pods that use hostPath volumes
There are multiple such Pods running in the kube-system namespace using hostPath volumes
$ kubectl get pod -n kube-system
NAME                                   READY   STATUS    RESTARTS   AGE
chaosblade-operator-64c9587579-9cj96   1/1     Running   0          6d21h
chaosblade-tool-488rv                  1/1     Running   1          15d
chaosblade-tool-bbzw7                  1/1     Running   0          15d
chaosblade-tool-rdwx9                  1/1     Running   3          15d
chaosblade-tool-wchxf                  1/1     Running   4          15d
coredns-59d64cd4d4-264v5               1/1     Running   0          14d
coredns-59d64cd4d4-q4p2m               1/1     Running   0          14d
coredns-59d64cd4d4-qszcl               1/1     Running   0          6d21h
etcd-yjq-k8s1                          1/1     Running   1          16d
kube-apiserver-yjq-k8s1                1/1     Running   1          16d
kube-controller-manager-yjq-k8s1       1/1     Running   2          15d
kube-proxy-2lnh2                       1/1     Running   1          16d
kube-proxy-422l7                       1/1     Running   4          16d
kube-proxy-8mw2q                       1/1     Running   5          16d
kube-proxy-vqx6j                       1/1     Running   1          16d
View information about one of the Pods:kubectl describe pod kube-proxy-2lnh -n kube-system
Volumes:
  kube-proxy:
    Type:      ConfigMap (a volume populated by a ConfigMap)
    Name:      kube-proxy
    Optional:  false
  xtables-lock:
    Type:          HostPath (bare host directory volume)
    Path:          /run/xtables.lock
    HostPathType:  FileOrCreate
  lib-modules:
    Type:          HostPath (bare host directory volume)
    Path:          /lib/modules
hostPath volumes are often used when trying to use persistent storage in single-node clusters
please remember, use the hostPath volume only when you need to read or write system files on the node. Never use them to persist data across Pods.
6.4 Using persistent storage
When an application running in a Pod needs to persist data to disk, and needs to have the same data even if the Pod is rescheduled to another node, you cannot use any of the types of volumes we have mentioned so far. Because this data needs to be accessible from any cluster node, it must be stored on some type of network-attached storage (NAS).
6.5 Decoupling pods from the underlying storage technology
All of the persistent volume types we've looked at so far require the Pod's developer to understand the actual network storage infrastructure available in the cluster. For example, to create an NFS-based volume, the developer must know the actual server where NFS resides. This goes against the basic idea of Kubernetes, which aims to hide the actual infrastructure from both applications and developers, so that they don't have to worry about the details of the infrastructure, and to make applications available on a wide range of cloud providers and on-premises data Enable portability between centers .
Ideally, developers deploying applications to Kubernetes should not know what storage technology is used under the hood, just like they don't have to know the type of physical server on which their pods are running. Infrastructure-related handling should be the exclusive domain of the cluster administrator.
When developers need a certain amount of persistent storage for their application, they can request it from Kubernetes in the same way they request resources such as CPU, memory, etc. when creating a Pod. System administrators can configure the cluster to provide applications with the resources they need.
6.5.1 Introducing PersistentVolumes and PersistentVolumeClaims
To enable applications to request storage in a Kubernetes cluster without having to deal with infrastructure details, two new resources have been introduced. They are PersistentVolumesand PersistentVolumeClaims.
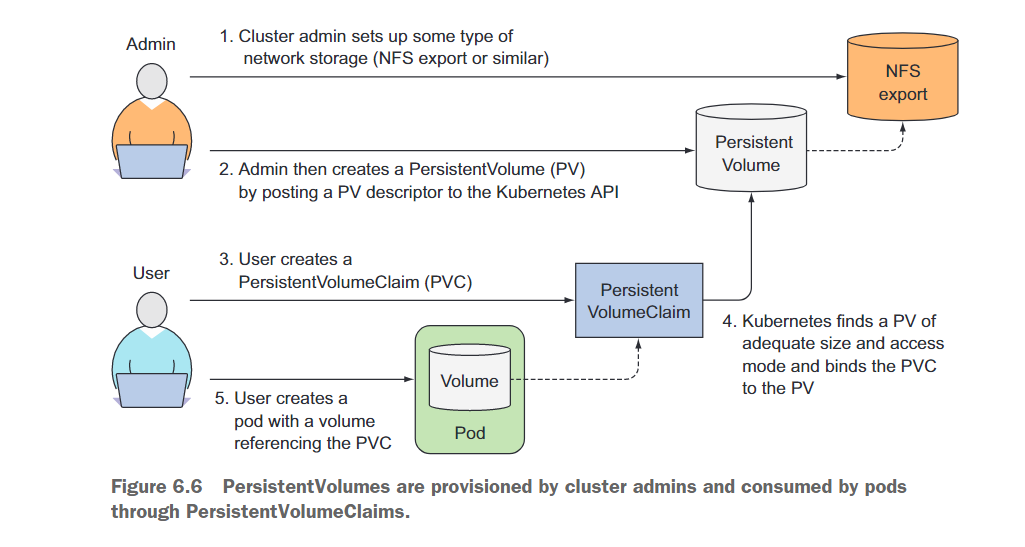
Using a PersistentVolume in a Pod is more complicated than using a normal Pod volume, so let's illustrate how Pods, PersistentVolumeClaims, PersistentVolumes, and the actual underlying storage relate to each other through Figure 6.6.
Instead of adding technology-specific volumes to their Pods, developers set up the underlying storage as a cluster administrator and register it with Kubernetes by creating a PersistentVolume resource through the Kubernetes API server. When creating a PersistentVolume, the administrator specifies its size and supported access modes.
When a cluster user needs to use persistent storage in one of their Pods, they first create a PersistentVolumeClaim manifest, specifying the required minimum size and access mode. Then, the user submits the PersistentVolumeClaim manifest to the Kubernetes API server, and Kubernetes finds the corresponding PersistentVolume and binds the volume to the Pod.
The PersistentVolumeClaim can then be used as a volume in the Pod. Other users cannot use the same PersistentVolume until the bound PersistentVolumeClaim is removed and released.