1 Chapter 8 Data Storage
As mentioned earlier, the life cycle of a container may be short and it will be created and destroyed frequently. Then when the container is destroyed, the data stored in the container will also be cleared. This result may be undesirable for users in some cases. In order to persist container data, kubernetes introduces the concept of Volume.
Volume is a shared directory in a Pod that can be accessed by multiple containers. It is defined on the Pod and then mounted to a specific file directory by multiple containers in a Pod. Kubernetes uses Volume to realize the connection between different containers in the same Pod. data sharing and persistent storage of data. The life container of a Volume is not related to the life cycle of a single container in the Pod. When the container is terminated or restarted, the data in the Volume will not be lost.
Kubernetes Volume supports multiple types, the more common ones are the following:
- Simple storage: EmptyDir, HostPath, NFS
- Advanced storage: PV, PVC
- Configuration storage: ConfigMap, Secret
1.1 Basic storage
1.1.1 EmptyDir
EmptyDir is the most basic Volume type. An EmptyDir is an empty directory on the Host.
EmptyDir is created when a Pod is assigned to a Node. Its initial content is empty, and there is no need to specify the corresponding directory file on the host, because kubernetes will automatically allocate a directory. When the Pod is destroyed, the data in EmptyDir will also be deleted. delete permanently. The uses of EmptyDir are as follows:
- Temporary space, such as a temporary directory required when some applications are running, and does not need to be retained permanently
- A directory where one container needs to obtain data from another container (multi-container shared directory)
Next, let's use EmptyDir through a case of file sharing between containers.
Prepare two containers nginx and busybox in a Pod, and then declare a Volume to be hung in the directories of the two containers. Then the nginx container is responsible for writing logs to the Volume, and busybox reads the log content to the console through commands.

Create a volume-emptydir.yaml
apiVersion: v1
kind: Pod
metadata:
  name: volume-emptydir
  namespace: dev
spec:
  containers:
  - name: nginx
    image: nginx:1.17.1
    ports:
    - containerPort: 80
    volumeMounts:  # 将logs-volume挂在到nginx容器中,对应的目录为 /var/log/nginx
    - name: logs-volume
      mountPath: /var/log/nginx
  - name: busybox
    image: busybox:1.30
    command: ["/bin/sh","-c","tail -f /logs/access.log"] # 初始命令,动态读取指定文件中内容
    volumeMounts:  # 将logs-volume 挂在到busybox容器中,对应的目录为 /logs
    - name: logs-volume
      mountPath: /logs
  volumes: # 声明volume, name为logs-volume,类型为emptyDir
  - name: logs-volume
    emptyDir: {}
# 创建Pod
[root@k8s-master01 ~]# kubectl create -f volume-emptydir.yaml
pod/volume-emptydir created
# 查看pod
[root@k8s-master01 ~]# kubectl get pods volume-emptydir -n dev -o wide
NAME READY STATUS RESTARTS AGE IP NODE ......
volume-emptydir 2/2 Running 0 97s 10.42.2.9 node1 ......
# 通过podIp访问nginx
[root@k8s-master01 ~]# curl 10.42.2.9
......
# 通过kubectl logs命令查看指定容器的标准输出
[root@k8s-master01 ~]# kubectl logs -f volume-emptydir -n dev -c busybox
10.42.1.0 - - [27/Jun/2021:15:08:54 +0000] "GET / HTTP/1.1" 200 612 "-" "curl/7.29.0" "-"1.1.2 HostPath
As mentioned in the previous lesson, the data in EmptyDir will not be persisted. It will be destroyed when the Pod ends. If you want to simply persist the data to the host, you can choose HostPath.
HostPath is to hang an actual directory in the Node host into the Pod for use by the container. This design can ensure that the Pod is destroyed, but the data basis can exist on the Node host.

Create a volume-hostpath.yaml:
apiVersion: v1
kind: Pod
metadata:
  name: volume-hostpath
  namespace: dev
spec:
  containers:
  - name: nginx
    image: nginx:1.17.1
    ports:
    - containerPort: 80
    volumeMounts:
    - name: logs-volume
      mountPath: /var/log/nginx
  - name: busybox
    image: busybox:1.30
    command: ["/bin/sh","-c","tail -f /logs/access.log"]
    volumeMounts:
    - name: logs-volume
      mountPath: /logs
  volumes:
  - name: logs-volume
    hostPath:
      path: /root/logs
      type: DirectoryOrCreate  # 目录存在就使用,不存在就先创建后使用
关于type的值的一点说明:
DirectoryOrCreate 目录存在就使用,不存在就先创建后使用
Directory 目录必须存在
FileOrCreate 文件存在就使用,不存在就先创建后使用
File 文件必须存在
Socket unix套接字必须存在
CharDevice 字符设备必须存在
BlockDevice 块设备必须存在# 创建Pod
[root@k8s-master01 ~]# kubectl create -f volume-hostpath.yaml
pod/volume-hostpath created
# 查看Pod
[root@k8s-master01 ~]# kubectl get pods volume-hostpath -n dev -o wide
NAME READY STATUS RESTARTS AGE IP NODE ......
pod-volume-hostpath 2/2 Running 0 16s 10.42.2.10 node1 ......
#访问nginx
[root@k8s-master01 ~]# curl 10.42.2.10
# 接下来就可以去host的/root/logs目录下查看存储的文件了
### 注意: 下面的操作需要到Pod所在的节点运行(案例中是node1)
[root@node1 ~]# ls /root/logs/
access.log error.log
# 同样的道理,如果在此目录下创建一个文件,到容器中也是可以看到的1.1.3 NFS
HostPath can solve the problem of data persistence, but once the Node node fails and the Pod is transferred to another node, problems will arise again. At this time, a separate network storage system needs to be prepared, and NFS and CIFS are commonly used.
NFS is a network file storage system. You can build an NFS server and then directly connect the storage in the Pod to the NFS system. In this case, no matter how the Pod is transferred on the node, as long as there is no problem with the connection between Node and NFS, the data will be Can be accessed successfully.
 1) First prepare the nfs server. For the sake of simplicity, the master node is directly used as the nfs server.
# 在nfs上安装nfs服务
[root@nfs ~]# yum install nfs-utils -y
# 准备一个共享目录
[root@nfs ~]# mkdir /root/data/nfs -pv
# 将共享目录以读写权限暴露给192.168.5.0/24网段中的所有主机
[root@nfs ~]# vim /etc/exports
[root@nfs ~]# more /etc/exports
/root/data/nfs 192.168.5.0/24(rw,no_root_squash)
# 启动nfs服务
[root@nfs ~]# systemctl restart nfs2) Next, install nfs on each node so that the node can drive the nfs device.
# 在node上安装nfs服务,注意不需要启动
[root@k8s-master01 ~]# yum install nfs-utils -y
3) Next, you can write the pod configuration file and create volume-nfs.yaml
apiVersion: v1
kind: Pod
metadata:
  name: volume-nfs
  namespace: dev
spec:
  containers:
  - name: nginx
    image: nginx:1.17.1
    ports:
    - containerPort: 80
    volumeMounts:
    - name: logs-volume
      mountPath: /var/log/nginx
  - name: busybox
    image: busybox:1.30
    command: ["/bin/sh","-c","tail -f /logs/access.log"]
    volumeMounts:
    - name: logs-volume
      mountPath: /logs
  volumes:
  - name: logs-volume
    nfs:
      server: 192.168.5.6  #nfs服务器地址
      path: /root/data/nfs #共享文件路径
4) Finally, run the pod and observe the results
# 创建pod
[root@k8s-master01 ~]# kubectl create -f volume-nfs.yaml
pod/volume-nfs created

# 查看pod
[root@k8s-master01 ~]# kubectl get pods volume-nfs -n dev
NAME                  READY   STATUS    RESTARTS   AGE
volume-nfs        2/2     Running   0          2m9s

# 查看nfs服务器上的共享目录,发现已经有文件了
[root@k8s-master01 ~]# ls /root/data/
access.log  error.log
1.2 Advanced Storage
We have already learned how to use NFS to provide storage. At this time, the user is required to build an NFS system and configure nfs in yaml. Since there are many storage systems supported by Kubernetes, it is obviously unrealistic for customers to master them all. In order to shield the details of the underlying storage implementation and facilitate user use, kubernetes introduces two resource objects, PV and PVC.
PV (Persistent Volume) means persistent volume and is an abstraction of the underlying shared storage. Generally, PV is created and configured by the kubernetes administrator. It is related to the underlying specific shared storage technology, and is connected to the shared storage through plug-ins.
PVC (Persistent Volume Claim) means persistent volume claim, which is a user's statement of storage needs. In other words, PVC is actually a resource request application issued by the user to the kubernetes system.
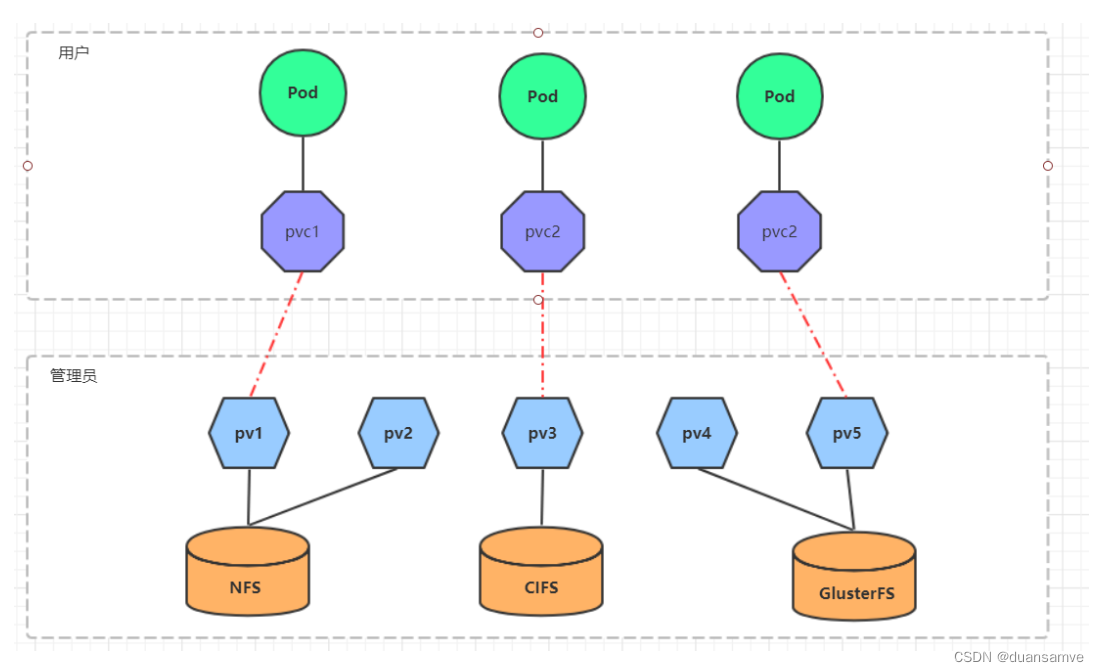
After using PV and PVC, the work can be further subdivided:
- Storage: Maintenance by storage engineers
- PV: kubernetes administrator maintenance
- PVC: kubernetes user maintenance
1.2.1 PV
PV is an abstraction of storage resources. The following is the resource manifest file:
apiVersion: v1
kind: PersistentVolume
metadata:
  name: pv2
spec:
  nfs: # 存储类型,与底层真正存储对应
  capacity:  # 存储能力,目前只支持存储空间的设置
    storage: 2Gi
  accessModes:  # 访问模式
  storageClassName: # 存储类别
  persistentVolumeReclaimPolicy: # 回收策略
Description of key configuration parameters of PV:
- storage type
The type of underlying actual storage. Kubernetes supports multiple storage types, and the configuration of each storage type is different.
- storage capacity
Currently, only storage space settings (storage=1Gi) are supported, but configurations of IOPS, throughput and other indicators may be added in the future.
- Access Modes (accessModes)
Used to describe the access permissions of user applications to storage resources. Access permissions include the following methods:
ReadWriteOnce (RWO): Read and write permissions, but can only be mounted by a single node
ReadOnlyMany (ROX): Read-only permission, can be mounted by multiple nodes
ReadWriteMany (RWX): read and write permissions, can be mounted by multiple nodes
It should be noted that different underlying storage types may support different access modes.
- Recycling policy (persistentVolumeReclaimPolicy)
How to deal with PV when it is no longer used. Three strategies are currently supported:
Retain retains data and requires the administrator to manually clean the data
Recycle clears the data in PV, the effect is equivalent to executing rm -rf /thevolume/*
Delete (Delete) The back-end storage connected to the PV completes the deletion operation of the volume. Of course, this is common in the storage services of cloud service providers.
It should be noted that different underlying storage types may support different recycling strategies.
- storage class
PV can specify a storage class through the storageClassName parameter
PVs with a specific category can only be bound to PVCs that requested that category
PVs with no category set can only be bound to PVCs that do not request any category.
- status
In the life cycle of a PV, it may be in 4 different stages:
Available: Indicates available status and has not been bound by any PVC.
Bound: Indicates that the PV has been bound by the PVC
Released: Indicates that the PVC has been deleted, but the resource has not been redeclared by the cluster.
Failed: Indicates that the automatic recycling of the PV failed.
experiment
Use NFS as storage to demonstrate the use of PV. Create three PVs, corresponding to the three exposed paths in NFS.
1) Prepare NFS environment
# 创建目录
[root@nfs ~]# mkdir /root/data/{pv1,pv2,pv3} -pv

# 暴露服务
[root@nfs ~]# more /etc/exports
/root/data/pv1     192.168.5.0/24(rw,no_root_squash)
/root/data/pv2     192.168.5.0/24(rw,no_root_squash)
/root/data/pv3     192.168.5.0/24(rw,no_root_squash)

# 重启服务
[root@nfs ~]#  systemctl restart nfs
2) Create pv.yaml
apiVersion: v1
kind: PersistentVolume
metadata:
  name:  pv1
spec:
  capacity:
    storage: 1Gi
  accessModes:
  - ReadWriteMany
  persistentVolumeReclaimPolicy: Retain
  nfs:
    path: /root/data/pv1
    server: 192.168.5.6

---

apiVersion: v1
kind: PersistentVolume
metadata:
  name:  pv2
spec:
  capacity:
    storage: 2Gi
  accessModes:
  - ReadWriteMany
  persistentVolumeReclaimPolicy: Retain
  nfs:
    path: /root/data/pv2
    server: 192.168.5.6

---

apiVersion: v1
kind: PersistentVolume
metadata:
  name:  pv3
spec:
  capacity:
    storage: 3Gi
  accessModes:
  - ReadWriteMany
  persistentVolumeReclaimPolicy: Retain
  nfs:
    path: /root/data/pv3
    server: 192.168.5.6
# 创建 pv
[root@k8s-master01 ~]# kubectl create -f pv.yaml
persistentvolume/pv1 created
persistentvolume/pv2 created
persistentvolume/pv3 created
# 查看pv
[root@k8s-master01 ~]# kubectl get pv -o wide
NAME CAPACITY ACCESS MODES RECLAIM POLICY STATUS AGE VOLUMEMODE
pv1 1Gi RWX Retain Available 10s Filesystem
pv2 2Gi RWX Retain Available 10s Filesystem
pv3 3Gi RWX Retain Available 9s Filesystem1.2.2 PVC
PVC is an application for resources, used to declare information on storage space, access mode, and storage category requirements. The following is the resource list file:
apiVersion: v1
kind: PersistentVolumeClaim
metadata:
  name: pvc
  namespace: dev
spec:
  accessModes: # 访问模式
  selector: # 采用标签对PV选择
  storageClassName: # 存储类别
  resources: # 请求空间
    requests:
      storage: 5Gi
Description of key configuration parameters of PVC:
Access Modes (accessModes)
Used to describe the user application's access rights to storage resources.
Selector
Through the setting of Label Selector, PVC can be used to filter existing PVs in the system.
Storage class (storageClassName)
When defining PVC, you can set the required back-end storage class. Only PVs with this class set can be selected by the system.
Resource requests (Resources)
Describes a request for a storage resource
experiment
1) Create pvc.yaml and apply for pv
apiVersion: v1
kind: PersistentVolumeClaim
metadata:
  name: pvc1
  namespace: dev
spec:
  accessModes:
  - ReadWriteMany
  resources:
    requests:
      storage: 1Gi
---
apiVersion: v1
kind: PersistentVolumeClaim
metadata:
  name: pvc2
  namespace: dev
spec:
  accessModes:
  - ReadWriteMany
  resources:
    requests:
      storage: 1Gi
---
apiVersion: v1
kind: PersistentVolumeClaim
metadata:
  name: pvc3
  namespace: dev
spec:
  accessModes:
  - ReadWriteMany
  resources:
    requests:
      storage: 1Gi
# 创建pvc
[root@k8s-master01 ~]# kubectl create -f pvc.yaml
persistentvolumeclaim/pvc1 created
persistentvolumeclaim/pvc2 created
persistentvolumeclaim/pvc3 created
# 查看pvc
[root@k8s-master01 ~]# kubectl get pvc -n dev -o wide
NAME STATUS VOLUME CAPACITY ACCESS MODES STORAGECLASS AGE VOLUMEMODE
pvc1 Bound pv1 1Gi RWX 15s Filesystem
pvc2 Bound pv2 2Gi RWX 15s Filesystem
pvc3 Bound pv3 3Gi RWX 15s Filesystem
# 查看pv
[root@k8s-master01 ~]# kubectl get pv -o wide
NAME CAPACITY ACCESS MODES RECLAIM POLICY STATUS CLAIM AGE VOLUMEMODE
pv1 1Gi RWx Retain Bound dev/pvc1 3h37m Filesystem
pv2 2Gi RWX Retain Bound dev/pvc2 3h37m Filesystem
pv3 3Gi RWX Retain Bound dev/pvc3 3h37m Filesystem 2) Create pods.yaml and use pv
apiVersion: v1
kind: Pod
metadata:
  name: pod1
  namespace: dev
spec:
  containers:
  - name: busybox
    image: busybox:1.30
    command: ["/bin/sh","-c","while true;do echo pod1 >> /root/out.txt; sleep 10; done;"]
    volumeMounts:
    - name: volume
      mountPath: /root/
  volumes:
    - name: volume
      persistentVolumeClaim:
        claimName: pvc1
        readOnly: false
---
apiVersion: v1
kind: Pod
metadata:
  name: pod2
  namespace: dev
spec:
  containers:
  - name: busybox
    image: busybox:1.30
    command: ["/bin/sh","-c","while true;do echo pod2 >> /root/out.txt; sleep 10; done;"]
    volumeMounts:
    - name: volume
      mountPath: /root/
  volumes:
    - name: volume
      persistentVolumeClaim:
        claimName: pvc2
# 创建pod
[root@k8s-master01 ~]# kubectl create -f pods.yaml
pod/pod1 created
pod/pod2 created
# 查看pod
[root@k8s-master01 ~]# kubectl get pods -n dev -o wide
NAME READY STATUS RESTARTS AGE IP NODE
pod1 1/1 Running 0 14s 10.244.1.69 node1
pod2 1/1 Running 0 14s 10.244.1.70 node1
# 查看pvc
[root@k8s-master01 ~]# kubectl get pvc -n dev -o wide
NAME STATUS VOLUME CAPACITY ACCESS MODES AGE VOLUMEMODE
pvc1 Bound pv1 1Gi RWX 94m Filesystem
pvc2 Bound pv2 2Gi RWX 94m Filesystem
pvc3 Bound pv3 3Gi RWX 94m Filesystem
# 查看pv
[root@k8s-master01 ~]# kubectl get pv -n dev -o wide
NAME CAPACITY ACCESS MODES RECLAIM POLICY STATUS CLAIM AGE VOLUMEMODE
pv1 1Gi RWX Retain Bound dev/pvc1 5h11m Filesystem
pv2 2Gi RWX Retain Bound dev/pvc2 5h11m Filesystem
pv3 3Gi RWX Retain Bound dev/pvc3 5h11m Filesystem
# 查看nfs中的文件存储
[root@nfs ~]# more /root/data/pv1/out.txt
node1
node1
[root@nfs ~]# more /root/data/pv2/out.txt
node21.2.3 Life cycle
PVC and PV have a one-to-one correspondence, and the interaction between PV and PVC follows the following life cycle:
Resource provisioning: Administrator manually creates underlying storage and PV
Resource binding: The user creates a PVC, and kubernetes is responsible for finding the PV based on the PVC declaration and binding it.
After the user defines the PVC, the system will select an existing PV that meets the conditions based on the PVC's request for storage resources.
Once found, the PV is bound to the user-defined PVC, and the user's application can use this PVC.
If it cannot be found, the PVC will remain in the Pending state indefinitely until the system administrator creates a PV that meets its requirements.
Once a PV is bound to a certain PVC, it will be exclusive to this PVC and cannot be bound to other PVCs.
Resource usage: Users can use pvc like volume in pod
Pod uses the definition of Volume to mount the PVC to a certain path in the container for use.
Resource release: user deletes pvc to release pv
When the storage resources are used up, the user can delete the PVC, and the PV bound to the PVC will be marked as "released", but it cannot be bound to other PVCs immediately. Data written through the previous PVC may still be left on the storage device, and the PV can only be used again after it is cleared.
Resource recycling: kubernetes recycles resources according to the recycling policy set by pv
For PVs, administrators can set recycling policies to set how to handle legacy data after the PVC bound to it releases resources. Only when the PV storage space is reclaimed can it be bound and used by new PVCs.

1.3 Configuration storage
1.3.1 ConfigMap
ConfigMap is a special storage volume, its main function is to store configuration information.
Create configmap.yaml with the following content:
apiVersion: v1
kind: ConfigMap
metadata:
  name: configmap
  namespace: dev
data:
  info: |
    username:admin
    password:123456
Next, create a configmap using this config file
# 创建configmap
[root@k8s-master01 ~]# kubectl create -f configmap.yaml
configmap/configmap created

# 查看configmap详情
[root@k8s-master01 ~]# kubectl describe cm configmap -n dev
Name:         configmap
Namespace:    dev
Labels:       <none>
Annotations:  <none>

Data
====
info:
----
username:admin
password:123456

Events:  <none>
Next, create a pod-configmap.yaml and mount the configmap created above.
apiVersion: v1
kind: Pod
metadata:
  name: pod-configmap
  namespace: dev
spec:
  containers:
  - name: nginx
    image: nginx:1.17.1
    volumeMounts: # 将configmap挂载到目录
    - name: config
      mountPath: /configmap/config
  volumes: # 引用configmap
  - name: config
    configMap:
      name: configmap
# 创建pod
[root@k8s-master01 ~]# kubectl create -f pod-configmap.yaml
pod/pod-configmap created
# 查看pod
[root@k8s-master01 ~]# kubectl get pod pod-configmap -n dev
NAME READY STATUS RESTARTS AGE
pod-configmap 1/1 Running 0 6s
#进入容器
[root@k8s-master01 ~]# kubectl exec -it pod-configmap -n dev /bin/sh
# cd /configmap/config/
# ls
info
# more info
username:admin
password:123456
# 可以看到映射已经成功,每个configmap都映射成了一个目录
# key--->文件 value---->文件中的内容
# 此时如果更新configmap的内容, 容器中的值也会动态更新1.3.2 Secret
In kubernetes, there is an object very similar to ConfigMap, called Secret object. It is mainly used to store sensitive information, such as passwords, keys, certificates, etc.
1) First encode the data using base64
[root@k8s-master01 ~]# echo -n 'admin' | base64 #准备username
YWRtaW4=
[root@k8s-master01 ~]# echo -n '123456' | base64 #准备password
MTIzNDU2
2) Next write secret.yaml and create Secret
apiVersion: v1
kind: Secret
metadata:
  name: secret
  namespace: dev
type: Opaque
data:
  username: YWRtaW4=
  password: MTIzNDU2
# 创建secret
[root@k8s-master01 ~]# kubectl create -f secret.yaml
secret/secret created
# 查看secret详情
[root@k8s-master01 ~]# kubectl describe secret secret -n dev
Name: secret
Namespace: dev
Labels: <none>
Annotations: <none>
Type: Opaque
Data
====
password: 6 bytes
username: 5 bytes3) Create pod-secret.yaml and mount the secret created above:
apiVersion: v1
kind: Pod
metadata:
  name: pod-secret
  namespace: dev
spec:
  containers:
  - name: nginx
    image: nginx:1.17.1
    volumeMounts: # 将secret挂载到目录
    - name: config
      mountPath: /secret/config
  volumes:
  - name: config
    secret:
      secretName: secret
# 创建pod
[root@k8s-master01 ~]# kubectl create -f pod-secret.yaml
pod/pod-secret created
# 查看pod
[root@k8s-master01 ~]# kubectl get pod pod-secret -n dev
NAME READY STATUS RESTARTS AGE
pod-secret 1/1 Running 0 2m28s
# 进入容器,查看secret信息,发现已经自动解码了
[root@k8s-master01 ~]# kubectl exec -it pod-secret /bin/sh -n dev
/ # ls /secret/config/
password username
/ # more /secret/config/username
admin
/ # more /secret/config/password
123456So far, we have implemented the encoding of information using secrets.