This article demonstrates how to use ArkUI of HarmonyOS to develop a healthy eating application in DevEco Studio 3. Experience the latest API 9 of HarmonyOS 3!
Get the HarmonyOS app
ArkUI of HarmonyOS is used to develop an ArkUI program "ArkUIHealthyDiet" for a healthy diet. The basic code is already available [1]. Individuals only need to modify the basic code to run it.
Import applications through DevEco Studio 3
For the installation and configuration of DevEco Studio 3, you can refer to the previous article "DevEco Studio 3 must be installed to play HarmonyOS 3, pay attention to avoiding bullets [2]" and will not repeat it here.
The first choice is to open DevEco Studio 3, and you can see the following interface.
Click "Open Project" to import the ArkUI program "ArkUIHealthyDiet" that we implemented.
After importing the program, the code can be developed and run on the basis of the program.
Create applications with DevEco Studio 3
If you want to learn ArkUI from 0 and experience the complete HarmonyOS development process, then it is recommended to follow this article to start the ArkUI development journey.
The first choice is to open DevEco Studio 3, and you can see the following interface.
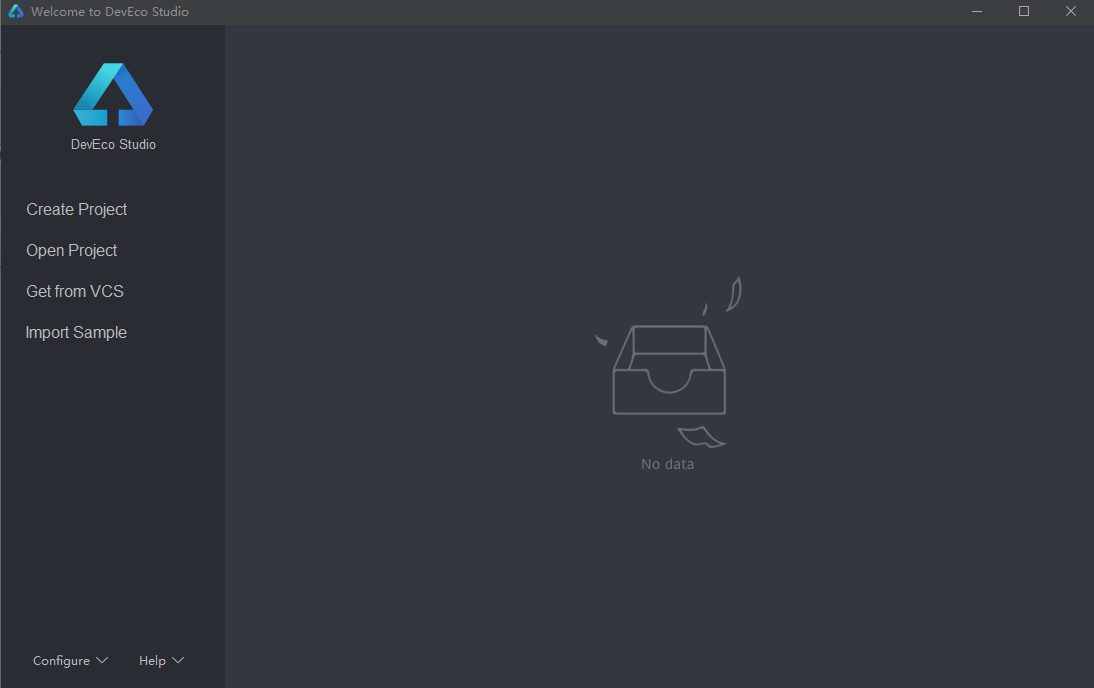
Click "Create Project" to create the ArkUI program "ArkUIHealthyDiet".
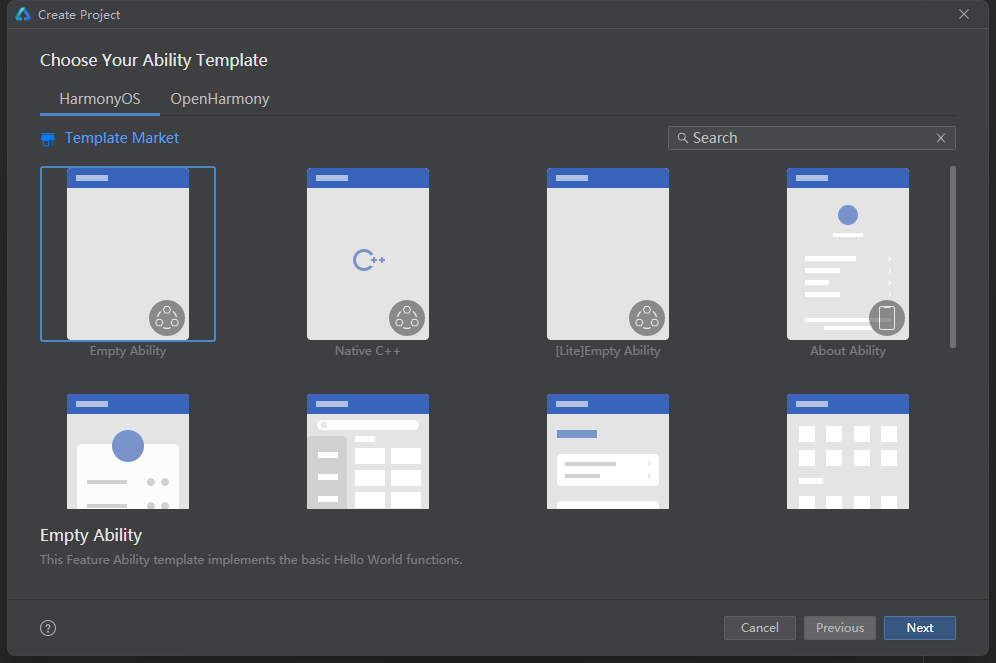
select template
Select the empty template Empty Ability, and click "Next" to execute the next step.
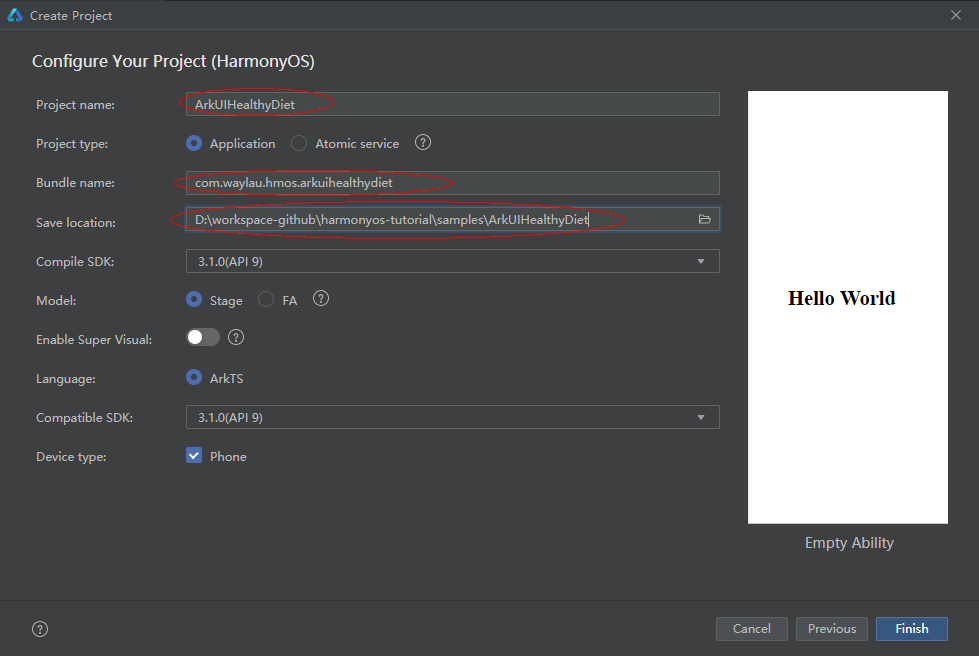
configuration items
Configure project information, mainly the part circled below. Other configurations can follow the default configuration. Click "Finish" to proceed to the next step.
Run the HarmonyOS application
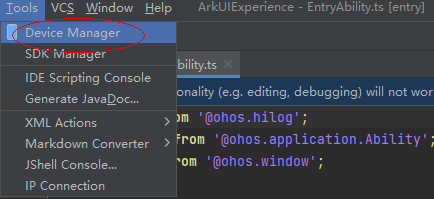
Open Device Manager
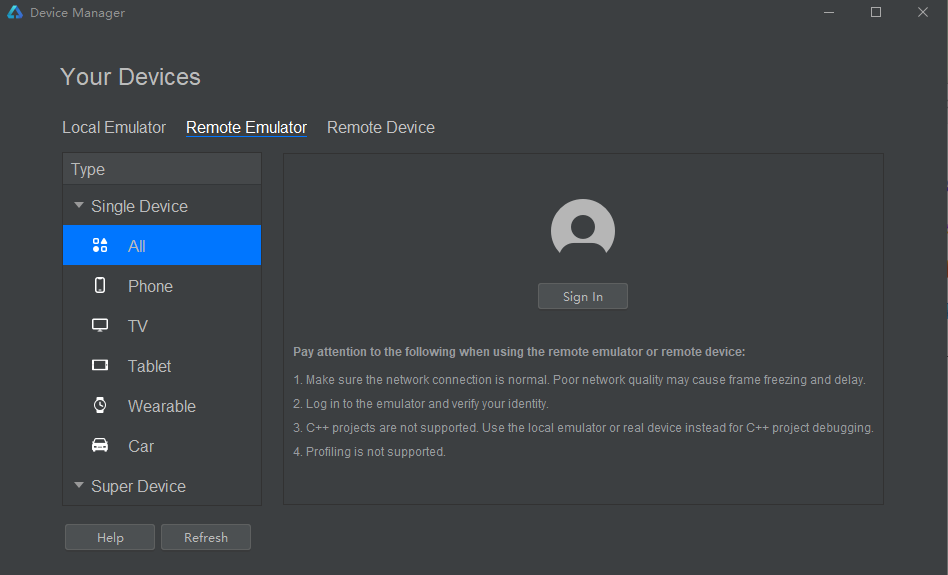
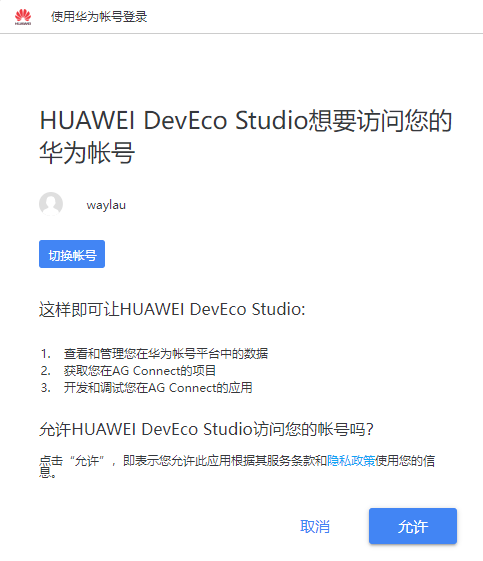
Log in with your Huawei account
Click "Sign In" to log in to your personally registered Huawei account. If not, please refer to the link at the end of this article to register.
Start the remote emulator
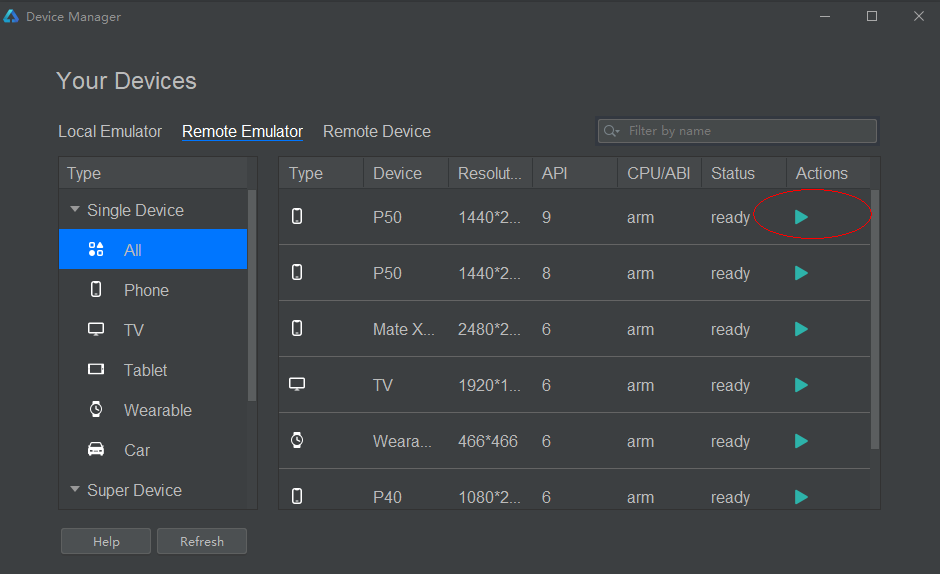
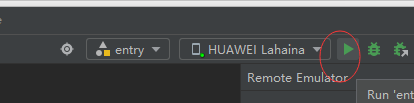
run the application
Click the down triangle button to launch the application
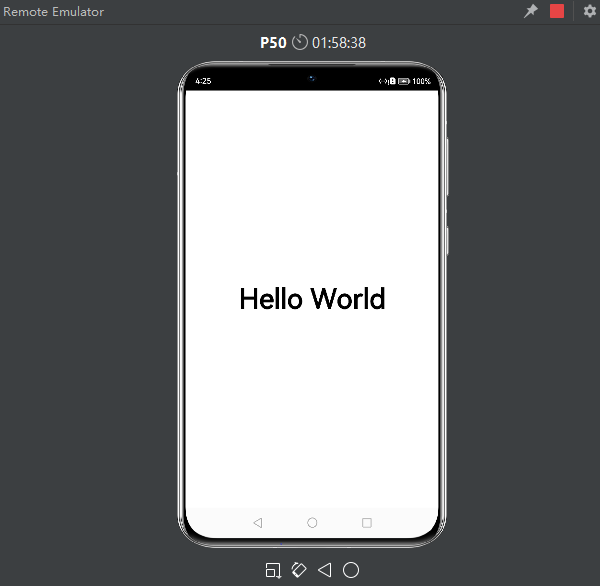
The application running effect diagram is as follows.
perfect application
The next step is to get to the point and start the development of the core functions of our healthy eating application.
Build a food data model
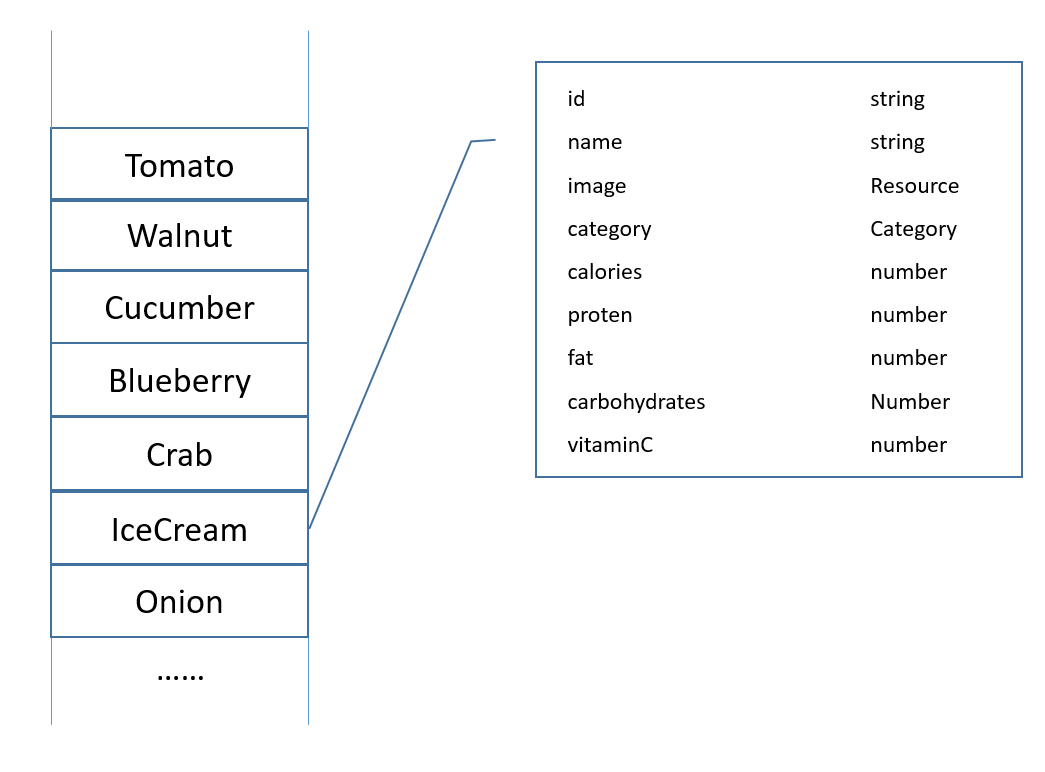
To create a food data model to uniformly store and manage food data. Food information includes: food name, calories, protein, fat, carbohydrates and vitamin C, etc.
Create a new model folder under the ets directory to store data model files.
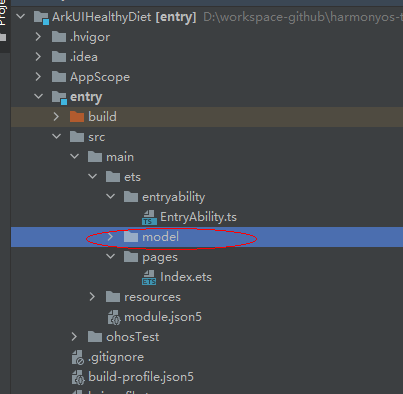
Create DataModels.ets in the model directory to store data models.
Define food data storage model FoodInfo and enumeration variable CategoryId, FoodData class includes food id, name (name), category (category), picture (image), calories (calories), protein (protein), fat (fat), carbohydrates (carbohydrates) and vitamin C (vitaminC) properties and so on.
export enum CategoryId {
  Fruit = 0,
  Vegetable,
  Nut,
  Seafood,
  Dessert
}


export type FoodInfo = {
  id: number
  letter: string
  name: string | Resource
  image: Resource
  categoryId: CategoryId
  calories: number
  protein: number
  fat: number
  carbohydrates: number
  vitaminC: number
}
copy
Create food resource data. Create a mock folder under the ets directory, and create MockData.ets under the mock folder. The code for declaring the food component array in MockData.ets is as follows:
import { FoodInfo, CategoryId} from '../model/DataModels'
// 构造数据的mock数据
export let mockFoods: Array<FoodInfo> = [
{
id: 0,
letter: 'Kiwi',
name: $r('app.string.food_name_kiwi'),
image: $r('app.media.kiwi'),
categoryId: CategoryId.Fruit,
calories: 61,
protein: 0.8,
fat: 0.6,
carbohydrates: 14.5,
vitaminC: 62
},
{
id: 1,
letter: 'Walnut',
name: $r('app.string.food_name_walnut'),
image: $r('app.media.walnut'),
categoryId: CategoryId.Nut,
calories: 646,
protein: 14.9,
fat: 58.8,
carbohydrates: 19.1,
vitaminC: 1.0
},
{
id: 2,
letter: 'Cucumber',
name: $r('app.string.food_name_cucumber'),
image: $r('app.media.cucumber'),
categoryId: CategoryId.Vegetable,
calories: 16,
protein: 0.8,
fat: 0.2,
carbohydrates: 2.9,
vitaminC: 9.0
},
{
id: 3,
letter: 'Blueberry',
name: $r('app.string.food_name_blueberry'),
image: $r('app.media.blueberry'),
categoryId: CategoryId.Fruit,
calories: 57,
protein: 0.7,
fat: 0.3,
carbohydrates: 14.5,
vitaminC: 9.7
},
{
id: 4,
letter: 'Crab',
name: $r('app.string.food_name_crab'),
image: $r('app.media.crab'),
categoryId: CategoryId.Seafood,
calories: 97,
protein: 19,
fat: 1.5,
carbohydrates: 0,
vitaminC: 7.6
},
{
id: 5,
letter: 'IceCream',
name: $r('app.string.food_name_ice_cream'),
image: $r('app.media.icecream'),
categoryId: CategoryId.Dessert,
calories: 150,
protein: 3.5,
fat: 11,
carbohydrates: 24,
vitaminC: 0.6
},
{
id: 6,
letter: 'Onion',
name: $r('app.string.food_name_onion'),
image: $r('app.media.onion'),
categoryId: CategoryId.Vegetable,
calories: 40,
protein: 1.1,
fat: 0.2,
carbohydrates: 9,
vitaminC: 8.0
},
{
id: 7,
letter: 'Mushroom',
name: $r('app.string.food_name_mushroom'),
image: $r('app.media.mushroom'),
categoryId: CategoryId.Vegetable,
calories: 20,
protein: 3.1,
fat: 0.3,
carbohydrates: 3.3,
vitaminC: 206
},
{
id: 8,
letter: 'Tomato',
name: $r('app.string.food_name_tomato'),
image: $r('app.media.tomato'),
categoryId: CategoryId.Vegetable,
calories: 15,
protein: 0.9,
fat: 0.2,
carbohydrates: 3.3,
vitaminC: 14.0
},
{
id: 9,
letter: 'Pitaya',
name: $r('app.string.food_name_pitaya'),
image: $r('app.media.pitaya'),
categoryId: CategoryId.Fruit,
calories: 55,
protein: 1.1,
fat: 0.2,
carbohydrates: 13.3,
vitaminC: 3.0
},
{
id: 10,
letter: 'Avocado',
name: $r('app.string.food_name_avocado'),
image: $r('app.media.avocado'),
categoryId: CategoryId.Fruit,
calories: 171,
protein: 2.0,
fat: 15.3,
carbohydrates: 7.4,
vitaminC: 8.0
},
{
id: 11,
letter: 'Strawberry',
name: $r('app.string.food_name_strawberry'),
image: $r('app.media.strawberry'),
categoryId: CategoryId.Fruit,
calories: 32,
protein: 1.0,
fat: 0.2,
carbohydrates: 7.1,
vitaminC: 47.0
}
]
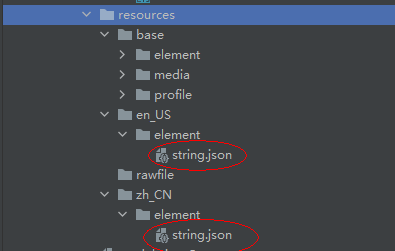
copyThe name needs to be internationalized, so this value is stored in the string.json file.
The food image resources referenced by image are placed in the resources > base > media directory.

Create DataUtil.ets under the model directory to load the data of the healthy eating application.
import { FoodInfo } from './DataModels'
import { mockFoods } from '../mock/MockData'

export function getFoods(): Array<FoodInfo> {
  return mockFoods
}
copy
The data resource preparation for the healthy diet application has been completed, and the next step is to create a food list page by loading these data.
Build a food list List layout
Use the List component and the ForEach loop to render to build a food list layout.
Modify the Index.ets file in the pages directory, create a new FoodList component as the page entry component, and FoodListItem as its subcomponent. The List component is a list component, which is suitable for the display of repeated data of the same type, and its child component is ListItem, which is suitable for displaying the units in the list.
import { FoodInfo } from '../model/DataModels'
import { getFoods } from '../model/DataUtil'
@Component
struct FoodListItem {
private foodItem: FoodInfo
build() {
Flex({ justifyContent: FlexAlign.Start, alignItems: ItemAlign.Center }) {
Image(this.foodItem.image)
.objectFit(ImageFit.Contain)
.height(40)
.width(40)
.margin({ right: 16 })
Text(this.foodItem.name)
.fontSize(14)
.flexGrow(1)
Text(this.foodItem.calories + ' kcal')
.fontSize(14)
}
.height(64)
.margin({ right: 24, left: 32 })
}
}
@Entry
@Component
struct FoodList {
private foodItems: FoodInfo[] = getFoods()
build() {
Column() {
Flex({ justifyContent: FlexAlign.Start, alignItems: ItemAlign.Center }) {
Text('Food List')
.fontSize(20)
.margin({ left: 20 })
}
.height('7%')
.backgroundColor('#FFf1f3f5')
List() {
ForEach(this.foodItems, item => {
ListItem() {
FoodListItem({ foodItem: item })
}
}, item => item.id.toString())
}
.height('93%')
}
}
}
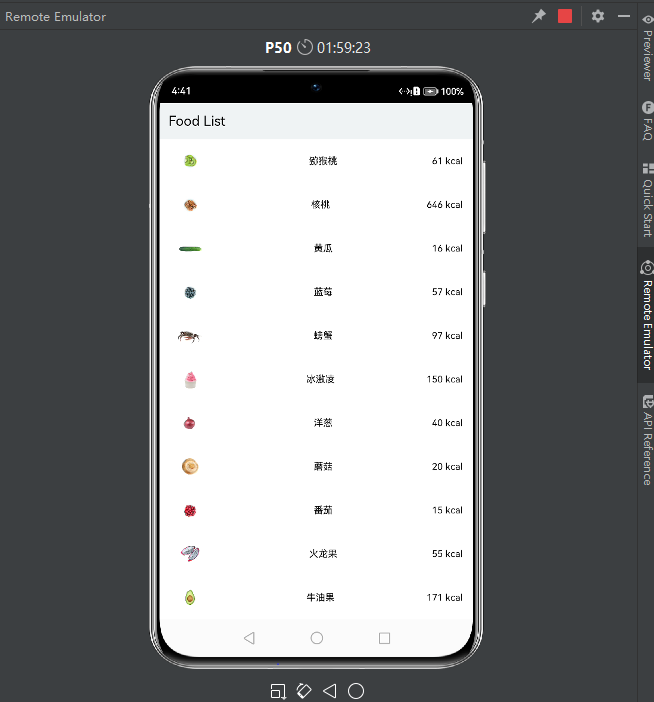
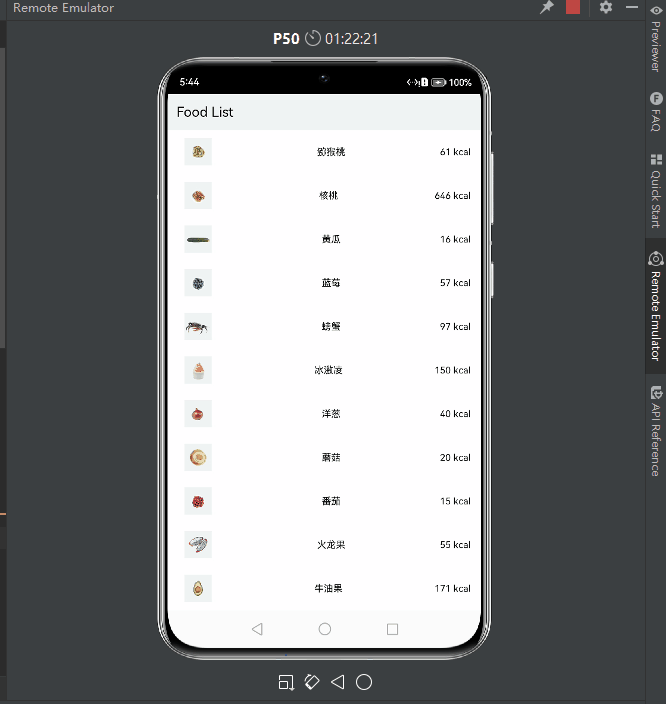
copyRun the application, you can see the effect of the list as follows.
Build a food detail page
In the pages directory, create the FoodDetail.ets file. The food information on the FoodDetail page is a directly declared constant, and now it needs to be reassigned with the passed FoodData data. The overall FoodDetail.ets code is as follows.
import router from '@ohos.router'
import { FoodInfo } from '../model/DataModels'
@Component
struct PageTitle {
build() {
Flex({ alignItems: ItemAlign.Start }) {
Image($r('app.media.back'))
.width(21.8)
.height(19.6)
Text('Food Detail')
.fontSize(21.8)
.margin({left: 17.4})
}
.height(61)
.backgroundColor('#FFedf2f5')
.padding({ top: 13, bottom: 15, left: 28.3 })
.onClick(() => {
router.back()
})
}
}
@Component
struct FoodImageDisplay {
private foodItem: FoodInfo
build() {
Stack({ alignContent: Alignment.BottomStart }) {
Image(this.foodItem.image)
.objectFit(ImageFit.Contain)
Text(this.foodItem.name)
.fontSize(26)
.fontWeight(500)
.margin({ left: 26, bottom: 17.4 })
}
.height(357)
.backgroundColor('#FFedf2f5')
}
}
@Component
struct ContentTable {
private foodItem: FoodInfo
@Builder IngredientItem(title:string, name: string, value: string) {
Flex() {
Text(title)
.fontSize(17.4)
.fontWeight(FontWeight.Bold)
.layoutWeight(1)
Flex() {
Text(name)
.fontSize(17.4)
.flexGrow(1)
Text(value)
.fontSize(17.4)
}
.layoutWeight(2)
}
}
build() {
Flex({ direction: FlexDirection.Column, justifyContent: FlexAlign.SpaceBetween, alignItems: ItemAlign.Start }) {
this.IngredientItem('Calories', 'Calories', this.foodItem.calories + 'kcal')
this.IngredientItem('Nutrition', 'Protein', this.foodItem.protein + 'g')
this.IngredientItem('', 'Fat', this.foodItem.fat + 'g')
this.IngredientItem('', 'Carbohydrates', this.foodItem.carbohydrates + 'g')
this.IngredientItem('', 'VitaminC', this.foodItem.vitaminC + 'mg')
}
.height(280)
.padding({ top: 30, right: 30, left: 30 })
}
}
@Entry
@Component
struct FoodDetail {
private foodItem: FoodInfo = router.getParams()[foodInfo]
build() {
Column() {
Stack( { alignContent: Alignment.TopStart }) {
FoodImageDisplay({ foodItem: this.foodItem })
PageTitle()
}
ContentTable({ foodItem: this.foodItem })
}
.alignItems(HorizontalAlign.Center)
}
}
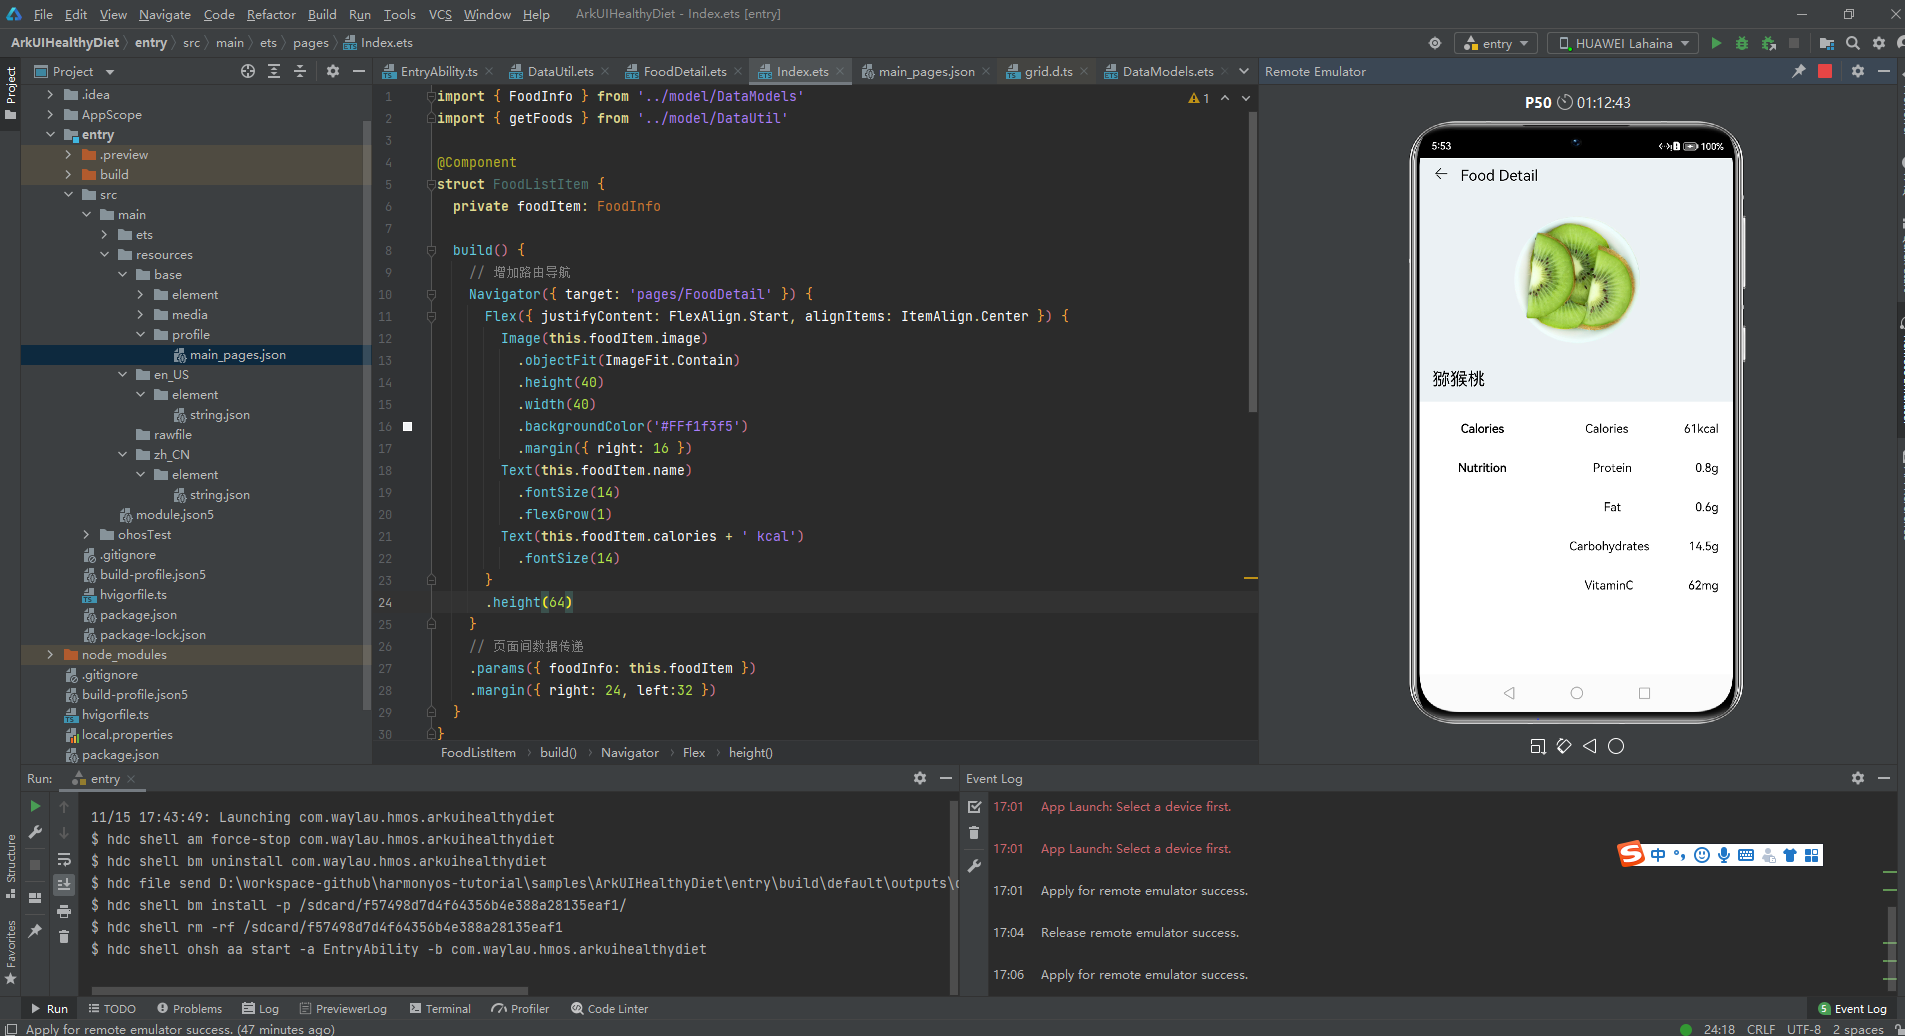
copyThe above code refers to the interface of the router API. By introducing the router on the page, various interfaces of the router can be called to realize various operations of page routing. Call router.getParams()[foodInfo] to get the data corresponding to the foodData carried when jumping to the list page.
Jump to list and details page
The above details page has already referenced the Router API, whether it can accept parameters from the route. Correspondingly, the list page also needs to be adjusted accordingly to trigger the routing jump. Click Index to jump to the FoodDetail page. Create a Navigator component in FoodListItem, make its subcomponents have routing function, and the target page target is 'pages/FoodDetail'.
Modify the Index.ets file,
@Component
struct FoodListItem {
  private foodItem: FoodInfo

  build() {
    // 增加路由导航
    Navigator({ target: 'pages/FoodDetail' }) {
      Flex({ justifyContent: FlexAlign.Start, alignItems: ItemAlign.Center }) {
        Image(this.foodItem.image)
          .objectFit(ImageFit.Contain)
          .height(40)
          .width(40)
          .backgroundColor('#FFf1f3f5')
          .margin({ right: 16 })
        Text(this.foodItem.name)
          .fontSize(14)
          .flexGrow(1)
        Text(this.foodItem.calories + ' kcal')
          .fontSize(14)
      }
      .height(64)
    }
    // 页面间数据传递
    .params({ foodInfo: this.foodItem })
    .margin({ right: 24, left:32 })
  }
}
copy
Among them, Navigator is a routing container component, which packs the ability of page routing. After specifying the page target, all the subcomponents it wraps have routing ability. The .params method is used for data transfer between pages.
Program running effect
For the complete demonstration video, see Station B: [Laowei Moving Bricks] Issue 027: Use HarmonyOS ArkUI to develop a healthy eating application_哔哩哔哩_bilibili
source code
See GitHub - waylau/harmonyos-tutorial: HarmonyOS Tutorial. "ArkUIHealthyDiet" in "Learning HarmonyOS from Lao Wei "
Related questions
Problem 1: Routing fails
The error is as follows:
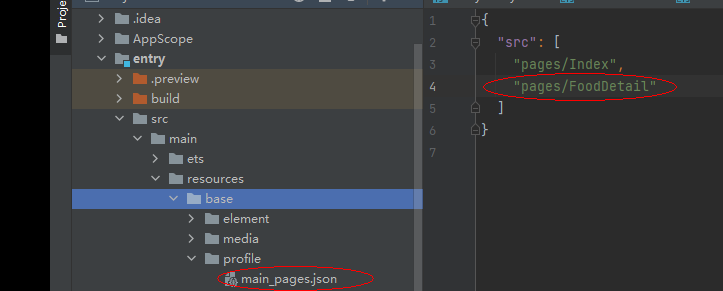
[manifest_router.cpp(GetPagePath)-(0)] [Engine Log] can't find this page pages/FoodDetail path
solution:
Add pages/FoodDetail to main_pages
References
-
"Learning HarmonyOS Development with Waylau" open source free tutorial, GitHub - waylau/harmonyos-tutorial: HarmonyOS Tutorial. "Learning HarmonyOS with Waylau" ↑
-
To play HarmonyOS 3, you must install DevEco Studio 3, pay attention to avoid bullets Huawei Developer Forum
-
"Hongmeng HarmonyOS application development from entry to proficiency" (Liu Weiwei, Peking University Press) double twelve full 100 minus 50