Sistema de oficina de Yunshang: cuenta oficial de WeChat
Acceso directo a la estación B [como Silicon Valley] :
https://www.bilibili.com/video/BV1Ya411S7aT
Esta publicación de blog se publica principalmente relacionada con el curso e incorpora algunas de mis propias opiniones y brinda soluciones relevantes a los problemas encontrados en el proceso de aprendizaje. ¡Aprender juntos y progresar juntos! ! !
Aquí hay una guía. Si tiene un nombre de dominio, puede usar el nombre de dominio directamente. Pronto, si no tiene uno, este artículo presentará una muy buena tecnología: la penetración de la intranet y el desarrollo de la cuenta oficial de WeChat. Esperando el próximo estudio.
Directorio de artículos
- Sistema de oficina de Yunshang: cuenta oficial de WeChat
-
- 1. Descripción de la función
- 2. Gestión del menú de la cuenta oficial
- 3. Inicio de sesión autorizado de WeChat
-
- 1. Desarrollo de interfaz del lado del servidor
-
- 1.1 Configurar la penetración de la intranet (ngrok)
- 1.2 Configurar el "nombre de dominio de la página de devolución de llamada autorizada"
- 1.3 Configure la devolución de llamada de autorización para obtener la dirección de la interfaz de información del usuario
- 1,4, interfaz de controlador
- 1.5, excluir interceptación
- 2. Procesamiento front-end móvil
- 4. Impulso de noticias
1. Descripción de la función
Los empleados usan la cuenta oficial de WeChat para completar la operación de aprobación, y las funciones involucradas incluyen: menú personalizado, inicio de sesión autorizado, mensaje
1. El menú de primer nivel de la cuenta oficial de WeChat es: Lista de aprobación, Centro de aprobación, Mi
2. Los empleados prestan atención a la cuenta oficial, el empleado inicia sesión en la cuenta oficial de WeChat por primera vez y vincula la cuenta del empleado a través del inicio de sesión autorizado de WeChat
3. Los empleados envían información de aprobación y aprobación a través de la cuenta oficial de WeChat, y el sistema envía la información de aprobación de acuerdo con la cuenta oficial de WeChat y retroalimenta el proceso de aprobación de manera oportuna
Captura de pantalla del proyecto:
![[Falló la transferencia de la imagen del enlace externo, el sitio de origen puede tener un mecanismo anti-leeching, se recomienda guardar la imagen y cargarla directamente (img-s3g1g1wf-1688014614430)(assets/1671689364185.png)]](https://img-blog.csdnimg.cn/8f2f02c936014034b62d03ddd7aa0dd8.png)
2. Gestión del menú de la cuenta oficial
Menú de primer nivel de la cuenta oficial, inicialización predeterminada de la base de datos (lista de aprobación, centro de aprobación, mina)
El efecto de página es el siguiente:
![[Falló la transferencia de la imagen del enlace externo, el sitio de origen puede tener un mecanismo anti-leeching, se recomienda guardar la imagen y subirla directamente (img-MQRwGtld-1688014614432)(assets\image-20230216150123939.png)]](https://img-blog.csdnimg.cn/562aee67334b4bc2a0eb8c35e9ada115.png)
1. Menú de gestión CRUD
1.1, mapeador
package com.atguigu.wechat.mapper;

import com.atguigu.model.wechat.Menu;
import com.baomidou.mybatisplus.core.mapper.BaseMapper;
import org.apache.ibatis.annotations.Mapper;

@Mapper
public interface MenuMapper extends BaseMapper<Menu> {


}
1.2, interfaz de servicio
package com.atguigu.wechat.service;

import com.atguigu.model.wechat.Menu;
import com.atguigu.vo.wechat.MenuVo;
import com.baomidou.mybatisplus.extension.service.IService;
import java.util.List;

public interface MenuService extends IService<Menu> {


    List<MenuVo> findMenuInfo();

}
1.3 Implementación de la interfaz de servicio
package com.atguigu.wechat.service.impl;

import com.atguigu.model.wechat.Menu;
import com.atguigu.vo.wechat.MenuVo;
import com.atguigu.wechat.mapper.MenuMapper;
import com.atguigu.wechat.service.MenuService;
import com.baomidou.mybatisplus.extension.service.impl.ServiceImpl;
import lombok.extern.slf4j.Slf4j;
import org.springframework.beans.BeanUtils;
import org.springframework.beans.factory.annotation.Autowired;
import org.springframework.stereotype.Service;
import java.util.ArrayList;
import java.util.Comparator;
import java.util.List;
import java.util.stream.Collectors;

@Service
public class MenuServiceImpl extends ServiceImpl<MenuMapper, Menu> implements MenuService {


    @Autowired
    private MenuMapper menuMapper;

    @Override
    public List<MenuVo> findMenuInfo() {


        List<MenuVo> list = new ArrayList<>();
        List<Menu> menuList = menuMapper.selectList(null);
        List<Menu> oneMenuList = menuList.stream().filter(menu -> menu.getParentId().longValue() == 0).collect(Collectors.toList());
        for (Menu oneMenu : oneMenuList) {


            MenuVo oneMenuVo = new MenuVo();
            BeanUtils.copyProperties(oneMenu, oneMenuVo);

            List<Menu> twoMenuList = menuList.stream()
                    .filter(menu -> menu.getParentId().longValue() == oneMenu.getId())
                    .sorted(Comparator.comparing(Menu::getSort))
                    .collect(Collectors.toList());
            List<MenuVo> children = new ArrayList<>();
            for (Menu twoMenu : twoMenuList) {


                MenuVo twoMenuVo = new MenuVo();
                BeanUtils.copyProperties(twoMenu, twoMenuVo);
                children.add(twoMenuVo);
            }
            oneMenuVo.setChildren(children);
            list.add(oneMenuVo);
        }
        return list;
    }
}
1,4, interfaz de controlador
package com.atguigu.wechat.controller;

import com.atguigu.common.result.Result;
import com.atguigu.model.wechat.Menu;
import com.atguigu.wechat.service.MenuService;
import io.swagger.annotations.ApiOperation;
import lombok.extern.slf4j.Slf4j;
import org.springframework.beans.factory.annotation.Autowired;
import org.springframework.security.access.prepost.PreAuthorize;
import org.springframework.web.bind.annotation.*;

@RestController
@RequestMapping("/admin/wechat/menu")
@Slf4j
public class MenuController {


    @Autowired
    private MenuService menuService;

    //@PreAuthorize("hasAuthority('bnt.menu.list')")
    @ApiOperation(value = "获取")
    @GetMapping("get/{id}")
    public Result get(@PathVariable Long id) {


        Menu menu = menuService.getById(id);
        return Result.ok(menu);
    }

    //@PreAuthorize("hasAuthority('bnt.menu.add')")
    @ApiOperation(value = "新增")
    @PostMapping("save")
    public Result save(@RequestBody Menu menu) {


        menuService.save(menu);
        return Result.ok();
    }

    //@PreAuthorize("hasAuthority('bnt.menu.update')")
    @ApiOperation(value = "修改")
    @PutMapping("update")
    public Result updateById(@RequestBody Menu menu) {


        menuService.updateById(menu);
        return Result.ok();
    }

    //@PreAuthorize("hasAuthority('bnt.menu.remove')")
    @ApiOperation(value = "删除")
    @DeleteMapping("remove/{id}")
    public Result remove(@PathVariable Long id) {


        menuService.removeById(id);
        return Result.ok();
    }

    //@PreAuthorize("hasAuthority('bnt.menu.list')")
    @ApiOperation(value = "获取全部菜单")
    @GetMapping("findMenuInfo")
    public Result findMenuInfo() {


        return Result.ok(menuService.findMenuInfo());
    }
}
2. Implementación frontal
2.1 Definir la interfaz api
Crear src/api/wechat/menu.js
import request from '@/utils/request'

const api_name = '/admin/wechat/menu'

export default {


  findMenuInfo() {


    return request({


      url: `${

      api_name}/findMenuInfo`,
      method: `get`
    })
  },

  save(menu) {


    return request({


      url: `${

      api_name}/save`,
      method: `post`,
      data: menu
    })
  },

  getById(id) {


    return request({


      url: `${

      api_name}/get/${

      id}`,
      method: `get`
    })
  },

  updateById(menu) {


    return request({


      url: `${

      api_name}/update`,
      method: `put`,
      data: menu
    })
  },

  removeById(id) {


    return request({


      url: `${

      api_name}/remove/${

      id}`,
      method: 'delete'
    })
  }
}
2.2 Realización de la página
Crear vistas/wechat/menu/list.vue
<template>
  <div class="app-container">

    <!-- 工具条 -->
    <div class="tools-div">
      <el-button class="btn-add" size="mini" @click="add">添 加</el-button>
    </div>

    <el-table
      :data="list"
      style="width: 100%;margin-bottom: 20px;"
      row-key="id"
      border
      default-expand-all
      :tree-props="{children: 'children'}">

      <el-table-column label="名称" prop="name" width="350"></el-table-column>
      <el-table-column label="类型" width="100">
        <template slot-scope="scope">
          {

   { scope.row.type == 'view' ? '链接' : scope.row.type == 'click' ? '事件' : '' }}
        </template>
      </el-table-column>
      <el-table-column label="菜单URL" prop="url" ></el-table-column>
      <el-table-column label="菜单KEY" prop="meunKey"  width="130"></el-table-column>
      <el-table-column label="排序号" prop="sort"  width="70"></el-table-column>
      <el-table-column label="操作" width="170" align="center">
        <template slot-scope="scope">
          <el-button v-if="scope.row.parentId > 0" type="text" size="mini" @click="edit(scope.row.id)">修改</el-button>
          <el-button v-if="scope.row.parentId > 0" type="text" size="mini" @click="removeDataById(scope.row.id)">删除</el-button>
        </template>
      </el-table-column>
    </el-table>

    <el-dialog title="添加/修改" :visible.sync="dialogVisible" width="40%" >
      <el-form ref="flashPromotionForm" label-width="150px" size="small" style="padding-right: 40px;">

        <el-form-item label="选择一级菜单">
          <el-select
            v-model="menu.parentId"
            placeholder="请选择">
            <el-option
              v-for="item in list"
              :key="item.id"
              :label="item.name"
              :value="item.id"/>
          </el-select>
        </el-form-item>
        <el-form-item label="菜单名称">
          <el-input v-model="menu.name"/>
        </el-form-item>
        <el-form-item label="菜单类型">
          <el-radio-group v-model="menu.type">
            <el-radio label="view">链接</el-radio>
            <el-radio label="click">事件</el-radio>
          </el-radio-group>
        </el-form-item>
        <el-form-item v-if="menu.type == 'view'" label="链接">
          <el-input v-model="menu.url"/>
        </el-form-item>
        <el-form-item v-if="menu.type == 'click'" label="菜单KEY">
          <el-input v-model="menu.meunKey"/>
        </el-form-item>
        <el-form-item label="排序">
          <el-input v-model="menu.sort"/>
        </el-form-item>
      </el-form>
      <span slot="footer" class="dialog-footer">
        <el-button @click="dialogVisible = false" size="small">取 消</el-button>
        <el-button type="primary" @click="saveOrUpdate()" size="small">确 定</el-button>
      </span>
    </el-dialog>
  </div>
</template>
<script>
import menuApi from '@/api/wechat/menu'
const defaultForm = {
  id: null,
  parentId: 1,
  name: '',
  nameId: null,
  sort: 1,
  type: 'view',
  meunKey: '',
  url: ''
}
export default {

  // 定义数据
  data() {
    return {
      list: [],
      dialogVisible: false,
      menu: defaultForm,
      saveBtnDisabled: false
    }
  },

  // 当页面加载时获取数据
  created() {
    this.fetchData()
  },

  methods: {
    // 调用api层获取数据库中的数据
    fetchData() {
      console.log('加载列表')
      menuApi.findMenuInfo().then(response => {
        this.list = response.data
        console.log(this.list)
      })
    },

    // 根据id删除数据
    removeDataById(id) {
      // debugger
      this.$confirm('此操作将永久删除该记录, 是否继续?', '提示', {
        confirmButtonText: '确定',
        cancelButtonText: '取消',
        type: 'warning'
      }).then(() => { // promise
        // 点击确定,远程调用ajax
        return menuApi.removeById(id)
      }).then((response) => {
        this.fetchData(this.page)
        this.$message.success(response.message || '删除成功')
      }).catch(() => {
        this.$message.info('取消删除')
      })
    },

    // -------------
    add() {
      this.dialogVisible = true
      this.menu = Object.assign({}, defaultForm)
    },

    edit(id) {
      this.dialogVisible = true
      this.fetchDataById(id)
    },

    fetchDataById(id) {
      menuApi.getById(id).then(response => {
        this.menu = response.data
      })
    },

    saveOrUpdate() {
      this.saveBtnDisabled = true // 防止表单重复提交

      if (!this.menu.id) {
        this.saveData()
      } else {
        this.updateData()
      }
    },

    // 新增
    saveData() {
      menuApi.save(this.menu).then(response => {
        this.$message.success(response.message || '操作成功')
        this.dialogVisible = false
        this.fetchData(this.page)
      })
    },

    // 根据id更新记录
    updateData() {
      menuApi.updateById(this.menu).then(response => {
        this.$message.success(response.message || '操作成功')
        this.dialogVisible = false
        this.fetchData(this.page)
      })
    }
  }
}
</script>
3. Pulsar menú
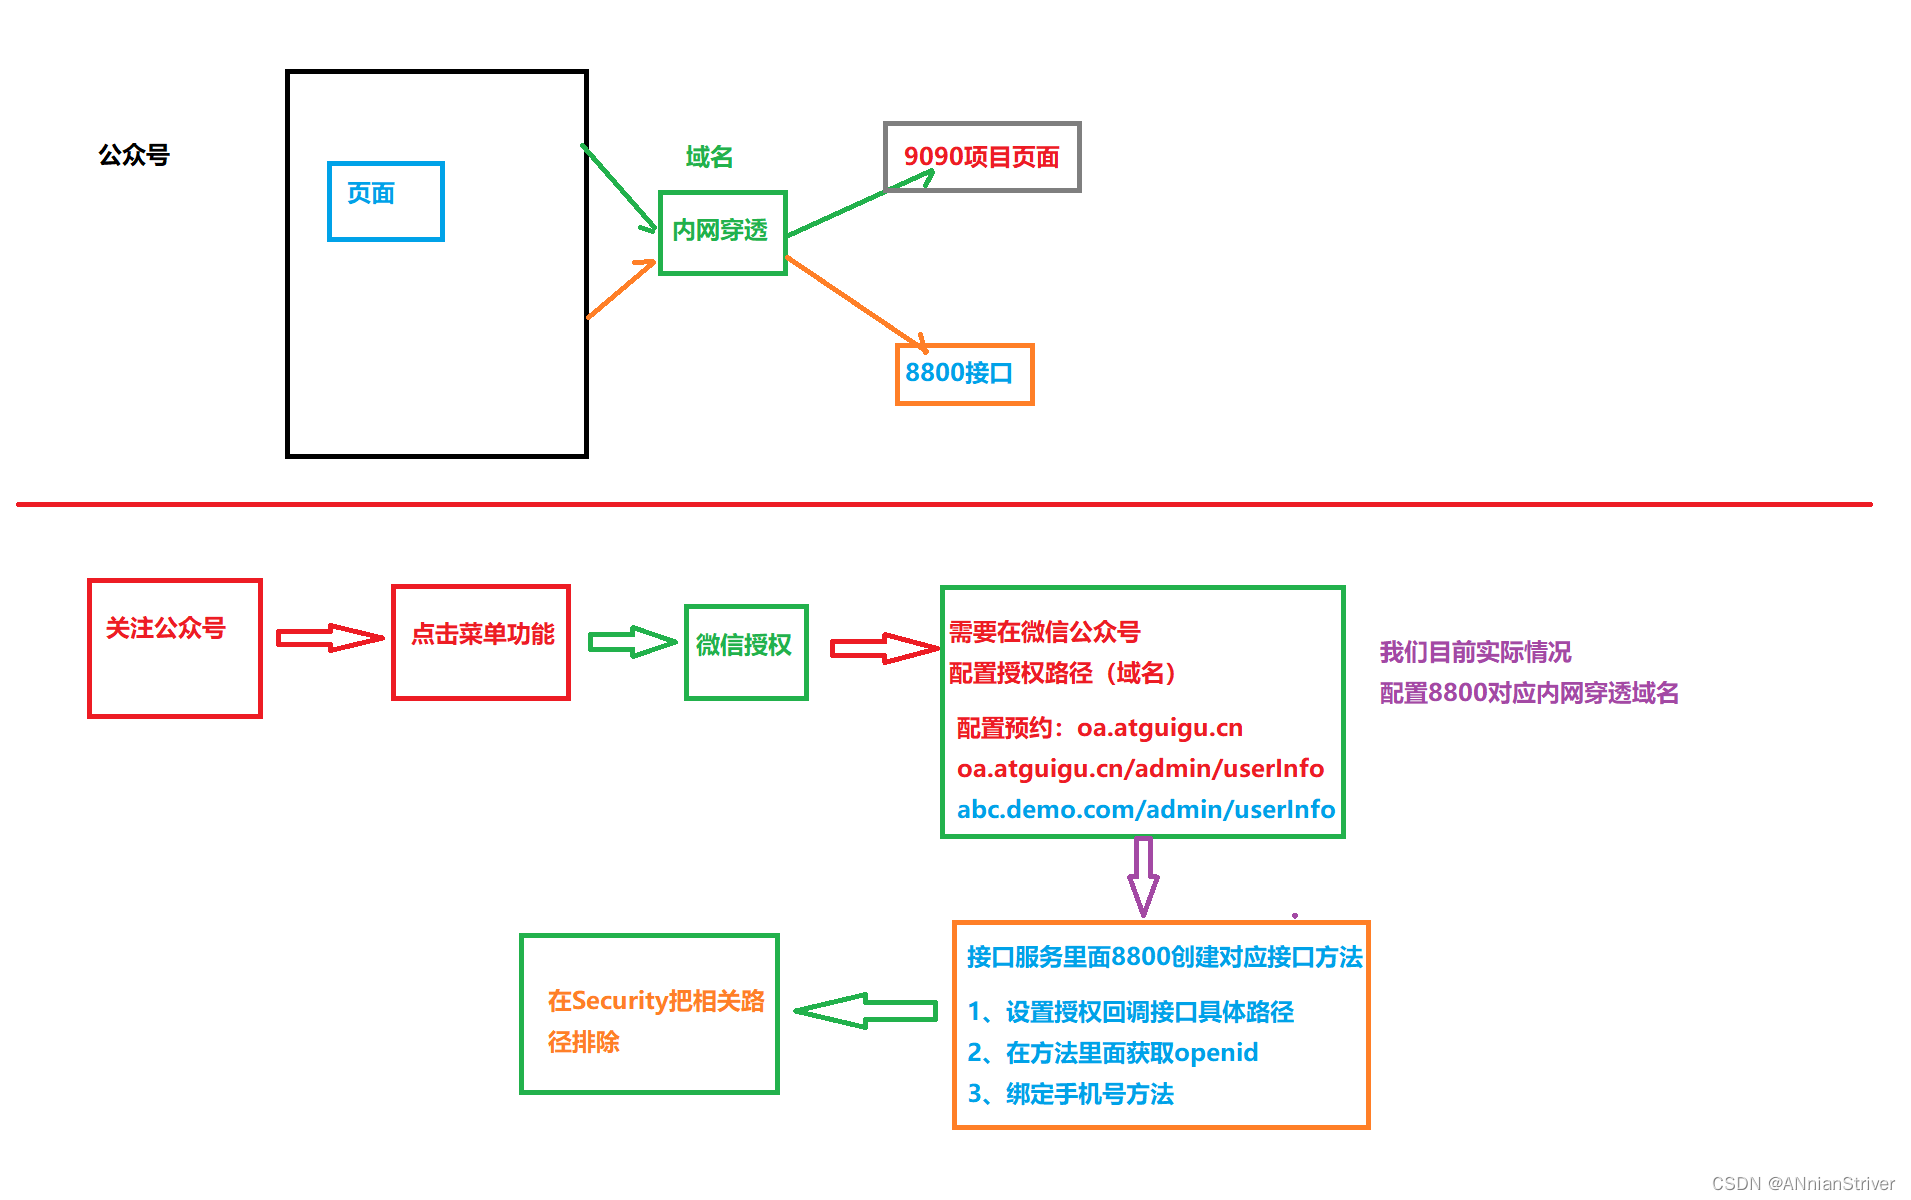
Después de configurar el menú en segundo plano, lo enviaremos a la plataforma pública de WeChat
3.1 Solicitar una cuenta
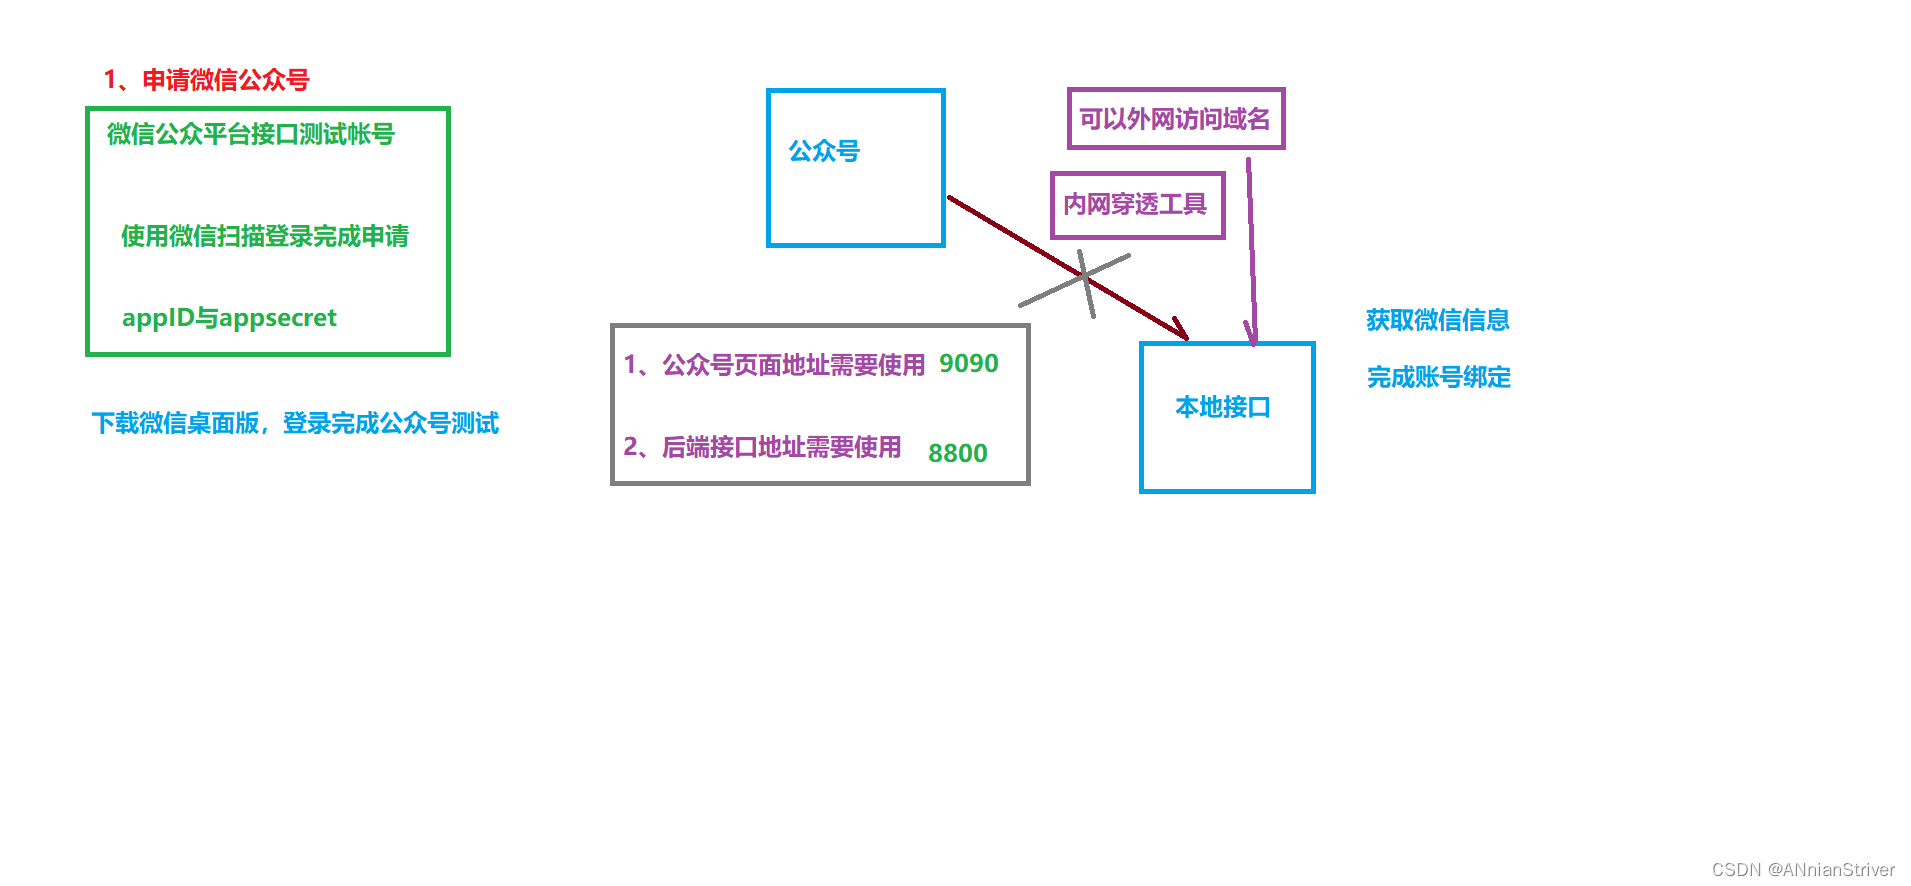
El sistema de oficina de Yunshang no tiene funciones avanzadas como el pago de WeChat, por lo que no es necesario usar una cuenta de servicio y la prueba se puede completar usando una cuenta de prueba.
Usamos la "cuenta de prueba de la interfaz de la plataforma pública de WeChat", la dirección de la aplicación: https://mp.weixin.qq.com/debug/cgi-bin/sandbox?t=sandbox/login, después de tener una cuenta formal, simplemente cambie directamente
![[Falló la transferencia de la imagen del enlace externo, el sitio de origen puede tener un mecanismo anti-leeching, se recomienda guardar la imagen y cargarla directamente (img-PtyVZOJq-1688014614435)(assets/1671602358397.png)]](https://img-blog.csdnimg.cn/85419e55cf7b4276b8983cc1854e133b.png)
Escanee e inicie sesión para obtener la información del número de prueba: appID y appsecret
![[Error en la transferencia de la imagen del enlace externo, el sitio de origen puede tener un mecanismo de enlace antirrobo, se recomienda guardar la imagen y cargarla directamente (img-WD8LdEZW-1688014614437)(activos\imagen-20230216191450386.png)]](https://img-blog.csdnimg.cn/180ccddb4683455e9d4507721ec0c563.png)
Vea la documentación de la API del "menú personalizado":
https://developers.weixin.qq.com/doc/offiaccount/Custom_Menus/Creating_Custom-Defined_Menu.html
Hay dos formas de implementar el menú push:
1. Siga completamente el método http del documento de la interfaz, pero este método es engorroso
2. Use la herramienta weixin-java-mp. Esta es una herramienta empaquetada que se puede usar directamente, lo cual es conveniente y rápido. Usaremos este método para desarrollar en el futuro.
3.2 Añadir configuración
Agregar configuración en application-dev.yml
wechat:
  mpAppId: wx13db7dcf69bc1223
  mpAppSecret: de3d7888d30febf84b64d0e6571e4027
3.3 Método de la herramienta
3.3.1 Introducción de dependencias
<dependency>
    <groupId>com.github.binarywang</groupId>
    <artifactId>weixin-java-mp</artifactId>
    <version>4.1.0</version>
</dependency>
3.3.2 Agregar herramientas y clases de configuración
Herramientas
package com.atguigu.wechat.config;

import lombok.Data;
import org.springframework.beans.factory.InitializingBean;
import org.springframework.beans.factory.annotation.Value;
import org.springframework.boot.context.properties.ConfigurationProperties;
import org.springframework.stereotype.Component;

@Data
@Component
@ConfigurationProperties(prefix = "wechat")
public class WechatAccountConfig {


    private String mpAppId;

    private String mpAppSecret;

}
clase de configuración
package com.atguigu.wechat.config;

import me.chanjar.weixin.mp.api.WxMpService;
import me.chanjar.weixin.mp.api.impl.WxMpServiceImpl;
import me.chanjar.weixin.mp.config.WxMpConfigStorage;
import me.chanjar.weixin.mp.config.impl.WxMpDefaultConfigImpl;
import org.springframework.beans.factory.annotation.Autowired;
import org.springframework.context.annotation.Bean;
import org.springframework.stereotype.Component;

@Component
public class WeChatMpConfig {


    @Autowired
    private WechatAccountConfig wechatAccountConfig;

    @Bean
    public WxMpService wxMpService(){


        WxMpService wxMpService = new WxMpServiceImpl();
        wxMpService.setWxMpConfigStorage(wxMpConfigStorage());
        return wxMpService;
    }

    @Bean
    public WxMpConfigStorage wxMpConfigStorage(){


        WxMpDefaultConfigImpl wxMpConfigStorage = new WxMpDefaultConfigImpl();
        wxMpConfigStorage.setAppId(wechatAccountConfig.getMpAppId());
        wxMpConfigStorage.setSecret(wechatAccountConfig.getMpAppSecret());
        return wxMpConfigStorage;
    }
}
3.3.3, implementación de interfaz push
Clase de operación: MenuServiceImpl
@Autowired
private WxMpService wxMpService;

@Override
public void syncMenu() {


    List<MenuVo> menuVoList = this.findMenuInfo();
    //菜单
    JSONArray buttonList = new JSONArray();
    for(MenuVo oneMenuVo : menuVoList) {


        JSONObject one = new JSONObject();
        one.put("name", oneMenuVo.getName());
        if(CollectionUtils.isEmpty(oneMenuVo.getChildren())) {


            one.put("type", oneMenuVo.getType());
            one.put("url", "http://oa.atguigu.cn/#"+oneMenuVo.getUrl());
        } else {


            JSONArray subButton = new JSONArray();
            for(MenuVo twoMenuVo : oneMenuVo.getChildren()) {


                JSONObject view = new JSONObject();
                view.put("type", twoMenuVo.getType());
                if(twoMenuVo.getType().equals("view")) {


                    view.put("name", twoMenuVo.getName());
                    //H5页面地址
                    view.put("url", "http://oa.atguigu.cn#"+twoMenuVo.getUrl());
                } else {


                    view.put("name", twoMenuVo.getName());
                    view.put("key", twoMenuVo.getMeunKey());
                }
                subButton.add(view);
            }
            one.put("sub_button", subButton);
        }
        buttonList.add(one);
    }
    //菜单
    JSONObject button = new JSONObject();
    button.put("button", buttonList);
    try {


        wxMpService.getMenuService().menuCreate(button.toJSONString());
    } catch (WxErrorException e) {


        throw new RuntimeException(e);
    }
}
3.3.4, interfaz del controlador
//@PreAuthorize("hasAuthority('bnt.menu.syncMenu')")
@ApiOperation(value = "同步菜单")
@GetMapping("syncMenu")
public Result createMenu() {


    menuService.syncMenu();
    return Result.ok();
}
3.4 Implementación frontal
3.4.1, interfaz API
Agregue api/wechat/menu.js
syncMenu() {


  return request({


    url: `${

      api_name}/syncMenu`,
    method: `get`
  })
},
3.4.2 Agregar función de sincronización a la lista del menú
1. Botón Agregar
<el-button class="btn-add" size="mini" @click="syncMenu" >同步菜单</el-button>
2. Agregar método
syncMenu() {


  this.$confirm('你确定上传菜单吗, 是否继续?', '提示', {


    confirmButtonText: '确定',
    cancelButtonText: '取消',
    type: 'warning'
  }).then(() => {


    return menuApi.syncMenu()
  }).then((response) => {


    this.$message.success(response.message)
  }).catch(error => {


    console.log('error', error)
    if (error === 'cancel') {


      this.$message.info('取消上传')
    }
  })
}
4. Eliminar menú de inserción
4.1 Eliminar interfaz
4.1.1, interfaz de servicio
void removeMenu();
4.1.2 Implementación de la interfaz de servicio
@SneakyThrows
@Override
public void removeMenu() {


    wxMpService.getMenuService().menuDelete();
}
4.1.3, interfaz del controlador
@PreAuthorize("hasAuthority('bnt.menu.removeMenu')")
@ApiOperation(value = "删除菜单")
@DeleteMapping("removeMenu")
public Result removeMenu() {


    menuService.removeMenu();
    return Result.ok();
}
4.2 Implementación frontal
4.2.1, interfaz API
Agregue api/wechat/menu.js
removeMenu() {


    return request({


      url: `${

      api_name}/removeMenu`,
      method: `delete`
    })
  }
4.2.2 Agregar función de sincronización a la lista del menú
1. Botón Agregar
<el-button class="btn-add" size="mini" @click="removeMenu">删除菜单</el-button>
2. Agregar método
removeMenu() {


  menuApi.removeMenu().then(response => {


    this.$message.success('菜单已删除')
  })
}
3. Inicio de sesión autorizado de WeChat
La cuenta actual del empleado en segundo plano no está asociada con la cuenta de WeChat, por lo que al hacer clic en el menú de WeChat, es necesario determinar si iniciar sesión. Si es la primera visita, aparecerá la capa de asociación para establecer el vínculo entre la cuenta de WeChat y la cuenta del empleado.
1. Desarrollo de interfaz del lado del servidor
1.1 Configurar la penetración de la intranet (ngrok)
1.1.1 Usuarios registrados
URL: https://ngrok.cc/login/registrar
![[Falló la transferencia de la imagen del enlace externo, el sitio de origen puede tener un mecanismo de enlace antirrobo, se recomienda guardar la imagen y cargarla directamente (img-TUUfTP9z-1688014614439)(activos\imagen-20220302155428572.png)]](https://img-blog.csdnimg.cn/0e6a14cb7f9b450e8e1d4b737fd56f77.png)
1.1.2 Autenticación de nombre real
(1) Después de un registro exitoso, inicie sesión en el sistema y realice la autenticación con el nombre real. La tarifa de autenticación es de 2 yuanes. El túnel solo se puede abrir después de pasar la autenticación.
![[Falló la transferencia de la imagen del enlace externo, el sitio de origen puede tener un mecanismo anti-leeching, se recomienda guardar la imagen y cargarla directamente (img-6LN4fwsE-1688014614441)(assets\image-20220302155551084.png)]](https://img-blog.csdnimg.cn/4965c2b8443545938678dc1aa8e429d7.png)
1.1.3 Abrir el túnel
(1) Seleccione Gestión de túneles -> Abrir túnel
El último es un servidor gratuito, se recomienda elegir un servidor pago, 10 yuanes/mes, porque el servidor gratuito tiene muchos usuarios y a menudo cae.
![[Falló la transferencia de la imagen del enlace externo, el sitio de origen puede tener un mecanismo anti-leeching, se recomienda guardar la imagen y cargarla directamente (img-oAe9D89e-1688014614444)(assets\image-20220302155753120.png)]](https://img-blog.csdnimg.cn/073aece2206844a3a98c6974d12f8550.png)
(2) Haga clic en Comprar ahora -> Ingrese la información relevante
![[Error en la transferencia de la imagen del enlace externo, el sitio de origen puede tener un mecanismo de enlace antirrobo, se recomienda guardar la imagen y cargarla directamente (img-wtZVhQqw-1688014614446)(activos\imagen-20220302160247603.png)]](https://img-blog.csdnimg.cn/d7a4814228b74904a726776f068e7d7a.png)
(3) Después de que la apertura sea exitosa, verifique el túnel abierto
Aquí se abren dos túneles, uno para la llamada de interfaz de backend y otro para la llamada de frontend de la cuenta oficial
![[Error en la transferencia de la imagen del enlace externo, el sitio de origen puede tener un mecanismo de enlace antirrobo, se recomienda guardar la imagen y cargarla directamente (img-p4GNWZCr-1688014614448)(activos\imagen-20220307092222322.png)]](https://img-blog.csdnimg.cn/68e2698d27594e058480b104996488ed.png)
1.1.4, iniciar el túnel
(1) Descarga la herramienta del cliente
![[Falló la transferencia de la imagen del enlace externo, el sitio de origen puede tener un mecanismo anti-leeching, se recomienda guardar la imagen y subirla directamente (img-tlEWEmVi-1688014614450)(assets\image-20220302160737471.png)]](https://img-blog.csdnimg.cn/3b811a816bf34632a43fd50f3c737f10.png)
(2) Seleccione la versión de Windows
![[Error en la transferencia de la imagen del enlace externo, el sitio de origen puede tener un mecanismo de enlace antirrobo, se recomienda guardar la imagen y cargarla directamente (img-qgCSD91r-1688014614451)(activos\imagen-20220302160834683.png)]](https://img-blog.csdnimg.cn/3758212481464441a0f6875941691129.png)
(3) Descomprima, busque el archivo bat, haga doble clic para comenzar
![[Falló la transferencia de la imagen del enlace externo, el sitio de origen puede tener un mecanismo de enlace antirrobo, se recomienda guardar la imagen y cargarla directamente (img-3s0cMkiD-1688014614453)(activos\imagen-20220302160924245.png)]](https://img-blog.csdnimg.cn/ac51e258282b4712b0f0eda48b1684d5.png)
(4) Ingrese la identificación del túnel, separe los múltiplos con comas y finalmente presione Entrar para comenzar
![[Error en la transferencia de la imagen del enlace externo, el sitio de origen puede tener un mecanismo de enlace antirrobo, se recomienda guardar la imagen y cargarla directamente (img-Hbrwf4Eh-1688014614456)(activos\imagen-20220307092329552.png)]](https://img-blog.csdnimg.cn/1a365d7ccd4e447ebaca68c6f8b079a1.png)
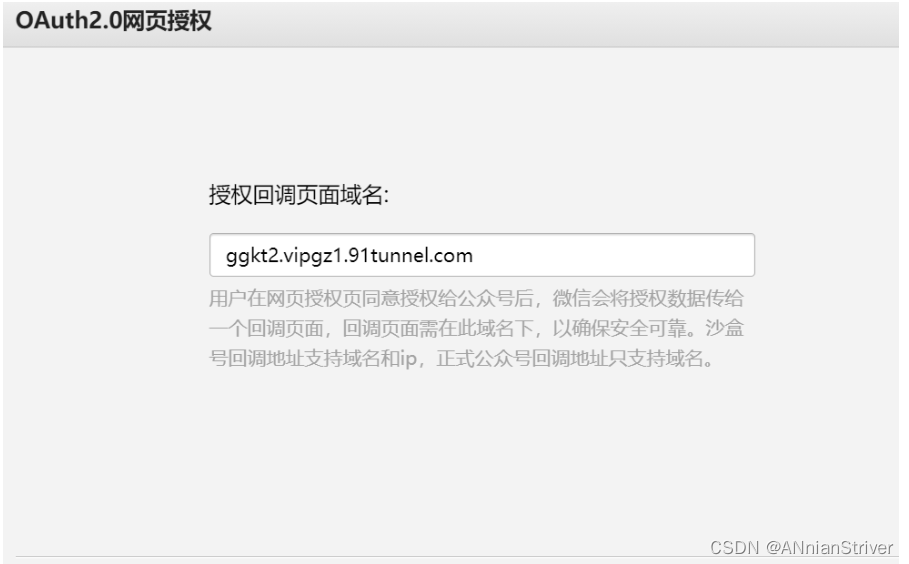
1.2 Configurar el "nombre de dominio de la página de devolución de llamada autorizada"
Tenga en cuenta que complete de acuerdo con su propia ID y nombre de dominio, ¡no lo use mal! ! ! ! !
Después de "[Autorización de la página web para obtener información básica del usuario]", haga clic en "Modificar" y agregue "Nombre de dominio de la página de devolución de llamada de autorización" (dirección de penetración de intranet de uso local)
1.3 Configure la devolución de llamada de autorización para obtener la dirección de la interfaz de información del usuario
wechat:
mpAppId: wx13db7dcf69bq1233
mpAppSecret: de3d7888d30febf84b64d041231e4027
# 授权回调获取用户信息接口地址
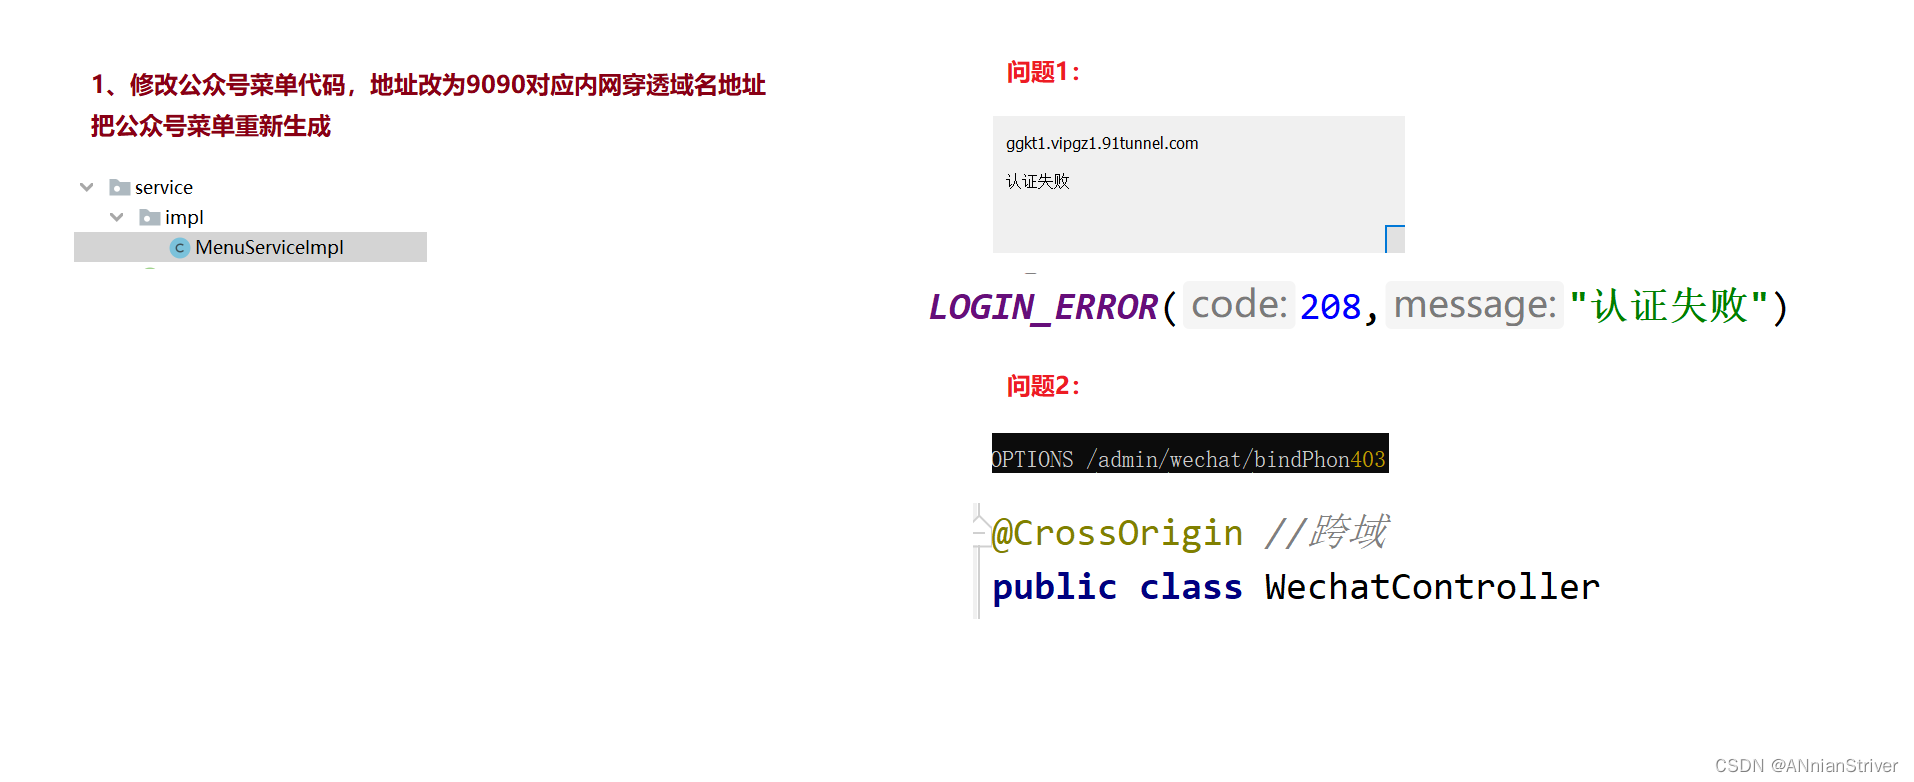
userInfoUrl: http://ggkt2.vipgz1.91tunnel.com/admin/wechat/userInfo
1,4, interfaz de controlador
package com.atguigu.wechat.controller;
import com.alibaba.fastjson.JSON;
import com.atguigu.common.jwt.JwtHelper;
import com.atguigu.common.result.Result;
import com.atguigu.model.system.SysUser;
import com.atguigu.system.service.SysUserService;
import com.atguigu.vo.wechat.BindPhoneVo;
import com.baomidou.mybatisplus.core.conditions.query.LambdaQueryWrapper;
import io.swagger.annotations.ApiOperation;
import lombok.extern.slf4j.Slf4j;
import me.chanjar.weixin.common.api.WxConsts;
import me.chanjar.weixin.common.bean.WxOAuth2UserInfo;
import me.chanjar.weixin.common.bean.oauth2.WxOAuth2AccessToken;
import me.chanjar.weixin.mp.api.WxMpService;
import org.springframework.beans.factory.annotation.Autowired;
import org.springframework.beans.factory.annotation.Value;
import org.springframework.stereotype.Controller;
import org.springframework.web.bind.annotation.*;
import javax.annotation.Resource;
import javax.servlet.http.HttpServletRequest;
import java.net.URLEncoder;
@Controller
@RequestMapping("/admin/wechat")
@Slf4j
public class WechatController {
@Resource
private SysUserService sysUserService;
@Autowired
private WxMpService wxMpService;
@Value("${wechat.userInfoUrl}")
private String userInfoUrl;
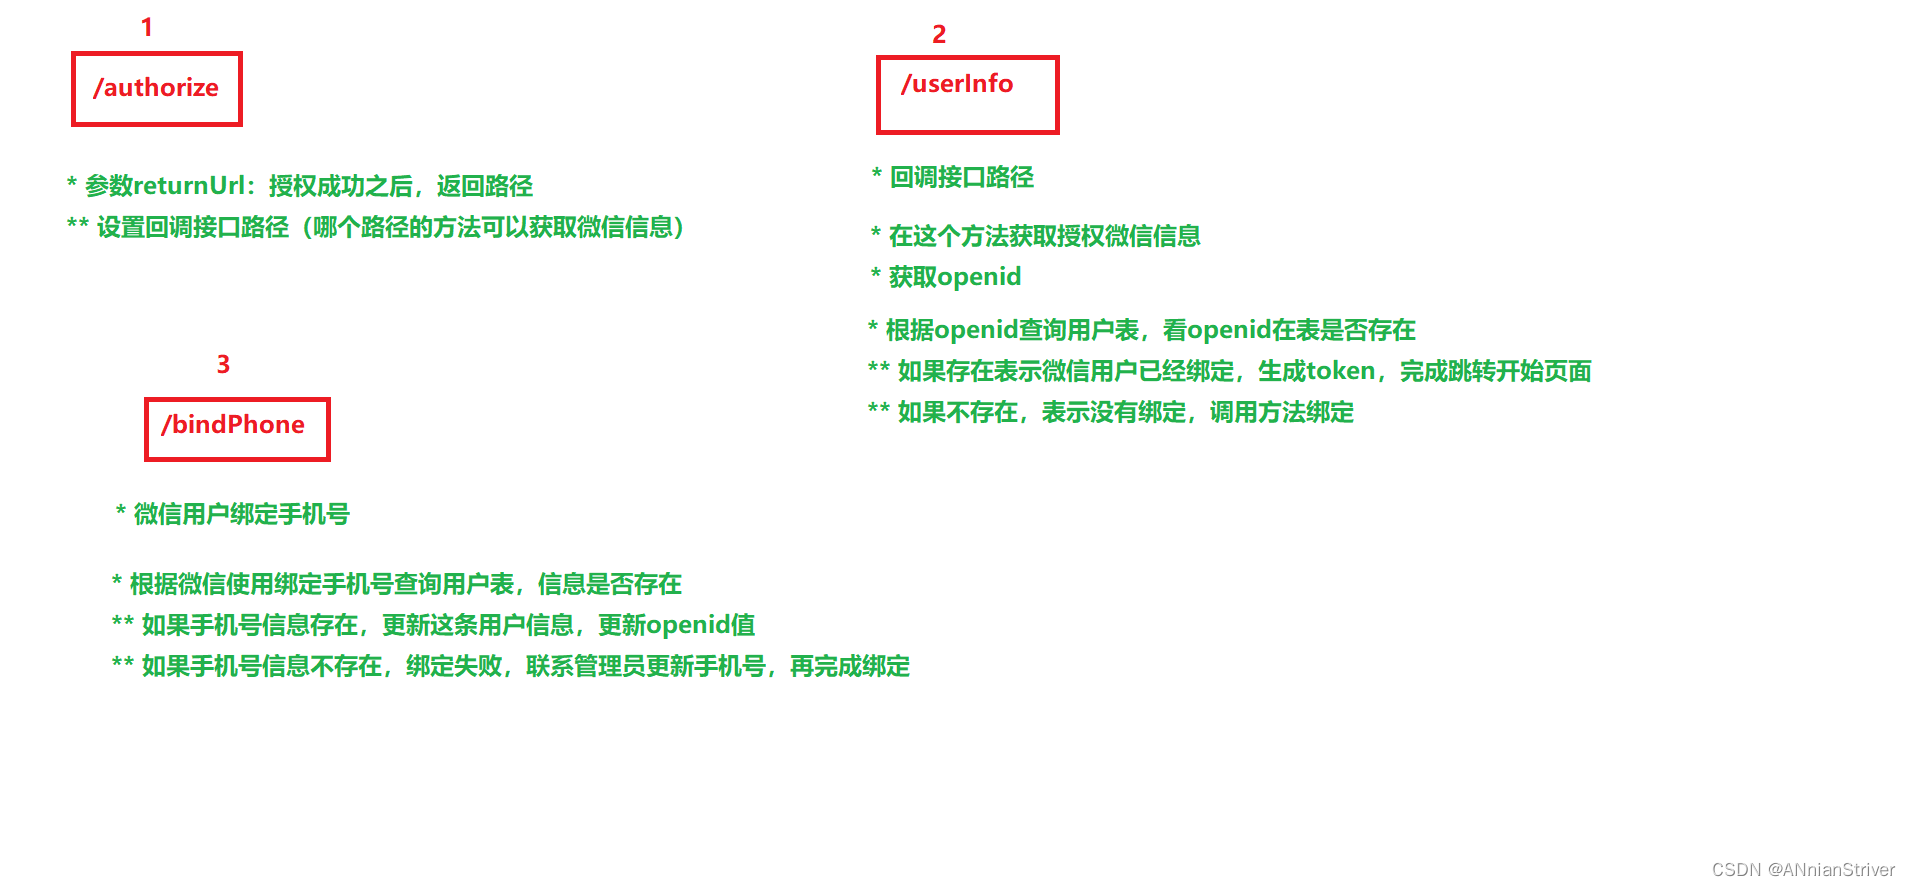
@GetMapping("/authorize")
public String authorize(@RequestParam("returnUrl") String returnUrl, HttpServletRequest request) {
//由于授权回调成功后,要返回原地址路径,原地址路径带“#”号,当前returnUrl获取带“#”的url获取不全,因此前端把“#”号替换为“guiguoa”了,这里要还原一下
String redirectURL = wxMpService.getOAuth2Service().buildAuthorizationUrl(userInfoUrl, WxConsts.OAuth2Scope.SNSAPI_USERINFO, URLEncoder.encode(returnUrl.replace("guiguoa", "#")));
log.info("【微信网页授权】获取code,redirectURL={}", redirectURL);
return "redirect:" + redirectURL;
}
@GetMapping("/userInfo")
public String userInfo(@RequestParam("code") String code,
@RequestParam("state") String returnUrl) throws Exception {
log.info("【微信网页授权】code={}", code);
log.info("【微信网页授权】state={}", returnUrl);
WxOAuth2AccessToken accessToken = wxMpService.getOAuth2Service().getAccessToken(code);
String openId = accessToken.getOpenId();
log.info("【微信网页授权】openId={}", openId);
WxOAuth2UserInfo wxMpUser = wxMpService.getOAuth2Service().getUserInfo(accessToken, null);
log.info("【微信网页授权】wxMpUser={}", JSON.toJSONString(wxMpUser));
SysUser sysUser = sysUserService.getOne(new LambdaQueryWrapper<SysUser>().eq(SysUser::getOpenId, openId));
String token = "";
//null != sysUser 说明已经绑定,反之为建立账号绑定,去页面建立账号绑定
if(null != sysUser) {
token = JwtHelper.createToken(sysUser.getId(), sysUser.getUsername());
}
if(returnUrl.indexOf("?") == -1) {
return "redirect:" + returnUrl + "?token=" + token + "&openId=" + openId;
} else {
return "redirect:" + returnUrl + "&token=" + token + "&openId=" + openId;
}
}
@ApiOperation(value = "微信账号绑定手机")
@PostMapping("bindPhone")
@ResponseBody
public Result bindPhone(@RequestBody BindPhoneVo bindPhoneVo) {
SysUser sysUser = sysUserService.getOne(new LambdaQueryWrapper<SysUser>().eq(SysUser::getPhone, bindPhoneVo.getPhone()));
if(null != sysUser) {
sysUser.setOpenId(bindPhoneVo.getOpenId());
sysUserService.updateById(sysUser);
String token = JwtHelper.createToken(sysUser.getId(), sysUser.getUsername());
return Result.ok(token);
} else {
return Result.fail("手机号码不存在,绑定失败");
}
}
}
1.5, excluir interceptación
Configurar la intercepción de exclusión en la clase WebSecurityConfig
   /**
     * 配置哪些请求不拦截
     * 排除swagger相关请求
     * @param web
     * @throws Exception
     */
    @Override
    public void configure(WebSecurity web) throws Exception {


        web.ignoring().antMatchers("/admin/modeler/**","/diagram-viewer/**","/editor-app/**","/*.html",
                "/admin/processImage/**",
                "/admin/wechat/authorize","/admin/wechat/userInfo","/admin/wechat/bindPhone",
                "/favicon.ico","/swagger-resources/**", "/webjars/**", "/v2/**", "/swagger-ui.html/**", "/doc.html");
    }
2. Procesamiento front-end móvil
2.1, agregar interfaz api
Agregar método en src/api/userInfo.js
bindPhone(bindPhoneVo) {


  return request({


    url: `/admin/wechat/bindPhone`,
    method: 'post',
    data: bindPhoneVo
  })
},
2.2 Relación vinculante
Dado que es necesario acceder a todas las páginas del terminal móvil después de la autorización y el inicio de sesión, colocamos el negocio de procesamiento en la página de entrada para el procesamiento, scr/App.vue
<template>
  <div id="app">
    <router-view />

    <el-dialog title="绑定手机" :visible.sync="dialogVisible" width="80%" >
      <el-form ref="dataForm" :model="bindPhoneVo" size="small">
        <h4>绑定你的手机号,建立云尚办公系统关联关系</h4>
        <el-form-item label="手机号码">
          <el-input v-model="bindPhoneVo.phone"/>
        </el-form-item>
      </el-form>
      <span slot="footer" class="dialog-footer">
        <el-button type="primary" icon="el-icon-check" @click="saveBind()" size="small">确 定</el-button>
      </span>
    </el-dialog>
  </div>
</template>
<script>
import userInfoApi from '@/api/userInfo'
export default {
  data() {
    return {
      show: true,
      dialogVisible: false,
      bindPhoneVo: {
        openId: '',
        phone: ''
      }
    };
  },

  created() {
    // 处理微信授权登录
    this.wechatLogin();
  },

  methods: {
    wechatLogin() {
      // 处理微信授权登录
      let token = this.getQueryString('token') || '';
      let openId = this.getQueryString('openId') || '';
      // token === '' && openId != '' 只要这种情况,未绑定账号
      if(token === '' && openId != '') {
        // 绑定账号
        this.bindPhoneVo.openId = openId
        this.dialogVisible = true
      } else {
        // 如果绑定了,授权登录直接返回token
        if(token !== '') {
          window.localStorage.setItem('token', token);
        }
        token = window.localStorage.getItem('token') || '';
        if (token == '') {
          let url = window.location.href.replace('#', 'guiguoa')
          window.location = 'http://oa.atguigu.cn/admin/wechat/authorize?returnUrl=' + url
        }
      }
    },

    saveBind() {
      if(this.bindPhoneVo.phone.length != 11) {
        alert('手机号码格式不正确')
        return
      }
      userInfoApi.bindPhone(this.bindPhoneVo).then(response => {
        window.localStorage.setItem('token', response.data);
        this.dialogVisible = false
        window.location = 'http://oa.atguigu.cn'
      })
    },

    getQueryString (paramName) {
      if(window.location.href.indexOf('?') == -1) return '';

      let searchString = window.location.href.split('?')[1];
      let i, val, params = searchString.split("&");

      for (i=0;i<params.length;i++) {
        val = params[i].split("=");
        if (val[0] == paramName) {
          return val[1];
        }
      }
      return '';
    }
  }
};
</script>
<style lang="scss">
#app {
  font-family: Avenir, Helvetica, Arial, sans-serif;
  -webkit-font-smoothing: antialiased;
  -moz-osx-font-smoothing: grayscale;
  color: #2c3e50;
}
</style>
2.3 Agregar referencia de WeChat js
Agregue la referencia js en public/index.html
<script src="http://res.wx.qq.com/open/js/jweixin-1.4.0.js" type="text/javascript"></script>
2.4 Ajustar request.js
import axios from "axios";

// 创建axios实例
const service = axios.create({


  baseURL: "http://oa.atguigu.cn", // api 的 base_url
  timeout: 30000 // 请求超时时间
});

// http request 拦截器
service.interceptors.request.use(config => {


    let token = window.localStorage.getItem("token") || "";
    if (token != "") {


      config.headers["token"] = token;
    }
    return config;
  },
  err => {


    return Promise.reject(err);
  });
// http response 拦截器
service.interceptors.response.use(response => {


    if (response.data.code == 208) {


      // debugger
      // 替换# 后台获取不到#后面的参数
      let url = window.location.href.replace('#', 'guiguoa')
      window.location = 'http://oa.atguigu.cn/admin/wechat/authorize?returnUrl=' + url
    } else {


      if (response.data.code == 200) {


        return response.data;
      } else {


        // 209没有权限 系统会自动跳转授权登录的,已在App.vue处理过,不需要提示
        if (response.data.code != 209) {


          alert(response.data.message || "error");
        }
        return Promise.reject(response);
      }
    }
  },
  error => {


    return Promise.reject(error.response);   // 返回接口返回的错误信息
  });

export default service;
2.5 Prueba
4. Impulso de noticias
Para la información pendiente de aprobación, debemos notificar al aprobador para que apruebe la información. Después de que el aprobador haya aprobado la información, debemos notificar al solicitante que la envió para ver la información.
Usamos la interfaz de "mensaje de plantilla de WeChat" para enviar mensajes
1. Configurar el mensaje de plantilla de WeChat
1. Aprobación pendiente: { {first.DATA}} Número de aprobación: { {keyword1.DATA}} Hora de envío: { {keyword2.DATA}} { {content.DATA}}
2. Se ha procesado la aprobación: { {first.DATA}} Número de aprobación: { {keyword1.DATA}} Hora de envío: { { keyword2.DATA}} Aprobador actual: { {keyword3.DATA}} Estado de aprobación: { {keyword4.DATA}} { {content.DATA}}
![[Falló la transferencia de la imagen del enlace externo, el sitio de origen puede tener un mecanismo anti-leeching, se recomienda guardar la imagen y cargarla directamente (img-vAqaRaxM-1688014614461)(assets/1671609701750.png)]](https://img-blog.csdnimg.cn/76c6836ba59c407d94c426facab021d3.png)
2. Definir la interfaz
package com.atguigu.wechat.service;

public interface MessageService {


    /**
     * 推送待审批人员
     * @param processId
     * @param userId
     * @param taskId
     */
    void pushPendingMessage(Long processId, Long userId, String taskId);

    /**
     * 审批后推送提交审批人员
     * @param processId
     * @param userId
     * @param status
     */
    void pushProcessedMessage(Long processId, Long userId, Integer status);

}
3. Implementación de la interfaz de servicio
package com.atguigu.wechat.service.impl;

import com.alibaba.fastjson.JSON;
import com.alibaba.fastjson.JSONObject;
import com.atguigu.model.process.Process;
import com.atguigu.model.process.ProcessTemplate;
import com.atguigu.model.system.SysUser;
import com.atguigu.process.service.ProcessService;
import com.atguigu.process.service.ProcessTemplateService;
import com.atguigu.security.custom.LoginUserInfoHelper;
import com.atguigu.system.service.SysUserService;
import com.atguigu.wechat.service.MessageService;
import lombok.SneakyThrows;
import lombok.extern.slf4j.Slf4j;
import me.chanjar.weixin.mp.api.WxMpService;
import me.chanjar.weixin.mp.bean.template.WxMpTemplateData;
import me.chanjar.weixin.mp.bean.template.WxMpTemplateMessage;
import org.joda.time.DateTime;
import org.springframework.stereotype.Service;
import org.springframework.util.StringUtils;

import javax.annotation.Resource;
import java.util.Map;

@Slf4j
@Service
public class MessageServiceImpl implements MessageService {


    @Resource
    private WxMpService wxMpService;

    @Resource
    private ProcessService processService;

    @Resource
    private ProcessTemplateService processTemplateService;

    @Resource
    private SysUserService sysUserService;

    @SneakyThrows
    @Override
    public void pushPendingMessage(Long processId, Long userId, String taskId) {


        Process process = processService.getById(processId);
        ProcessTemplate processTemplate = processTemplateService.getById(process.getProcessTemplateId());
        SysUser sysUser = sysUserService.getById(userId);
        SysUser submitSysUser = sysUserService.getById(process.getUserId());
        String openid = sysUser.getOpenId();
        //方便测试,给默认值(开发者本人的openId)
        if(StringUtils.isEmpty(openid)) {


            openid = "omwf25izKON9dktgoy0dogqvnGhk";
        }
        WxMpTemplateMessage templateMessage = WxMpTemplateMessage.builder()
        .toUser(openid)//要推送的用户openid
        .templateId("KvOVeW7jz4-DZgQ_WuXjMZO5I4pPA7L7fflVNwC_ZQg")//模板id
        .url("http://oa.atguigu.cn/#/show/"+processId+"/"+taskId)//点击模板消息要访问的网址
        .build();
        JSONObject jsonObject = JSON.parseObject(process.getFormValues());
        JSONObject formShowData = jsonObject.getJSONObject("formShowData");
        StringBuffer content = new StringBuffer();
        for (Map.Entry entry : formShowData.entrySet()) {


            content.append(entry.getKey()).append(":").append(entry.getValue()).append("\n ");
        }
        templateMessage.addData(new WxMpTemplateData("first", submitSysUser.getName()+"提交了"+processTemplate.getName()+"审批申请,请注意查看。", "#272727"));
        templateMessage.addData(new WxMpTemplateData("keyword1", process.getProcessCode(), "#272727"));
        templateMessage.addData(new WxMpTemplateData("keyword2", new DateTime(process.getCreateTime()).toString("yyyy-MM-dd HH:mm:ss"), "#272727"));
         templateMessage.addData(new WxMpTemplateData("content", content.toString(), "#272727"));
        String msg = wxMpService.getTemplateMsgService().sendTemplateMsg(templateMessage);
        log.info("推送消息返回:{}", msg);
    }

    @SneakyThrows
    @Override
    public void pushProcessedMessage(Long processId, Long userId, Integer status) {


        Process process = processService.getById(processId);
        ProcessTemplate processTemplate = processTemplateService.getById(process.getProcessTemplateId());
        SysUser sysUser = sysUserService.getById(userId);
        SysUser currentSysUser = sysUserService.getById(LoginUserInfoHelper.getUserId());
        String openid = sysUser.getOpenId();
        if(StringUtils.isEmpty(openid)) {


            openid = "omwf25izKON9dktgoy0dogqvnGhk";
        }
        WxMpTemplateMessage templateMessage = WxMpTemplateMessage.builder()
                .toUser(openid)//要推送的用户openid
                .templateId("I0kVeto7T0WIDP6tyoHh-hx83wa9_pe7Nx9eT93-6sc")//模板id
                .url("http://oa.atguigu.cn/#/show/"+processId+"/0")//点击模板消息要访问的网址
                .build();
        JSONObject jsonObject = JSON.parseObject(process.getFormValues());
        JSONObject formShowData = jsonObject.getJSONObject("formShowData");
        StringBuffer content = new StringBuffer();
        for (Map.Entry entry : formShowData.entrySet()) {


            content.append(entry.getKey()).append(":").append(entry.getValue()).append("\n ");
        }
        templateMessage.addData(new WxMpTemplateData("first", "你发起的"+processTemplate.getName()+"审批申请已经被处理了,请注意查看。", "#272727"));
        templateMessage.addData(new WxMpTemplateData("keyword1", process.getProcessCode(), "#272727"));
        templateMessage.addData(new WxMpTemplateData("keyword2", new DateTime(process.getCreateTime()).toString("yyyy-MM-dd HH:mm:ss"), "#272727"));
        templateMessage.addData(new WxMpTemplateData("keyword3", currentSysUser.getName(), "#272727"));
        templateMessage.addData(new WxMpTemplateData("keyword4", status == 1 ? "审批通过" : "审批拒绝", status == 1 ? "#009966" : "#FF0033"));
        templateMessage.addData(new WxMpTemplateData("content", content.toString(), "#272727"));
        String msg = wxMpService.getTemplateMsgService().sendTemplateMsg(templateMessage);
        log.info("推送消息返回:{}", msg);
    }

}
4. Pulsar llamada
4.1 Interfaz de instancia de proceso de inicio
segmento de código
@Autowired
private MessageService messageService;
@Transactional
public Process startUp(ProcessFormVo processFormVo) {


    ...

    //计算下一个审批人
    List<Task> taskList = this.getCurrentTaskList(processInstanceId);
    if (!CollectionUtils.isEmpty(taskList)) {


        List<String> assigneeList = new ArrayList<>();
        for(Task task : taskList) {


            SysUser sysUser = sysUserService.getByUsername(task.getAssignee());
            assigneeList.add(sysUser.getName());

            //推送消息给下一个审批人
            messageService.pushPendingMessage(process.getId(), sysUser.getId(), task.getId());
        }
        process.setDescription("等待" + StringUtils.join(assigneeList.toArray(), ",") + "审批");
    }

    processMapper.updateById(process);
    return process;
}
4.2 Interfaz de aprobación
segmento de código
public void approve(ApprovalVo approvalVo) {


    ...

    //计算下一个审批人
    Process process = this.getById(approvalVo.getProcessId());
    List<Task> taskList = this.getCurrentTaskList(process.getProcessInstanceId());
    if (!CollectionUtils.isEmpty(taskList)) {


        List<String> assigneeList = new ArrayList<>();
        for(Task task : taskList) {


            SysUser sysUser = sysUserService.getByUsername(task.getAssignee());
            assigneeList.add(sysUser.getName());

            //推送消息给下一个审批人
            messageService.pushPendingMessage(process.getId(), sysUser.getId(), task.getId());
        }

        process.setDescription("等待" + StringUtils.join(assigneeList.toArray(), ",") + "审批");
        process.setStatus(1);
    } else {


        ...
    }
    //推送消息给申请人
    messageService.pushProcessedMessage(process.getId(), process.getUserId(), approvalVo.getStatus());
    this.updateById(process);
}