Encontré información relevante en Internet. Algunos contenidos de datos no tienen pasos, lo cual es difícil de entender. Aquí hay un diagrama de forma de onda personalizado simple primero:
El efecto se muestra en la figura.
Hay varios pasos para la vista personalizada:
- Una clase hereda de View o ViewGroup;
- anular constructor
- Método de inicialización: se utiliza para inicializar pinceles, atributos personalizados, etc.
- Reescriba el método onMeasure (): se utiliza para medir el tamaño de la pantalla, el modo de longitud y ancho
- Vuelva a escribir el método onLayout(): vista de diseño
- Anule el método onDraw(): dibuje la interfaz
- Escriba los parámetros de configuración relacionados o la interfaz de devolución de llamada, etc.
Estos son los métodos relacionados con las ondas:
La primera es la curva de Bezier.
Puede ver qué tipo de ejemplo es en este sitio web: http://myst729.github.io/bezier-curve/
Si quieres saber más sobre el principio de la curva de Bezier, puedes buscar por ti mismo
El siguiente es un proceso de código simple:
Android proporciona dos métodos en la clase Path:


quadTo representa el método de la ecuación cuadrática cubicTo representa el método de la ecuación cúbica
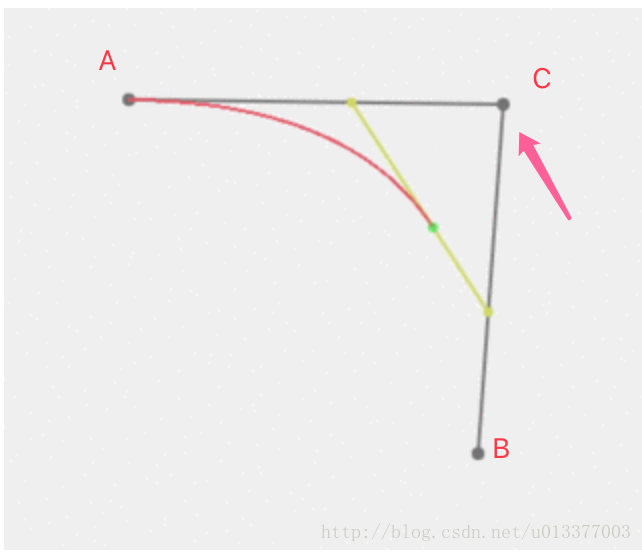
El punto C del proceso de eventos representado por x1, y1, el punto final B representado por x2, y2, etc.
Así que primero establece un punto de partida: x0, y0 usa este método:

Ahora muévase a un punto, luego pase el punto de proceso y luego al punto final
Código anterior:
WaveView hereda de View
package com.riti.testview;

import android.content.Context;
import android.graphics.Canvas;
import android.graphics.Color;
import android.graphics.Paint;
import android.graphics.Path;
import android.support.annotation.Nullable;
import android.util.AttributeSet;
import android.view.View;

/**
 * Created by YZBbanban on 2018/2/28.
 */

public class WareView extends View {
    private Paint mPaint;
    private Path mPath;

    public WareView(Context context) {
        super(context);
        init();
    }

    public WareView(Context context, @Nullable AttributeSet attrs) {
        super(context, attrs);
        init();
    }

    public WareView(Context context, @Nullable AttributeSet attrs, int defStyleAttr) {
        super(context, attrs, defStyleAttr);
        init();
    }

    private void init() {
        mPaint = new Paint();
        mPaint.setAntiAlias(true);//防锯齿
        mPaint.setDither(true);//防抖动
        mPath = new Path();

    }

    @Override
    protected void onMeasure(int widthMeasureSpec, int heightMeasureSpec) {
        super.onMeasure(widthMeasureSpec, heightMeasureSpec);
    }

    @Override
    protected void onLayout(boolean changed, int left, int top, int right, int bottom) {
        super.onLayout(changed, left, top, right, bottom);
    }

    @Override
    protected void onDraw(Canvas canvas) {
        super.onDraw(canvas);
        //画笔颜色
        mPaint.setColor(Color.RED);
        //设置为描边
        mPaint.setStyle(Paint.Style.STROKE);
        //移动到左边屏幕中间
        mPath.moveTo(0.0f , getHeight()/2);
        //贝斯阿尔曲线
        mPath.quadTo(getWidth()/2,getHeight()/2,getWidth()/2,getHeight());
        //在画布上绘制
        canvas.drawPath(mPath,mPaint);

    }

}
Representaciones:
El dibujo de la curva Bezier simple se completa y lo siguiente entra en el tema:
Primero trace la curva:
modelo de curva
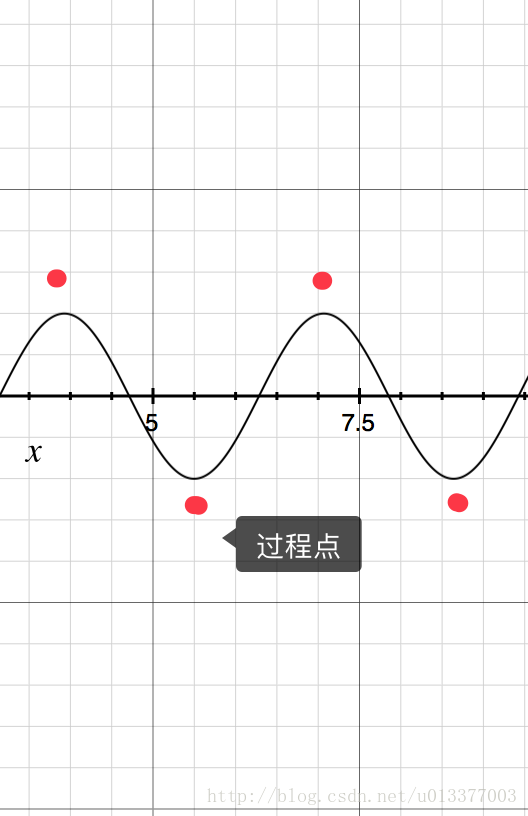
Como se muestra en la figura: el punto inicial es (0, getHeight()/2) y hay cuatro puntos de proceso, por lo que debe escribir cuatro métodos de ecuación cuadrática y hay cuatro puntos finales:
método:
    @Override
    protected void onDraw(Canvas canvas) {
        super.onDraw(canvas);
        //画笔颜色
        mPaint.setColor(Color.RED);
        //设置为描边
        mPaint.setStyle(Paint.Style.STROKE);
        //移动到左边屏幕中间
        mPath.moveTo(0.0f , getHeight()/2);
        //贝斯阿尔曲线
        mPath.quadTo(getWidth()/8,getHeight()/2-100,getWidth()/4,getHeight()/2);
        mPath.quadTo(3*getWidth()/8,getHeight()/2+100,getWidth()/2,getHeight()/2);
        mPath.quadTo(5*getWidth()/8,getHeight()/2-100,3*getWidth()/4,getHeight()/2);
        mPath.quadTo(7*getWidth()/8,getHeight()/2+100,getWidth(),getHeight()/2);
        //在画布上绘制
        canvas.drawPath(mPath,mPaint);

    }
Efecto:

El efecto está fuera, solo deje que la curva se mueva, aquí hay un método simple, alargue la curva, más allá del lado izquierdo de la pantalla, y luego muévase hacia la derecha, use ValueAnimator
Gráficos teóricos:
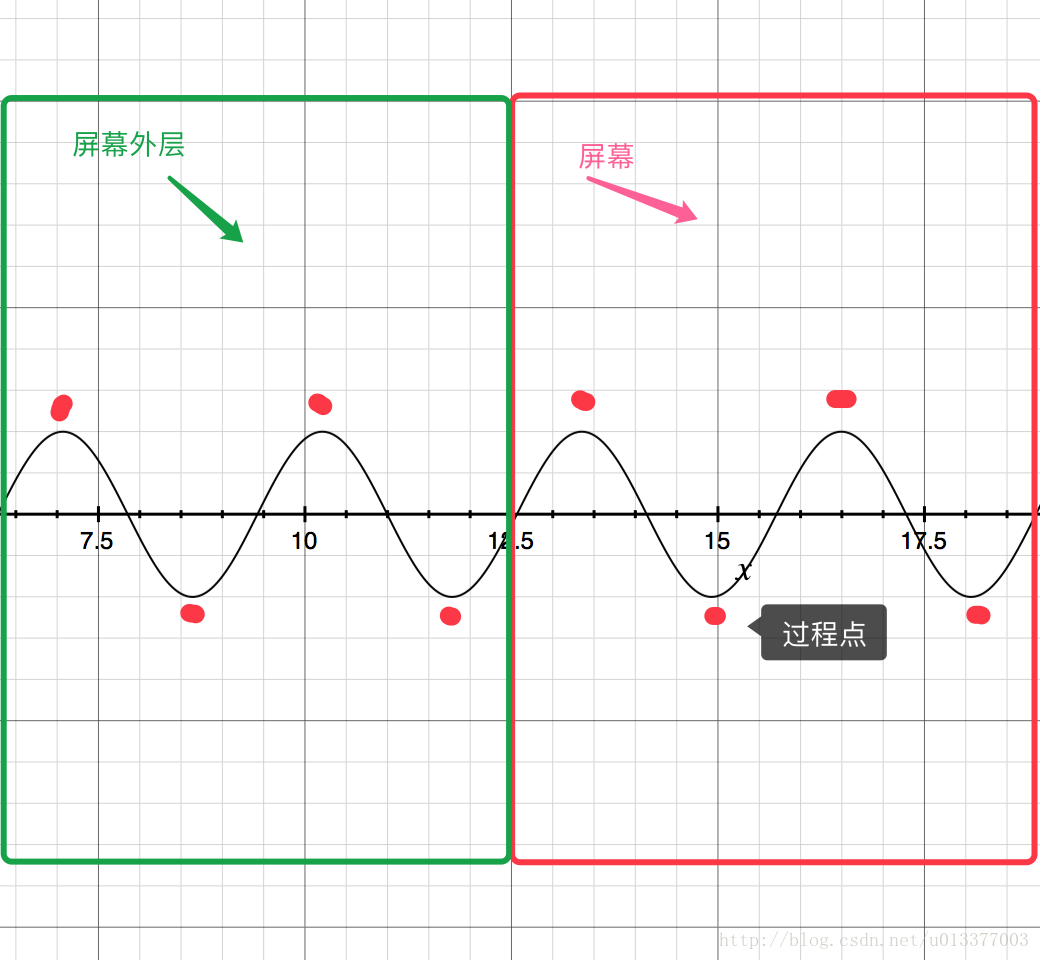
Dibuje dicha curva y luego cambie continuamente el desplazamiento del eje x, el código anterior:
@Override
protected void onDraw(Canvas canvas) {
    super.onDraw(canvas);
    //画笔颜色
    mPaint.setColor(Color.RED);
    //设置为描边
    mPaint.setStyle(Paint.Style.STROKE);
    //初始化,不然会重复绘制
    mPath.reset();
    //移动到左边屏幕中间
    mPath.moveTo(0.0f , getHeight()/2);
    //贝斯阿尔曲线
    mPath.quadTo(-7 * getWidth() / 8 + offset, getHeight()/2 - 100, -3*getWidth() / 4 + offset, getHeight()/2);
    mPath.quadTo(-5 * getWidth() / 8 + offset, getHeight()/2 + 100, -getWidth()/2+offset, getHeight()/2);
    mPath.quadTo(-3 * getWidth() / 8 + offset, getHeight()/2 - 100, -getWidth() / 4 + offset, getHeight()/2);
    mPath.quadTo(-1 * getWidth() / 8 + offset, getHeight()/2 + 100, offset, getHeight()/2);

    mPath.quadTo(1 * getWidth() / 8 + offset, getHeight()/2 - 100, getWidth() / 4 + offset, getHeight()/2);
    mPath.quadTo(3 * getWidth() / 8 + offset, getHeight()/2 + 100, getWidth()/2 + offset, getHeight()/2);
    mPath.quadTo(5 * getWidth() / 8 + offset, getHeight()/2 - 100, 3*getWidth() / 4 + offset, getHeight()/2);
    mPath.quadTo(7 * getWidth() / 8 + offset, getHeight()/2 + 100, getWidth() + offset, getHeight()/2);
    //在画布上绘制
    canvas.drawPath(mPath,mPaint);

}
Por supuesto, debe establecer un valor inicial de compensación de 0. El efecto no cambia mucho, porque la mitad de la curva está en el lado izquierdo de la pantalla y no se puede ver.
Añadir efectos de animación:
    private void xController() {
        ValueAnimator mAnimator = ValueAnimator.ofFloat(0, getWidth());
        mAnimator.setInterpolator(new LinearInterpolator());
        mAnimator.addUpdateListener(new ValueAnimator.AnimatorUpdateListener() {
            @Override
            public void onAnimationUpdate(ValueAnimator valueAnimator) {
                float animatorValue = (float) valueAnimator.getAnimatedValue();
                offset = animatorValue;//不断的设置偏移量,并重画
                postInvalidate();

            }
        });
        mAnimator.setDuration(1000);
        mAnimator.setRepeatCount(ValueAnimator.INFINITE);
        mAnimator.start();
    }
Agregue el método xcontroller() en el método onLayout()
Representaciones:
Curva dinámica completa
El siguiente es el color de relleno:
Cambiar el estilo de pincel a LLENAR
Código anterior:
 @Override
    protected void onDraw(Canvas canvas) {
        super.onDraw(canvas);
        //画笔颜色
        mPaint.setColor(Color.RED);
        //改变模式为填充 fill
        mPaint.setStyle(Paint.Style.FILL);
        //初始化,不然会重复绘制
        mPath.reset();
        //移动到左边屏幕中间
        mPath.moveTo(0.0f , getHeight()/2);
        //贝斯阿尔曲线
        mPath.quadTo(-7 * getWidth() / 8 + offset, getHeight()/2 - 100, -3*getWidth() / 4 + offset, getHeight()/2);
        mPath.quadTo(-5 * getWidth() / 8 + offset, getHeight()/2 + 100, -getWidth()/2+offset, getHeight()/2);
        mPath.quadTo(-3 * getWidth() / 8 + offset, getHeight()/2 - 100, -getWidth() / 4 + offset, getHeight()/2);
        mPath.quadTo(-1 * getWidth() / 8 + offset, getHeight()/2 + 100, offset, getHeight()/2);

        mPath.quadTo(1 * getWidth() / 8 + offset, getHeight()/2 - 100, getWidth() / 4 + offset, getHeight()/2);
        mPath.quadTo(3 * getWidth() / 8 + offset, getHeight()/2 + 100, getWidth()/2 + offset, getHeight()/2);
        mPath.quadTo(5 * getWidth() / 8 + offset, getHeight()/2 - 100, 3*getWidth() / 4 + offset, getHeight()/2);
        mPath.quadTo(7 * getWidth() / 8 + offset, getHeight()/2 + 100, getWidth() + offset, getHeight()/2);
        //贝塞尔曲线中点为屏幕右端竖直方向的中点,所以选取屏幕上方作为一条线的中点
        mPath.lineTo(getWidth(),0);
        //在移动到屏幕起始点,形成闭区间
        mPath.lineTo(0,0);

        //在画布上绘制
        canvas.drawPath(mPath,mPaint);

    }
Representaciones:
Por qué es hacia arriba, lo siguiente introducirá:
Hay un modo en Android llamado método superpuesto PorterDuff.Mode de este tipo
Si desea obtener más información sobre la superposición de lienzo de búsqueda de Android, no lo explicaré aquí. Los amigos que tienen necesidades pueden dejar un mensaje y responderán a tiempo.
Superposición significa la intersección de dos gráficos. La forma en que lo uso es para eliminar el modo CLEAR para una superposición de superficie similar a un círculo.
Primero dibuja un círculo:
        float radius = 150.0f;
//        Log.i(TAG, "onDraw: "+getWidth());
        mPaint.setColor(Color.YELLOW);
        mPaint.setStyle(Paint.Style.FILL);
        int layerId = canvas.saveLayer(0, 0, getWidth(), getHeight(), null, Canvas.ALL_SAVE_FLAG);//创建透明图层
        canvas.drawCircle(getWidth() / 2, getHeight() / 2, radius, mPaint);
Primero hablemos de la capa transparente, porque no se crea un efecto de superposición en el lienzo original, por lo que no se puede usar la superposición del lienzo. Lo mejor es crear una capa para el asiento (creé una capa transparente para toda la pantalla )
Código completo:
 @Override
    protected void onDraw(Canvas canvas) {
        super.onDraw(canvas);

        float radius = 150.0f;
//        Log.i(TAG, "onDraw: "+getWidth());
        mPaint.setColor(Color.YELLOW);
        mPaint.setStyle(Paint.Style.FILL);
        int layerId = canvas.saveLayer(0, 0, getWidth(), getHeight(), null, Canvas.ALL_SAVE_FLAG);//创建透明图层
        canvas.drawCircle(getWidth() / 2, getHeight() / 2, radius, mPaint);


        //画笔颜色
        mPaint.setColor(Color.RED);
        //改变模式为填充 fill
        mPaint.setStyle(Paint.Style.FILL);
        //设置图层叠加样式
        mPaint.setXfermode(new PorterDuffXfermode(PorterDuff.Mode.CLEAR));
        //初始化,不然会重复绘制
        mPath.reset();
        //移动到左边屏幕中间
        mPath.moveTo(0.0f , getHeight()/2);
        //贝斯阿尔曲线
        mPath.quadTo(-7 * getWidth() / 8 + offset, getHeight()/2 - 100, -3*getWidth() / 4 + offset, getHeight()/2);
        mPath.quadTo(-5 * getWidth() / 8 + offset, getHeight()/2 + 100, -getWidth()/2+offset, getHeight()/2);
        mPath.quadTo(-3 * getWidth() / 8 + offset, getHeight()/2 - 100, -getWidth() / 4 + offset, getHeight()/2);
        mPath.quadTo(-1 * getWidth() / 8 + offset, getHeight()/2 + 100, offset, getHeight()/2);

        mPath.quadTo(1 * getWidth() / 8 + offset, getHeight()/2 - 100, getWidth() / 4 + offset, getHeight()/2);
        mPath.quadTo(3 * getWidth() / 8 + offset, getHeight()/2 + 100, getWidth()/2 + offset, getHeight()/2);
        mPath.quadTo(5 * getWidth() / 8 + offset, getHeight()/2 - 100, 3*getWidth() / 4 + offset, getHeight()/2);
        mPath.quadTo(7 * getWidth() / 8 + offset, getHeight()/2 + 100, getWidth() + offset, getHeight()/2);
        //贝塞尔曲线中点为屏幕右端竖直方向的中点,所以选取屏幕上方作为一条线的中点
        mPath.lineTo(getWidth(),0);
        //在移动到屏幕起始点,形成闭区间
        mPath.lineTo(0,0);

        //在画布上绘制
        canvas.drawPath(mPath,mPaint);
        //取消样式
        mPaint.setXfermode(null);
        //在 onDraw 之前保存画笔等的状态,便于下次直接使用画笔等工具
        canvas.restoreToCount(layerId);

        //绘制边界
        mPaint.setColor(Color.BLACK);
        mPaint.setStyle(Paint.Style.STROKE);
        canvas.drawCircle(getWidth() / 2, getHeight() / 2, radius, mPaint);

    }
salida estática terminada
Ahora necesita agregar algunas cosas dinámicas: línea de base (la curva sube lentamente), la densidad de la curva, etc. Aquí hay una demostración simple, así que simplemente hice el siguiente método
Código completo:
package com.riti.testview;

import android.animation.ValueAnimator;
import android.content.Context;
import android.graphics.Canvas;
import android.graphics.Color;
import android.graphics.Paint;
import android.graphics.Path;
import android.graphics.PorterDuff;
import android.graphics.PorterDuffXfermode;
import android.os.Build;
import android.support.annotation.Nullable;
import android.support.annotation.RequiresApi;
import android.util.AttributeSet;
import android.util.Log;
import android.view.View;
import android.view.animation.LinearInterpolator;

/**
 * Created by YZBbanban on 2018/2/28.
 */

public class WareView extends View {
    private Paint mPaint;
    private Path mPath;
    private float offset;//偏移量
    private float baseLine;//基线


    public WareView(Context context) {
        super(context);
        init();
    }

    public WareView(Context context, @Nullable AttributeSet attrs) {
        super(context, attrs);
        init();
    }

    public WareView(Context context, @Nullable AttributeSet attrs, int defStyleAttr) {
        super(context, attrs, defStyleAttr);
        init();
    }

    private void init() {
        mPaint = new Paint();
        mPaint.setAntiAlias(true);
        mPaint.setDither(true);
        mPath = new Path();

    }

    @Override
    protected void onMeasure(int widthMeasureSpec, int heightMeasureSpec) {
        super.onMeasure(widthMeasureSpec, heightMeasureSpec);
        baseLine = MeasureSpec.getSize(heightMeasureSpec) / 2 + 150;
        Log.i(TAG, "onMeasure---->: " + baseLine);
    }

    @Override
    protected void onLayout(boolean changed, int left, int top, int right, int bottom) {
        super.onLayout(changed, left, top, right, bottom);
        xController();
    }

    @RequiresApi(api = Build.VERSION_CODES.KITKAT)
    @Override
    protected void onDraw(Canvas canvas) {
        super.onDraw(canvas);
        float radius = 150.0f;
//        Log.i(TAG, "onDraw: "+getWidth());
        mPaint.setColor(Color.YELLOW);
        mPaint.setStyle(Paint.Style.FILL);
        int layerId = canvas.saveLayer(0, 0, getWidth(), getHeight(), null, Canvas.ALL_SAVE_FLAG);//创建透明图层
        canvas.drawCircle(getWidth() / 2, getHeight() / 2, radius, mPaint);

        mPaint.setColor(Color.YELLOW);
        mPaint.setStyle(Paint.Style.FILL);
        mPaint.setXfermode(new PorterDuffXfermode(PorterDuff.Mode.CLEAR));
        mPath.reset();
        mPath.moveTo(-getWidth() + offset, baseLine);

        //曲线密集度,8个周期 可自行添加或用属性设置,这里不做演示,有要求可留言
        int wareStep = 8;
        for (int i = 0; i < wareStep; i++) {
            float base = baseLine;
            if (i % 2 == 0) {
                base = base + 30f;
            } else {
                base = base - 30f;
            }
            mPath.quadTo(
                    (2 * i - wareStep + 1) * getWidth() / wareStep + offset,
                    base,
                    2 * (i - 3) * getWidth() / wareStep + offset,
                    baseLine);
        }

//        mPath.quadTo(-7 * getWidth() / 8 + offset, baseLine - 30, -3*getWidth() / 4 + offset, baseLine);
//        mPath.quadTo(-5 * getWidth() / 8 + offset, baseLine + 30, -getWidth()/2+offset, baseLine);
//        mPath.quadTo(-3 * getWidth() / 8 + offset, baseLine - 30, -getWidth() / 4 + offset, baseLine);
//        mPath.quadTo(-1 * getWidth() / 8 + offset, baseLine + 30, offset, baseLine);
//
//        mPath.quadTo(1 * getWidth() / 8 + offset, baseLine - 30, getWidth() / 4 + offset, baseLine);
//        mPath.quadTo(3 * getWidth() / 8 + offset, baseLine + 30, getWidth()/2 + offset, baseLine);
//        mPath.quadTo(5 * getWidth() / 8 + offset, baseLine - 30, 3*getWidth() / 4 + offset, baseLine);
//        mPath.quadTo(7 * getWidth() / 8 + offset, baseLine + 30, getWidth() + offset, baseLine);

        mPath.lineTo(getWidth(), 0.0f);
        mPath.lineTo(-getWidth() + offset, 0.0f);
        mPath.close();


        canvas.drawPath(mPath, mPaint);

        mPaint.setXfermode(null);
        canvas.restoreToCount(layerId);

        mPaint.setColor(Color.BLACK);
        mPaint.setStyle(Paint.Style.STROKE);
        canvas.drawCircle(getWidth() / 2, getHeight() / 2, radius, mPaint);
    }

    private void xController() {
        ValueAnimator mAnimator = ValueAnimator.ofFloat(0, getWidth());
        mAnimator.setInterpolator(new LinearInterpolator());
        mAnimator.addUpdateListener(new ValueAnimator.AnimatorUpdateListener() {
            @Override
            public void onAnimationUpdate(ValueAnimator valueAnimator) {
                float animatorValue = (float) valueAnimator.getAnimatedValue();
                offset = animatorValue;//不断的设置偏移量,并重画
                postInvalidate();

            }
        });
        mAnimator.setDuration(1000);
        mAnimator.setRepeatCount(ValueAnimator.INFINITE);
        mAnimator.start();
    }

    private static final String TAG = "WareView";

    public void setProcess(int process) {
        Log.i(TAG, "setProcess: " + process);
        //[-150,150]
        float step = process * 3f;

        float pro = getHeight() / 2 + (150f - step);
        Log.i(TAG, "setProcess getWidth: " + getWidth());
        Log.i(TAG, "pro: " + pro);

        this.baseLine = pro;
    }
}
Dirección del proyecto: https://github.com/yzbbanban/TestView