Caso de producción de efectos especiales
Resumen del caso
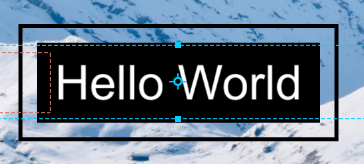
Haremos un título con un borde y elementos estirables al mismo tiempo, para que pueda lograr algunos efectos de subtítulos complejos. Primero, echemos un vistazo a los siguientes ejemplos de efectos.


Ideas creativas
1. Todo el efecto tiene un borde general del texto, que se utiliza para especificar la anchura y la altura máximas del texto que se puede escribir.
2. El fondo negro y las líneas se estirarán de acuerdo con el texto de entrada real, para que siempre se incluyan alrededor del texto real.
3. Se agregarán efectos de animación al principio y al final de este texto de efecto.
4. Hemos proporcionado los materiales de producción correspondientes en la carpeta de tutoriales.
Flujo de producción
Paso 1: inicie el software
| Descripción del flujo |
|
| A |
Primero inicie el software e ingrese al módulo de producción de subtítulos |
| B |
Primero reemplace una imagen de fondo para una mejor visualización
|

Paso 2: establece los atributos del texto en sí
| Descripción del flujo |
|
| A |
Establezca los atributos del subtítulo en sí, los parámetros específicos son los siguientes
|
El tercer paso: configurar el texto en sí mismo dentro y fuera de la animación
Aquí primero debemos enfatizar un concepto. Para una herramienta de producción, el título es una pista con una longitud fija, pero en el uso real del título, el usuario puede arrastrar la longitud del título por sí mismo, por lo que hemos introducido el [in stop out] El concepto ingresa al título, como se muestra en la figura siguiente

En la herramienta, cambiamos la animación de la pista de texto en tres partes: en animación, fuera de animación y posición de parada.
1. En el diseño, el diseñador aún puede configurar una animación completa de un texto para que aparezca o desaparezca.
2. Puede establecer la posición de detención del texto arrastrando el control deslizante rojo
3. Antes de la posición de parada, se utilizará como un intervalo dentro de la animación, y después de la posición de parada es un intervalo fuera de la animación.
4. Cuando el usuario usa un título, independientemente de la longitud del arrastre, primero mostrará todos los efectos de texto en el intervalo de animación, y luego la parte estirada permanecerá en la posición detenida, y finalmente el efecto de intervalo de animación de salida será realizado al final
| Descripción del flujo |
|
| A |
Primero arrastre el control deslizante rojo para establecer la posición del título para que se detenga en 600 ms |
| B |
Establezca el fotograma clave del valor de [opacidad] de la pista de subtítulos, los parámetros específicos son los siguientes: tiempo clave = "0" Valor = 0 tiempo clave = " 360 " Valor = 0 tiempo clave = " 440 " Valor = 1 tiempo clave = " 600 " Valor = 1 tiempo clave = " 760 " Valor = 1 key time="840" Value=0 key time="1200"Value=0 |
Step 4: Set the black background
Since the black background contains in animation, stop and out animation, it is realized by three tracks respectively
| In animation flow description |
|
| A |
Import a black image from the material library and place it under the text track |
| B |
Set the image as a stretched element, change [Normal] to [Stretched element] on the track, and set the track attribute to [Normal] |
| C |
Click [Settings] to pop up the four sides of the stretched element, first click the middle of the Sudoku, as the four sides have a stretching relationship with the text box, and set the offset values of the four sides to "-32, 32, -20, 20"
|
| D |
Cancel the transformation data of the synchronized caption track, and then click Apply |
| E |
Set the start time of the track to 0 and the length to 600ms |
| F |
Set the zoom key frame value of the track as follows key time="0" value="0.00,0.00" key time="40" value="0.46,0.46" key time="80" value="0.65,0.65" key time="120" value="0.76,0.76" key time="160" value="0.83,0.83" key time="200" value="0.89,0.89" key time="240" value="0.92,0.92" key time="280" value="0.95,0.95" key time="320" value="0.97,0.97" key time="360" value="0.98,0.98" key time="400" value="0.992,0.992" key time="440" value="0.997,0.997" <key time="480" value="1,1"
|


| Stop style flow description |
|
| A |
Continue to drag the black image onto the track |
| B |
Set the track properties to [stop style] |
| C |
Set the track to [stretch element] |
| D |
Click [Settings] to pop up the four sides of the stretched element, first click the middle of the sudoku, as the four sides have a stretching relationship with the text box, and set the offset values of the four sides to "-32, 32, -20, 20"
|

| Out animation flow description |
|
| A |
Import a black image from the material library and place it under the text track |
| B |
The track attribute is [Out animation], the starting position of the track at this time is from the stop to the end of the caption |
| C |
Set the image as a stretched element, change [Normal] to [Stretched Element] on the track, and click [Set] to pop up the four sides of the stretched element. First, click the middle of the sudoku, as the four sides and the text box are pulled together Extend the relationship, and set the offset values of the four sides to "-32, 32, -20, 20" |
| D |
Cancel the transformation data of the synchronized caption track, and then click Apply |
| E |
Set the start time of the track to 0 and the length to 600ms |
| F |
Set the zoom keyframe value of the track as follows key time="720" value="1,1" key time="760" value="0.997,0.997" key time="800" value="0.992,0.992" key time="840" value="0.98,0.98" key time="880" value="0.97,0.97" key time="920" value="0.95,0.95" key time="960" value="0.92,0.92" key time="1000" value="0.89,0.89" key time="1040" value="0.83,0.83" key time="1080" value="0.76,0.76" key time="1120" value="0.65,0.65" key time="1160" value="0.46,0.46" key time="1200" value="0.00,0.00"
|

At this point we have completed the animation of the image and the black background image, and the effect can be seen when playing
Step 5: Set the black frame around
We still use this black solid color image to make the black frame around, and there are still three parts of the concept of in animation, stop style and out animation.
| In animation flow description |
|
| A |
Among them, the in animation has an overall scaling of the frame, so we introduce the concept of group, first create a group |
| B |
Then drag in four black pictures and set the track properties of the pictures to [Normal] |
| C |
Set all four pictures as group 1 |
| D |
Set all four tracks as stretch elements, and set the parameter values of each stretch element separately as follows A. Black picture 1, click [left middle] and set the offset to "-60, -54, 48, -48" B. Black picture 2, click [right middle] and set the offset to "54, 60, 48, -48" C. Black picture 3, click [bottom center] and set the offset to "-54, 54, -42, -48" D. Black picture 4, click [Top Center] and set the offset to "-54, 54, 48, 42" So we see a black frame composed of four pictures
|
| E |
Set the zoom keyframe on the group key time="0" value="1.25,1.25" key time="40" value="1.247,1.247" key time="80" value="1.235,1.235" key time="120" value="1.21,1.21" key time="160" value="1.18,1.18" key time="200" value="1.14,1.14" key time="240" value="1.104,1.104" key time="280" value="1.075,1.075" key time="320" value="1.053,1.053" key time="360" value="1.036,1.036" key time="400" value="1.023,1.023" key time="440" value="1.014,1.014" key time="480" value="1.008,1.008" key time="520" value="1.003,1.003" key time="560" value="1.001,1.001" key time="600" value="1.00,1.00"
|
| F |
Set the opacity keyframe on the group key time="0" value="0" key time="40" value="0.20" key time="80" value="0.40" key time="120" value="0.60" key time="160" value="0.80" key time="200" value="1" When the following parameters are set, we can see that the in animation of the frame is completed
|

| Stop style flow description |
|
| A |
The overall stop style is consistent with the logic of the black bottom plate just now. The specific operations are as follows |
| B |
First drag 4 black pictures into the track |
| C |
Set these four picture track properties to stop style |
| D |
Set four tracks as [stretch elements] |
| E |
Set the stretch value of the four pictures separately
A. Black picture 1, click [left middle] and set the offset to "-60, -54, 48, -48" B. Black picture 2, click [right middle] and set the offset to "54, 60, 48, -48" C. Black picture 3, click [bottom center] and set the offset to "-54, 54, -42, -48" D. Black picture 4, click [Top Center] and set the offset to "-54, 54, 48, 42" Then the stop style is set
|

| Out animation flow description |
|
| A |
The out animation is used to set the disappearing method of the frame. Since the position is to consider each current effect, the related group concept is no longer introduced. The specific flow is as follows |
| B |
First drag 4 black pictures into the track |
| C |
Set these four picture track properties as out animation |
| D |
Set four tracks as [stretch elements] |
| E |
Set the stretch value of the four pictures separately
|
| F |
Separate the zoom and opacity key frames of each picture. Since the parameter values of the four sides are the same, you can set a copy |
| G |
Set zoom keyframe key time="0" value="1" key time="40" value="1.001" key time="80" value="1.003" key time="120" value="1.008" key time="160" value="1.014" key time="200" value="1.023" key time="240" value="1.036" key time="280" value="1.053" key time="320" value="1.075" key time="360" value="1.104" key time="400" value="1.14" key time="440" value="1.18" key time="480" value="1.21" key time="520" value="1.235" key time="560" value="1.247" key time="600" value="1.25" |
| H |
Set opacity keyframe key time="0" value="1" key time="440" value="0.80" key time="480" value="0.60" key time="520" value="0.40" key time="560" value="0.20" key time="600" value="0"
After setting the out animation, the whole effect is complete, you can click play to view the effect |
Step 6: Export the material package
Click the Generate Special Effect button in the upper right corner to generate special effects, please note the following
1. Export ID number settings
2. Set the Chinese and English name of the caption package
3. If the material package is upgraded under the same ID, please update the version number
4. Click Export to complete
