I. Glossary description
qemu: virtual machine, the machine used to simulate some kind of physical infrastructure, so that we can simulate the launch of the operating system boot from power-on to the final
grub2: bootloader, for loading linux kernel (vmlinuz) and initrd (ram disk, memory file system)
busybox: for the production of the final root file system (rootfs), which is at the root of our ubuntu and other releases of the operating system /
ram disk (initrd, initram): where initrd ram disk and initram is a file format it comes to the above busybox is the ultimate root file system (rootfs), that ram disk is linux operating system for the transition to the rootfs intermediate the root file system root file system. As it will be a temporary root file system is first used to mount linux operating system, and then finally switched to rootfs file system (busybox generated above)
NOTE: linux reason ram disk is required, although the bootloader program capable of identifying the disk (e.g. grub ext can identify the type of file system), but the bootloader code is, and when the control referred bootloader linux operating system, linux operating the current system can not predict what kind of file system format, so there are two ways to complete, is the first of all the type of file system driver code are all statically compiled into the linux operating system, but this is the case not only linux kernel code to increase the amount, but if the file system type or have migrated to upgrade, you will need to recompile the linux operating system. Then the second is now using linux now, bootloader initrd will advance pre-loaded into memory, and then the start address and end address to the linux operating system, linux is inherently capable of operating memory and initrd file system type is fixed and therefore we know linux file system stored in the memory of what type of data. Therefore, it can serve as the root directory, and load other types of file system drive so that you can read rootfs actual disk, and finally complete the switch
vmlinuz: linux actual kernel file, which mainly consists of three parts:
A first portion (code mode switching): 16-bit real-bit protected mode code is the code +32 +64 bit length mode code
Part II: extracting kernel code
Part III: compressed kernel code, after being unpacked for the elf file format, the final kernel running kernel code, preceded by the first and second part can be said to be ready to stage the environment
Second, the kernel boot process
1. Turn on power up
2.bios program execution
3. Detection of individual disks MBR (Master Boot Record) Status Bit
4. For active mbr disk (512 byte, the end of 0xAA55), loading the data before the disk 512byte as bootloader code (this is the code of grub2)
5.bootloader run, i.e. grub2 bootloader program execution, which detects the partition table (partition tables are in the 512 byte mbr, which is also near the end of the mbr, as shown below: Since grub2 bootloader can identify the type of file system ext , through the mbr partition table information, to know the location of each partition and the partition type of file system, such grub2 bootloader will be able to read this file partition /boot/grub/grub.cfg path information. Thus bootloader It will be loaded into memory by the vmlinuz initrd position and configuration files, and switching control to a kernel code vmlinuz

6.vmlinuz begin executing code from the beginning, the code execution flow substantially
1) arch / x86 / boot / header.S into the 16-bit real mode code (Physical Address = linear segment register address = offset << 4+)
2) Jump to arch / x86 / boot / main.c mounted idt and GDT (global descriptor table, since the switching back to the 32-bit protected mode segment register value saved, called the segment selector, and for the gdtr calculated address value with the actual permissions segment register start address, access address and the size, etc., then the physical address = address = thread start address + offset)
3) Jump to arch / x86 / boot / pmjump.S, cr0 position of control register 1 is turned on PE 32-bit protected mode, the protected mode and jumps to the code, i.e., now a 32-bit register can be stored as a segment register and a segment selectors
4) Jump to arch / x86 / boot / compressed / head_64.S, 64 bits long patterns prepared for handover, reconfiguration of gdtr value, the value of the initialization words cr3 (tab preparation), the PAE open, open EFER.LME Finally, the sort mode is provided cr0 open, so long into the 64-bit mode.
5) then calls extract_kernel extract the linux kernel code to obtain elf format, and the file format according elf kernel address space into the correct position, and then jump to start_kernel function, which will be passed bootloader initrd parameters as a basis for initrd mount the file system as the root, and read the actual basis of the root file system rootfs initrd, and completing the handover, the calling init final rootfs root file system (default / sbin / init) of a user program, to switch to user programs and associated system initialization environment
Third, the needs of the environment
1.ubuntu (quickly get vmlinuz and initrd)
The X-os 2. Mac ( QEMU installation of the machine, the effect should be the same theory linux and windows installed qemu, pointed out here just because they are tested on mac os x operating system )
Fourth, make a boot file
The operation is completed at ubuntu
1. Get vmlinuz
After the series in order to quickly start up and see the effect of linux, ubuntu can take under direct / boot / vmlinuz-xxx-xxx-generic use, compiled to explain the situation has a lot of online articles, and other effects can be linked together, and then you try also can compile your own kernel
2. Obtain initrd- memory file system
Also available from /boot/initrd.img-xxx-xxx-generic under ubuntu, if you want to see the memory storage file system in the end what can be obtained by following the instruction, in fact, its first since it is the root file system , and then we will release in ubuntu and other operating systems see the root file system is similar.
mkdir initrd
cd initrd
cp /boot/initrd.img-x.x.x-xxx-generic ./initrd.img.gz
gunzip initrd.img.gz
cpio -ivmd < initrd.img
Below you can see a similar file structure:
3. Make a boot file (start.img = mbr + rootfs)
1) Create a 100M startup files, used to simulate the subsequent physical disk
touch start.img
dd if=/dev/zero of=./start.img bs=1M count=100
2) disk partition
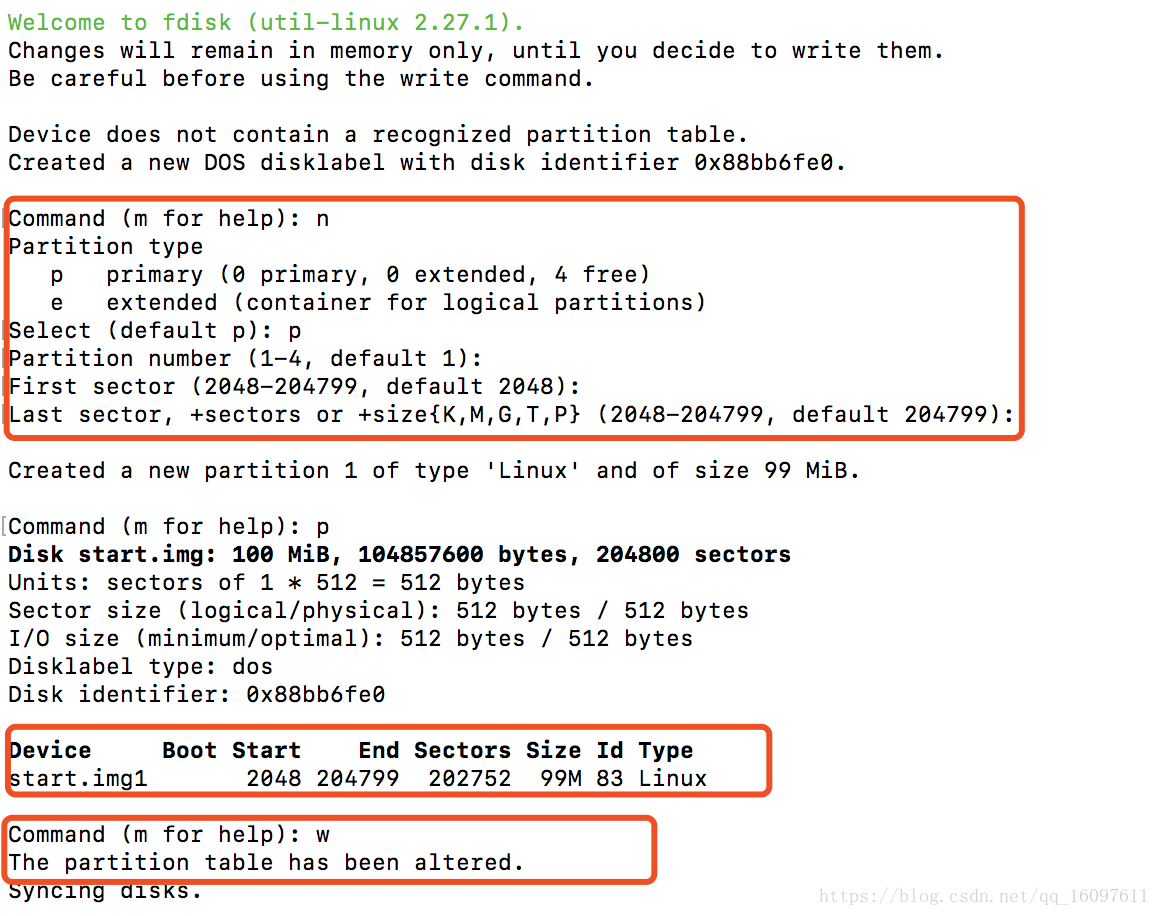
fdisk start.img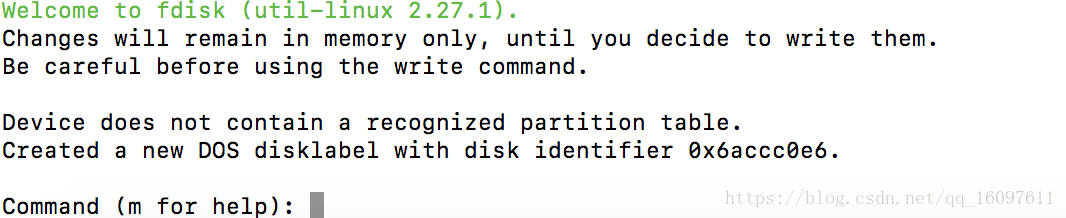
Enter n to create a partition for the production of rootfs root file system, you can see the first partition is created start.img1, size 99M ( Remember to enter w save changes ):
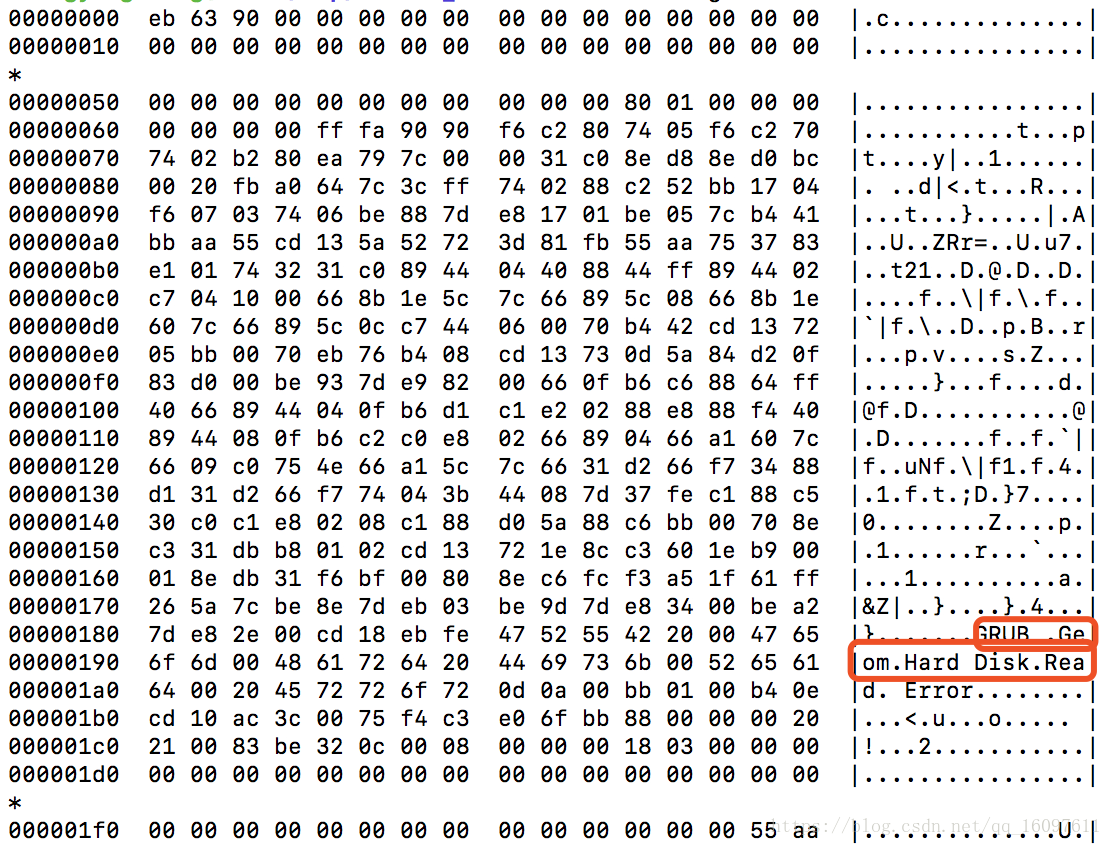
Then the command hd (hexdump) command to view the contents of the first 512 bytes (hereinafter as mbr structure):
hd start.img -n 512Can be seen that the front end 512 start.img byte is 0x55 0xAA (stored during the previous low, high in the post, so 0xAA55 i.e., indicate to MBR, and is active state), the other from 00 20 21 00 83 be 32 0c 00 08 00 00 00 00 18 03 00 for the first disk partition entry, is used to describe information about the partition, which is also the mbr:

3) make the root file system rootfs
The start.img first partition is formatted as ext4 file system:
sudo losetup /dev/loop0 start.img // 将start.img关联到/dev/loop0设备,这样linux操作系统可以将start.img当作块设备(磁盘)来进行操作
sudo kpartx -av /dev/loop0 // 将start.img的分区生成设备到/dev/mapper中,这里第一个分区即为/dev/mapper/loop0p1
sudo mkfs.ext4 /dev/mapper/loop0p1 // 将start.img的第一个分区格式化为ext4文件系统
Mount the first partition, start making rootfs root file system:
mkdir rootfs
sudo mount /dev/mapper/loop0p1 rootfs // 这样便可以对第一个分区的文件系统进行文件目录等操作了
Compile busybox (here select the dynamic compilation , subsequent ping network will statically compiled a bug):
mkdir busybox
cd busybox
wget https://busybox.net/downloads/busybox-1.29.3.tar.bz2
tar -xjf busybox-1.29.3.tar.bz2
cd busybox-1.29.3
make menuconfig // 生成busybox的配置文件,因为需要动态编译,默认这个版本就是动态编译,所以直接退出保存就可以
make
make install //会将文件到安装到当前目录的_install下
Because it is dynamic compilation, you need to view the command in the bin and sbin dynamic .so what files need to, you can use the ldd command to see:
ldd bin/pingWill find mainly relies on the file in the / lib / x86_64-linux-gnu and / lib64 directory, so copied on it:

sudo mkdir lib
sudo cp -r /lib/x86_64-linux-gnu/ ./lib/
sudo cp -r /lib64 ./
Preparations almost ready, start making rootfs root file system:
cd rootfs // 到达之前挂载第一分区的rootfs目录下
sudo cp -r busybox/busybox-1.29.3/_install/* ./ // 将之前编译的busybox的_install目录下的所有文件都拷贝过来
According to the above operation, we have a rootfs root file system, the root file system rootfs mounted in the first partition
Now that we have mbr, mbr and have been described in the first partition, and the first partition has been made into rootfs root file system, then also the lack of bios program jumps to the grub2 bootloader program in the mbr and grub2 Find the path to the location of the vmlinuz and initrd.img.
4) Installation grub2 bootloader
cd rootfs
sudo mkdir -p boot/grub
sudo grub-install --root-directory=/tmp/rootfs_learn/rootfs /dev/loop0 // 意思是将grub2 bootloader程序安装到start.img的mbr中(前512字节的代码内容),以及将grub启动过程中需要的一些驱动文件安装到根目录下的boot/grub目录下
Can view hd start.img -n 512, you can see what is in front of the whole is no longer 0, but also through the right side of the character described see some grub, grub will be installed bootloader can know the code to the start.img mbr in:
Another can see the ls boot / grub / directory:
Such grub2 bootloader will be considered successful installation (behind will say about grub.cfg configuration)
The position information informed vmlinuz and initrd.img to grub2:
Here we first look at what we have now, we have the mbr bootloader program, we have also for the first disk partitioning start.img of storage capacity, and for the ext4 file system format and made into rootfs root file system. The grub2 bootloader program is able to identify the ext4 file system, it is able to know that the first partition in the end what is stored, so we only need to vmlinuz and initrd.img stored in the first partition, grub2 bootloader is the ability to read this two files.
Note: Due to a clerical error, the following initrd.img and initrd refer to the same file
cd rootfs
sudp cp -r /boot/vmlinuz-x.x.x-xxx-generic ./boot/
sudo cp -r /boot/initrd.img-x.x.x-xxx-generic ./boot/
sudo ln -s ./boot/vmlinuz-x.x.x-xxx-generic ./vmlinuz
sudo ln -s ./boot/initrd.img-x.x.x-xxx-generic ./initrd
Now rootfs directory is the following:
5.1 because of the use of ubuntu is the initrd.img, which will be performing its / init script as the root file system will mount some directories such as / dev, / proc, / run, etc., so you need to create some additional directories:
cd rootfs
sudo mkdir dev proc run etc root sys
6. Everything is ready, start the implementation of the document test results:
cd ../ // 到达与rootfs目录同级
sudo umount /dev/mapper/loop0p1 // 卸载start.img的第一分区
sudo dmsetup remove /dev/mapper/loop0p1 // 删除start.img第一分区所生成的设备
sudo losetup -d /dev/loop0 // 取消start.img关联到/dev/loop0设备
Such start.img startup files will be produced, will now be start.img copied to the machine is equipped with qemu (I own a macbook):
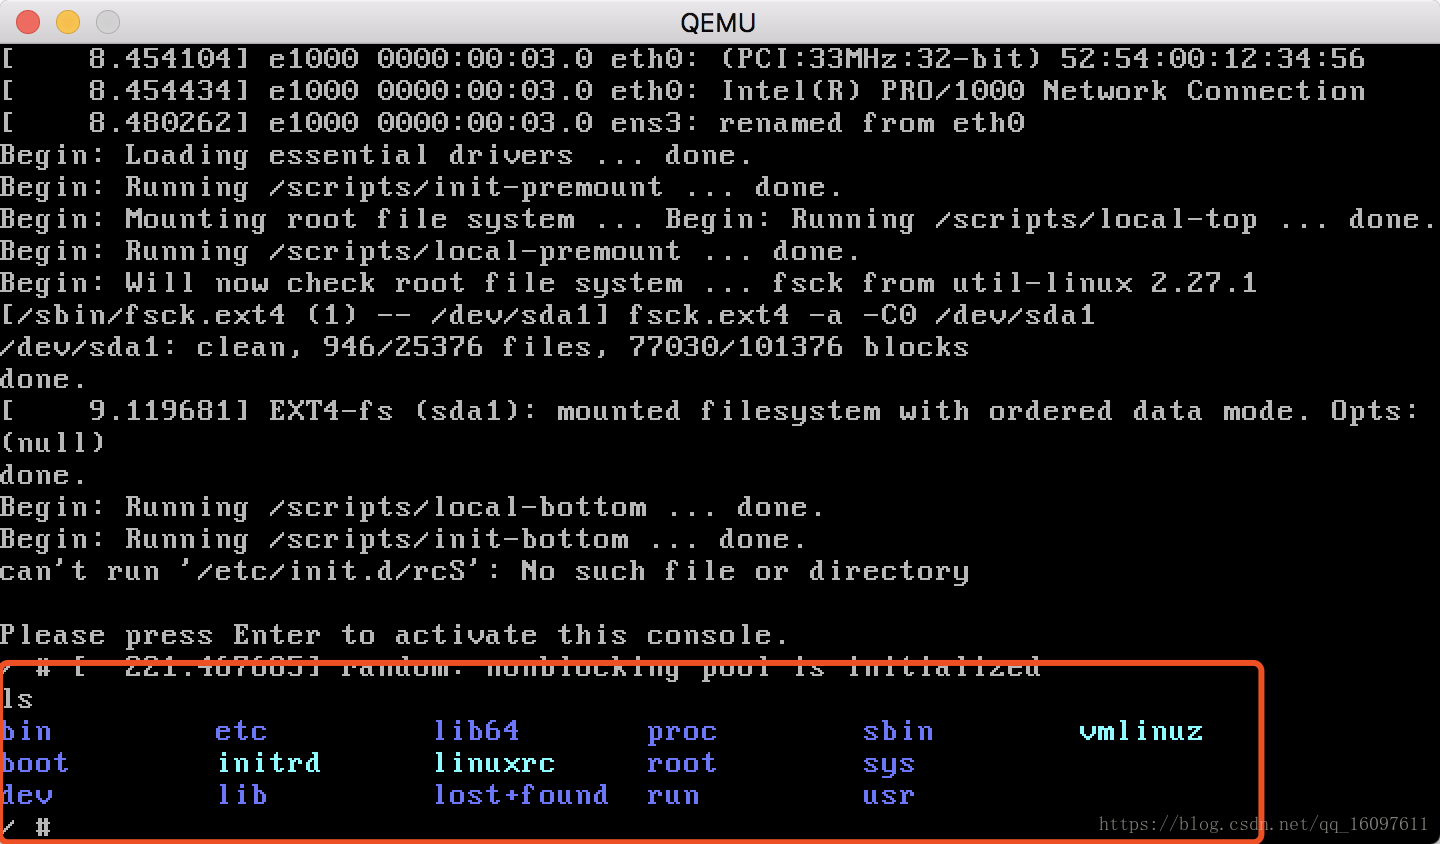
qemu-system-x86_64 -m 1024M -drive format=raw,file=start.imgStart interface will reach the grub command line mode, although grub can identify the ext4 file system, but it does not tell us specifically vmlinuz and initrd.img path, so we to tell grub two positions (which is manually set root path inform grub / vmlinuz and / initrd where the partition, where hd0, msdos1 represents a partition of a disk, i.e. start.img first partition, set prefix to inform the subsequent command grub directory location and drive where, as here, the linux commands and command initrd), and finally executing the startup boot to:

This appears below, it would mean linux kernel has been successfully started up:
Five additional operations - Optimization
1. The first program init program (Ubuntu now a first alternative program has been systemd)
Starts when the first user program linux init starts, the program will first read / etc / inittab file and initialize system environment, according to the configuration information of / etc / inittab file
So / etc / inittab as we can boot item configuration:
cd rootfs
cd etc
sudo touch inittab

# 创建第一个初始化脚本
sudo mkdir init.d
cd init.d
sudo touch rcS
sudo chmod +x rcS
/ Etc / initiab, meaning linux project calls /etc/init.d/rcS initialization script, and then executes the / bin / sh to enter a shell command mode:
::sysinit:/etc/init.d/rcS
::respawn:-/bin/sh
/etc/init.d/rcS, careful you will find that by default, when linux mount the root file system read-only file system (read-only file system), so you can make the root file system can use the following two commands write:
#!/bin/sh

mount -o remount,rw /
mount -o remount,rw
After the execution of this configuration -> / sbin / init-> read / etc / inittab-> then calls the initialization /etc/init.d/rcS -> / bin / sh shell enters command mode
Note: The above operations are the first to re-edit start.img rootfs partition in ubuntu, since the beginning of the root file system is not writable
Note: The following operations can be performed rootfs qemu start in
2. Configure user login information
Here we use / bin / login, / bin / login brief implementation process:
1. First, it will get the current hostname of the machine, and then show hostname login:
2. When the user enters a user name and password, it will read the / etc / passwd and / etc / shadow to get the correct user name and password
3. After the user logs in successfully, the program will execute the default configuration of / etc / passwd end of the call, such as / bin / sh or / bin / bash
So first configure hostname:
We hostname configuration file to / etc / hostname
cd /etc
echo "busybox" > hostname
hostname -F /etc/hostname
For every boot can load the hostname, hostname -F command we will write the file within rcS
#!/bin/sh

mount -o remount,rw /
mount -o remount,rw

hostname -F /etc/hostname
This will configure the hostname
Then we can ubuntu in / etc / passwd and / etc / shadow file copy over ( that is, log in using the root / password ), and then leaving only the root user of the line
Last Modified inittab file to:
::sysinit:/etc/init.d/rcS
::respawn:-/bin/login
3. Change / bin / sh prefix show
Now showing that the "/ #"
First, / bin / sh order to load the configuration file read / etc / profile global configuration file, and then read ~ / configuration files .bashrc
The / bin / sh prefix PS1 show for display according to the environment variables, so we can configure the PS1 in / etc / profile at
# 现在rootfs已经可以写了
cd /etc
touch profile
vi profile
PS1='[\u@\h \W]\#'
export PS1Meant to show [username @hostname path] #, showing the effect is as follows:
4. Network Configuration
The default qemu-system-x86_64, qemu is built-in user model network stack.

According to this figure may know, we want to link to external networks needs to be configured by default qemu ip: 10.0.2.2, 10.0.2.2 therefore can extranet as our gateway.
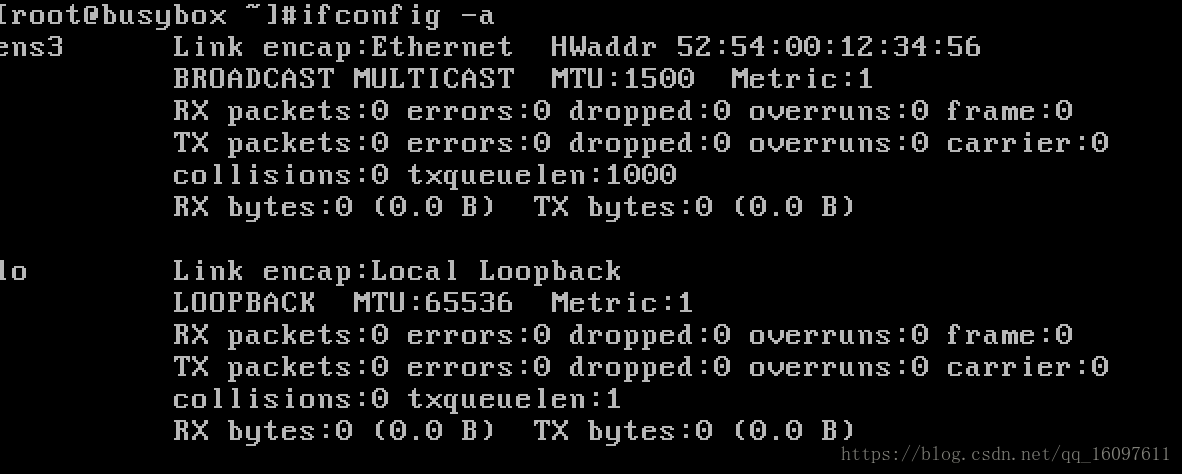
First, check the current card which, ifconfig -a, where you can see a ens3 and lo, ens3 as our external network card, and lo nature is our local loopback adapter:
Therefore, we can configure the network to / etc / network / interfaces:
auto lo
iface lo inet loopback
auto ens3
iface ens3 inet static
address 10.0.2.15
netmask 255.255.255.0
Then perform ifup ens3 up to start the network card configuration:
ifdown ens3 down
ifup ens3 up
Then configure routing, meaning that in addition to the machine ip, ip are out of the other gateway:
route add -net 0.0.0.0 netmask 0.0.0.0 gw 10.0.2.2 dev ens3
Configuring DNS services /etc/resolv.conf:
nameserver 8.8.8.8
nameserver 8.8.4.4
Can test ping www.baidu.com
Now the Internet has been through, in order to avoid the next time the machine starts or to reconfigure, / etc / init.d / rcS add the following configuration:
#!/bin/sh

mount -o remount,rw /
mount -o remount,rw

hostname -F /etc/hostname


ifdown ens3 down
ifup ens3 up

route add -net 0.0.0.0 netmask 0.0.0.0 gw 10.0.2.2 dev ens3
Another way to set up the network, is used to automatically obtain ip, manual processes, and we are almost through dhcp:
0. first start ens3 NIC, ifconfig ens3 up
1.udhcpc -i ens3, get to be assigned to our ip (udhcpc acquisition process for the network card broadcast by ens3 dhcp protocol)
2.udhcpc script executes /etc/share/udhcpc/default.script
3. script set ip and subnet mask of the card by ifconfig ens3 ip netmask
4. The script continues to call route add default dev gw operation, set up outside the network gateway routing
5. Finally, the script will set up /etc/resolv.conf address configuration of DNS service
So in the end we have to do is:
1. Copy busybox / examples / udhcp / simple.script to /usr/share/udhcpc/default.script under rootfs
2. Start NIC, ifconfig ens3 up
3. Call udhcpc, udhcpc -i ens3 to
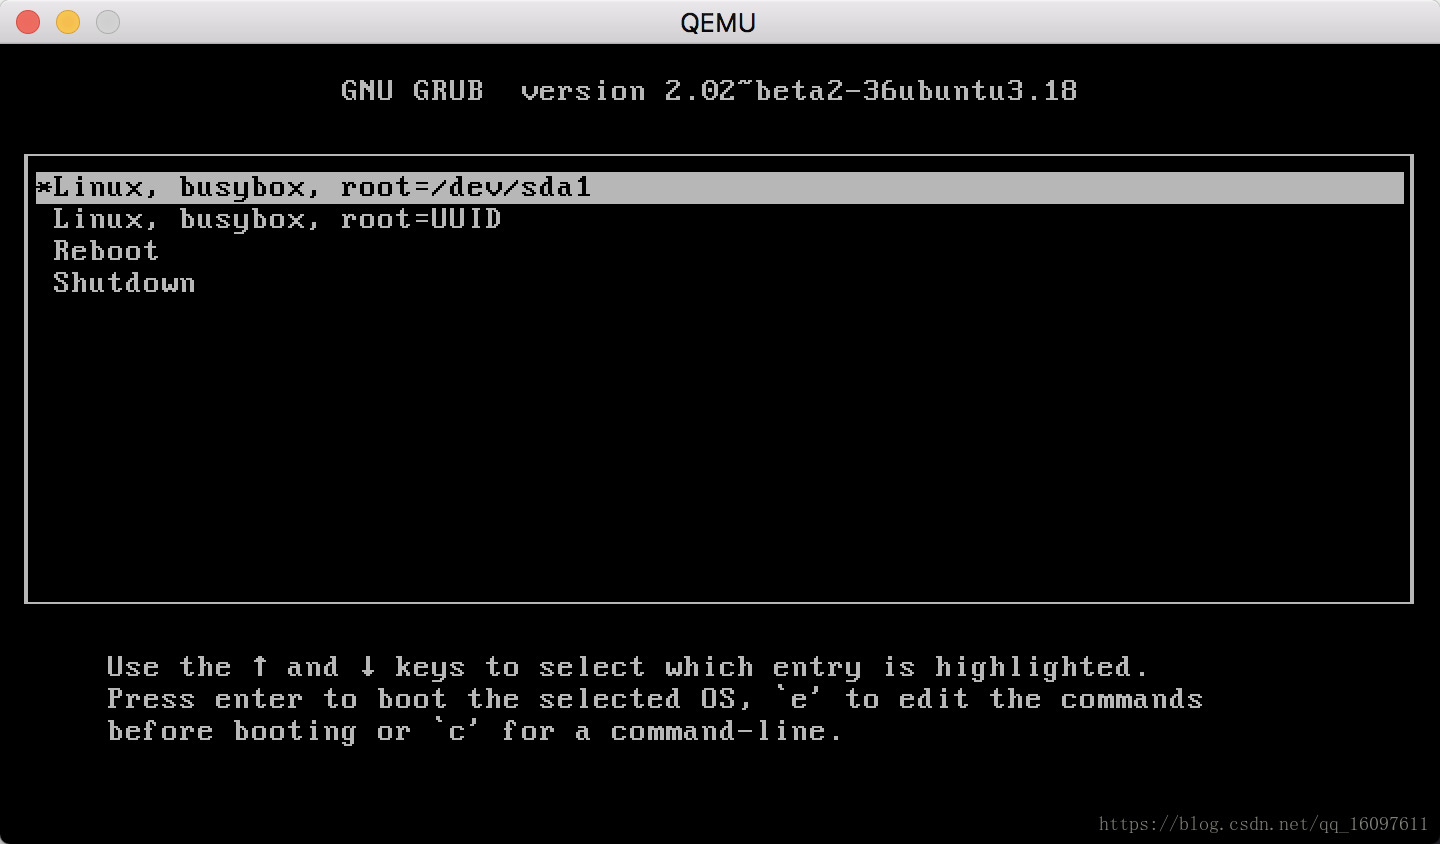
5. Configure menu grub2 start:
/Boot/grub/grub.cfg configured to, when one menu is selected, the default GRUB boot command is executed, it is unnecessary to re-boot command input, how to get UUID parameter, the device can be obtained by blkid / dev / sda1 the UUID:
set default=0

menuentry 'Linux, busybox, root=/dev/sda1' {
    linux /vmlinuz root=/dev/sda1
    initrd /initrd
}

menuentry 'Linux, busybox, root=UUID' {
    linux /vmlinuz root=UUID=80f65534-ae79-4bcb-84db-b1b50c11ceb1
    initrd /initrd
}

menuentry 'Reboot' {
    reboot
}

menuentry 'Shutdown' {
    halt
}
Results are as follows: