❤ source project ❤
GitHub address: https: //github.com/Umbrella001/mtapp
Article Directory
- A, server folder design
- 1.1 mongodb start the configuration database administration tools and object model mongoose:
- 1.2 In some relatively landing configuration register used interfaces:
- Two, mongodb databases, Redis service, smtp mail service
- 2.1 How to start configuring a mongodb / redis / smtp basic configuration `config.js`:
- 2.2 Interface began to write about landing registered user logout validation:
- Three, mongoose user model configuration
- Fourth, implement the interface interface of users.js
- 5, configuration axios Basic Configuration
- Sixth, the configuration passport related configuration
- Seven, the definition of registration, login, send a verification code, log out, access to user information five interfaces
- Eight, the final route will be added in the written sever startup file index.js
- Nine, start redis services and databases mongodb
- Ten, start the service npm run dev
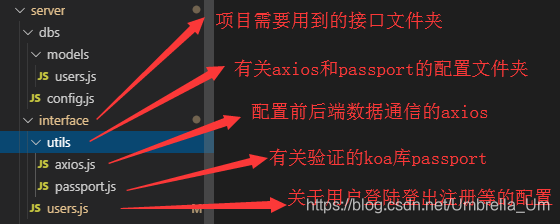
A, server folder design
1.1 mongodb start the configuration database administration tools and object model mongoose:
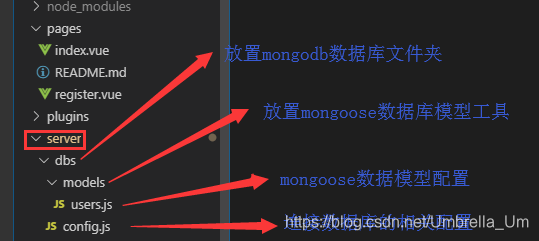
1.2 In some relatively landing configuration register used interfaces:
Two, mongodb databases, Redis service, smtp mail service
2.1 How to start configuring a basic configuration mongodb / redis / smtp of config.js:
① configure the connection mongodb host and port
② configuration redis host and port
② configure the look and Tencent mail interface to host smtp service interface, get registration code:
Direct Path: landing qq-mail account === === === Set pop3 ... that bar
is enabled by default services are closed, the first major achievement of the project need to start two services can also operate mail function, and finally get the authorization code

/**
 * describe: 数据库mongodb、redis服务、smtp邮箱服务基本配置
 * author: umbrella
 * date: 2019-6-28
 * --------------------说明------------------------
 * 导出一个对象export default即为配置mongodb的
 * --连接默认mongondb(默认端口27017)/{数据库名称}
 * --配置redis设置只读host(当前主机号)|| 只读端口6379(默认不要乱改)
 * --配置smtp邮箱服务,固定host(stmp.qq.com)|| 开启pop功能的对应邮箱 || 填写功能授权码pass
 *   模拟随机码code方法 || 验证码有效时间expire
 */
export default {

    dbs: 'mongodb://127.0.0.1:27017/mtapp',
    redis:{
        get host(){
            return '127.0.0.1'
        },
        get port(){
            return 6379
        }
    },
    smtp:{
        get host(){
            return 'stmp.qq.com'		// 验证的邮箱服务smtp
        },
        get user(){
            return '[email protected]'  // 发送验证的邮箱
        },
        get pass(){
            return 'hrhypacrzilkedai'   // 授权码
        },
        get code(){
            return ()=>{
                return Math.random().toString(16).slice(2,6).toUpperCase();  // 生成一个16进制的4位大写验证码
            }
        },
        get expire(){
            return ()=>{
                return new Date().getTime()+60*60*1000   // 可设置为 1h 或者 1min 自定
            }
        }

    }
}
2.2 Interface began to write about landing registered user logout validation:
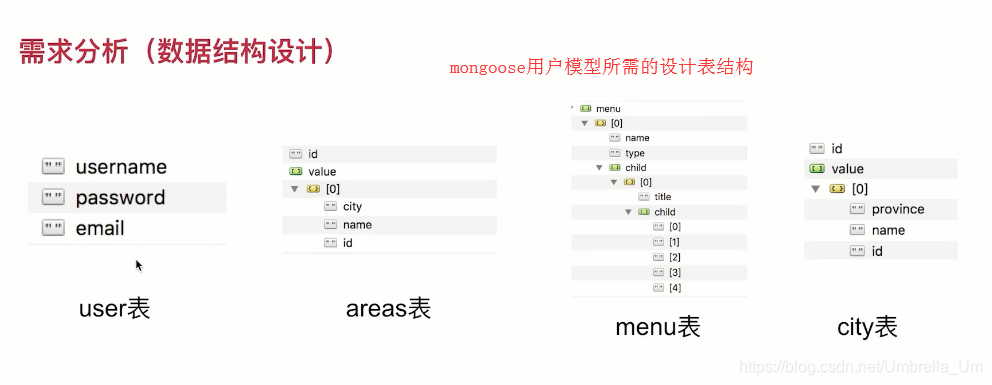
Three, mongoose user model configuration
Currently installed version:
/**
 * descripe: 创建mongoose数据库模型面板,并配置必须的库类型
 * author: umbrella
 * date: 2018-6-28PM16:42:26
 * -------------------说明------------------
 * --导入所需的moogoose模型包
 * --定义Schema模型,每一个schema对应一个mongoDB collection 并且在那个collection里面定义了documents的模型
 * --填写模型所需要的表结构
 * --导出mongoose模型UserSchema
 */
import mongoose from 'mongoose'
const Schema = mongoose.Schema
const UserSchema = new Schema({
    username:{
        type: String,
        unique: true,
        require: true
    },
    password:{
        type: String,
        require: true
    },
    email:{
        type: String,
        require: true
    }
})

export default mongoose.model('User',UserSchema)
Fourth, implement the interface interface of users.js
And the introduction of package versions:
- Please router-7.4.0 @
- Fredis @ 3.1.2
- nodemailer @4.6.8
5, configuration axios Basic Configuration
Install version:
- axios @0.18.0
Reference official website: http: //www.axios-js.com/zh-cn/
/**
 * descripe: 封装前后端通信axios配置
 * author: umbrella
 * date: 018-6-28PM17:24:28
 * ---------------说明----------------
 * --导入所需的axios包,创建axios实例
 * --配置基础的URL,请求超时timeout,及公共头部headers
 * --参考文档:http://www.axios-js.com/docs/#Creating-an-instance
 * --导出该axios接口实例instance
 */
import axios from 'axios'

const instance = axios.create({
    baseURL: `http://${process.env.HOST||'loclhost'}:${process.env.PORT||3000}`,
    timeout: 1000,
    headers:{}
})

export default instance
Sixth, the configuration passport related configuration
Attaching guide the required packages:
- Please passport-4.1.1 ^
- passport-local ^1.0.0
/**
 * descripe: 配置相关的passpost
 * author: umbrella
 * date: 018-6-28PM19:44:18
 * ---------------说明----------------
 * --导包passport 适用于koa的passport实现路由进入前登陆验证 || 同理适用于koa的Local策略包 ||
 *   导入mongoose模型
 * --参考passport官网:http://www.passportjs.org/
 * --使用本地策略LocalStrategy实现简单的登陆查询,注册添加的校验
 * --参数说明 username用户输入的账户名 || password用户输入的密码 || done回调函数
 * --导出passport
 */
import passport from 'koa-passport'
import LocalStrategy from 'passport-local'
import UserModel from '../../dbs/models/users'

passport.use(new LocalStrategy(async function(username,password,done){
    // 使用koa特色的异步async和await完成校验
    let where = {
        username
    };
    // 在数据库mongoose模型中查询username用户名
    let result = await UserModel.findOne(where)
    if(result!=null){
        // 用户名存在时,检查数据库存储的密码是否一致
        if(result.password===password){
            return done(null,result)
        }else{
            return done(null,false,'密码错误')
        }
    }else{
        return done(null,false,'用户名不存在')
    }
}))

// 用户每次登陆成功时,将数据存储进筛选中,然后通过筛选读取用户对象序列化及反序列化
passport.serializeUser(function(user,done){
    done(null,user)
})

passport.deserializeUser(function(user,done){
    return done(null,user)
})

export default passport
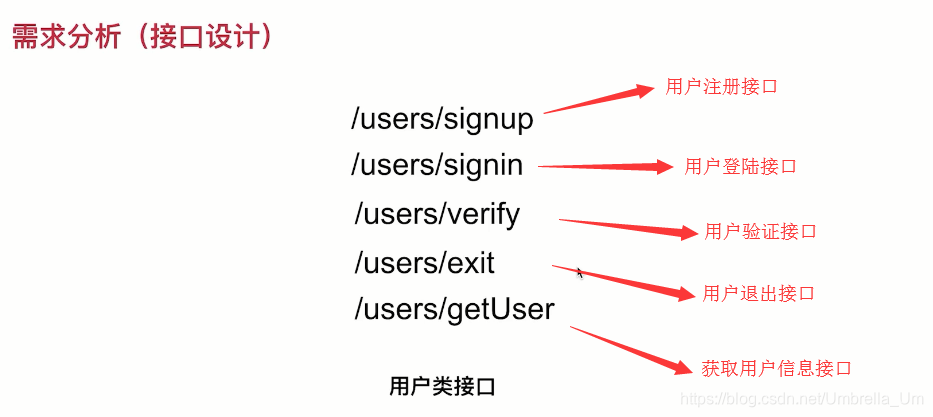
Seven, the definition of registration, login, send a verification code, log out, access to user information five interfaces
Installation package and version numbers need:
- Please router-7.4.0 ^
- Fredis ^ 3.1.3
- nodemailer ^4.6.8
You need to use the configuration:User passport axios Email
↓ Configure the public about the path of the current interface /users, so this five prefix interface must have this path stitching
↓ get Redis container storage services, where users store
↓ configure the router interfaces required
↓ export router
Eight, the final route will be added in the written sever startup file index.js
Introducing related packages:
- mongoose
- bodyParser in post request processing axios parameters required, if the parameter is not introduced to the desired post get
- session session with project Login Register take with koa, instead of cookie
- Redis
- json mainly beautify the server sends data to the client output format
Configuring session-related
→ configuration session storage rights
app.keys = ['mt','keyskeys']   // 配置keys两个值,一个是项目的缩写,另外一个是密钥
app.proxy = true  // 允许跨域
app.use(session({key: 'mt',prefix: 'mt:uid', store: new Redis()})) // 给加key值,加前缀好识别,在开启在Redis的储存权限
Related post-processing configuration of
→ extension parameters post acquisition type and use json library beautify
app.use(bodyParser({extendTypes:['json','form','text']}))
app.use(json())
The model object mongoose real connection to the database MongoDB
→ official configuration, dbconfig.dbs config.js is configured database url
mongoose.connect(dbConfig.dbs,{
  useNewUrlParser: true
})
Configuring passport-related
→ initialization passport and passport to open the session docking function
app.use(passport.initialize())
app.use(passport.session())
Using routing routes
→ herein can refer wording: https://www.jianshu.com/p/fef91266a44c
app.use(users.routes()).use(users.allowedMethods())
Nine, start redis services and databases mongodb
Two open cmd:
Start cmd enter redis installation directory: redis-server
appears to start successfully and to illustrate this connection ports
start cmd input in mongodb in: mongod
error process ... code100 see write this blog:
HTTPS: // Blog .csdn.net / Umbrella_Um / article / details / 99662011

after the success of this figure shows, then visit http: 127.0.0.1: 27017 / blog is that part of the check appears
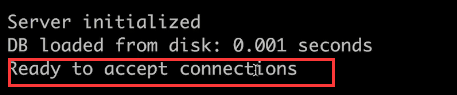
Ten, start the service npm run dev
Successful start to
❤ source project ❤
GitHub address: https: //github.com/Umbrella001/mtapp
