Interface Test Automation
1, the code level interface testing: white box testing, test code with the code
2, Test Interface protocol level: gray test, measured in code agreement, the final test codes
3, GUI test interface test can be understood as: black test, measured with the interface Code 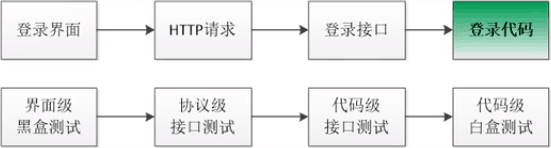
Code grade white box: unit testing to be more detailed attention to operating logic of the code
Code level Interface: the method of interest code, formal parameters, the functions, the return value other
gray box testing: tESTING method using the white box or dark test using white box test method of
Code Level Interface Test Step three:
1, defining the desired results
2 do not call the target object
3, compared to the actual results
GUI test automation three steps: defining a desired result, the operation of the measured object, the results of comparison of actual
three manual test steps: definition of a desired result, the operation of the measured object, compare the actual result
Purpose of the test driver (Test Fixture, Test Driver) is to achieve the above three steps, and thus the driver is invoked through a plurality of times to achieve the purpose of full test
1, if the return value of the test object, it returns directly as a result of the actual value and the desired results of comparison do
2, if the measured object does not return a value, depending on the particular function of the code under test, to find the corresponding verification point.
Examples of (Code Level)
The code being tested
"""实现以下三段程序:。
1.利用Python原生代码,结合ASCII 码的方式,实现一个函数,check_number(number),形参为一
个字符串,判断该字符串能否被正常转换一个数字,并返回True或False的结果。。
2.利用Python原生代码,不使用自带函数或**运算符,实现计算X的Y次方的功能: power(x, y),
返回计算的结果,参数Y为整数,X类型不限。。
3.利用Python的文件操作方法,实现一个create_ file 的函数,参数为文件数量和文件内容,无返回
值,功能为在D盘下创建一个目录叫"TestFolder", 目录下面创建参数数量个文本文件,为每个
文本文件写参数指定的内容。
"""

import os


class function():

    def check_number(self, number):
        is_valid = True
        is_correct = True
        point = 0
        minus = 0

        for char in number:
            ascii = ord(char)
            if ascii < 45 or ascii == 47 or ascii > 57:
                is_valid = False
                break
            if ascii == 46:
                point += 1
            if ascii == 45:
                point += 1
        if is_valid and point <= 1 and minus <= 1:
            if minus == 1 and ord(number[0]) != 45:
                is_correct = False
            else:
                is_correct = True
        else:
            is_correct = False
        return is_correct

    def power(self,x,y):
        result = 1
        if y < 0:
            for i in range(-y):
                result *= x
            result = 1/result
        else:
            for i in range(y):
                result *= x
        return result

    def creat_file(self,count,content):
        #先判断有没有该文件,没有再去创建
        if not os.path.exists("D://TestFolder"):
            os.mkdir("D://TestFolder")
        for i in range(1,count+1):
            file = open(f"D://TestFolder/File_{i}.txt","w")
            file.write(content)
            file.close()

if __name__ == "__main__":
    t = function()
    print(t.power(2,-2))
Test code
from code_test.function_code import function
import os
import random

class test_driver():

    #定义测试驱动程序,调用被测对象,对比实际结果和期望结果
    def test_check_number(self,number,expect):
        fun = function()
        actual =fun.check_number(number)
        if expect == actual:
            print("测试成功")
        else:
            print(f"测试失败,被测试值为:{number}")

    #测试没有返回值的create_file方法
    def test_creat_file(self,count,content):
        #调用被测对象
        function().creat_file(count,content)
        random_count = random.randint(1,int(count))
        #检查对应的特征
        is_folder_exist = os.path.exists("D://TestFolder")
        is_file_exist = os.path.exists(f"D://TestFolder/File_{random_count}.txt")
        is_content_correct = open("D://TestFolder/File_3.txt").read() == content

        if is_folder_exist and is_file_exist and is_content_correct:
            print("测试成功")
        else:
            print("测试失败")

if __name__ == "__main__":
    td = test_driver()

    #执行测试用例
    # td.test_check_number("12345",True)
    # td.test_check_number("._123456",True)

    td.test_creat_file(3,"测试内容")

后期补上使用unittest框架测试
Protocol-level interface test
1, regardless of the front-end interface, regardless of the operating platform, protocol provided with the server interface only about
2, and programming language independent, unrelated to the sending interface
1. What is the protocol
pre-defined specifications
Mechanism defined in ISO OSI seven layer reference model:

Application Layer: HTTP, HTTPS, SMTP / POP3 / IMAP, SFTP, SOAP, RTMP, HLS, QICQ, MSN ...
intermediate layer: the transport layer, can solve the apparatus between two days the key to resolve the transmission of data, TCP / UDP constitute
TCP: reliable connection, three-way handshake, waving four times, data validation, poor performance

UDP: unreliable, better performance, data may be lost, not necessarily stable transmission
under three layers: physical hardware, network layer: a router; data layer: switch
TCP/IP协议模型:

2、HTTP协议:
HTTP:Hype Text Transfer Protocol
SOAP:Simple Object Access Protocol
HTTPS:HTTP+SSL
HLS:HTTP live Streaming
HTTP : General application layer protocol for communication between any of these platforms. Both the C / S or B / S can be either PC, a mobile terminal can.
https://www.baidu.com/
. 1, protocol type: HTTP
2, host domain name: Baidu.com
. 3, port number: 80 by default
4, the file path: / default home page at the root
5, address parameters:
HTTP协议的主要特点可概括如下:。
(1) 支持客户/服务器模式。
(2)简单快速:客户向服务器请求服务时,只需传送请求方法和路径。请求方法常用的有GET、POST、HEAD、 PUT、DELETE 等。每种方法定了源量与感分视家的类型不同。
(3)由于HTTP协议简单,使得HTTP服务器的程序规模小,因而通信速度很快。
(4)灵活: HTTP 允许传输任意类型的数据对象。正在传输的类型由Content-Type加以标记。
(5)无连接:无连接的含义是限制每次连接只处理一个请求。服务器处理完客户的请求,并
收到客户的应答后,即断开连接。采用这种方式可以节省传输时间。
(6) 无状态: HTTP 协议是无状态协议。无状态是指协议对于事务处理没有记忆能力。缺少状态意味着如果后续处理需要前面的信息,则它必须重传,这样可能导致每次连接传送的
数据量增大。另一方面,在服务器不需要先前信息时它的应答就较快。
(7) 明文传输,HTTP协议不支持加密处理,所以在安全性方面是一 大硬伤。目前解决这一 安全问题的方法是使用HTTPS协议(基于HTTP+SSL协议)的一种安全传输方案。
为了适应移动互.联网和物联网的快速发展,目前正在制订HTTP2甚至HTTP3的规范,相
信新版本的协议规范一定能够 对现有的HTTP1. 1版本做出较大的升级和优化。
请求的类型:
(1). GET,顾名思义:获取,取得。GET请求是指客户端发送一个请求给服务器,目的是从服务器端取得资源。比如一个网页,一张图片,一个文件,一个视频等。
(2). POST,顾名思义:提交。意为向服务器端提交数据。比如上传文件,提交用户名密码实现登录。
POST请求与GET请求其实都是浏览器与服务器之间进行交互,沟通一一种桥梁,两者都能够实现很多类似的功能,本质上没有太大区别。通常情况下来说,GET请求用于数据的获取,而POST请求用于数据的提交,并且所有提交的数据均放在请求的正文中,但是这也不是非得这样。
响应:
发送请求后,服务器端做出处理并返回相应的结果。
一个请求,一定会对一个响应,有求必应。
不存在只有请求,没有响应的情况,没有响应也是一个种响应。
也不存在只有响应,没有请求的情况。
相应请求的类型由HTTP的5种状态码表示:
1XX,2XX,3XX:正常类型
4XX:客户端错误
5XX:服务的错误
详解:状态码
请求与响应:标头,正文
get请求只有标头,没有正文,post请求才有正文,而相应均有标头和正文。
标头信息主要解决客户端与服务器之间的通信协商规范
接口测试实施时,必须要有对应的接口文档规范,清晰地描述接口的功能,参数,响应等具体的作用
1、接口的地址
2、接口的功能
3、参数的作用:每个参数分别代表的意思
4、响应的作用:文本,HTML,json,二进制等,描述每个字段或每个值的作用。
Session/Cookie:
1、HTTP协议本身是无状态协议,所以需要通过服务器端保存session并且在客户端保存cookie进而实现客户端与服务端状态的保持
2、键值对的形式出现,session变量,cookie变量,还有很重要的sessionid,服务器分配给每一个不同的客户端的一个唯一标识。
3、session和cookie可以设置生命周期
Set-Cookie: 595d9_ck_info=%2F%09; expires=Sun, 07-Feb-2021 09:51:32 GMT; Max-Age=31536000; path=/
接口测试自动化:
可以显著提升开发脚本的效率的测试执行的效率,主要测试关注点为服务器。通常用于测试压力,性能,安全,可靠等
GUI测试自动化:
相对效率更低,问题更多,但并非不必要,能更好地模拟用户行为,关注客户操作,通常用于测试功能,兼容,可用性等。
实例:
import http.client


class Test_phpwind():

    def __init__(self):
        self.host = "192.168.1.102"
        self.port = "8081"
        self.cookie = ""

    def test_home(self):
        conn = http.client.HTTPConnection(host=self.host, port=self.port)
        conn.request(method="GET", url="/phpwind/")  # 在没有指定访问目录的时候,要加上后面的/,访问默认首页
        resul = conn.getresponse().getheaders()
        for i in range(len(resul)):
            if resul[i][0] == "Set-Cookie":
                self.cookie += resul[i][1]

    def test_get_image(self):
        conn = http.client.HTTPConnection(host=self.host,port=self.port)
        conn.request(method="GET",url="/phpwind/mode/area/images/flash-no.gif")  #图片地址
        resp = conn.getresponse()
        content_type = resp.getheader("Content-Type")
        if content_type.startswith("text"):
            print(conn.getresponse().read().decode())
        else:
            print("这是一个二进制文件,已下载到本地")
            # file = open("E://cs.jpg","wb+")
            # file.write(resp.read())
            # file.close()
            with open("E://cs.jpg","wb+") as file:
                file.write(resp.read())

    def test_login(self):
        conn = http.client.HTTPConnection(host=self.host,port=self.port)
        header = {"Content-Type": "application/x-www-form-urlencoded"}  #必须要
        body = "step=2&lgt=0&pwuser=admin&pwpwd=admin&hideid=0&cktime=31536000"  #需要写成这种格式
        # body = {                                  #这种会报错TypeError: can't concat str to bytes
        #     "tep":2,
        #     "lgt":0,
        #     "pwuser":"admin",
        #     "pwpwd":"admin",
        #     "hideid":0,
        #     "cktime":31536000
        # }
        a = conn.request(method="POST",url="/phpwind/login.php",body=body,headers=header)
        if  a.find("您已经顺利登录"):
            print("登录成功")
        else:
            print("登录失败")


if __name__ == "__main__":
    td = Test_phpwind()
    td.test_home()
requests库
HTTP文件上传的请求解析:
红色为可修改信息,标蓝色的横杠数量有差异,第二次要比第一次多两根,第三处结尾必须是两根,第一次可以没有。
标头:
Content-Type: multipart/form-data; boundary= ---- WebKitFormBoundaryUsTIaFmAgVlVfLaO
正文:
------WebKitFormBoundaryUsTIaFmAgVlVfLaO
Content-Disposition: form-data; name=“attachment_1”; filename="测试图片3.jpg "
Content-Type: image/jpeg
####中文的是二进制数据#####
------WebKitFormBoundaryUsTIaFmAgVlVfLaO –
Content-Type对照表:content-type
实例:
import threading,requests,random,re


class test_posting():
    def __init__(self):
        self.session = requests.session()


####登录
    def login(self):
        url = "http://192.168.1.102:8081/phpwind/login.php?"
        i = random.randint(1,3)
        body = {
            "step": 2,
            "pwuser": f"user00{i}",
            "pwpwd": "123456",
            "lgt": 0
        }

        response = self.session.post(url,data=body)
        newtxt = response.text
        if "您已经顺利登录" in newtxt:
            print("登录成功")
        else:
            print("登录失败")

####点击发帖
    def posting(self):
######点击发帖,获取verify
        url1 = "http://192.168.1.102:8081//phpwind/post.php"
        i = random.randint(1,3)
        params = {
            "fid":3
        }
        response = self.session.get(url=url1,params=params)
        newtxt = response.text
        pattern = 'name="verify" value="(.*?)" />'
        result = re.findall(pattern=pattern, string=newtxt)
        verify_code = result[0]
        print(result)
#####发帖请求
        url2 = "http://192.168.1.102:8081/phpwind/post.php?"
        file_date = {"attachment_1": open("E://cs.jpg","rb")}
        body = {
            "magicname":"",
            "magicid":"",
            "verify":verify_code,
            "atc_title":"测试标题-user001-004",
            "atc_iconid":0,
            "atc_content":"测试标题-user001-004",
            "atc_autourl":1,
            "atc_usesign":1,
            "atc_convert":1,
            "atc_rvrc":0,
            "atc_enhidetype":"rvrc",
            "atc_money":0,
            "atc_credittype":"money",
            "atc_desc1":"",
            "att_special1":0,
            "att_ctype1":"money",
            "atc_needrvrc1":0,
            "step":2,
            "pid":"",
            "action":"new",
            "fid":3,
            "tid":"",
            "article":0,
            "special":0
        }
        response = self.session.post(url=url2,data=body,files=file_date)
        if "发帖完毕点击进入主题列表" in response.text:
            print("发帖完成")
        else:
            print("发帖失败")
        self.session = requests.session()

    #下载文件
    def download_image(self):
        resp = self.session.get("http://192.168.1.102:8081/phpwind/mode/area/images/flash-no.gif")
        with open("D://cs.jpg","wb") as file:
            file.write(resp.content)

    #文件上传
    def upload_file(self):
        file_date = {"attachment_1": open("E://cs.jpg","rb")}
        upload_url = "http://192.168.1.102:8081/phpwind/post.php"
        resp_upload = self.session.post(url=upload_url,files=file_date)
        resp_upload.encoding = "urf-8"
        print(resp_upload)
        print(resp_upload.text)  #因为需要登录和所以直接放到发帖的里面了

    def main(self):
        self.login()
        self.posting()
        # self.download_image()
        # self.upload_file()

if __name__ == "__main__":
    cs = test_posting()
    for i in range(1):
        threading.Thread(target=cs.main).start()
Web service
web service接口,SOAP:simple object access protocol,依附于http协议的一种基于xml格式的协议,在http的头部和正文又定了一个新的规则
安装suds:pip install suds-py3
实例:
import requests
from suds.client import Client

url = "http://ws.webxml.com.cn/webservices/DomesticAirline.asmx/getDomesticAirlinesTime "
data = {"startCity":"深圳",
        "lastCity":"长沙",
        "theDate":"2020-2-9",
        "userID":""
}
resp = requests.post(url=url,data=data)
print(resp.text)


url2 = "http://ws.webxml.com.cn/WebServices/MobileCodeWS.asmx?wsdl"
client = Client(url2)
resp2 = client.service.getMobileCodeInfo("13537206767","")
print(resp2)
