Article Directory
Integration of a
Usually to build a spring-based web application, we need to do the following:
1, pom jar package file related to the introduction, including spring, springmvc, redis, mybaits, log4j, mysql-connector-java Related jar ... etc.
2, configure web.xml, Listener configuration, Filter configuration, Servlet configuration, log4j configuration, error configuration ...
3, configure a database connection configuration spring Affairs
4, the configuration view resolver
5, open the annotation, auto scan function
6, after the completion of the deployment configuration tomcat, start debugging
and automatic configuration springboot principle simplifies many steps
In springboot we only need to introduce the following simple steps to complete the initial project to build a ssm background.
1, the introduction jar
<parent>
 <groupId>org.springframework.boot</groupId>
 <artifactId>spring-boot-starter-parent</artifactId>
 <version>2.0.4.RELEASE</version>
 <relativePath/> <!-- lookup parent from repository -->
</parent>
<!--mybatis 开发包-->
<dependency>
 <groupId>org.mybatis.spring.boot</groupId>
 <artifactId>mybatis-spring-boot-starter</artifactId>
 <version>1.3.2</version>
</dependency>
<!--springboot web模块支持-->
<dependency>
 <groupId>org.springframework.boot</groupId>
 <artifactId>spring-boot-starter-web</artifactId>
</dependency>
<dependency>
 <groupId>mysql</groupId>
 <artifactId>mysql-connector-java</artifactId>
 <scope>runtime</scope>
</dependency>
<!--druid 的数据源-->
<dependency>
 <groupId>com.alibaba</groupId>
 <artifactId>druid</artifactId>
 <version>1.0.31</version>
</dependency>
spring-boot-starter-web package automatically help us to introduce the relevant jar package web module development needs,
mybatis-spring-boot-starter introduced dao help us develop relevant jar package.
spring-boot-starter-xxx is the official starter, xxx-spring-boot-starter is a starter provided by third parties.
2, the configuration data source
spring:
 datasource:
 url: jdbc:mysql://127.0.0.1:3306/mybatis_test
 username: root
 password: root
 driver-class-name: com.mysql.jdbc.Driver
 type: com.alibaba.druid.pool.DruidDataSource
 dbcp2:
 min-idle: 5
 initial-size: 5
 max-total: 5
 max-wait-millis: 200
stater mechanism to help us complete the relevant jar package needed to start the project. That problem again, the traditional spring application configuration application.xml not to do in a lot of bean, such as dataSource configuration, transactionManager configuration ... how springboot is to help us accomplish these bean configuration?
We can automatically configure the key steps and corresponding comments are summarized as follows:
1, @ Configuration & and @ Bean-> configuration code based on bean java
2, @ Conditional-> Set conditions depend autoconfiguration
3, @ EnableConfigurationProperties with @ ConfigurationProperties-> reads the configuration file into a bean.
4, @ EnableAutoConfiguration, @ AutoConfigurationPackage with @ Import-> find and load the bean implementation.
Reference article:
https://msd.misuland.com/pd/2884250034537241066
Integration of two
We have developed a Spring Boot any project, will be used as start classes
1 @SpringBootApplication
2 public class Application {
3     public static void main(String[] args) {
4         SpringApplication.run(Application.class, args);
5     }
6 }
As can be seen from the above code, Annotation definitions (@SpringBootApplication) and class definition (SpringApplication.run) most dazzling, so to demystify SpringBoot, we want these two to start on it.
First, the secret behind the SpringBootApplication
@SpringBootApplication annotation is the core Spring Boot notes, it is actually a combination of notes:
 1 @Target(ElementType.TYPE)
 2 @Retention(RetentionPolicy.RUNTIME)
 3 @Documented
 4 @Inherited
 5 @SpringBootConfiguration
 6 @EnableAutoConfiguration
 7 @ComponentScan(excludeFilters = {
 8         @Filter(type = FilterType.CUSTOM, classes = TypeExcludeFilter.class),
 9         @Filter(type = FilterType.CUSTOM, classes = AutoConfigurationExcludeFilter.class) })
10 public @interface SpringBootApplication {
11 ...
12 }
Although the definition used more Annotation been marked original information, but in fact important only three Annotation:
- @Configuration (@SpringBootConfiguration opening the application to view and found that there was a @Configuration)
- @EnableAutoConfiguration
- @ComponentScan
I.e. @SpringBootApplication = (default property) @Configuration + @EnableAutoConfiguration + @ComponentScan.
So, if we start using SpringBoot class as follows, the whole class started SpringBoot application can still function as before and so on:
1 @Configuration
2 @EnableAutoConfiguration
3 @ComponentScan
4 public class Application {
5     public static void main(String[] args) {
6         SpringApplication.run(Application.class, args);
7     }
8 }
Each write three more tired, so write a @SpringBootApplication convenient point. The next sections describe these three Annotation.
1、@Configuration
@Configuration here is no stranger to us, that it is the Spring Ioc @ Configuration container JavaConfig form of configuration classes used, SpringBoot recommended community-based configurations JavaConfig, so here start classes after marked @Configuration itself is actually a IoC container configuration class.
A few simple examples under review, XML config configuration with a difference:
(1) the level of expression of the form
XML configuration-based approach is this:
1 <?xml version="1.0" encoding="UTF-8"?>
2 <beans xmlns="http://www.springframework.org/schema/beans"
3        xmlns:xsi="http://www.w3.org/2001/XMLSchema-instance"
4        xsi:schemaLocation="http://www.springframework.org/schema/beans http://www.springframework.org/schema/beans/spring-beans-3.0.xsd"
5        default-lazy-init="true">
6     <!--bean定义-->
7 </beans>
The JavaConfig-based configuration is this:
1 @Configuration
2 public class MockConfiguration{
3     //bean定义
4 }
Any marked a Java class definition is a @Configuration JavaConfig configuration class.
(2) define the level registered bean
XML-based configuration is this:
1 <bean id="mockService" class="..MockServiceImpl">
2     ...
3 </bean>
The form-based configuration JavaConfig is this:
1 @Configuration
2 public class MockConfiguration{
3     @Bean
4     public MockService mockService(){
5         return new MockServiceImpl();
6     }
7 }
Any method @Bean marked, the return value will be defined as a bean registered Spring IoC container, a default name to the method defined bean id.
(3) the relationship between the expression level of dependency injection
In order to express dependencies between bean and bean, typically in XML form is:
1 <bean id="mockService" class="..MockServiceImpl">
2     <propery name ="dependencyService" ref="dependencyService" />
3 </bean>
4
5 <bean id="dependencyService" class="DependencyServiceImpl"></bean>
The form-based configuration JavaConfig is this:
 1 @Configuration
 2 public class MockConfiguration{
 3     @Bean
 4     public MockService mockService(){
 5         return new MockServiceImpl(dependencyService());
 6     }
 7
 8     @Bean
 9     public DependencyService dependencyService(){
10         return new DependencyServiceImpl();
11     }
12 }
If you define a class JavaConfig the bean rely on other bean, directly call the corresponding dependent bean creation method on it.
@Configuration: @Configuration mentioned we should mention his partner @Bean. These two notes can create a simple spring configuration class can be used to replace the corresponding xml configuration files.
1 <beans>
2     <bean id = "car" class="com.test.Car">
3         <property name="wheel" ref = "wheel"></property>
4     </bean>
5     <bean id = "wheel" class="com.test.Wheel"></bean>
6 </beans>
It is equivalent to:
 1 @Configuration
 2 public class Conf {
 3     @Bean
 4     public Car car() {
 5         Car car = new Car();
 6         car.setWheel(wheel());
 7         return car;
 8     }
 9
10     @Bean
11     public Wheel wheel() {
12         return new Wheel();
13     }
14 }
@Configuration annotation identifies the class type may be used as a source Spring IoC container bean definition.
@Bean annotation tells Spring, with a @Bean annotation method returns an object that should be registered as a bean in the Spring application context.
2、@ComponentScan
@ComponentScan this comment is very important in the Spring, which correspond to elements in the XML configuration, @ ComponentScan function is actually automatically scan and load the components that meet the conditions (such as @Component and @Repository etc.) or bean definitions, eventually these bean to define the load IoC container.
We can fine-grained range of attributes such as custom @ComponentScan by basePackages automatic scanning, if not specified, the default will be the Spring framework to achieve a scan package from the class declaration @ComponentScan lies.
Note: So SpringBoot start classes is best placed in the root package, because the default is not specified basePackages.
3、@EnableAutoConfiguration
Annotation personal feeling @EnableAutoConfiguration the most important, so on the last to interpret, if you remember Annotation Spring framework provides definitions of the various names for the beginning @Enable? For example, @ EnableScheduling, @ EnableCaching, @ EnableMBeanExport etc., @ EnableAutoConfiguration ideas and ways of doing things is actually the same strain, is a quick overview, with the support of @Import collected and registered bean definitions related to specific scene.
- @EnableScheduling @Import by the scheduling framework Spring bean definitions are loaded into the relevant IoC container.
- @EnableMBeanExport IoC is loaded into the container through the associated definitions @Import JMX bean.
And also with the help of @EnableAutoConfiguration @Import will load all the bean definitions that meet the criteria to automatically configure the IoC container, and nothing more!
The @EnableAutoConfiguration rely classpath jar for automatic configuration for the project, such as: adding a spring-boot-starter-web-dependent, and automatically adds Spring MVC dependent Tomcat, Spring Boot will automatically Tomcat and Spring MVC configuration.
@EnableAutoConfiguration as a composite Annotation, its own key information is defined as follows:
 1 @SuppressWarnings("deprecation")
 2 @Target(ElementType.TYPE)
 3 @Retention(RetentionPolicy.RUNTIME)
 4 @Documented
 5 @Inherited
 6 @AutoConfigurationPackage
 7 @Import(EnableAutoConfigurationImportSelector.class)
 8 public @interface EnableAutoConfiguration {
 9     ...
10 }
One of the most critical to the genus @Import (EnableAutoConfigurationImportSelector.class), by means of EnableAutoConfigurationImportSelector, @ EnableAutoConfiguration can help SpringBoot apply to all eligible @Configuration configuration is loaded into the current SpringBoot create and use IoC container. Like an "octopus", as a means of Spring framework existing tools: the support SpringFactoriesLoader, @ EnableAutoConfiguration can intelligently auto-configuration was able to effect you're done!
Automatic Configuration unsung heroes: SpringFactoriesLoader Comments
SpringFactoriesLoader proprietary frame belongs to an extended Spring embodiment, its main function is to load the configuration file from the specified configuration META-INF / spring.factories.
 1 public abstract class SpringFactoriesLoader {
 2     //...
 3     public static <T> List<T> loadFactories(Class<T> factoryClass, ClassLoader classLoader) {
 4         ...
 5     }
 6
 7
 8     public static List<String> loadFactoryNames(Class<?> factoryClass, ClassLoader classLoader) {
 9         ....
10     }
11 }
With @EnableAutoConfiguration used, it is to provide more support function to find an arrangement that, as Key to find, acquire a corresponding set of @Configuration classes based on the full class name org.springframework.boot.autoconfigure.EnableAutoConfiguration @EnableAutoConfiguration.
上图就是从SpringBoot的autoconfigure依赖包中的META-INF/spring.factories配置文件中摘录的一段内容,可以很好地说明问题。
所以,@EnableAutoConfiguration自动配置的魔法骑士就变成了:从classpath中搜寻所有的META-INF/spring.factories配置文件,并将其中org.springframework.boot.autoconfigure.EnableutoConfiguration对应的配置项通过反射(Java Refletion)实例化为对应的标注了@Configuration的JavaConfig形式的IoC容器配置类,然后汇总为一个并加载到IoC容器。
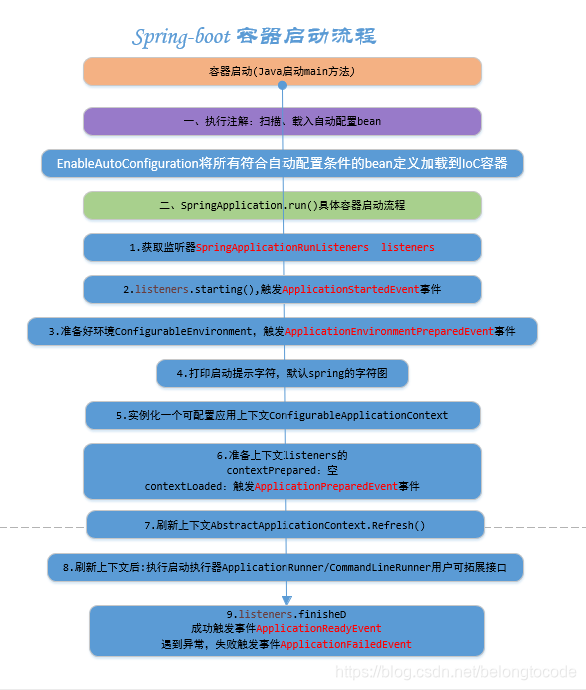
二、深入探索SpringApplication执行流程
SpringApplication的run方法的实现是我们本次旅程的主要线路,该方法的主要流程大体可以归纳如下:
1) 如果我们使用的是SpringApplication的静态run方法,那么,这个方法里面首先要创建一个SpringApplication对象实例,然后调用这个创建好的SpringApplication的实例方法。在SpringApplication实例初始化的时候,它会提前做几件事情:
- 根据classpath里面是否存在某个特征类(org.springframework.web.context.ConfigurableWebApplicationContext)来决定是否应该创建一个为Web应用使用的ApplicationContext类型。
- 使用SpringFactoriesLoader在应用的classpath中查找并加载所有可用的ApplicationContextInitializer。
- 使用SpringFactoriesLoader在应用的classpath中查找并加载所有可用的ApplicationListener。
- 推断并设置main方法的定义类。
2) SpringApplication实例初始化完成并且完成设置后,就开始执行run方法的逻辑了,方法执行伊始,首先遍历执行所有通过SpringFactoriesLoader可以查找到并加载的SpringApplicationRunListener。调用它们的started()方法,告诉这些SpringApplicationRunListener,“嘿,SpringBoot应用要开始执行咯!”。
3) 创建并配置当前Spring Boot应用将要使用的Environment(包括配置要使用的PropertySource以及Profile)。
4) 遍历调用所有SpringApplicationRunListener的environmentPrepared()的方法,告诉他们:“当前SpringBoot应用使用的Environment准备好了咯!”。
5) 如果SpringApplication的showBanner属性被设置为true,则打印banner。
6) 根据用户是否明确设置了applicationContextClass类型以及初始化阶段的推断结果,决定该为当前SpringBoot应用创建什么类型的ApplicationContext并创建完成,然后根据条件决定是否添加ShutdownHook,决定是否使用自定义的BeanNameGenerator,决定是否使用自定义的ResourceLoader,当然,最重要的,将之前准备好的Environment设置给创建好的ApplicationContext使用。
7) ApplicationContext创建好之后,SpringApplication会再次借助Spring-FactoriesLoader,查找并加载classpath中所有可用的ApplicationContext-Initializer,然后遍历调用这些ApplicationContextInitializer的initialize(applicationContext)方法来对已经创建好的ApplicationContext进行进一步的处理。
8) 遍历调用所有SpringApplicationRunListener的contextPrepared()方法。
9) 最核心的一步,将之前通过@EnableAutoConfiguration获取的所有配置以及其他形式的IoC容器配置加载到已经准备完毕的ApplicationContext。
10) 遍历调用所有SpringApplicationRunListener的contextLoaded()方法。
11) 调用ApplicationContext的refresh()方法,完成IoC容器可用的最后一道工序。
12) 查找当前ApplicationContext中是否注册有CommandLineRunner,如果有,则遍历执行它们。
13) 正常情况下,遍历执行SpringApplicationRunListener的finished()方法、(如果整个过程出现异常,则依然调用所有SpringApplicationRunListener的finished()方法,只不过这种情况下会将异常信息一并传入处理)
去除事件通知点后,整个流程如下:
本文以调试一个实际的SpringBoot启动程序为例,参考流程中主要类类图,来分析其启动逻辑和自动化配置原理。
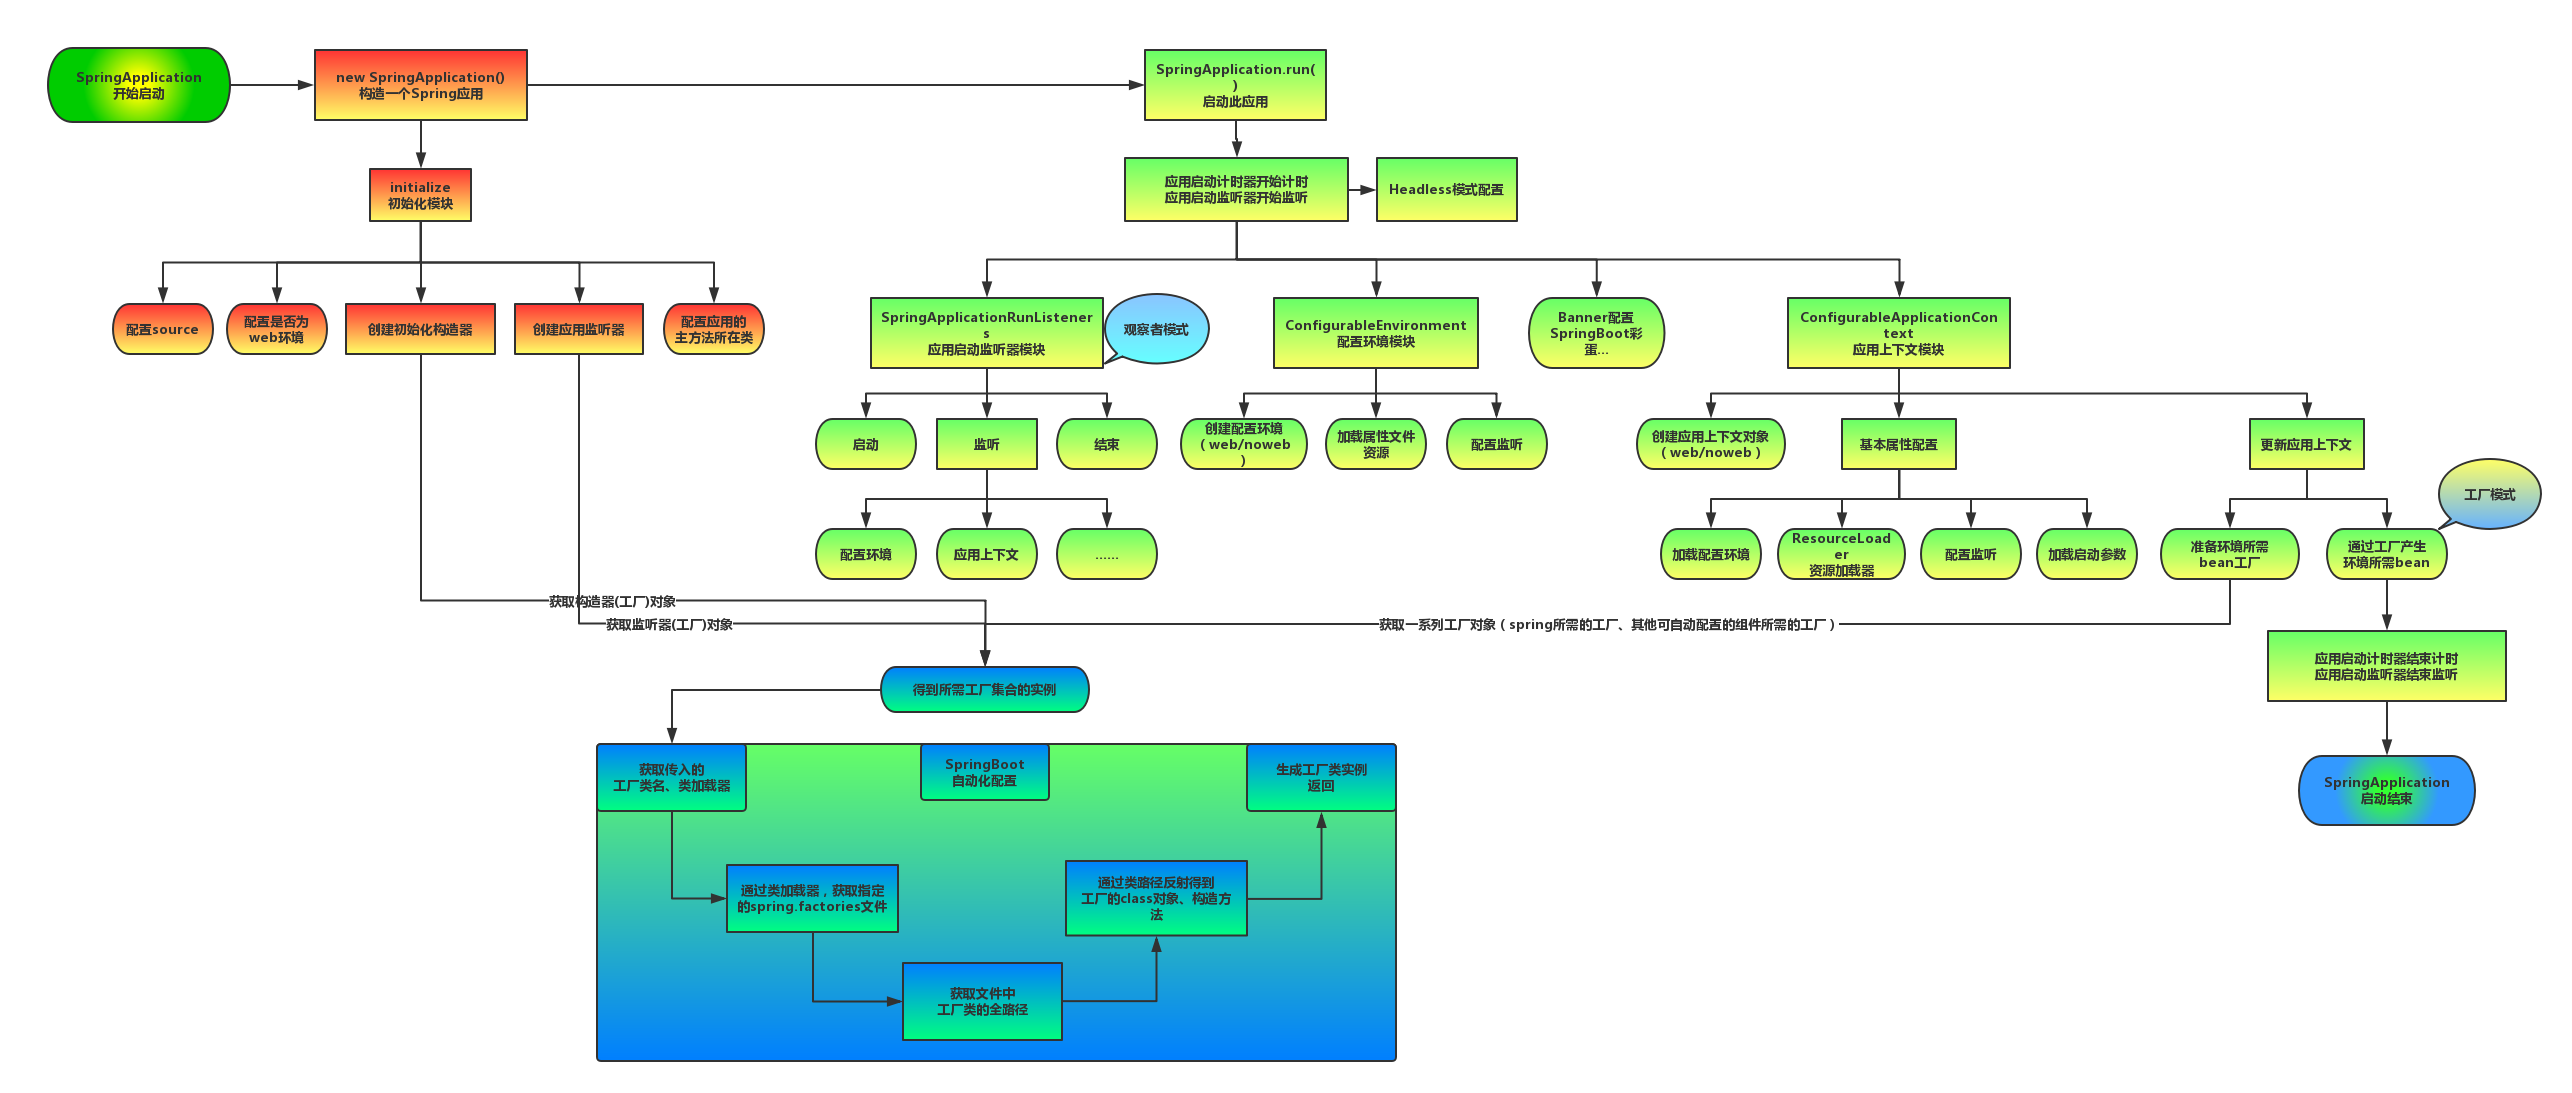
总览:
上图为SpringBoot启动结构图,我们发现启动流程主要分为三个部分,第一部分进行SpringApplication的初始化模块,配置一些基本的环境变量、资源、构造器、监听器,第二部分实现了应用具体的启动方案,包括启动流程的监听模块、加载配置环境模块、及核心的创建上下文环境模块,第三部分是自动化配置模块,该模块作为springboot自动配置核心,在后面的分析中会详细讨论。在下面的启动程序中我们会串联起结构中的主要功能。
启动:
每个SpringBoot程序都有一个主入口,也就是main方法,main里面调用SpringApplication.run()启动整个spring-boot程序,该方法所在类需要使用@SpringBootApplication注解,以及@ImportResource注解(if need),@SpringBootApplication包括三个注解,功能如下:
@EnableAutoConfiguration:SpringBoot根据应用所声明的依赖来对Spring框架进行自动配置。
@SpringBootConfiguration(内部为@Configuration):被标注的类等于在spring的XML配置文件中(applicationContext.xml),装配所有bean事务,提供了一个spring的上下文环境。
@ComponentScan:组件扫描,可自动发现和装配Bean,默认扫描SpringApplication的run方法里的Booter.class所在的包路径下文件,所以最好将该启动类放到根包路径下。
SpringBoot启动类
首先进入run方法
run方法中去创建了一个SpringApplication实例,在该构造方法内,我们可以发现其调用了一个初始化的initialize方法
这里主要是为SpringApplication对象赋一些初值。构造函数执行完毕后,我们回到run方法
该方法中实现了如下几个关键步骤:
1.创建了应用的监听器SpringApplicationRunListeners并开始监听
2.加载SpringBoot配置环境(ConfigurableEnvironment),如果是通过web容器发布,会加载StandardEnvironment,其最终也是继承了ConfigurableEnvironment,类图如下
可以看出,*Environment最终都实现了PropertyResolver接口,我们平时通过environment对象获取配置文件中指定Key对应的value方法时,就是调用了propertyResolver接口的getProperty方法
3.配置环境(Environment)加入到监听器对象中(SpringApplicationRunListeners)
4.创建run方法的返回对象:ConfigurableApplicationContext(应用配置上下文),我们可以看一下创建方法:
方法会先获取显式设置的应用上下文(applicationContextClass),如果不存在,再加载默认的环境配置(通过是否是web environment判断),默认选择AnnotationConfigApplicationContext注解上下文(通过扫描所有注解类来加载bean),最后通过BeanUtils实例化上下文对象,并返回。
ConfigurableApplicationContext类图如下:
主要看其继承的两个方向:
LifeCycle:生命周期类,定义了start启动、stop结束、isRunning是否运行中等生命周期空值方法
ApplicationContext:应用上下文类,其主要继承了beanFactory(bean的工厂类)
5.回到run方法内,prepareContext方法将listeners、environment、applicationArguments、banner等重要组件与上下文对象关联
6.接下来的refreshContext(context)方法(初始化方法如下)将是实现spring-boot-starter-*(mybatis、redis等)自动化配置的关键,包括spring.factories的加载,bean的实例化等核心工作。
配置结束后,Springboot做了一些基本的收尾工作,返回了应用环境上下文。回顾整体流程,Springboot的启动,主要创建了配置环境(environment)、事件监听(listeners)、应用上下文(applicationContext),并基于以上条件,在容器中开始实例化我们需要的Bean,至此,通过SpringBoot启动的程序已经构造完成,接下来我们来探讨自动化配置是如何实现。
自动化配置:
之前的启动结构图中,我们注意到无论是应用初始化还是具体的执行过程,都调用了SpringBoot自动配置模块。
SpringBoot自动配置模块
该配置模块的主要使用到了SpringFactoriesLoader,即Spring工厂加载器,该对象提供了loadFactoryNames方法,入参为factoryClass和classLoader,即需要传入上图中的工厂类名称和对应的类加载器,方法会根据指定的classLoader,加载该类加器搜索路径下的指定文件,即spring.factories文件,传入的工厂类为接口,而文件中对应的类则是接口的实现类,或最终作为实现类,所以文件中一般为如下图这种一对多的类名集合,获取到这些实现类的类名后,loadFactoryNames方法返回类名集合,方法调用方得到这些集合后,再通过反射获取这些类的类对象、构造方法,最终生成实例。
工厂接口与其若干实现类接口名称
下图有助于我们形象理解自动配置流程。
SpringBoot自动化配置关键组件关系图
mybatis-spring-boot-starter、spring-boot-starter-web等组件的META-INF文件下均含有spring.factories文件,自动配置模块中,SpringFactoriesLoader收集到文件中的类全名并返回一个类全名的数组,返回的类全名通过反射被实例化,就形成了具体的工厂实例,工厂实例来生成组件具体需要的bean。
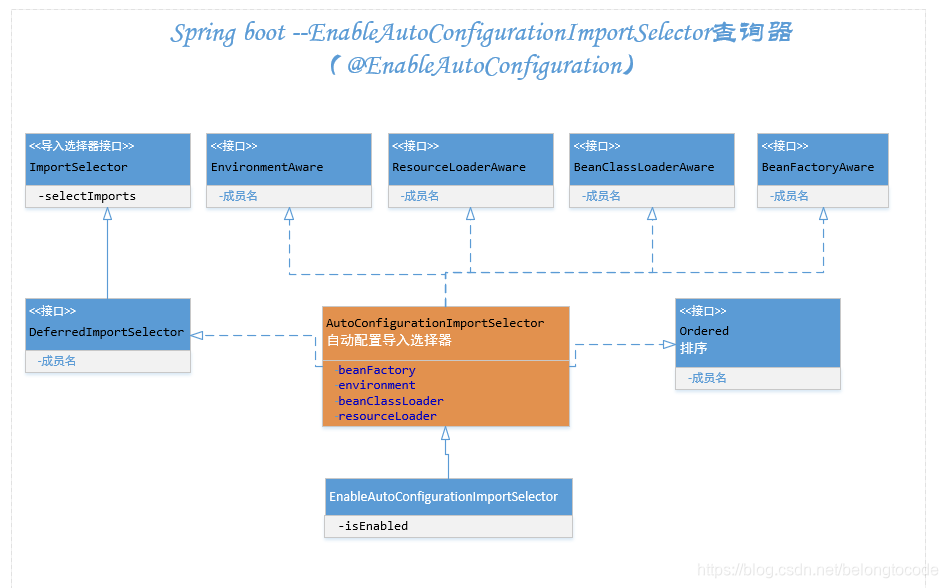
之前我们提到了EnableAutoConfiguration注解,其类图如下:
可以发现其最终实现了ImportSelector(选择器)和BeanClassLoaderAware(bean类加载器中间件),重点关注一下AutoConfigurationImportSelector的selectImports方法。
该方法在springboot启动流程——bean实例化前被执行,返回要实例化的类信息列表。我们知道,如果获取到类信息,spring自然可以通过类加载器将类加载到jvm中,现在我们已经通过spring-boot的starter依赖方式依赖了我们需要的组件,那么这些组建的类信息在select方法中也是可以被获取到的,不要急我们继续向下分析。
该方法中的getCandidateConfigurations方法,通过方法注释了解到,其返回一个自动配置类的类名列表,方法调用了loadFactoryNames方法,查看该方法
在上面的代码可以看到自动配置器会根据传入的factoryClass.getName()到项目系统路径下所有的spring.factories文件中找到相应的key,从而加载里面的类。我们就选取这个mybatis-spring-boot-autoconfigure下的spring.factories文件
进入org.mybatis.spring.boot.autoconfigure.MybatisAutoConfiguration中,主要看一下类头:
发现Spring的@Configuration,俨然是一个通过注解标注的springBean,继续向下看,
@ConditionalOnClass({ SqlSessionFactory.class, SqlSessionFactoryBean.class})这个注解的意思是:当存在SqlSessionFactory.class, SqlSessionFactoryBean.class这两个类时才解析MybatisAutoConfiguration配置类,否则不解析这一个配置类,make sence,我们需要mybatis为我们返回会话对象,就必须有会话工厂相关类。
@CondtionalOnBean(DataSource.class):只有处理已经被声明为bean的dataSource。
@ConditionalOnMissingBean(MapperFactoryBean.class)这个注解的意思是如果容器中不存在name指定的bean则创建bean注入,否则不执行(该类源码较长,篇幅限制不全粘贴)
以上配置可以保证sqlSessionFactory、sqlSessionTemplate、dataSource等mybatis所需的组件均可被自动配置,@Configuration注解已经提供了Spring的上下文环境,所以以上组件的配置方式与Spring启动时通过mybatis.xml文件进行配置起到一个效果。通过分析我们可以发现,只要一个基于SpringBoot项目的类路径下存在SqlSessionFactory.class, SqlSessionFactoryBean.class,并且容器中已经注册了dataSourceBean,就可以触发自动化配置,意思说我们只要在maven的项目中加入了mybatis所需要的若干依赖,就可以触发自动配置,但引入mybatis原生依赖的话,每集成一个功能都要去修改其自动化配置类,那就得不到开箱即用的效果了。所以Spring-boot为我们提供了统一的starter可以直接配置好相关的类,触发自动配置所需的依赖(mybatis)如下:
这里是截取的mybatis-spring-boot-starter的源码中pom.xml文件中所有依赖:
因为maven依赖的传递性,我们只要依赖starter就可以依赖到所有需要自动配置的类,实现开箱即用的功能。也体现出Springboot简化了Spring框架带来的大量XML配置以及复杂的依赖管理,让开发人员可以更加关注业务逻辑的开发。
文参考章:
https://www.cnblogs.com/xiaoxi/p/7999885.html
整合三
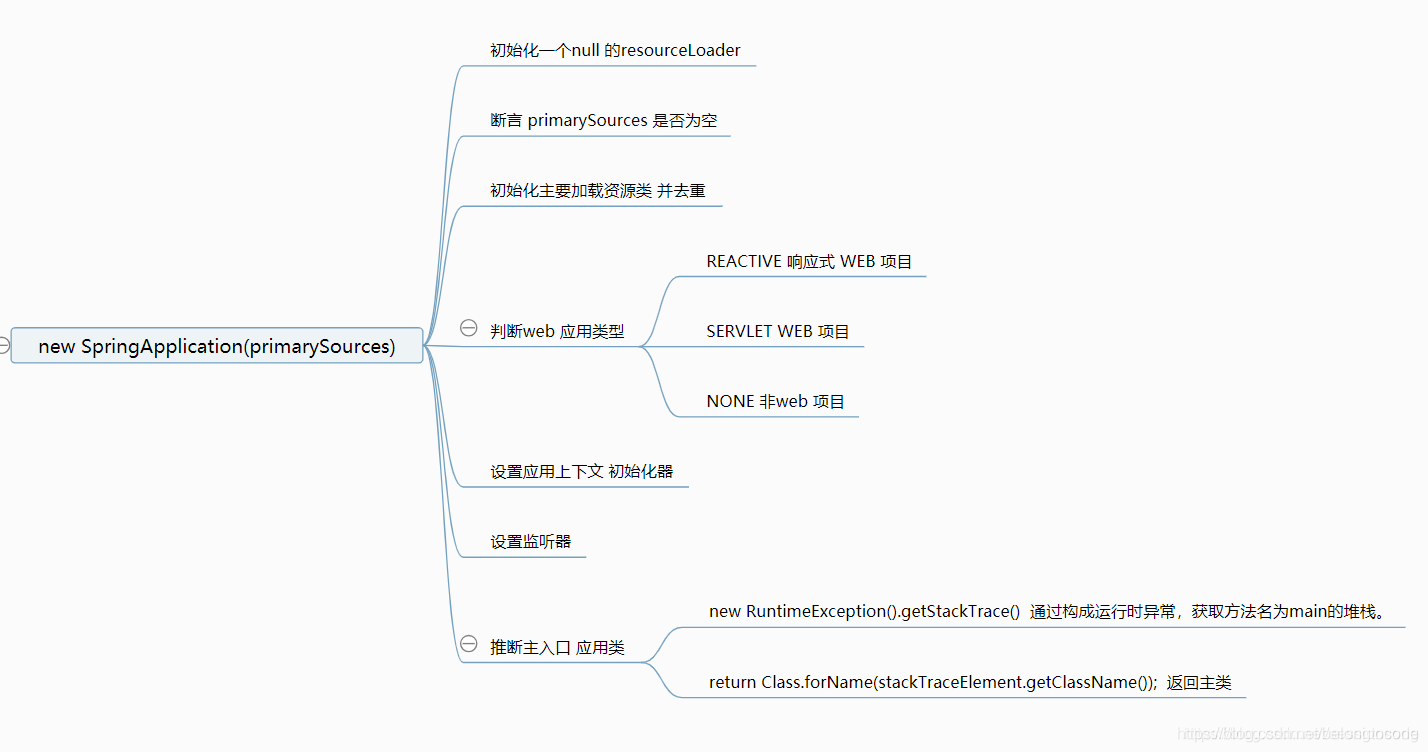
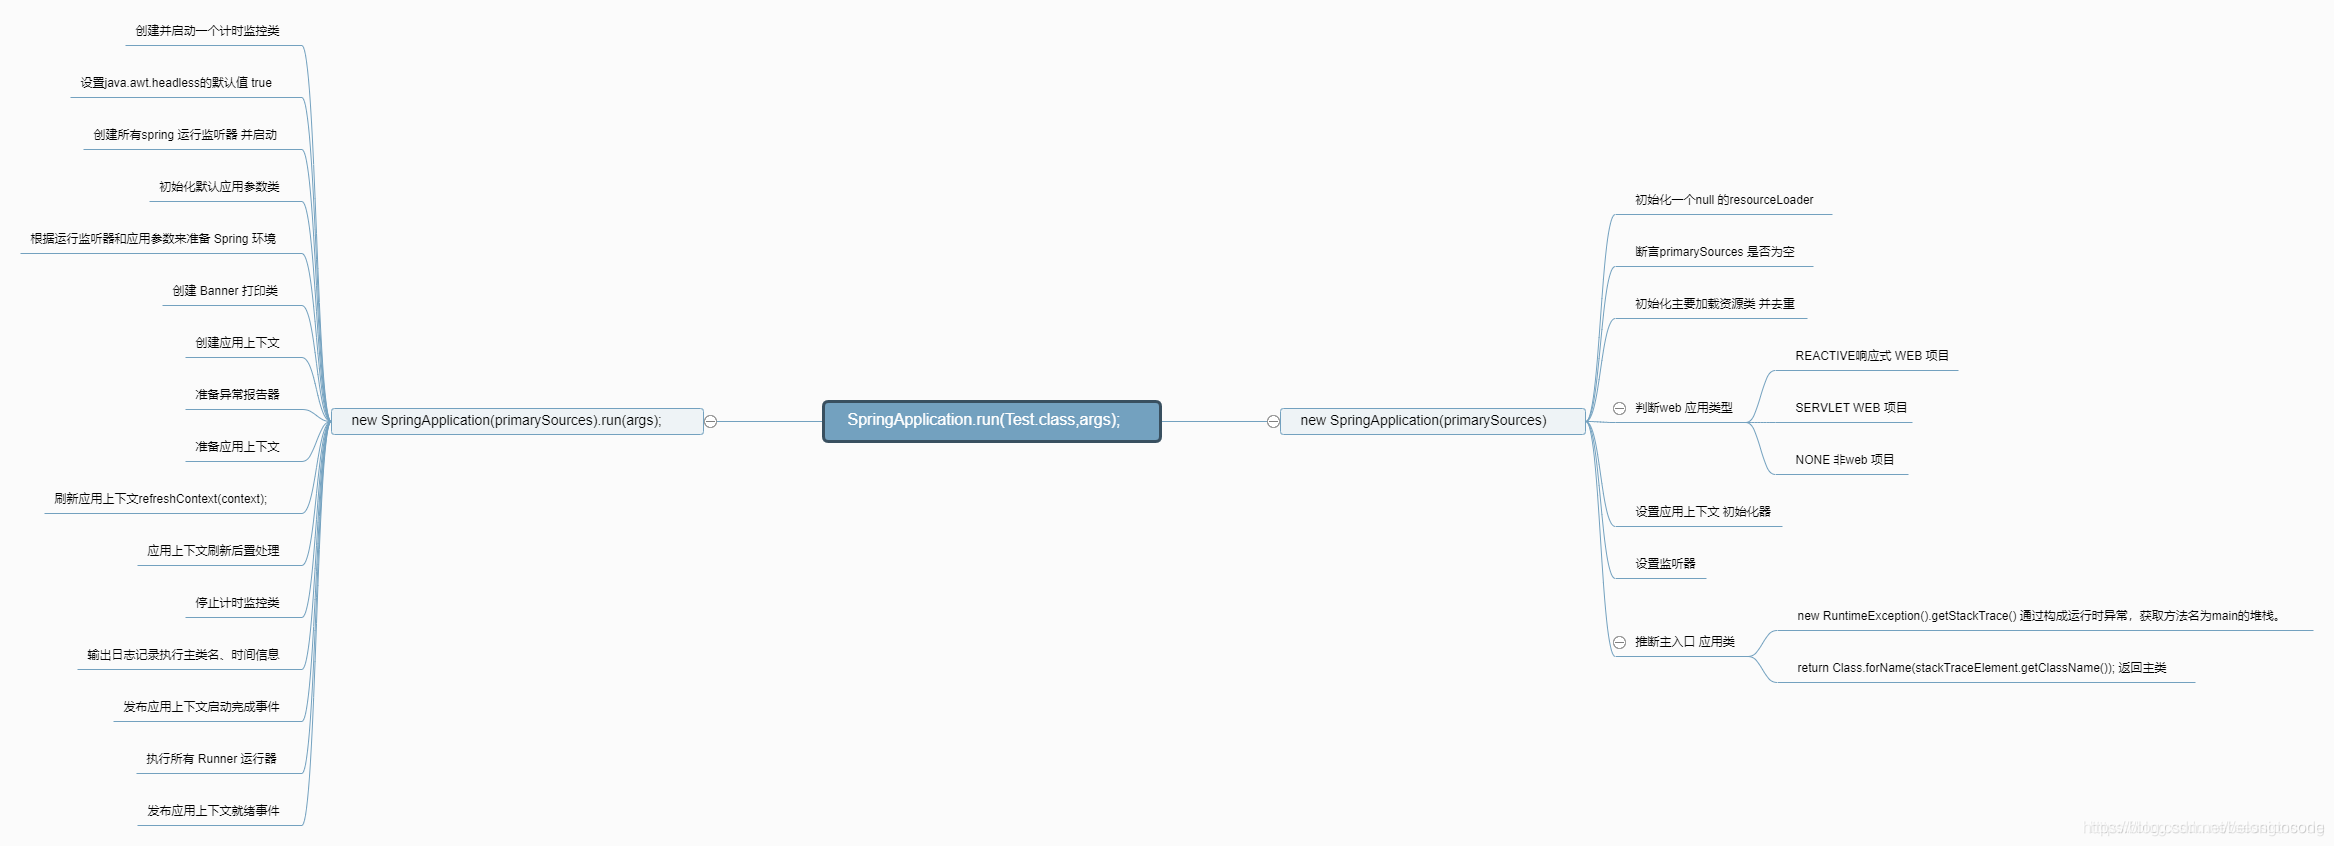
return new SpringApplication(primarySources).run(args);
主要分两步 第一步new 一个 SpringApplication 应用,第二步 运行SpringApplication 对象
第二步 运行 springboot 应用
总图
参考文章:
https://blog.csdn.net/sessionsong/article/details/86682808
整合四
springboot容器启动流程:
其中最重要的:

运行机制为:
springboot事件驱动:详情见:springboot事件驱动与观察者模式(http://www.cnblogs.com/dennyzhangdd/p/8343229.html)

参考文章:
https://blog.csdn.net/qq_41063141/article/details/83239941
整合六
1、首先从main方法开始看
public static void main(String[] args) {
    //代码很简单SpringApplication.run();
	SpringApplication.run(ConsumerApp.class, args);
}
public static ConfigurableApplicationContext run(Class<?> primarySource,
			String... args) {
        //这个里面调用了run() 方法,我们转到定义
		return run(new Class<?>[] { primarySource }, args);
	}


//这个run方法代码也很简单,就做了两件事情
//1、new了一个SpringApplication() 这么一个对象
//2、执行new出来的SpringApplication()对象的run()方法
public static ConfigurableApplicationContext run(Class<?>[] primarySources,
			String[] args) {
		return new SpringApplication(primarySources).run(args);
	}
2、上面代码主要分以下两步
- 第一步new了一个SpringApplication对象
- 第二部调用了run()方法
3、接下来我们来看看new SpringApplication()代码
public SpringApplication(ResourceLoader resourceLoader, Class<?>... primarySources) {
		this.resourceLoader = resourceLoader;
		Assert.notNull(primarySources, "PrimarySources must not be null");
        //1、先把主类保存起来
		this.primarySources = new LinkedHashSet<>(Arrays.asList(primarySources));


    //2、判断运行项目的类型
	this.webApplicationType = WebApplicationType.deduceFromClasspath();

    //3、扫描当前路径下META-INF/spring.factories文件的
         ApplicationContextInitializer并加载
	setInitializers((Collection) getSpringFactoriesInstances(
			ApplicationContextInitializer.class));

    //4、同样也是扫描当前路径下META-INF/spring.factories文件下的
         ApplicationListener并加载
	setListeners((Collection) getSpringFactoriesInstances(ApplicationListener.class));
	this.mainApplicationClass = deduceMainApplicationClass();
}
这里面还是要说一下ApplicationContextInitializer和ApplicationListener
- ApplicationContextInitializer 这个类当springboot上下文Context初始化完成后会调用
- ApplicationListener 当springboot启动时事件change后都会触发
我们来看一个案例,就更好理解上面这两个类
/**

- Context初始化后调用类

- @author ShiMinChen
  *
   */
  public class StarterApplicationContextInitializer implements ApplicationContextInitializer<ConfigurableApplicationContext> {

  @Override
  public void initialize(ConfigurableApplicationContext applicationContext) {
  	System.out.println("applicationContext 初始化完成 ... ");
  }

}
public class StarterApplicationListener implements ApplicationListener {


@Override
public void onApplicationEvent(ApplicationEvent event) {
    System.out.println(event.toString());
    System.out.println("ApplicationListener .... " + System.currentTimeMillis());
}
}
我们需要把这两个类集成到springboot里面去,其实操作也挺简单的
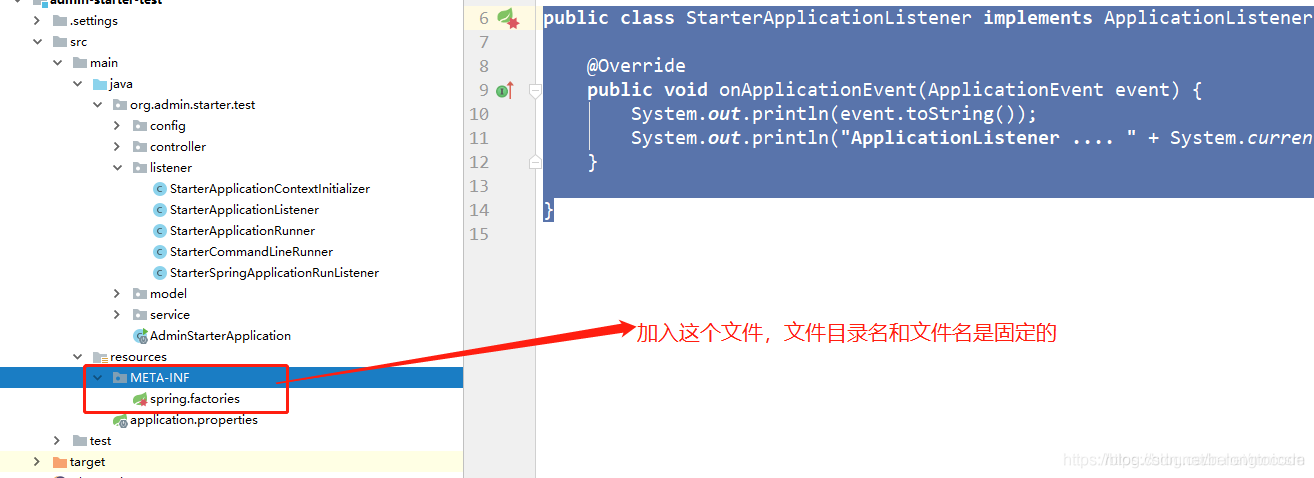
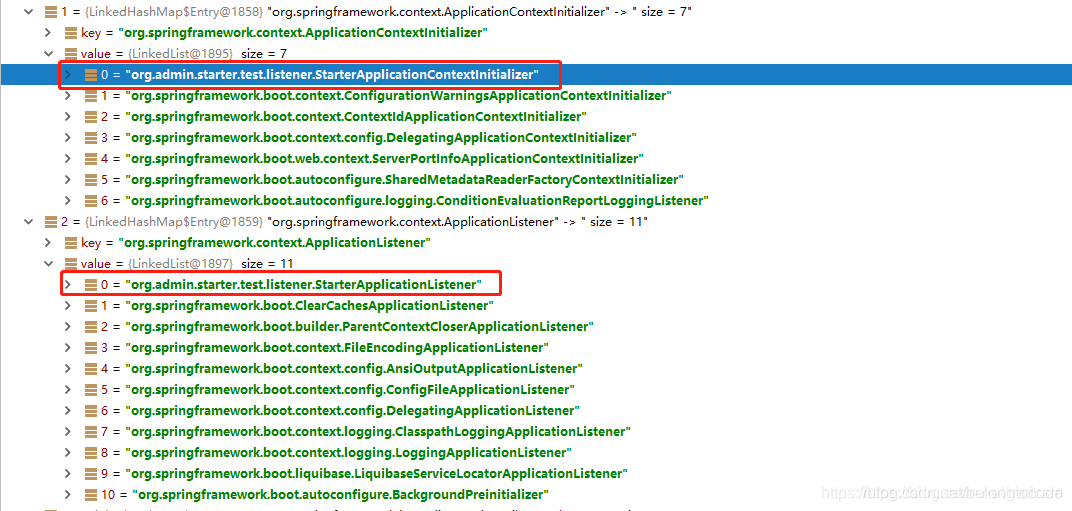
然后在META-INF/spring.factories 文件配置那两个类
org.springframework.context.ApplicationContextInitializer=\
org.admin.starter.test.listener.StarterApplicationContextInitializer

org.springframework.context.ApplicationListener=\
  org.admin.starter.test.listener.StarterApplicationListener
4、我们代码DEBUG一下,在loadSpringFactories() 方法打一个断点
private static Map<String, List<String>> loadSpringFactories(@Nullable ClassLoader classLoader) {
		MultiValueMap<String, String> result = cache.get(classLoader);
		if (result != null)
			return result;
		try {
			Enumeration<URL> urls = (classLoader != null ?
					classLoader.getResources(FACTORIES_RESOURCE_LOCATION) :
					ClassLoader.getSystemResources(FACTORIES_RESOURCE_LOCATION));
			result = new LinkedMultiValueMap<>();
			while (urls.hasMoreElements()) {
				URL url = urls.nextElement();
				UrlResource resource = new UrlResource(url);
				Properties properties = PropertiesLoaderUtils.loadProperties(resource);
				for (Map.Entry<?, ?> entry : properties.entrySet()) {
					List<String> factoryClassNames = Arrays.asList(
							StringUtils.commaDelimitedListToStringArray((String) entry.getValue()));
					result.addAll((String) entry.getKey(), factoryClassNames);
				}
			}
			cache.put(classLoader, result);

        // 端点打在这里就行了
		return result;
	}
	catch (IOException ex) {
		throw new IllegalArgumentException("Unable to load factories from location [" +
				FACTORIES_RESOURCE_LOCATION + "]", ex);
	}
}
总结:上面就是SpringApplication初始化的代码,new SpringApplication()没做啥事情 ,主要加载了META-INF/spring.factories 下面定义的事件监听器接口实现类
5、接下来看看run()方法,这个里面感觉有一大堆东西
public ConfigurableApplicationContext run(String... args) {

    <!--1、这个是一个计时器,没什么好说的-->
	StopWatch stopWatch = new StopWatch();
	stopWatch.start();
	ConfigurableApplicationContext context = null;
	Collection<SpringBootExceptionReporter> exceptionReporters = new ArrayList<>();

    <!--2、这个也不是重点,就是设置了一些环境变量-->
    configureHeadlessProperty();

    <!--3、获取事件监听器SpringApplicationRunListener类型,并且执行starting()方法-->
	SpringApplicationRunListeners listeners = getRunListeners(args);
	listeners.starting();

	try {

        <!--4、把参数args封装成DefaultApplicationArguments,这个了解一下就知道-->
		ApplicationArguments applicationArguments = new DefaultApplicationArguments(
				args);

        <!--5、这个很重要准备环境了,并且把环境跟spring上下文绑定好,并且执行environmentPrepared()方法-->
		ConfigurableEnvironment environment = prepareEnvironment(listeners,
				applicationArguments);

        <!--6、判断一些环境的值,并设置一些环境的值-->
		configureIgnoreBeanInfo(environment);

        <!--7、打印banner-->
		Banner printedBanner = printBanner(environment);

        <!--8、创建上下文,根据项目类型创建上下文-->
		context = createApplicationContext();

        <!--9、获取异常报告事件监听-->
		exceptionReporters = getSpringFactoriesInstances(
				SpringBootExceptionReporter.class,
				new Class[] { ConfigurableApplicationContext.class }, context);

        <!--10、准备上下文,执行完成后调用contextPrepared()方法,contextLoaded()方法-->
		prepareContext(context, environment, listeners, applicationArguments,
				printedBanner);

        <!--11、这个是spring启动的代码了,这里就回去里面就回去扫描并且初始化单实列bean了-->
        //这个refreshContext()加载了bean,还启动了内置web容器,需要细细的去看看
		refreshContext(context);

        <!--12、啥事情都没有做-->
		afterRefresh(context, applicationArguments);
		stopWatch.stop();
		if (this.logStartupInfo) {
			new StartupInfoLogger(this.mainApplicationClass)
					.logStarted(getApplicationLog(), stopWatch);
		}

        <!--13、执行ApplicationRunListeners中的started()方法-->
		listeners.started(context);

        <!--执行Runner(ApplicationRunner和CommandLineRunner)-->
		callRunners(context, applicationArguments);
	}
	catch (Throwable ex) {
		handleRunFailure(context, listeners, exceptionReporters, ex);
		throw new IllegalStateException(ex);
	}
	listeners.running(context);
	return context;
}
我们还是重点来看refreshContext(context) 这个方法,这个方法启动spring的代码加载了bean,还启动了内置web容器
private void refreshContext(ConfigurableApplicationContext context) {
        // 转到定义看看
		refresh(context);
		if (this.registerShutdownHook) {
			try {
				context.registerShutdownHook();
			}
			catch (AccessControlException ex) {
				// Not allowed in some environments.
			}
		}
	}
protected void refresh(ApplicationContext applicationContext) {
		Assert.isInstanceOf(AbstractApplicationContext.class, applicationContext);
        //看看refresh()方法去
		((AbstractApplicationContext) applicationContext).refresh();
	}
转到AbstractApplicationContext - >refresh()方法里面发现这是spring容器启动代码
@Override
	public void refresh() throws BeansException, IllegalStateException {
		synchronized (this.startupShutdownMonitor) {
			// Prepare this context for refreshing.
			prepareRefresh();

		// Tell the subclass to refresh the internal bean factory.
		ConfigurableListableBeanFactory beanFactory = obtainFreshBeanFactory();

		// Prepare the bean factory for use in this context.
		prepareBeanFactory(beanFactory);

		try {
			// Allows post-processing of the bean factory in context subclasses.
			postProcessBeanFactory(beanFactory);

			// Invoke factory processors registered as beans in the context.
			invokeBeanFactoryPostProcessors(beanFactory);

			// Register bean processors that intercept bean creation.
			registerBeanPostProcessors(beanFactory);

			// Initialize message source for this context.
			initMessageSource();

			// Initialize event multicaster for this context.
			initApplicationEventMulticaster();

			// Initialize other special beans in specific context subclasses.
			onRefresh();

			// Check for listener beans and register them.
			registerListeners();

			// Instantiate all remaining (non-lazy-init) singletons.
			finishBeanFactoryInitialization(beanFactory);

			// Last step: publish corresponding event.
			finishRefresh();
		}

		catch (BeansException ex) {
			if (logger.isWarnEnabled()) {
				logger.warn("Exception encountered during context initialization - " +
						"cancelling refresh attempt: " + ex);
			}

			// Destroy already created singletons to avoid dangling resources.
			destroyBeans();

			// Reset 'active' flag.
			cancelRefresh(ex);

			// Propagate exception to caller.
			throw ex;
		}

		finally {
			// Reset common introspection caches in Spring's core, since we
			// might not ever need metadata for singleton beans anymore...
			resetCommonCaches();
		}
	}
}
spring容器启动代码就不说了,这里主要看一下onRefresh() 这个方法,转到定义发现这个方法里面啥都没有,因为这个AbstractApplicationContext是一个抽象类,所以我们要找到继承AbstractApplicationContext的子类,去看子类里面的onRefresh()
protected void onRefresh() throws BeansException {
    //这是一个空方法,AbstractApplicationContext 这个类是一个抽象类,
    //所以我们要找到集成AbstractApplicationContext的子类,去看子类里面的onRefresh()
	// For subclasses: do nothing by default.
}

我们这里是一个Web项目,所以我们就去看 ServletWebServerApplicationContext 这个类 ,我还是把类的关系图贴一下
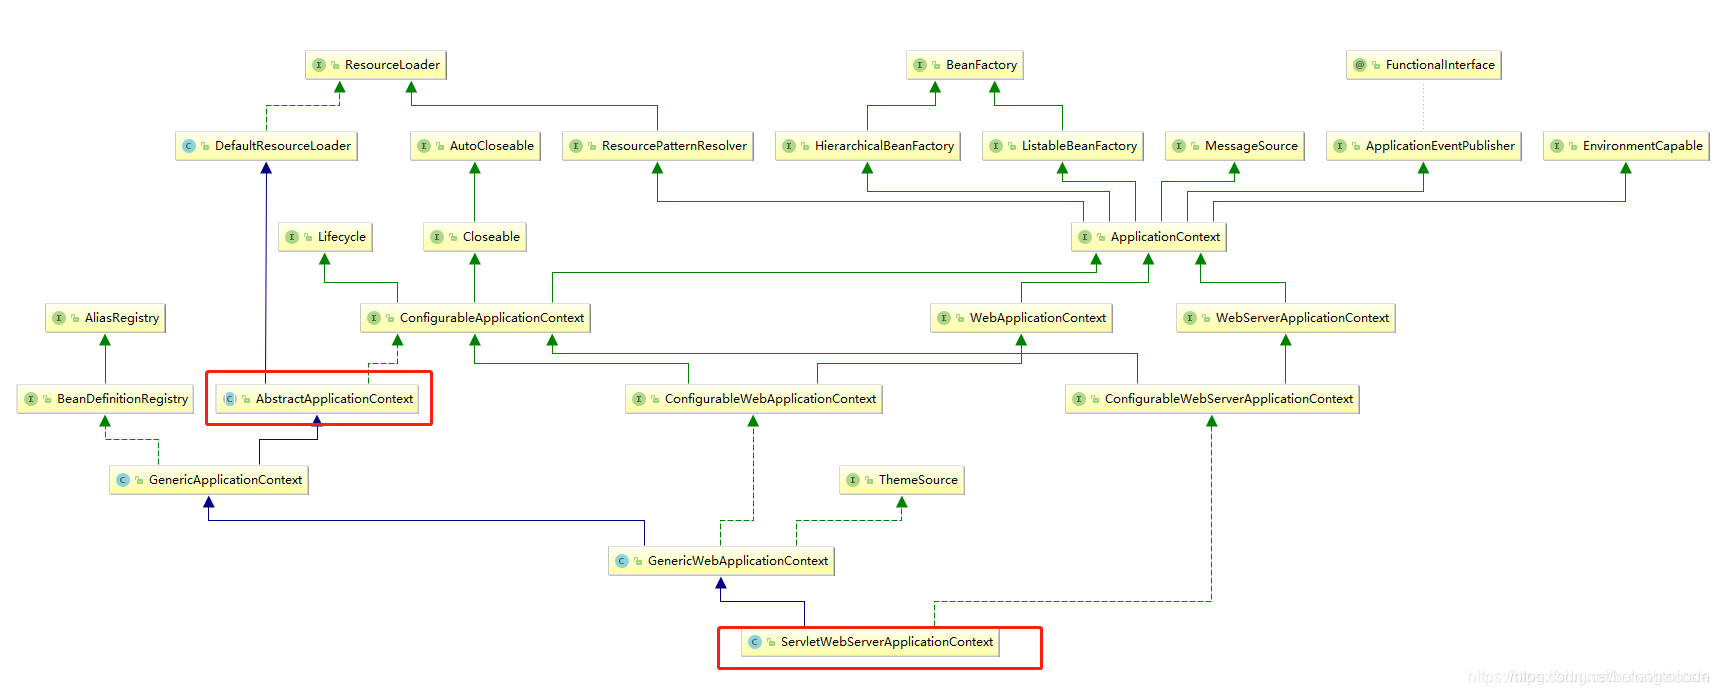
我们就去看 ServletWebServerApplicationContext 这个类下面的 onRefresh() 方法
protected void onRefresh() {
		super.onRefresh();
		try {
            //看到内置容器的影子了,进去看看
			createWebServer();
		}
		catch (Throwable ex) {
			throw new ApplicationContextException("Unable to start web server", ex);
		}
	}
private void createWebServer() {
		WebServer webServer = this.webServer;
		ServletContext servletContext = getServletContext();
		if (webServer == null && servletContext == null) {
            //1、这个获取webServerFactory还是要进去看看
			ServletWebServerFactory factory = getWebServerFactory();
			this.webServer = factory.getWebServer(getSelfInitializer());
		}
		else if (servletContext != null) {
			try {
				getSelfInitializer().onStartup(servletContext);
			}
			catch (ServletException ex) {
				throw new ApplicationContextException("Cannot initialize servlet context",
						ex);
			}
		}
		initPropertySources();
	}
我们继续看下getWebServletFactory() 这个方法,这个里面其实就是选择出哪种类型的web容器了
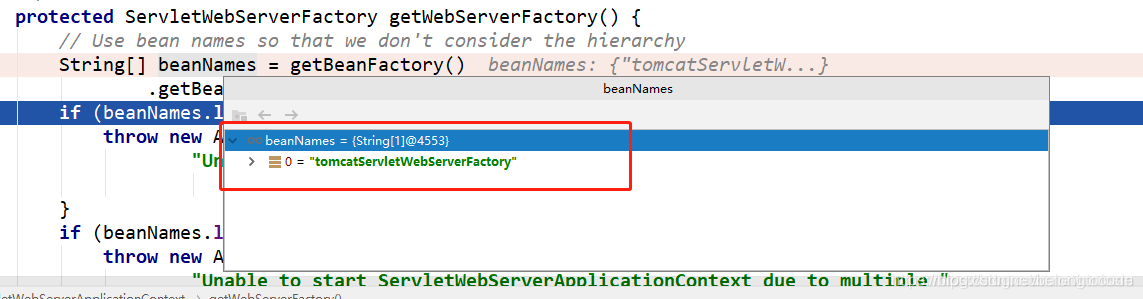
protected ServletWebServerFactory getWebServerFactory() {
		// Use bean names so that we don't consider the hierarchy
		String[] beanNames = getBeanFactory()
				.getBeanNamesForType(ServletWebServerFactory.class);
		if (beanNames.length == 0) {
			throw new ApplicationContextException(
					"Unable to start ServletWebServerApplicationContext due to missing "
							+ "ServletWebServerFactory bean.");
		}
		if (beanNames.length > 1) {
			throw new ApplicationContextException(
					"Unable to start ServletWebServerApplicationContext due to multiple "
							+ "ServletWebServerFactory beans : "
							+ StringUtils.arrayToCommaDelimitedString(beanNames));
		}
		return getBeanFactory().getBean(beanNames[0], ServletWebServerFactory.class);
	}
我们再回头去看factory.getWebServer(getSelfInitializer()) ,转到定义就会看到很熟悉的名字tomcat
public WebServer getWebServer(ServletContextInitializer... initializers) {
        //tomcat这位大哥出现了
		Tomcat tomcat = new Tomcat();
		File baseDir = (this.baseDirectory != null ? this.baseDirectory
				: createTempDir("tomcat"));
		tomcat.setBaseDir(baseDir.getAbsolutePath());
		Connector connector = new Connector(this.protocol);
		tomcat.getService().addConnector(connector);
		customizeConnector(connector);
		tomcat.setConnector(connector);
		tomcat.getHost().setAutoDeploy(false);
		configureEngine(tomcat.getEngine());
		for (Connector additionalConnector : this.additionalTomcatConnectors) {
			tomcat.getService().addConnector(additionalConnector);
		}
		prepareContext(tomcat.getHost(), initializers);
		return getTomcatWebServer(tomcat);
	}
Tomcat 就在这里启动的
总结:
1、run() 方法主要调用了spring容器启动方法扫描配置,加载bean到spring容器中
2、启动的内置Web容器
Reference article:
https://blog.csdn.net/mnicsm/article/details/93893669
