Construction of GLFW
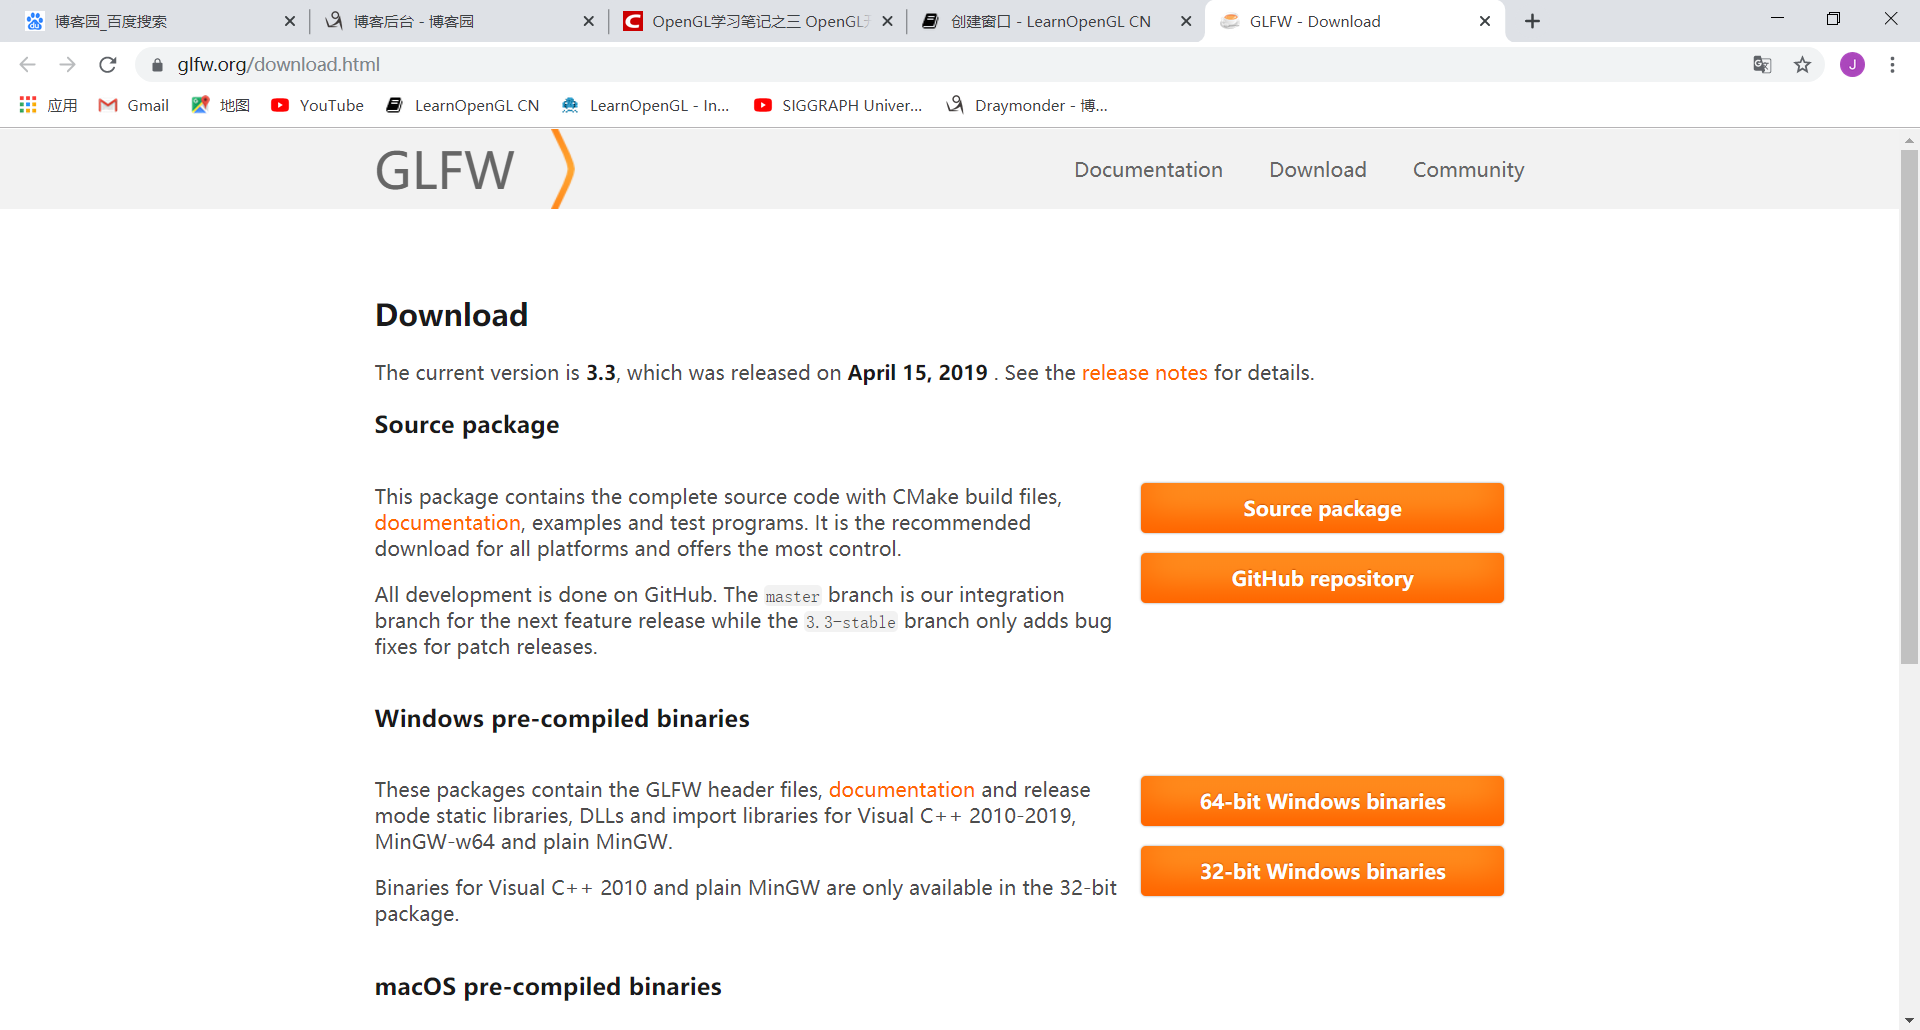
GLFW can get (from the download page on its official website https://www.glfw.org/download.html ). GLFW for Visual Studio have been pre-compiled binary version and the corresponding header file 2013/2015, but for completeness we will compile the source code starts. So we need to download the source code package, Source package button click below to download the source package.
After downloading the source package, unzip it and open it. Compiling from source library can be generated to ensure the library is compatible with your operating system and CPU, and precompiled binaries may occur compatibility problems (sometimes not even support your system files). A problem generated source code is not everyone using the same IDE development program, thus providing engineering / solution files might not be compatible with some of the IDE. So people can only create their own projects / solutions from .c / .cpp and .h / .hpp file, this is a boring job. But therefore also the birth of a tool called the CMake.
CMake
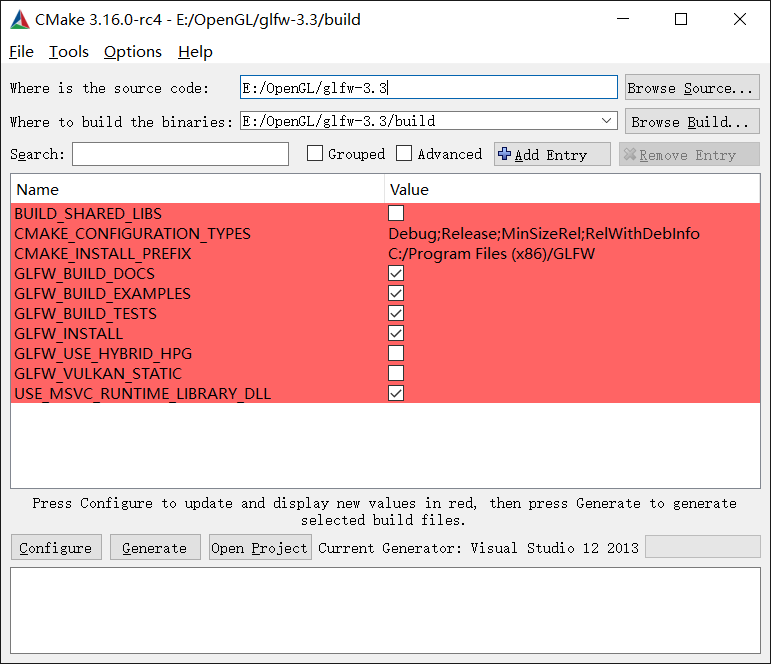
CMake is a project file generation tool. Users can use pre-defined CMake script, generate a different IDE project files according to your choice (such as Visual Studio, Code :: Blocks, Eclipse ). This allows us to create a Visual Studio 2013 project files from source code in GLFW, after compiling. First, we need to from here ( https://cmake.org/download/ choose win64-x64) to download and install CMake. When CMake successful installation, you can choose to start from the command line or GUI CMake, because I do not want to make things too complicated, we chose to use GUI. CMake need a source code directory and store the compiled results of a target directory. We chose GLFW source directory in the root directory of the source code, build and then we create a new folder, select the target directory.
After you set up the source and destination directories, click Configure (Setup) button, let CMake settings and read the source code. Next we need to select the project builder, because we are using Visual Studio 2013, we chose Visual Studio 12 2013 option. CMake will show optional compiler option is used to generate the final configuration of the library. Here we use the default settings, and click Configure (Set) button to save the settings again. After saving, click Generate (generation) button to generate the project files in the folder in your build file.
Compile
GLFW.sln file can be found in the build folder, opened with Visual Studio 2013. Because CMake've configured the project (the entire solution has 30 projects, what we need is one glfw, which is used to generate glfw3.lib file), so right-on glfw generation project, the compiled library glfw3. lib (Note that we are using a version 3) will appear in src / Debug folder.
After library generation is completed, we need to let the IDE know the location of the library and header files. There are two ways:
- Find IDE or compiler / lib and / include folder, add GLFW's include folder of files to IDE / include folder go. In a similar manner, the glfw3.lib added to the / lib folder go. While this can work, but this is not the recommended way, because it could make it hard to manage libraries and include files, and reinstall the IDE or compiler can cause these files are missing.
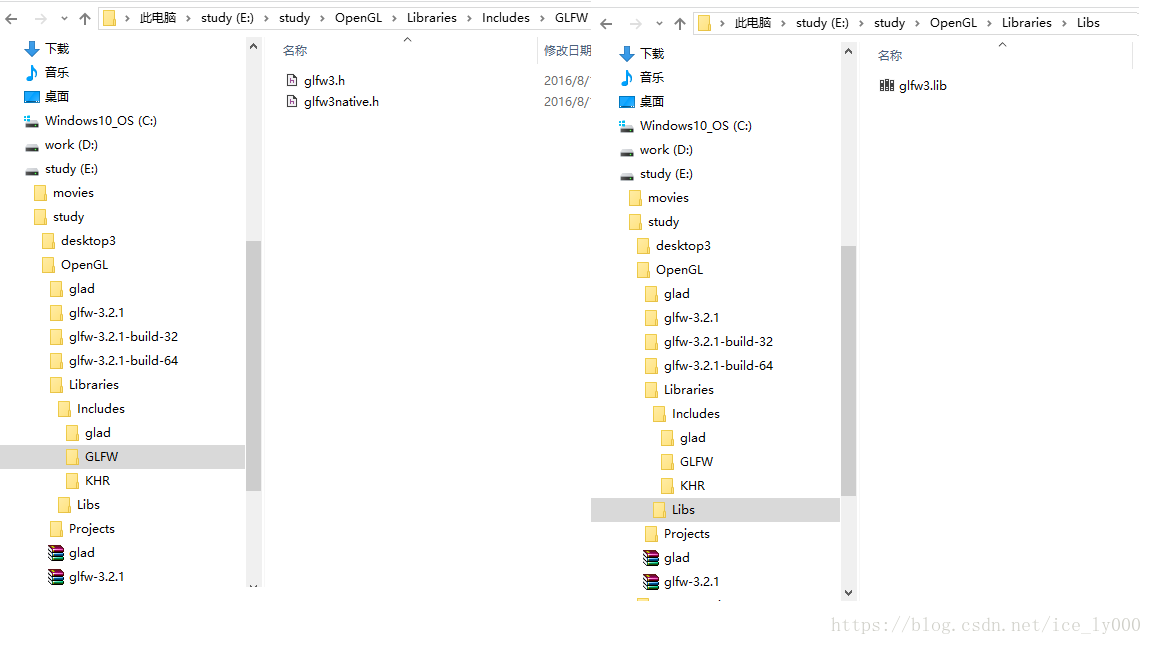
- The recommended way is to create a new directory containing all third-party libraries and header files, and specify the folders in your IDE or compiler. I personally would use a separate folder, which contains Libs and Include folder where to store all the third-party libraries and header files used in OpenGL project. So that all of my third-party libraries are in the same position (at most computer and can be shared). However, this requires that you always need to tell the IDE when a new project / compiler where to find these directories. The following is a directory on my machine (by map, create a folder like in a similar manner)
After completion of the above steps, we can use GLFW create our first project of OpenGL!
Our first project
首先,打开Visual Studio,创建一个新的项目。如果VS提供了多个选项,选择Visual C++,然后选择Empty Project(空项目)(别忘了给你的项目起一个合适的名字)。现在我们终于有一个空的工作空间了,开始创建我们第一个OpenGL程序吧!
链接
为了使我们的程序使用GLFW,我们需要把GLFW库链接(Link)进工程。这可以通过在链接器的设置里指定我们要使用glfw3.lib来完成,但是由于我们将第三方库放在另外的目录中,我们的工程还不知道在哪寻找这个文件。于是我们首先需要将我们放第三方库的目录添加进设置。要添加这些目录(需要VS搜索库和include文件的地方),我们首先进入Project Properties(工程属性,在解决方案窗口里右键项目),然后选择VC++ Directories(VC++ 目录)选项卡(如下图)。在下面的两栏添加目录(包含目录以及库目录):

这里你可以把自己的目录加进去,让工程知道到哪去搜索。
这里可以添加任意多个目录,IDE会从这些目录里寻找头文件。所以只要你将GLFW的Include文件夹加进路径中,你就可以使用<GLFW/..>来引用头文件。库文件夹也是一样的。
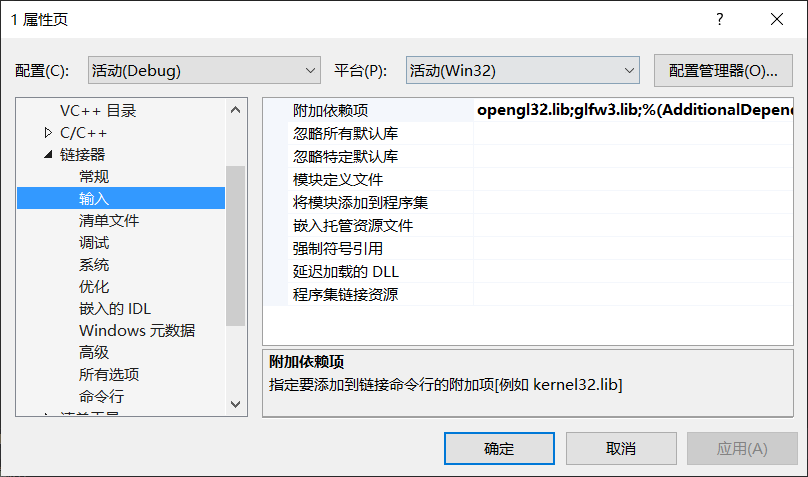
现在VS可以找到所需的所有文件了。最后需要在Linker(链接器)选项卡里的Input(输入)选项卡里添加glfw3.lib和opengl32.lib这两个文件:
GLFW的安装与配置就到此为止。
配置GLAD
GLAD是一个开源的库,它能解决我们上面提到的那个繁琐的问题。GLAD的配置与大多数的开源库有些许的不同,GLAD使用了一个在线服务。在这里我们能够告诉GLAD需要定义的OpenGL版本,并且根据这个版本加载所有相关的OpenGL函数。
打开GLAD的在线服务(https://glad.dav1d.de/),将语言(Language)设置为C/C++,在API选项中,选择3.3以上的OpenGL(gl)版本(我们的教程中将使用3.3版本,但更新的版本也能正常工作)。之后将模式(Profile)设置为Core,并且保证生成加载器(Generate a loader)的选项是选中的。现在可以先(暂时)忽略拓展(Extensions)中的内容。都选择完之后,点击生成(Generate)按钮来生成库文件。
GLAD现在应该提供给你了一个zip压缩文件,包含两个头文件目录,和一个glad.c文件。将两个头文件目录(glad和KHR)复制到你的Includes文件夹中(注意这个Includes是配置GLFW时配置的Libraries文件夹下的子目录,而非工程下的目录),并添加glad.c文件到你的工程中。

经过前面的这些步骤之后,你就应该可以将以下的指令加到你的文件顶部了:
#include <glad/glad.h>
点击编译按钮应该不会给你提示任何的错误,到这里我们就已经准备好GLFW和GLAD环境了,去真正使用GLFW和GLAD来设置OpenGL上下文并创建一个窗口了。记得确保你的头文件和库文件的目录设置正确,以及链接器里引用的库文件名正确。

参考:
https://blog.csdn.net/ice_ly000/article/details/80336873
https://learnopengl-cn.github.io/01%20Getting%20started/02%20Creating%20a%20window/