Recently spent on learning vue, it is always off, the effect is not very obvious learning, thinking for a long time, it should not be a summary of the system, leading to a lot of knowledge is always plausible, but also in part thinking has not changed from java over ado, and slowly learn it!
I'm ready to learn vue just summarize it as a note, do not remember the time to look back;
vue official document: https://cn.vuejs.org
1. What is vue.js
In fact, Baidu, you can know a lot of explanation, is a progressive framework for building user interfaces, Vue is designed to be a bottom-up layer by layer application, Vue core libraries .... only concerned with the view layer, to be honest the beginning for me, what did not directly learn on the right, temporarily put vue js as a third-party libraries used, on a similar jquery, like, first introduced with the script tag, and then use the ok with a specific syntax;
Of course, this is the most low way back we slowly learn how and webpack package management tool integration, modular development, in this, let's look at a few concepts:
node: node What is it? We know that js code can run on the browser, but no browser js can run it? Of course, so there node, node js is a runtime environment, you can understand it as a substitute for the browser, but the key is to get rid of the restrictions after js browser, you can write the backend with js code; for example, you can write a server, in fact, write a program up and running has been listening on a port on the computer, the outside world can access the port through http request, then this program will receive a url request, read based on the url path write file, and then return to user requests;
npm: can be simply understood as a tool to download third-party libraries, with this tool you want to use the excellent third-party libraries in your project needs only one command can be a npm i xxx -s, most relatively new node already it comes with npm, so you do not need to download their own
webpack: npm can download, when used in a modular development, because if the dependencies between modules is very complex, and then do the project, when the page loads or interaction, will launch a large number of requests, in order to optimize performance, you need to use such webpack packetizer packetizes integration module, to reduce the number of requests. Borrow a map, in fact, a simplified tool package dependencies
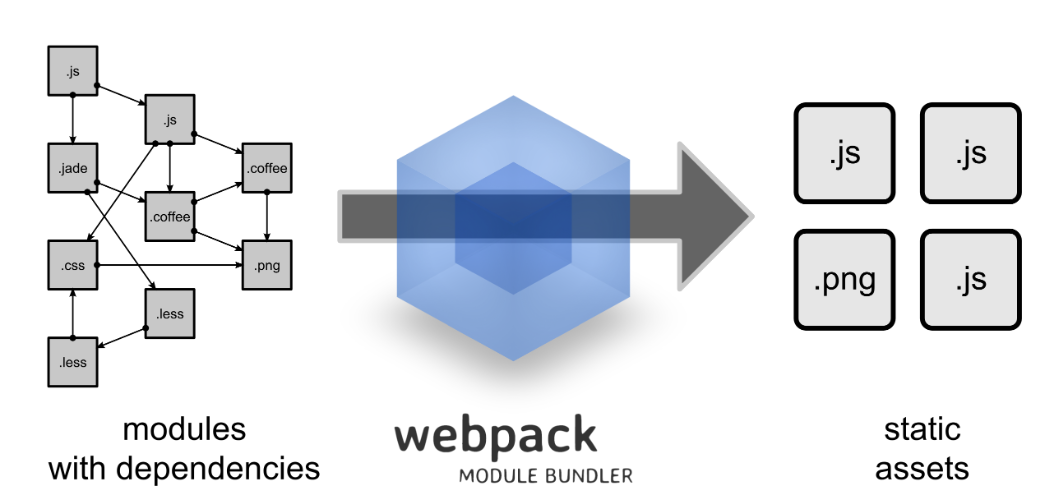
In a word, node is a runtime environment, npm is a tool to download third-party libraries to avoid duplication create the wheel, webpack packaging tools to optimize performance
2.vue simple to use
We start from the most simple, just prepare a html file, do not start from the vue-cli scaffolding, since the beginning of the directory too, face mask to force w (° o °) w
Here is my editor favors vscode, highly recommended by this, the biggest reason I use this editor is lightweight (Do not Wrong, vscode full name is called Visual Studio Code, there is a name much like Microsoft Visual Studio Code, the size of several G ....), and what you want to plug directly download, easy to use, of course, are interested can also use webstorm and so on;
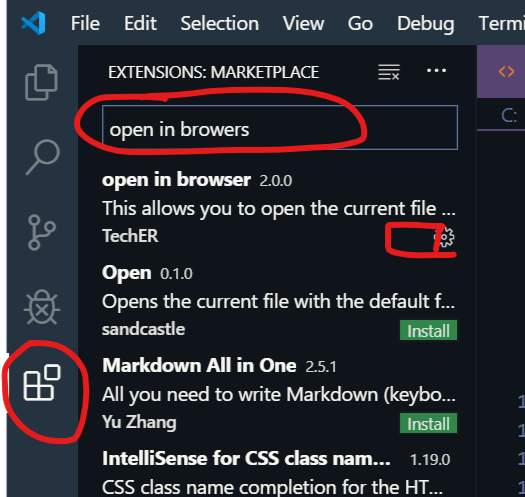
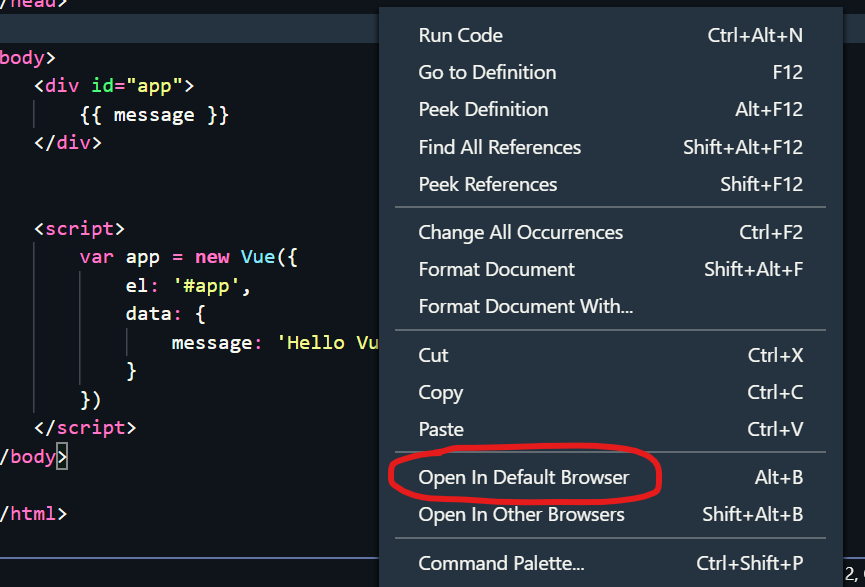
Create a new html file with vscode open, then! + Tab to quickly generate html template, introducing vue js file, and download the vscode open in browers in a plug-in, so you can right option is the default browser opens in html or open in another browser
Simple vue Code:
<!DOCTYPE html>
<html lang="en">

<head>
    <meta charset="UTF-8">
    <meta name="viewport" content="width=device-width, initial-scale=1.0">
    <meta http-equiv="X-UA-Compatible" content="ie=edge">
    <title>Document</title>
    <!-- 引入vue的依赖文件 -->
    <script src="https://cdn.jsdelivr.net/npm/vue"></Script >
</ head >

< body >
    < div ID = "App" >
        {{}} // message there is a message variable, with wrap} {} {
    </ div >


    < Script >
        var App =  new new Vue ( {
            EL: ' #app ' ,   // this is selected above div tag
            Data: {
                message: ' ! Vue the Hello '     // a variable assignment message, there will be synchronized to the message label div
            }
        })
    </script>
</body>

</html>
Right, open the default browser, and the browser will be able to see Hello Vue!
Easily, requires only three steps, first the introduction vue dependencies, then with html tag {{xxx}} vue wrapped in a variable, the final instance is created Vue, optionally, a Label In this example, the definition of variable values, then the value of this variable will take effect in the html tag;
In fact, here it is equivalent to document.getElementsById ( "App"). InnerText = " the Hello Vue! ", However vue purpose is to try to not let us go directly manipulate dom node, we just need to focus on filling the data to the label on the line, Here we understand these simple look vue common commands it!
3.vue basic grammar
We use the {{}} 2 represented in this thing where the variables are associated with the instance and Vue, in fact, vue gave us some command
We want to note that : as long as the instruction is bound with vue, all variables, functions, objects (except boolean type) or expression, such as the classic v-bind: class = "{= "xxx"; note marks which are variable, not a string
3.1 v-bind command
The instructions may bind any property tag, so that the value of this attribute becomes the attributes vue not find this very wound,! Example: <a v-bind:href="url"> I Baidu </a>
This attribute href a tag, v-bind is bound to the command, so that the value of the href url attribute becomes an attribute of vue, shown below, in Vue example, we can for this url property assignment, is not very easy, and this command can be abbreviated into the colon, that is, after the above is a shorthand label <a :href="url"> I Baidu </a>

I have already said, v-bind attribute can bind any property tag, that attribute id, class, style, src, and so properties can only require a similar statement: xxx = "aaa", and then in the Vue examples of attribute data declared to aaa
3.2 v-for instruction
This command is often used to cycle through, give a simple example:
App new new Vue = var ({
            EL: '#app',
            Data: {// define an array of books
                books: [{
                    name: "Robinson",
                    . price: 15
                }, {
                    name: "gourd",
                    . price : 7
                }]
            }
        })
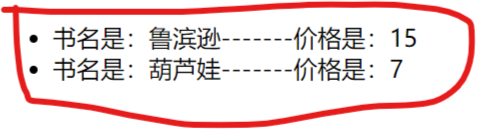
< UL >
   < Li V-for = "Books in Book" > Title is: {{book.name}} ------- price: book.price {{}} </ Li >
</ UL >
3.3 v-if instruction
The conditions for determining, if the v-if = "flag" the flag is true, then the label is visible, otherwise not see, for example:
 < H1 v-IF = "to true" > You can not see me </ h1 >
 < h1 v-IF = "false" > Can you see me </ h1 >
Of course, also be v-if there is an attribute, and the effect is the same as above
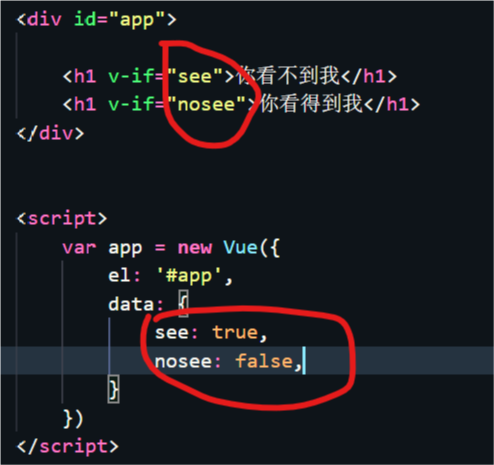
这个指令和v-show用法一样,效果几乎一样,唯一的区别就是v-if指令为false时,那么该标签在html中根本就没有,而v-show即使为false,这个标签在html是存在的,只不过该标签使用style="display: none;"不显示出来,这也很好理解
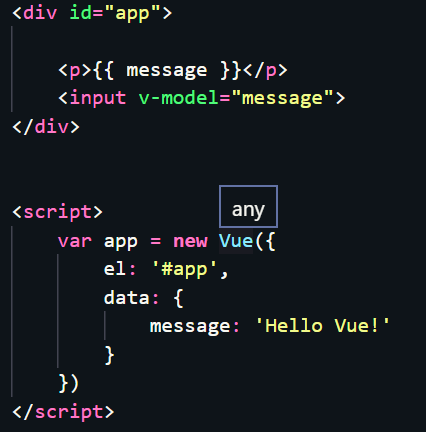
3.4 v-model指令
注意,这个指令只会用在input标签中,换句话说只会用在表单中,举个例子,如下图,只要输入框中改变了什么,那么上面的显示也会跟着改变,而且也会用于表单信息收集,后面用到的时候再说

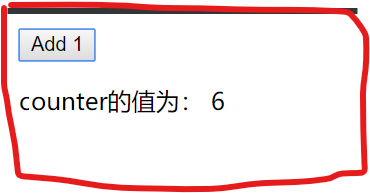
3.5 v-on指令
前面的几个指令都是绑定属性的,这个命令是绑定事件的,我们可以用这个命令来绑定一些事件函数;举个例子,绑定只要鼠标的点击事件,每一次点击按钮,counter的值就会加一,使得vue实例中的counter也会跟着加一,然后p标签又会时刻监听着counter的变化,所以最终的效果就是每点击一次按钮,屏幕中的数字就会变化加一
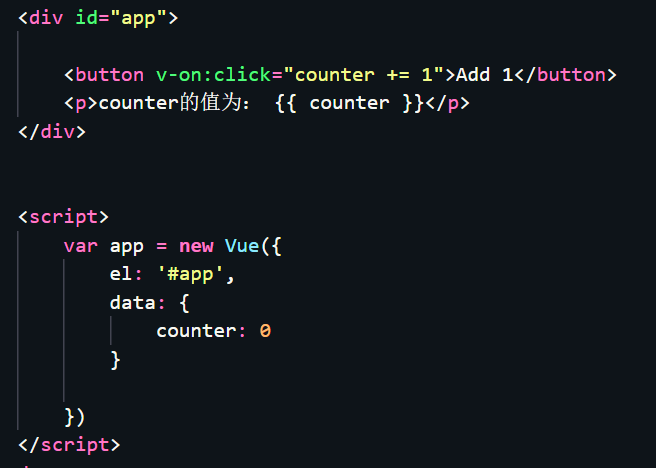
补充一下,v-on指令由于很常用,所以也有简写形式,就是@,比如上面的<button @click="counter += 1">Add 1</button>
到这里可以说vue的几个基本指令就说完了,还是很容易的,不知道大家有没有发现,我们现在的指令还只是涉及到了vue实例中的data中的属性,那么,在Vue实例中,除了el、data还有其他的属性吗?
4.vue实例的属性
vue实例的属性太多,我们就说说的常用属性,首先的就是在上面我们说到的el属性和data属性,这两个属性很好理解,el的全称是element,也就是标签嘛,这里用的id选择器选择指定标签,当然也可以用class选择器,自己可以试试;然后data属性表示在标签中要进行初始化的一些静态数据,注意,这里是静态数据;
然后我们要想办法让这些数据是动态的,于是就有了事件监听然后调用指定的函数,于是就有一个属性是methods,在面向对象的语言中,这些函数也叫做方法,这里的就是存放标签中监听的自定义的事件函数;
由于每一次标签中的数据发生变化,我们要动态显示的话,都用函数监听,那么每一次都会调用函数,虽然说可以实现基本功能,但是在某些特殊情况下,我们可以利用一个计算属性computed,这个属性有一个好处,就是可以使用缓存,比如计算属性中有个变量数据一直没有改变,那么下一次访问就直接返回缓存中的结果就行了,而函数的话每一次都会去执行一次;
还有就是在vue实例在实例化的过程中也会默认调用一些函数(这些函数不是在methods中的),这些函数是一些生命周期函数,大概分为三个部分,初始化的时候调用beforeCreate和created、beforedMount和mounted;更新数据的时候beforeUpdate和updated;销毁vue实例的时候beforeDestroy和destroy;
我们简单了解vue的生命周期,下面有个图从官网那里拿过来的,很经典的一个图:

下面我们就用简单的例子,简单看看使用一下这几个常用的属性和生命周期函数:
<!DOCTYPE html>
<html lang="en">

<head>
    <meta charset="UTF-8">
    <meta name="viewport" content="width=device-width, initial-scale=1.0">
    <meta http-equiv="X-UA-Compatible" content="ie=edge">
    <title>Document</title>
    <script src="https://cdn.staticfile.org/vue/2.2.2/vue.min.js"></script>
</head>

<body>

    <div id="app">
        <input type="text" v-model="message" placeholder="随便输入什么内容">
        <input type="submit" value="逆转按钮" @click = "reverseMsg">
        <br>
        <div>计算属性为:{{msg}}</div>
    </div>

    <script>
        new Vue({
            el: '#app',
            data: {
                message: ''
            },
            methods:{
                //这个方法作用是将字符串逆转
                reverseMsg(){
                    return this.message = this.message.split('').reverse().join('')
                }

            },
            computed:{
                //这个计算属性,在这类就是将逆转的字符串后面加计算返回
                msg(){
                   return this.message+"计算"
                }

            },
            //以下都是生命周期函数的执行时机
            beforeCreate(){
                console.log("beforeCreate方法执行")
            },
            created(){
                console.log("create方法执行")
            },
            beforeMount(){
                console.log("beforedMount方法执行")
            },
            mounted(){
                console.log("mounted方法执行")
            },
            beforeUpdate(){
                console.log("beforeUpdate方法执行")
            },
            updated(){
                console.log("updated方法执行")
            },
            //注意,下面两个直接用页面测试不出来,到后面使用了vue-cli之后就很好测试了
            destoryed(){
                console.log("destoryed方法执行");
            },
            beforeDestory(){
                console.log("beforeDestory方法执行");
            }
        })
    </script>

</body>

</html>
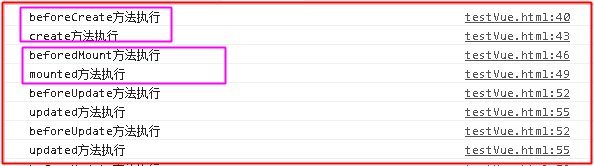
可以看到,多次更新数据框中的数据都会调用更新的函数,而beforeCreate和created、beforedMount和mounted只会执行一次;beforeUpdate和updated会执行多次
具体的步骤:
在调用beforeCreate的时候,vue实例中的el,data,data中的message都为undefined;
调用created的时候,el还是undefined,而数据已经与data中的属性进行绑定(放在data中属性当值发生改变的同时,视图也会发生变化),一般可以在这里做初始数据的获取;
调用beforedMount,载入前(完成了data和el数据初始化),但是页面中的内容还是vue中的占位符,data中的message信息没有被挂在到Bom节点中,一般可以在这里做初始数据的获取;
调用mounted,载入后html已经渲染(ajax请求可以放在这个函数中),把vue实例中的data里的message挂载到BOM节点中去;
调用beforeUpdate,更新前状态(html中的数据变化前,不是data中的数据改变前),重新渲染之前触发,然后vue的虚拟dom机制会重新构建虚拟dom与上一次的虚拟dom进行对比之后重新渲染;
调用updated,数据已经更改完成,dom也重新渲染完成
没记错的话还有一个监听属性没有说到,后面用到再说,其实监听属性暂时基本用不到,先放一下,还有几个动画的指令,有兴趣的自己研究一下;
5.vue组件
前面说了这么多都是一些基本用法,vue真正的精髓就是组件,可以有很多很多的组件,那么什么是组件呢?是一个js文件,还是一个css文件?
其实我认为组件是一个资源的集合,比如后面我们可能会用到的Element UI组件库中的组件,每一个组件都包括js,css,scss,image等资源组成,然后我们随时可以用这个组件放在我们的页面中,不需要我们去自己手写样式或者去复制别人的css、js代码了,实现了代码的重用性,极大的简化了开发;
当然我们这里会用到最简单的组件,组件中就是一个template属性(在模块化开发中组件是一个vue文件,里面有一个template标签,在这个标签里,可以用所有的html语法以及vue指令),例如下面的这样的:
<div id="app">
<!--至于怎么使用组件呢?可以直接用组件名当作标签使用就行了,注意,这里标签中可以使用vue指令-->
<template01></template01>
<template02></template02>
<div>{{message}}</div>
</div>
<script>
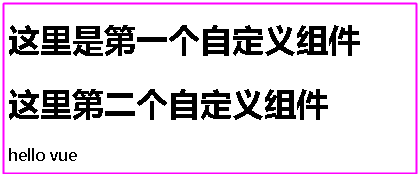
var template01 = {template: '<h1>这里是第一个自定义组件</h1>'}
var template02 = {template: '<h1>这里第二个自定义组件</h1>'}
//这里是第一种注册组件的做法,直接全局注册,也就是说子组件中还可以用组件2
Vue.component("template02",template02)
new Vue({
el: '#app',
data: {
message: 'hello vue'
},
//这是第二种注册组件的方式,但是这种方式是能在当前组件使用,这里相当于 "template01": template01
components:{
template01
}
})
</script>
如果是在组件化开发中,我们的组件是这种形式的,下图所示:
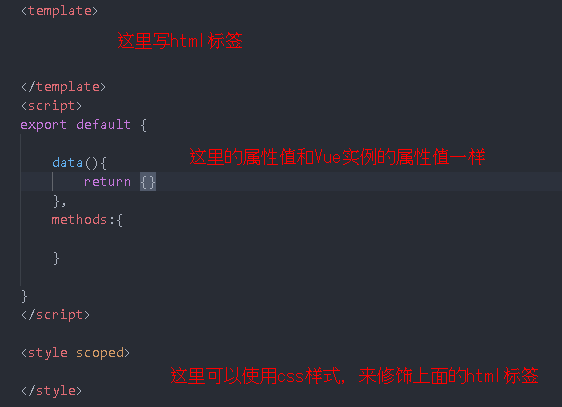
·· 这里还有一点需要说一下,上面我们使用了template01 组件,但是这个组件中是不能使用new Vue(xxx)这个里面的data数据的,因为取不到;
我们把当前的组件叫做父组件,template01 组件叫做子组件,现在我们需要传递数据,由于子组件无法使用父组件中的数据,于是我们可以在子组件使用一个props,然后父组件可以在<template01></template01>中使用vue指令绑定自定义属性,这样就将数据传到子组件的props中,然后子组件就可以随便使用props中的数据了;
举个简单的例子:


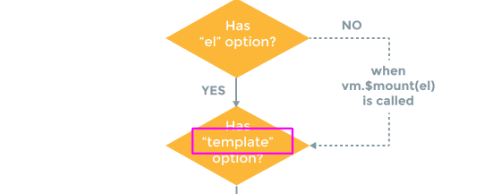
补充一下,不知道大家有没有觉得这个template属性比较熟悉,在前面应该见过,就是那个Vue生命周期的图中,有关于生命周期的具体详解我看了一篇博客讲的挺不错的,有兴趣的可以去看看,点击这里;
其实这里的template是vue的一个实例属性,就像data属性和el属性一样,实际上表示的是要渲染的模板,如果在Vue中没有声明这个属性template,默认就把el属性指向的标签当作template去解析;否则只解析Vue中的template属性对应的标签内容,此时el对应的标签不会解析
 <div id="app">

        <div>外面的模板:{{message}}</div>

    </div>

    <script>

        new Vue({
            el: '#app',
            data: {
                message: 'hello vue'
            },
            //注意,此时不管这个div中没有没id="app"都一样,只会默认解析这个模板,然后渲染数据
           template:'<div><p>template属性对应的模板:{{message}}</p></div>'


        })
    </script>
显示的结果是:

由此可以知道Vue实例中的template属性优先级更高,不过这个属性很少用到。。。
6.总结
多了解Vue的声明周期以及vue基础知识很重要,然后在使用vue的过程中学会了很多的东西,慢慢学吧,这次只是简单的看了一下基础知识,下一次就好好的用vue-cli构建项目,然后快速开发一些东西