1. The conventional string method
1. indexOf: Find an initial position of a character string
2. slice: intercepting string (comprising the starting position, the end position is not included)
不会根据参数大小,交换参数位置
如果出现-1按倒数第一个数,如果出现-2按倒数第二个数。
3. substring: intercepting string (comprising the starting position, the end position is not included)
会根据参数大小,交换参数位置
如果出现负数,则按0处理。
4. substr: interception string
5. split:
作用: 通过一个指定的字符串 把原字符串分割成一个数组。
语法: array string.split([separator] [, limit])
参数:separator是指分割符。limit指定最多分割的数量,可以理解为数组长度,默认为全部。
返回值:返回一个数组。
注意:当没有分割符的时候(没有传入参数),整个字符串将作为一个整体保存到数组中。 用分割符分割的时候,分割符会在被删除了在传入数组。
<script>
var str="我爱,你,们";
console.log(str.split(","));//["我爱","你","们"]
console.log(str.split(",",2));//["我爱","你"]
console.log(str.split());//["我爱,你,们"]
console.log(str.split("mmm"));//["我爱,你,们"]
console.log(str.split(""));//["我", "爱", "," , "你", "," ,"们"]
</script>6.charAt: returns the corresponding character position
2. The array of conventional methods
1. join: the array of splice by specifying a string of characters.
separator可选,如果省略的话,默认为一个逗号。如果 seprator 是一个空字符串,那么数组中的所有元素将被直接连接。2. push: to the end of the array to add one or more elements. Return value: length of the new array. We will modify the original array.
3. unshift: to the end of the array to add one or more elements. Return value: length of the new array. We will modify the original array.
4. pop: the role: Remove the last element of the array. Returns: an element that was deleted. Note: will modify the original array.
5. shift: the role: Remove the first element of the array. Returns: an element that was deleted. Note: will modify the original array.
6. slice: action: intercepting a portion of the array, and returns the new array Return value: taken after the new array. Note: do not modify the original array.
7. splice
array array.splice(start, deleteCount[, item1[, item2[, ...]]])
- start    起始位置
- deleteCount    删除长度
- item    添加的内容
返回值: 由被删除的元素组成的一个数组
注意:修改了原数组的内容。
<script>
    var att="Liangzhifang".split("");
    console.log(att.splice(2,4,["a"]));//["a","n","g","z"]
    console.log(att);//["L","i",["a"],"h","i","f","a","n","g"]
</script>
4.sort
Role: the elements of the array to be sorted.
Syntax: Array arr.sort ([the compareFunction]);
Parameters: the compareFunction optional. It is used to specify functions arranged in a certain order. If omitted, the elements are sorted in various sites Unicode characters into a string.
Returns: sorted array.
<script>
    //当什么都不传入的时候,sort()默认由小到大排列。
    var attr=[9,5,4,3,2];
    console.log(attr.sort());//[2, 3, 4, 5, 9]
    //传入function的时候,sort()内的function返回值大于0,由小到大排列。
    var attrO=[9,5,4,3,2];
    console.log(attrO.sort(function () {
        return 1;
    }));//[2, 3, 4, 5, 9]
    //传入function的时候,sort()内的function返回值小于或者等于0,数组序列不变。
    var attrT=[9,5,4,3,2];
    console.log(attrT.sort(function () {
        return -1;
    }));// [9, 5, 4, 3, 2]
    //由于sort内部是随机抽取两个值,我们在利用function函数的返回值,大于0的时候,交换位置。小于或者等于0的时候不变,来排序。
    //以下是由小到大排序
    var attrTh=[9,5,4,3,2];
    console.log(attrTh.sort(function (a,b) {
        return a-b;
    }));// [2, 3, 4, 5, 9]
    //以下是由大到小排序
    var attrF=[9,5,4,3,2];
    console.log(attrF.sort(function (a,b) {
        return b-a;// [9, 5, 4, 3, 2]
    }));

</script>
3.DOM
1.children 和 childNodes
children 获取节点的一级的元素子节点,返回的是集合 HTMLCollection
childNodes 获取节点的子节点,可能获取到 元素节点,文本节点,注释节点,返回的是集合 NodeList
<body>
<div id="wrap">
<div id="content">
<div id="inner"></div>
</div>
<p>p</p>
一句话
</div>
<script>
var wrap = document.getElementById("wrap");
console.log( wrap.childNodes );
console.log( wrap.children );
</script>
</body>2.
a sibling element on node.previousElementSibling
next node.nextElementSibling element of sibling
<body>
<!--、
    兄弟关系
        node.previousElementSibling 上一个元素兄弟节点
        node.nextElementSibling 下一个元素兄弟节点
-->
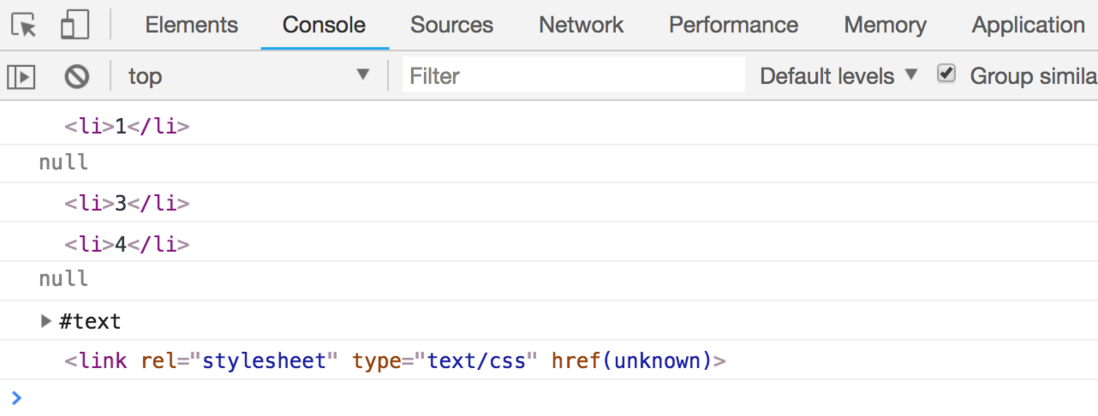
<ul id="list">
    <li>1</li>
    <li id="item">2</li>
    <li>3</li>
    <li>4</li>
</ul>
一句话
<link rel="stylesheet" type="text/css" href=""/>
<script>
    var list = document.getElementById("list");
    var item = document.getElementById("item");
    console.log( item.previousElementSibling );
    console.log( item.previousElementSibling.previousElementSibling );

    console.log( item.nextElementSibling );
    console.log( item.nextElementSibling.nextElementSibling );
    console.log( item.nextElementSibling.nextElementSibling.nextElementSibling );
</script>
3.firstElementChild和lastElementChild
<body>
<div id="wrap">
    <div>1</div>
    <div>2</div>
    <div>3</div>
    <div>4</div>
</div>
<script>
    var wrap = document.getElementById("wrap");
    console.log( wrap.firstElementChild );//<div>1</div>
    console.log( wrap.lastElementChild );//<div>4</div>
</script>
</body>
4.setAttribute和removeAttribute
<body>
    <img id="img" _src="./2.jpg" src="1.jpg"/>
    <script>
        var img = document.getElementById("img");
        document.onclick = function(){
            img.setAttribute( "src", img.getAttribute("_src") );//点击页面后,将图片1换成图片2
        };
        img.setAttribute( "s", img.getAttribute("_src") );//在行间设置自定义属性 s="./2.jpg".
        console.log(img.getAttribute("s"));
        setTimeout(function(){
            img.removeAttribute( "s" );//页面打开是后,删除行间设置的自定义属性。
        },1000)
    </script>
</body>
5.getBoundingClientRect()
script>
    var box = document.getElementById("box");
    console.log( box.getBoundingClientRect() );
    console.log( box.getBoundingClientRect().left );//盒子 左边 距离 可视区 左边 的距离  301
    console.log( box.getBoundingClientRect().right);//盒子 右边 距离 可视区 左边 的距离  481
    console.log( box.getBoundingClientRect().top);//盒子 顶部 距离 可视区 顶部 的距离 ,这个页面的滚动会发生变化   501
    console.log( box.getBoundingClientRect().bottom);//盒子 底部 距离 可视区 顶部 的距离,这个页面的滚动会发生变化   731
    console.log( box.getBoundingClientRect().width);//盒子 可视 宽度(就是不包括margin) 180
    console.log( box.getBoundingClientRect().height);//盒子 可视 高度(就是不包括margin)230
</script>
6.createElemen
创建元素:
    innerHTML
        问题:原先元素的事件会被清除.
    document.createElement("div");
        为创建的元素添加属性,样式,事件
<script>
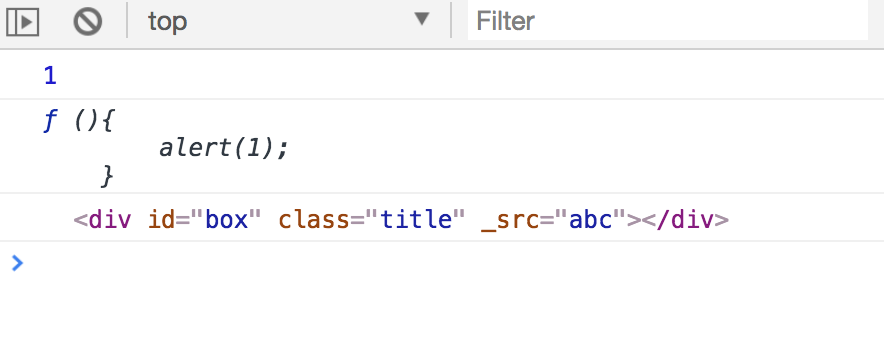
var d = document.createElement("div");//创建一个div元素,此方法的返回值是你创建的元素
d.id = "box";
d.className = "title";
d._index = 1; // 通过 js 方式 添加的自定义属性
console.log( d._index );
//------------------------------------------
d.onclick = function(){
alert(1);
}
console.log( d.onclick );
//------------------------------------------
d.setAttribute("_src","abc");
console.log( d );
</script>7.appendChild
parentNode.appendChild(childNode)

    往一个节点里边添加一个子节点,注意是添加在最后
    parentNode:父节点(需要把节点放入哪个容器的内部)
    childNode:子节点(需要放的节点)
    childNode 会被放进 parentNode 内部 的 尾部
<html>
<head>
<meta charset="UTF-8">
<title></title>
<style>
#wrap{
border: 1px solid #000;
}
#son{
background-color: red;
}
.white{
color: #fff;
}
</style>
</head>
<body>
<div id="wrap">
<div>大头儿子</div>
</div>
<script>
var wrap = document.getElementById("wrap");
var div = document.createElement("div");
div.innerHTML = "老王之子";
div.id = "son";
div.className = "white";
div.onclick = function(){
alert( "绿了" );
}
console.log( div );
wrap.appendChild( div );
</script>
</body>
</html>
8.insertBefore
parentNode.insertBefore(childNode1,childNode2)
        往一个节点的 指定子节点前边插入一个节点
    childNode1插入到childNode2前边;
    如果第二个参数没有,会报错
    如果第二个参数是null,相当于appendChild
9.removeChild
parentNode.removeChild(childNodes)
    从一个节点中删除指定的子节点。
        注意:返回值是你删除的节点
10.replaceChild
parentNode.replaceChild(node,childNode)
    node用来替换的节点
    childNodes被替换的子节点
        两个参数都必须写。
11.cloneNode
node.cloneNode(boolean)
    克隆一个节点,返回值是 克隆 的新节点
        boolean:是否进行深度克隆
            true:克隆元素和元素包含的子孙节点
            flase:克隆元素但不包含元素的子孙节点
    注意:
        克隆的时候会把节点的id也克隆下来,所以要注意单独设置节点的id
<!DOCTYPE html>
<html>
<head>
<meta charset="UTF-8">
<title></title>
<style>
#wrap{
border: 10px solid #000;
}
.box{
width:100px;
height:60px;
background-color: red;
}
</style>
</head>
<body>
<div id="wrap">
<div id="bigHead" class="box">
大头儿子
<!--注释-->
<div>半碗粉
<div>辣椒油</div>
</div>
</div>
</div>
<script>
var wrap = document.getElementById("wrap");
var bigHead = document.getElementById("bigHead");
bigHead.onclick = function(){
console.log( 1 );
}
var num = 0;
document.onclick = function(){
// var clone = document.createElement("div");
// clone.innerHTML = bigHead.innerHTML;
//------------------------------------------
// var clone = bigHead.cloneNode();
var clone = bigHead.cloneNode(true);
clone.onclick = bigHead.onclick;
clone.id = "box"+num++;
console.log( clone.onclick );
console.log( clone );
wrap.appendChild( clone );
}
</script>
</body>
</html>


