A, IDE tools introduced
Production environment is recommended to use the mysql command line, but for the convenience of our tests, you can use the IDE tool
Download link: https: //pan.baidu.com/s/1bpo5mqj
Two, MySQL data backup
# 1. Physical backup: direct copy the database file for large database environments (
The data, control files, archive log files, etc. ).
But can not return to the heterogeneous systems such as Windows. # 2 logical backup: Backup is built table, database, and other operations performed by SQL insert statements for small and medium sized databases, relatively low efficiency. # 3. Export Table: Import table to a text file.
IDE tools can also be used for backup, click the dump SQL .., then we focus to look at the implementation of logical backup MySQLdump
1. Logical backup implemented using mysqldump

# Syntax:
# mysqldump -h -u user name -p password server database name> .sql backup files
when you are logged locally when the -h can not write, when other users log on, you have to write -h server


# example:
1. Single backups
the mysqldump -uroot--p123456 day47> E: \\ day47.sql
the mysqldump -uroot--p123456 Test class Employee Department> E: \\ Test-ce.sql
2. multiple backups
mysqldump -uroot -p123456 - the DB2 zuoye the Test Databases> E: \\ dbzzz.sql
3. Back up all libraries
mysqldump -uroot -p123456 --all-databases> E : //all.sql
2. Restore the logical backup
1 . In the absence of recovery log in
C: \ the Users \ Administrator > MySQL-uroot--p123456 the Test < day47.sql
drop Database day47;
drop the Test Database;
the Create Database day47;
the Create Database the Test;
MySQL -uroot--p123456 day47 < day47 .sql
MySQL -uroot--p123456 the Test <day47.sql   # also can add their new empty database backup of your library
method after .mysql recovery log into
MySQL > use db1;
MySQL > the sET SQL_LOG_BIN = 0;   # set the log If the write log is equal to 1, do not write it equal to zero. Generally do not set up
MySQL> Source E: \\ day47.sql;

 3. Note: If the backup / restoring a single library, you can modify the file sql
DROP Database IF EXISTS School;
create database school;
use school;
Before recovery is not logged in, if you do not want to see a recovery time is not always have to log in to see ah, then we can do it, you do not see the log in directly.
Do not have to log into the implementation of the sql statement
MySQL-uroot--e " use the Test; Show the Tables; "    # Note that double quotes
MySQL-uroot--e " Show Databases; "  # Note the semicolon in double quotes
Notes:
1. Completely restored to a clean environment (such as a new database or delete the original database)
2. During the restoration of all SQL statements should not be recorded in the binlog
3. Export and import of table
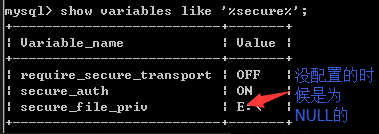
一、表的导出
use day47
select * from userinfo;
select * from userinfo into outfile 'E:\\userinfo.txt'  fields terminated
by ',' lines terminated by '\n';  #将字段之间按逗号分开,行之间用'\n'分开

这样写的话报错了。新版本不支持你这样直接指定路径写,为了保证数据的安全。
如果一旦有黑客拿到sql权限的时候,就把你的数据就给拿走了。你的数据就不安全了
那么怎么解决这个错误呢?
show variables like '%secure%';
解决方法:更改配置文件
[mysqld]
secure_file_priv='E:\\'
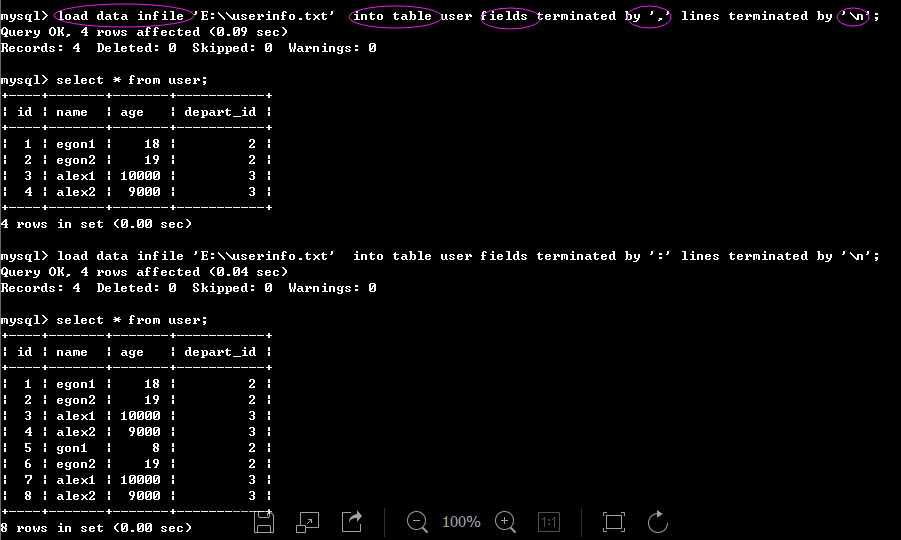
二、表的导入
use bak;
show tables;
create table user(id int primary key auto_increment,name char(20),age int,depart_id int);
desc user;
load data infile 'E:\\userinfo.txt' into table user fields terminated by ','
lines terminated by '\n';#导入表
4.数据库迁移
务必保证在相同版本之间迁移
# mysqldump -h 源IP -uroot -p123 --databases db1 | mysql -h 目标IP -uroot -p456
一、IDE工具介绍
生产环境还是推荐使用mysql命令行,但为了方便我们测试,可以使用IDE工具
下载链接:https://pan.baidu.com/s/1bpo5mqj
二、MySQL数据备份
#1. 物理备份: 直接复制数据库文件,适用于大型数据库环境(
如数据文件、控制文件、归档日志文件等)。
但不能恢复到异构系统中如Windows。

#2. 逻辑备份: 备份的是建表、建库、插入等操作所执行SQL语句,适用于中小型数据库,效率相对较低。
#3. 导出表: 将表导入到文本文件中。
也可以用IDE工具来实现备份,点击转储SQL..,那我们重点来研究一下MySQLdump实现的逻辑备份
1.使用mysqldump实现逻辑备份
#语法:
# mysqldump -h 服务器 -u用户名 -p密码 数据库名 > 备份文件.sql
当你是本地登录的时候这个-h可以不写,当其他用户登录时,就得写上-h 服务器


#示例:
1.单库备份
mysqldump -uroot -p123456 day47 > E:\\day47.sql
mysqldump -uroot -p123456 test class employee department > E:\\test-c-e.sql
2.多库备份
mysqldump -uroot -p123456 --databases test db2 zuoye > E:\\dbzzz.sql
3.备份所有库
mysqldump -uroot -p123456 --all-databases > E://all.sql
2.恢复逻辑备份
方法1.在没有登录进去之前恢复
C:\Users\Administrator>mysql -uroot -p123456 test < day47.sql
drop database day47;
drop database test;
create database day47;
create database test;
mysql -uroot -p123456 day47 < day47.sql
mysql -uroot -p123456 test < day47.sql  #也可以在自己新建的空数据库里添加你备份的库
方法2.mysql登录进去后恢复
mysql> use db1;
mysql> SET SQL_LOG_BIN=0;  #设置日志,如果写日志就等于1,不写就等于0。一般不用设置
mysql> source E:\\day47.sql;

3.注:如果备份/恢复单个库时,可以修改sql文件
DROP database if exists school;
create database school;
use school;
在没有登录之前恢复是,如果你想看恢复了没有的时候是不是每次都要登录进去看看啊,那么我们可以这样做,就不用登录直接查看 了。
不用再登录进去执行sql语句了
mysql -uroot -e "use test;show tables;"   #注意是双引号
mysql -uroot -e "show databases;" #注意分号在双引号里面
注意事项:
1. 完全恢复到一个干净的环境(例如新的数据库或删除原有的数据库)
2. 恢复期间所有SQL语句不应该记录到binlog中
3.表的导出与导入
一、表的导出
use day47
select * from userinfo;
select * from userinfo into outfile 'E:\\userinfo.txt'  fields terminated
by ',' lines terminated by '\n';  #将字段之间按逗号分开,行之间用'\n'分开

这样写的话报错了。新版本不支持你这样直接指定路径写,为了保证数据的安全。
如果一旦有黑客拿到sql权限的时候,就把你的数据就给拿走了。你的数据就不安全了
那么怎么解决这个错误呢?
show variables like '%secure%';
解决方法:更改配置文件
[mysqld]
secure_file_priv='E:\\'
二、表的导入
use bak;
show tables;
create table user(id int primary key auto_increment,name char(20),age int,depart_id int);
desc user;
load data infile 'E:\\userinfo.txt' into table user fields terminated by ','
lines terminated by '\n';#导入表
4. Database Migration
Sure that migrate between the same version
 # mysqldump -h source IP -uroot -p123 --databases db1 | mysql -h target IP -uroot -p456