Foreword
Introduction not only a picture.

Linux is very powerful network functions, all of a sudden we can not understand the network command when configuring the server infrastructure environment, first understand the network parameter setting command.
- ifconfig query and set parameters such as network card and ip
- ifup, ifdown script commands, easier way to start off the network
- ip compliance with instructions directly modify the functional
在我们刚装好linux的时候,需要用xshell进行远程连接,那就得获取ip地址,有时候网卡默认是没启动的,Linux也就拿不到ip地址,因此我们得手动启动网卡#编辑网卡配置文件
vim /etc/sysconfig/network-scripts/ifcfg-eth0
#修改配置参数
ONBOOT=yesDetailed network card configuration file
as follows
网络配置文件:
/etc/sysconfig/network

网络接口配置文件:
/etc/sysconfig/network-scripts/ifcfg-INTERFACE_NAME
DEVICE=: 关联的设备名称,要与文件名的后半部“INTERFACE_NAME”保持一致;
BOOTPROTO={static|none|dhcp|bootp}: 引导协议;要使用静态地址,使用static或none;dhcp表示使用DHCP服务器获取地址;
IPADDR=: IP地址
NETMASK=:子网掩码
GATEWAY=:设定默认网关;
ONBOOT=:开机时是否自动激活此网络接口;
HWADDR=: 硬件地址,要与硬件中的地址保持一致;可省;
USERCTL={yes|no}: 是否允许普通用户控制此接口;
PEERDNS={yes|no}: 是否在BOOTPROTO为dhcp时接受由DHCP服务器指定的DNS地址;
ifup, ifdown command
启动/关闭一块网卡
ifup eth0
ifdown eth0

---
如果关闭网卡,xshell会怎样?
ifconfig command
ifconfig 查看网卡的ip地址
直接输入ifconfig会列出已经启动的网卡,也可以输入ifconfig eth0单独显示eth0的信息
各选项解释是:
eth0    网卡的代号
lo        回环地址loopback
inet    IPv4的Ip地址
netmask    子网掩码
broadcast    广播地址
RX/TX     流量发/收情况     tx是发送(transport),rx是接收(receive)
packets     数据包数
errors     数据包错误数
dropped    数据包有问题被丢弃的数量
collisions    数据包碰撞情况,数值太多代表网络状况差
ip command
ip是一个命令,不是TCP/IP那个ip,这个ip命令是结合了ifconfig和route两个命令的功能。
ip addr show #查看ip信息
Learn how to view card information, then view system information.
Your system is what version?
#查看系统版本信息
cat /etc/redhat-release
CentOS Linux release 7.4.1708 (Core)
#查看内核版本号
uname -r
3.10.0-693.el7.x86_64
#查看系统多少位
uname -m
x86_64
#查看内核所有信息
uname -a
User Management
现代操作系统一般属于多用户的操作系统,也就是说,同一台机器可以为多个用户建立账户,一般这些用户都是为普通用户,这些普通用户能同时登录这台计算机,计算机对这些用户分配一定的资源。
普通用户在所分配到的资源内进行各自的操作,相互之间不受影响。但是这些普通用户的权限是有限制的,且用户太多的话,管理就不便,从而引入root用户。
此用户是唯一的,且拥有系统的所有权限。root用户所在的组称为root组。“组”是具有相似权限的多个用户的集合
Claim the root
Linux系统的特性就是可以满足多个用户,同时工作,因此Linux系统必须具备很好的安全性。
在安装RHEL7时设置的root管理员密码,这个root管理员就是所有UNIX系统中的超级用户,它拥有最高的系统所有权,能够管理系统的各项功能,如添加/删除用户,启动/关闭进程,开启/禁用硬件设备等等。
因此“能力越大,责任越大”,root权限必须很好的掌握,否则一个错误的命令可能会摧毁整个系统。
Why root called root?
在Linux系统中,用户也有自己的UID身份账号且唯一
系统管理员UID为0
系统用户UID为1~999    Linux安装的服务程序都会创建独有的用户负责运行。
普通用户UID从1000开始:由管理员创建
User group GID
为了方便管理属于同一组的用户,Linux 系统中还引入了用户组的概念。通过使用用 户组号码(GID,Group IDentification),我们可以把多个用户加入到同一个组中,从而方 便为组中的用户统一规划权限或指定任务。
假设有一个公司中有多个部门,每个部门中又 有很多员工。如果只想让员工访问本部门内的资源,则可以针对部门而非具体的员工来设 置权限。
例如,可以通过对技术部门设置权限,使得只有技术部门的员工可以访问公司的 数据库信息等。Linux管理员在创建用户时,将自动创建一个与其同名的用户组,这个用户组只有该用户一个人We all know that administrator user under windows
such
Or so
Linux / unix is a multi-user, multi-tasking operating system.
root: The default has the highest administrative authority in Unix / linux operating system. It can be understood as the main group ⬇️⬇️⬇️ qq group

Ordinary users: an administrator or a user with administrative privileges created, can only read, see, can not add, delete, change.
Create a regular user
#添加用户
useradd oldboy
#设置密码
passwd redhat

root用户可以修改其他所有人的密码,且不需要验证
Switch User
su命令可以切换用户身份的需求,
su - username

su命令中间的-号很重要,意味着完全切换到新的用户,即环境变量信息也变更为新用户的信息
#先看下当前用户(我是谁)
whoami
#切换用户
su - oldboy
#退出用户登录
logout
ctrl + d- In general, in a production environment to avoid direct root user, unless there is a special system maintenance requirements, used up immediately returned to normal users
- Non-interactive password (echo "redhat" | passwd --stdin oldboy && history -c)
Tip:
1.超级用户root切换普通用户无需密码,例如“群主”想踢谁就踢谁
2.普通用户切换root,需要输入密码
3.普通用户权限较小,只能基本查看信息
4.$符号是普通用户命令提示符,#是超级管理员的提示符root是当前用户,oldboyedu是主机名,~代表当前路径,也是家目录groupadd command
group命令用于创建用户组,为了更加高效的指派系统中各个用户的权限,在工作中常常添加几个用户到一个组里面,这样可以针对一类用户安排权限。
例如超哥以前在公司里,就负责添加openLDAP用户管理,偶尔台湾,美国的同事去上海协作,我就得给他们添加到it部门组里面,以至于他们有对服务器操作的权限。
groupadd it_dep
userdel Delete user
-f     强制删除用户
-r    同事删除用户以及家目录
userdel -r pyyu
sudo command
sudo command used to execute commands in other capacities, the default identity for the root. In the /etc/sudoersset of user instructions executable sudo. If its an unauthorized user attempts to use sudo, it will issue a warning message to the administrator. When users use sudo, you must first enter the password, and 5 minutes after the expiration date, the deadline you must re-enter the password.
grammar
sudo 【选项】【参数】
-b:在后台执行指令;
-h:显示帮助;
-H:将HOME环境变量设为新身份的HOME环境变量;
-k:结束密码的有效期限,也就是下次再执行sudo时便需要输入密码;。
-l:列出目前用户可执行与无法执行的指令;
-p:改变询问密码的提示符号;
-s<shell>:执行指定的shell;
-u<用户>:以指定的用户作为新的身份。若不加上此参数,则预设以root作为新的身份;
-v:延长密码有效期限5分钟;
-V :显示版本信息
Examples
The sudo command is used in what time?
Figure

How to do? Enough authority, this time the need sudo ls / root to run as root, small chaoge right, root can always be right !!

This is due to the configuration sudo must edit / etc / sudoers file, and only root can modify, we can directly edit the sudoers file via visudo command, use this command you can also check grammar, than the direct editing vim / etc / sudoers safer
visudo 编辑sudoers文件

写入
## Allow root to run any commands anywhere
root    ALL=(ALL)       ALL
chaoge  ALL=(ALL)       ALL   #允许chaoge在任何地方,执行任何命令
此时切换chaoge用户
#su命令用于切换当前用户身份到其他用户身份,变更时须输入所要变更的用户帐号与密码。
su - chaoge
已经可以使用sudo ls /root 命令File and directory permissions
Linux is the purpose of permissions (data protection account)
Three Identities based primarily on Linux authority to decide:
- user / owner file users, files belong to which users
- group is a group, files belong to which group
- others are neither user, no longer group, is the other, others
What are permissions
在Linux中,每个文件都有所属的所有者,和所有组,并且规定了文件的所有者,所有组以及其他人对文件的,可读,可写,可执行等权限。

对于目录的权限来说,可读是读取目录文件列表,可写是表示在目录内新增,修改,删除文件。可执行表示可以进入目录
Observation Linux permissions
Use a command to view permissions
ls -l /var/log/mysqld.log 
Reading on the map:
- Permission, the first letter of the file type, the subsequent nine letters, with each group of three, the identity of the three kinds of permissions
- File number of links
- File owner - owner
- File has group - is a group
- File size
- Last modified date
- file name
First to analyze the type of file
-    一般文件
d    文件夹
l    软连接(快捷方式)
b    块设备,存储媒体文件为主
c    代表键盘,鼠标等设备
file permission
r    read可读,可以用cat等命令查看
w    write写入,可以编辑或者删除这个文件
x    executable    可以执行
Directory Permissions
Do not use root privileges experimental test here! ! ! ! root too Niubi
Do ordinary users! ! ! ! ! Test file, folder permissions operation, ordinary users!
r    可以对此目录执行ls列出所有文件
w    可以在这个目录创建文件
x    可以cd进入这个目录,或者查看详细信息
Permissions and digital conversion

ls -l /var/log/mysqld.log
-rw-r--r-- 1 mysql mysql 6735642 8月  11 14:19 /var/log/mysqld.log
这个就代表mysqld.log文件属主是mysql,属组是mysql,只有mysql用户可以读取编写这个文件,其他人只能读此文件。
View user permissions command
id指令查看用户所属群主
[root@oldboy_python ~ 16:34:52]#id root
uid=0(root) gid=0(root) 组=0(root)
Modify file permissions attributes
普通用户只能修改自己的文件名,时间与权限(注意)
因此修改其他用户权限,只能用最nb的root用户
# Root user switching
[Pyyu @ oldboy_python root] $ su -
当前/tmp/pyyu.txt文件以存在,且信息是
-rw-rw-r-- 1 pyyu pyyu    0 8月  11 16:41 pyyu.txt
Modify the owner to root
chown
[root@oldboy_python /tmp 16:43:12]#chown root pyyu.txt View information
[root@oldboy_python /tmp 16:43:42]#ll pyyu.txt
-rw-rw-r-- 1 root pyyu 0 8月  11 16:41 pyyu.txt
Modify is a group
chgrp
[root@oldboy_python /tmp 16:43:42]#ll pyyu.txt
-rw-rw-r-- 1 root pyyu 0 8月  11 16:41 pyyu.txt
[root@oldboy_python /tmp 16:44:59]#chgrp root pyyu.txt
[root@oldboy_python /tmp 16:45:51]#ll pyyu.txt
-rw-rw-r-- 1 root root 0 8月  11 16:41 pyyu.txt
file permission
Three Identities we know authority (owner, is a group, others), each of the three identity has rwx permissions, the system also provides a digital computing privileges.
r    read          4
w    write        2
x    execute     1
Each identity is the minimum 0, maximum is r + w + x 7 points
Three Identities therefore, the highest authority is 777, the minimum is 000
-rw-rw-r-- 1 root root 0 8月  11 16:41 pyyu.txt
因此可知pyyu.txt的权限是
属主是6 r+w(4+2)
属组是6 r+w(4+2)
其他人是4 r(4)
Command to modify the permissions
chmod
chmod [身份]   [参数]   [文件]
    u(user)   +(添加)
    g(group)   -(减去)
    o(other)  =(赋值)
    a(all)
E.g
当前权限
-rw-rw-r-- 1 root root 0 8月  11 16:41 pyyu.txt
方法1
减去属主的写权限
chmod u-w pyyu.txt
查看权限
-r--rw-r-- 1 root root 0 8月  11 16:41 pyyu.txt

方法2
属主添加可读可写可执行权限
chmod 700 pyyu.txt

属主可读可写可执行
属组可读可执行
其他人可读可执行
chmod 755 pyyu.txt
Modify the file name, file modification dates change
mv pyyu.txt chaoge.txt
#触摸,修改时间
touch chaoge.txt
Soft connection
Soft link, also called symbolic links, shortcuts, windows similar.
Shortcuts to commonly used to install software configuration, such as python, nginx etc.
ln -s 目标文件  软连接名

1.存在文件/tmp/test.txt
[root@master tmp]# ls -l
-rw-r--r-- 1 root root     10 10月 15 21:23 test.txt

2.在/home目录中建立软连接,指向/tmp/test.txt文件
ln -s /tmp/test.txt my_test

3.查看软连接信息
lrwxrwxrwx 1 root root 13 10月 15 21:35 my_test -> /tmp/test.txt

4.通过软连接查看文件
cat my_test

my_test只是/tmp/test.txt的一个别名,因此删除my_test不会影响/tmp/test.txt,但是删除了本尊,
快捷方式就无意义不存在了
PS1 variable
Linux command prompt is controlled by the environment variable PS1
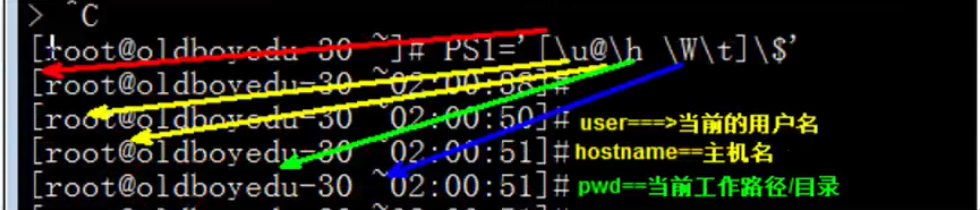
[root@oldboy_python ~]# echo $PS1
[\u@\h \W]\$

可以自行调整全局变量/etc/profile文件用于永久生效 PS1='[\u@\h \W\t]\$'
\d  日期
\H  完整主机名
\h  主机名第一个名字
\t  时间24小时制HHMMSS
\T  时间12小时制
\A  时间24小时制HHMM
\u  当前用户账号名
\v  BASH的版本
\w  完整工作目录
\W  利用basename取得工作目录名
\#  下达的第几个命令
\$  提示字符,root为#,普通用户为$
PS1 > 变量名
$PS1 > 查看变量内容
PS1=新内容 重新赋值

变量赋值,查看
name='chaoge'
echo $name

PS1显示ip地址
export PS1="[\u@\h `/sbin/ifconfig ens33 | sed -nr 's/.*inet (addr:)?(([0-9]*\.){3}[0-9]*).*/\2/p'` \w]\$
extracting tar command
People invented a variety of packages, either a shoulder bag or in a pocket, it is to let the "File" is more convenient to carry. linux file packaging tools is best known for tar.
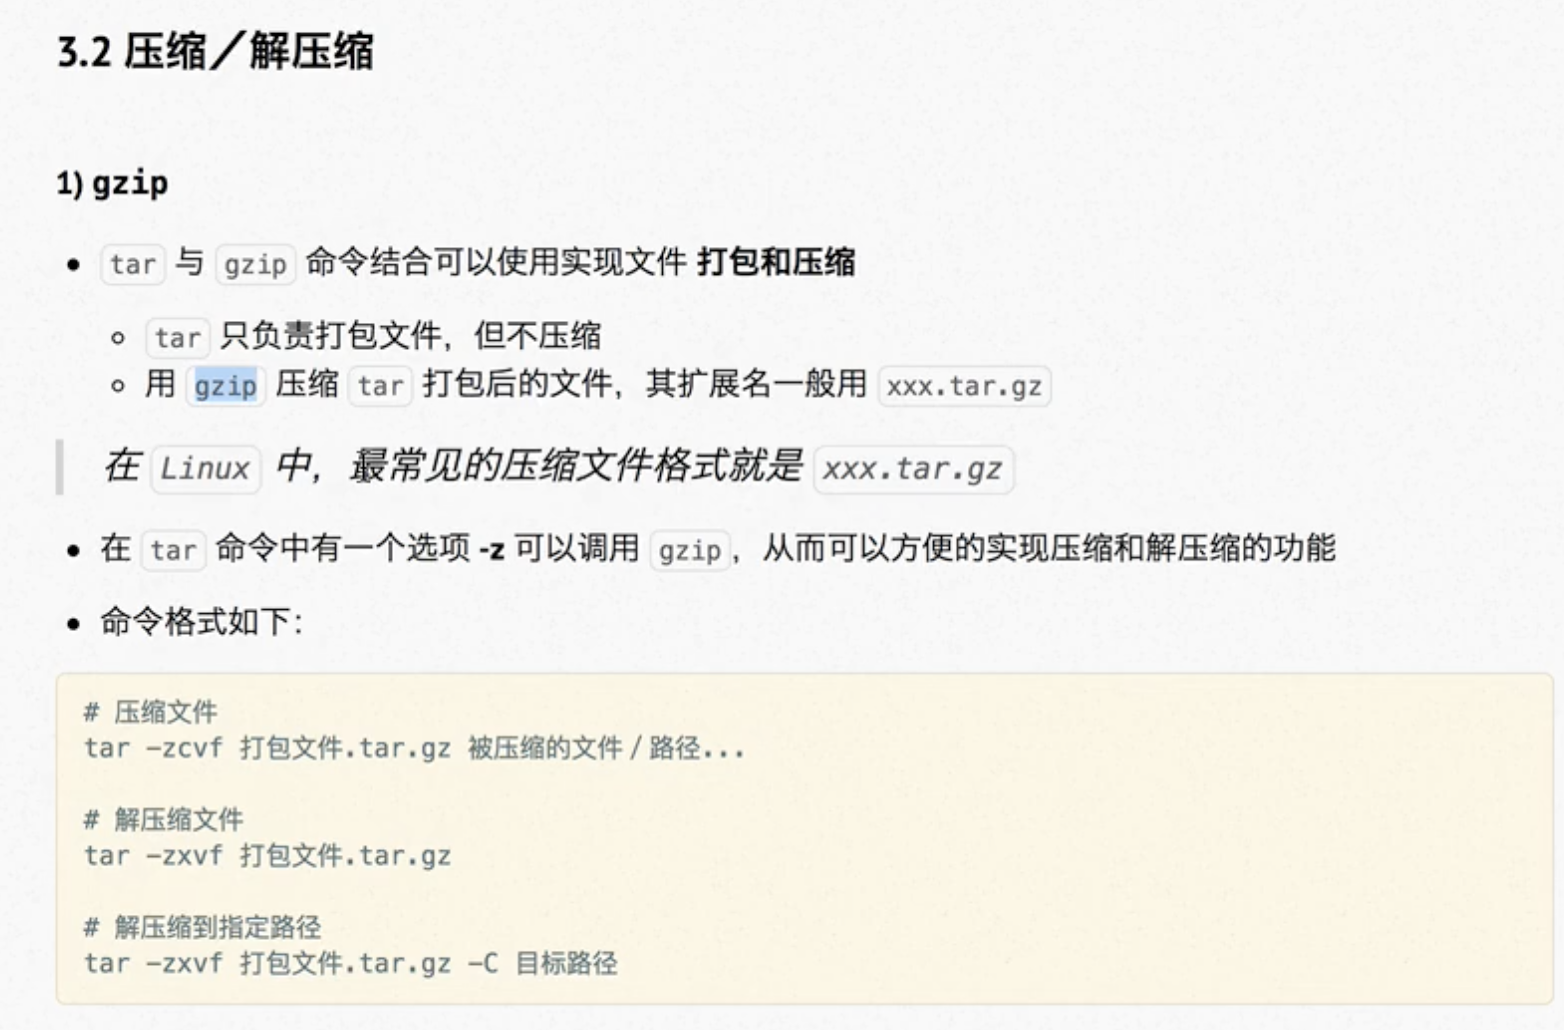
tar 命令:用来压缩和解压文件。tar本身不具有压缩功能。他是调用压缩功能实现的grammar
tar(选项)(参数)
-A或--catenate:新增文件到以存在的备份文件;
-B:设置区块大小;
-c或--create:建立新的备份文件;
-C <目录>:这个选项用在解压缩,若要在特定目录解压缩,可以使用这个选项。
-d:记录文件的差别;
-x或--extract或--get:从备份文件中还原文件;
-t或--list:列出备份文件的内容;
-z或--gzip或--ungzip:通过gzip指令处理备份文件;
-Z或--compress或--uncompress:通过compress指令处理备份文件;
-f<备份文件>或--file=<备份文件>:指定备份文件;
-v或--verbose:显示指令执行过程;
-r:添加文件到已经压缩的文件;
-u:添加改变了和现有的文件到已经存在的压缩文件;
-j:支持bzip2解压文件;
-v:显示操作过程;
-l:文件系统边界设置;
-k:保留原有文件不覆盖;
-m:保留文件不被覆盖;
-w:确认压缩文件的正确性;
-p或--same-permissions:用原来的文件权限还原文件;
-P或--absolute-names:文件名使用绝对名称,不移除文件名称前的“/”号;
-N <日期格式> 或 --newer=<日期时间>:只将较指定日期更新的文件保存到备份文件里;
--exclude=<范本样式>:排除符合范本样式的文件。
Examples

tar -zxvf Python-3.7.0b3.tgz #解压

tar -czvf oldboy.txt.tar.gz oldboy.txt #压缩oldboy.txt

上述命令等于 以下两条命令
tar -cvf oldboy.tar oldboy.txt
gzip oldboy.tar

tar -cf all_pic.tar *.jpg #压缩当前目录所有jpg结尾的文件

tar -xjf xx.tar.bz2  #解压缩bz2结尾的文件
gzip command
gzip用来压缩文件,是个使用广泛的压缩程序,被压缩的以".gz"扩展名
gzip可以压缩较大的文件,以60%~70%压缩率来节省磁盘空间
grammar
-d或--decompress或----uncompress:解开压缩文件;
-f或——force:强行压缩文件。
-h或——help:在线帮助;
-l或——list:列出压缩文件的相关信息;
-L或——license:显示版本与版权信息;
-r或——recursive:递归处理,将指定目录下的所有文件及子目录一并处理;
-v或——verbose:显示指令执行过程;
Examples
压缩当前目录所有文件为.gz文件
gzip *
把上例中每个压缩的文件解压,并列出详细的信息
gzip -dv *

显示压缩文件的信息,并不解压
gzip -l *
压缩一个tar备份文件,扩展名是tar.gz
tar -cf my.tar my_first.py
gzip -r my.tar
netstat command
netstat命令用来打印Linux中网络系统的状态信息,可让你得知整个Linux系统的网络情况。Syntax [options]
netstat [选项]
-t或--tcp:显示TCP传输协议的连线状况;
-u或--udp:显示UDP传输协议的连线状况;
-n或--numeric:直接使用ip地址,而不通过域名服务器;
-l或--listening:显示监控中的服务器的Socket;
-p或--programs:显示正在使用Socket的程序识别码和程序名称;
-a或--all:显示所有连线中的Socket;
Examples
[root@oldboy_python ~ 10:21:59]#netstat -tunlp
Active Internet connections (only servers)
Proto Recv-Q Send-Q Local Address           Foreign Address         State       PID/Program name
tcp        0      0 0.0.0.0:111             0.0.0.0:*               LISTEN      1/systemd
tcp        0      0 0.0.0.0:22              0.0.0.0:*               LISTEN      814/sshd
tcp6       0      0 :::111                  :::*                    LISTEN      2703/rpcbind
tcp6       0      0 :::3306                 :::*                    LISTEN      29269/mysqld
udp        0      0 0.0.0.0:758             0.0.0.0:*                           2703/rpcbind
udp        0      0 0.0.0.0:111             0.0.0.0:*                           2703/rpcbind
udp        0      0 10.141.32.137:123       0.0.0.0:*                           484/ntpd
udp        0      0 127.0.0.1:123           0.0.0.0:*                           484/ntpd
udp        0      0 0.0.0.0:123             0.0.0.0:*                           484/ntpd
udp6       0      0 :::758                  :::*                                2703/rpcbind
udp6       0      0 :::111                  :::*                                2703/rpcbind
udp6       0      0 :::123                  :::*                                484/ntpd
ps command
ps command is used to view the system status of the process in the format of "ps [parameters]."
ps  命令常用参数
-a     显示所有进程
-u     用户以及其他详细信息
-x    显示没有控制终端的进程
Kill Command
kill命令用来删除执行中的程序或工作。kill可将指定的信息送至程序。Options
-a:当处理当前进程时,不限制命令名和进程号的对应关系;
-l <信息编号>:若不加<信息编号>选项,则-l参数会列出全部的信息名称;
-p:指定kill 命令只打印相关进程的进程号,而不发送任何信号;
-s <信息名称或编号>:指定要送出的信息;
-u:指定用户。
Only ninth signal (SIGKILL) can unconditionally terminate the process, other processes have the right to ignore the signal, the following are commonly used signals:
HUP     1    终端断线
INT     2    中断(同 Ctrl + C)
QUIT    3    退出(同 Ctrl + \)
TERM   15    终止
KILL    9    强制终止
CONT   18    继续(与STOP相反, fg/bg命令)
STOP   19    暂停(同 Ctrl + Z)
Examples
先用ps查找进程,然后用kill杀掉:
ps -ef | grep vim
root      3268  2884  0 16:21 pts/1    00:00:00 vim install.log
root      3370  2822  0 16:21 pts/0    00:00:00 grep vim

kill 3268
killall command
通常来讲,复杂软件的服务程序会有多个进程协同为用户提供服务,如果逐个去结束这 些进程会比较麻烦,此时可以使用 killall 命令来批量结束某个服务程序带有的全部进程。
例如nginx启动后有2个进程
killall nginx