First, the preparatory work
- + Account applet developer tools micro-channel front-end code + + = rear micro channel data applet
- Watercress public API + = parameters in real-time leaderboard data and details data
- PyCharm + Python + crawler chart data code = crawling
- Idea + Java + SpringBoot = backend interface definition
- Tencent cloud server + Tomcat + backend interface definition = accessible interface to back-end services
- Domain name + IP + SSL + certificate filed legal back-end interface to access path =
Second, the front end
1. registered micro letter applet account
Enter: micro-channel public platform , choose the type of account applet to register in accordance with the procedure. Note that each mailbox can only register an account.
2. Download Development Tools
With the account, we can use this account for development, and development IDE with a micro-channel Tencent produced developer tools, enter: applet development tool , download the corresponding version installed.
3. Start small program into the front-end development
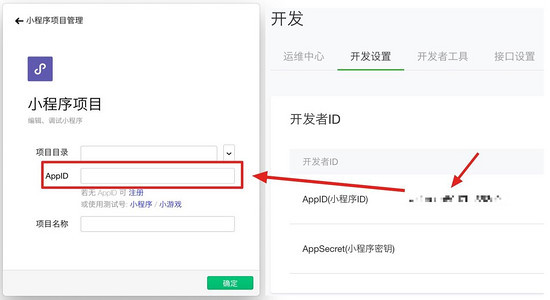
Open just download a good micro-channel developer tools, scan code login, create a small project. Log in micro-channel public platform number, in the development - AppID find your applet> Developer ID and fill in the Project Settings -> Developer settings.

Then began the real development of a specific page, the development process to develop reference documents: a small micro-channel program guide access
4. The front end of the development process
Small front-end development program is in fact Tencent's development tools, the use of js language, follow the development of Tencent document specification applets were written in code. The development process can compile, preview, device debugging, etc., you can use a variety of plug-ins, you can call some public api backend interface or define your own, or you can use cloud functions provided by Tencent.
Backend interface is a need to call starts with https, and the need to develop micro-channel public platform -> Development Settings -> Server configured your domain name.
The on-line Package
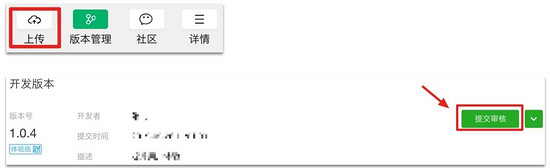
After the development is completed can be prepared on the line, first in developer tools in the written code to upload, click Upload custom version numbers and comments, to the micro-channel version of the management of public platforms submitted for review, pending adoption, says on-line success , and you can search for your applet to access the micro letter.
summary
Here, even if the work is completed the front-end, in fact, generally do not involve complex data processing, then the back-end is not required, simply direct all data are stored in the front line. If you're a small program that is the case, then this article here can end up. You do not need to read the back. If you need a more flexible interaction, more complex logic, backend interface that is indispensable. It is more complex back-end data interface is how to complete it, you continue to go down with me to know.
rear end
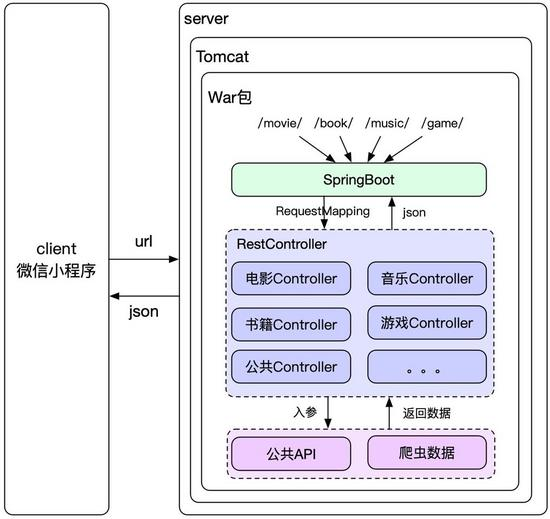
The main back-end program is available to small data interface, so that each page can have a small program leaderboard data to show, I offer here is http interface string returned Json format. The language used is Java, the framework used is SpringBoot, the final java code packed into war package deployed on the cloud host web server in Tomcat, Tomcat will be automatically distributed to my program code by requesting the url over processing logic, the processed data corresponding to the request to get places return Json format string.
FIG main process is as follows:
Server set up
1. Purchase cloud server
First, the back-end to store program code, you need a machine, although it could be your computer, but your computer can not guarantee 24 hours a boot and allow access to the external network, you need to buy a cloud server; secondly, outside network access to the means required a public network IP, purchase cloud servers supporting a corresponding IP address.
I'm using here is Tencent cloud server, enter the official website to buy: Tencent cloud , select the server configuration, payment can be.
Based on consideration of budget and actual need (in fact, or because reluctant to spend money), I choose here is the relatively low with the machine:
- CPU: 1 core
- Memory: 1 GB
- Public network bandwidths: 1 Mbps
- Operating System: CentOS 7.5 64 Wei
- System disk: hard disk of high performance Cloud, total 50 GB
- Data plate: high performance cloud hard disk, total 50 GB
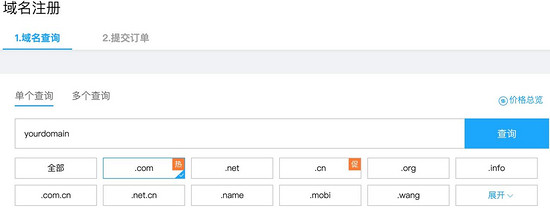
2. Purchase domain name
A domain name is used to map to the IP, easy to use direct access to its domain name server IP bindings are located. Although the form and the direct use of IP ports can also access to the cloud server we buy, but a bad record to IP, and secondly, not allowed to use micro-channel IP plus port in the form of url. So the only "generous" buy a domain name of.
Domain purchase any domain name service provider, for the convenience I also buy directly on Tencent cloud, purchase link: domain name registration
3. DNS
I bought the domain name, the domain name that how to use it, not supporting the use of domain names and IP is no sense of domain names. Here we need this binding domain, or subdomain on the server we need to provide services corresponding to the IP, is the IP I just purchased a cloud server.
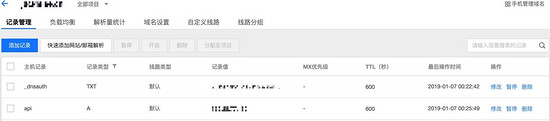
In the cloud resolution Tencent cloud background, click on your domain name to add records, mainly to add A general record, the domain name is bound to the IPv4 address, you can add multiple to distinguish the domain host record levels, @ express two domain names directly xxx.com, others said that the use of three or more stages of the domain name, hanging in your own multi-level domain names are the property of the following two domain names you tube.
4. The domain name for the record
Why do domain name for the record? This, this world Wang soil, the Internet this third acre of land naturally belongs to the state, can casually lets you access services. In order to reclaim the land frontier, not impossible, just we need to prepare to El Pais, under supervision.
The entire process of building a small program, domain name registration is the longest time spent, spent more than ten twenty days. Page to enter the record: the record management began to record, in detail, I do not say, for the record process details Reference: Site registration mainly include the following several processes:
(1) apply for curtain pictures (2) verify the record information (3) Fill in the subject information (4) fill out the website information (5) uploaded material (6) confirmed the record information, submit the trial (7) approved, to complete the record
5. Buy SSL Certificates
Why do I need an SSL certificate it? Because you can make after you have configured SSL certificate our url starts with https, it is a small micro-channel program requires domain access method, encrypted transmission mode is more secure.
He said that the purchase, in fact, you can choose a free certificate "buy" and they can achieve their goals, but did not pay strong encryption, security, natural weak first-class. But it also can not stop my free choice, after all, poor putting the word.
Go to order page: SSL certificate , select the configuration you want to buy a certificate, orders to pay, download the certificate, subsequent configuration web server need it.
summary
After a big front five steps, then our servers have the ability to use the https protocol to access by domain name. The next work on the development of the rest of our back-end interface and back-end program code to be deployed to this server for applet access.
The back-end application development
surroundings:
Development language: Java 8
Integrated development environment: IntelliJ IDEA Ultimate 2017
web framework: Springboot
Build tools: Maven
Install these tools will not go into detail, a lot of online tutorials, but do not know if the back-end development, the installation of this set of environment is useless, here tentatively assumed that the reader is to understand some of the back-end development knowledge.
Listed below are the most important part of the Java code to illustrate how http interface to the back-end programs are offered:
|
1
2
3
4
5
6
7
8
9
10
11
12
13
14
15
16
17
18
19
20
21
22
23
24
25
26
27
28
29
30
31
32
33
34
35
36
37
38
39
40
41
42
43
44
45
46
|
@RestController
@RequestMapping
(value =
"/movie"
)
public
class
MovieListController
extends
MovieBaseController{
private
static
final
Logger log = org.slf4j.LoggerFactory.getLogger(MovieListController.
class
);
/**
* 豆瓣top250电影
*/
@RequestMapping
(value =
"/top250"
)
public
CommonRespVo<List<ListCommonVo>> getMovieTop250() {
try
{
HttpServletRequest request =
this
.getHttpServletRequest();
String start = request.getParameter(
"start"
);
String limit = request.getParameter(
"limit"
);
String url = String.format(
"https://api.douban.com/v2/movie/top250?start=%s&count=%s"
,start,limit);
JSONObject jsonObject = HttpUtil.getInfoFromHttpApi(url);
List<ListCommonVo> listCommonVos =
this
.movieListDataTrans(jsonObject);
if
(CollectionUtils.isNotEmpty(listCommonVos)) {
return
new
CommonRespVo(listCommonVos, CommonRespVoCode.SUCCESS);
}
}
catch
(Exception e) {
log.error(
"获取豆瓣top250电影信息异常"
,e);
}
return
new
CommonRespVo(CommonRespVoCode.FAILED.code,
"未获取到数据"
);
}
/**
* 华语top100电影
*/
@RequestMapping
(value =
"/chinaTopMovie"
)
public
CommonRespVo<List<JSONObject>> getChinaTopMovie() {
try
{
List<JSONObject> result =
this
.getSubList(Lists.newArrayList(ChinaTopMovieData.chinaTopMovieData));
if
(CollectionUtils.isNotEmpty(result)) {
return
new
CommonRespVo(result, CommonRespVoCode.SUCCESS);
}
}
catch
(Exception e) {
log.error(
"获取华语Top电影信息异常"
,e);
}
return
new
CommonRespVo(CommonRespVoCode.FAILED.code,
"未获取到数据"
);
}
//省略后续代码
}
|
The code above, is one of the two interfaces, one is to get watercress top250 movie information through the public API, a reptile data is acquired by the Chinese top100 movie information. You can see the annotations indicate SpringBoot use RestController such treatment http request, and returns the data format on the json method corresponding to each RequestMapping.
RequestMapping annotation is mapping the role of a url for each method. @RequestMapping annotation class may act on the controller, it may be a method which acts on the under. When adding @RequestMapping annotation at the class level, the notes will be applied to all methods of controller. The @RequestMapping statement on the class level will @RequestMapping comment on the method supplement. This is the final path of the url above is the cause of the class plus method, the local test of time through url in the browser: http://localhost:8080/movie/chinaTopMovie?start=0&limit=10 you can get to the data returned.
After completion of the development of the program code, and the item code is built with Maven war packaged into a package in the form of a file, which can be found in the target directory war package, it will be referred to later use this war package.
Data Sources
排行榜数据是要具有一定的权威性,客观性的,所以当然不能我随便拿一些数据排列一下就成的,我自己又没有能力去统计这几类信息的相关排行,所以我就想到了拿来主义:从别人那里拿已经具备一定权威的数据。豆瓣有一些公共开源的api可以拿到我想要的部分数据,另外一些数据在其他各大排行榜网站上都有,但是没有现成的api把他们的数据提供给我,他们既然不给,那我只能自己去取了。
我使用Python写了一些爬虫软件定期的爬取特定的排行榜网站上的数据,用这些数据更新我本地的静态数据,这样我的Java程序就可以拿到相对新的数据了。这里其实我还可以做得更好,但为了快速的上线,我来不及使用数据库落地这些爬取来的数据,这样有个不好的结果就是,每次服务重启的时候,有一段时间的数据不是最新的。这在我的可接受范围内,后面有时间再去解决这个问题吧。
豆瓣的api示例: https://api.douban.com/v2/movie/top250?start=0&count=10 ,通过这个url可以批量分页的拿到top电影榜的数据。
python爬虫则使用的是urlopen,urllib.request.urlopen()函数是用于实现对目标url的访问,返回url对应的网页数据。再使用BeautifulSoup对网页数据进行解析,主要是遍历搜索文档树从而拿到自己想要的那部分数据。
部署后端程序
准备:
- 云服务主机: 腾讯云服务器
- Web应用服务器:Tomcat 8
- JRE:Java 8
- SSL证书:Tomcat对应的SSL证书
- FTP传输工具:FileZilla
首先登录购买的那台云服务器,部署前先安装好环境,主要是安装JRE和Tomcat,安装好后还需要对Tomcat进行一番配置。
1. 安装环境
安装JRE 点击下载Java运行时环境:Java SE Runtime Environment 8u201 ,下载后安装。
安装Tomcat 需要提前安装好Tomcat。进Tomcat官网下载对应版本的Tomcat压缩包:Apache Tomcat,将下载好的压缩包拷贝至指定的目录并解压,我这里是拷贝到 /usr/local 。
2. 配置Tomcat
配置Tomcat的环境变量,配置过程参考: Apache Tomcat User Guide
把我们之前购买并下载好的SSL证书配置在Tomcat中,具体配置过程参考:Tomcat 证书部署,或者参考官网文档: SSL/TLS Configuration HOW-TO
3. 部署应用
将我们之前用Maven打包好的war包拷贝到安装Tomcat的webapps目录下,如我这里下图的位置:
|
1
2
3
4
|
[root@VM_0_12_centos webapps]
# pwd
/usr/local/tomcat8/webapps
[root@VM_0_12_centos webapps]
# ls
docs examples host-manager manager ROOT wxrank wxrank.war
|
这里也就是上图中wxrank.war文件,然后去Tomcat的bin文件夹下运行startup.bat启动tomcat,即可自动解压war包,并部署。
小结
为了方便,上面有些文件是在自己的电脑上下载好了,再通过FileZilla上传到云服务器上,我自己电脑和云服务器之间的其他文件传输也都是用的这个工具。
随着Tomcat的配置以及部署成功,我们的后端接口就可以通过url访问到了。
以上就是本文的全部内容,希望对大家的学习有所帮助,也希望大家多多支持脚本之家。
还有很多数据没准备好,后面有时间再优化优化。另外既然云服务器买都买了,怎么着也得充分的利用下,所以又在上面搭了一个个人博客,点下面我的博客链接看一下效果吧:
原文链接:https://juejin.im/post/5cb33f4a5188251ae64a7c3e