First, the software needs to be installed (depending on the version you need to install, does not necessarily have to be in accordance with the version of the small series)
- JDK:1.8.0_171
- Python:3.7.1
- node.js:10.13.0
- android-sdk_r24.4.1-windows
- Appia: 1.4.16.1
- selenium:2.53.6
Two, JDK installation steps
- Download: https://www.oracle.com/technetwork/java/javase/downloads/jdk8-downloads-2133151.html (choose according to their own computers can download the corresponding version)
- Locate the downloaded file, run the ".exe" file to start the installation
- Select the installation path (Installation path Chinese are not allowed), may be installed by default, you can also customize the installation, the installation must remember the installation path.
-
Jre installer will automatically pop up after the installation of jdk, jre installed in the parent directory jdk.
For example: jdk path is C: \ Program Files (x86) \ Java \ jdk1.8.0_25, the jre path is C: \ Program Files (x86) \ Java \ jre1.8.0_25.
- After successful installation, start the configuration environment variable
5.1 Open the Control Panel -> System and Security -> System -> Advanced System Settings -> Advanced -> Environment Variables -> System environment variables;
5.2 New variable name JAVA_HOME, variable value C: \ Program Files (x86) \ Java \ jdk1.8.0_25;
5.3 New variable name JRE_HOME, the variable value C: \ Program Files (x86) \ Java \ jre1.8.0_25;
5.4 New variable name CLASSPATH, the variable value C: \ Program Files (x86) \ Java \ jdk1.8.0_25 \ lib; C: \ Program Files (x86) \ Java \ jre1.8.0_25 \ lib;
5.5 edit the variable name Path, the new value of the variable C: \ Program Files (x86) \ Java \ jdk1.8.0_25 \ bin; C: \ Program Files (x86) \ Java \ jre1.8.0_25 \ bin;
5.6 Open cmd verify that the installation was successful, enter java -version, if we view the version number, then the installation was successful.
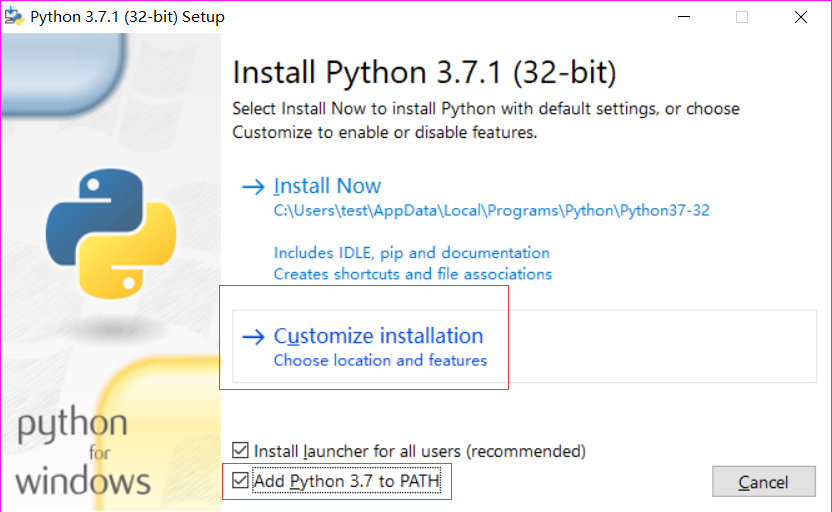
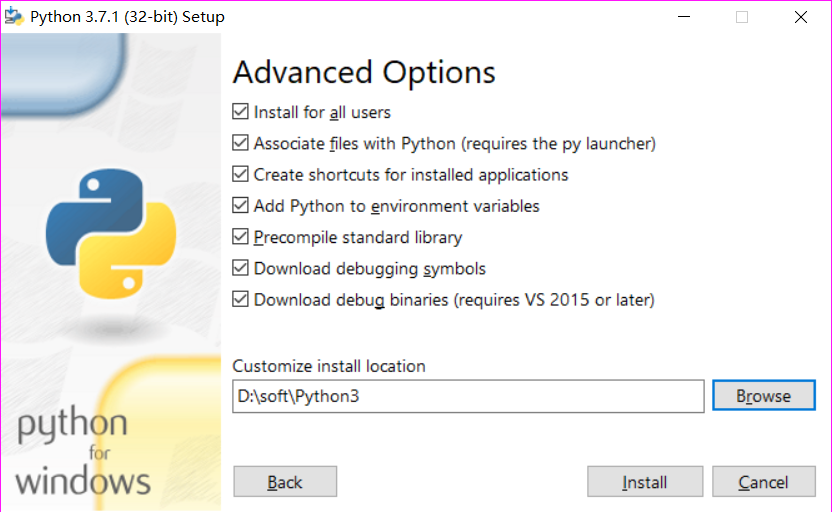
Three, Python mounting step
- Download: https://www.python.org/ 15
- Fool installation
3. After the successful installation, the control panel - Path seen> as> System and Security -> System -> Advanced System Settings -> Advanced -> Environment Variables - -> System environment variables:

4. Open cmd verify that the installation was successful, enter the python, it appears the version number of the installation is successful
Four, node.js mounting step
- Download: https://nodejs.org/en/download/ 23
- Fool installation
- Open cmd verify that the installation was successful, enter npm, the following picture appears, the installation is successful

Five, android-sdk mounting step
- Download: https://www.androiddevtools.cn/


2. extracting archive, double-click to open the selected SDK manager.exe
3. Check the version you want to download the API and the corresponding version of android
4. Configuration Environment variables:
4.1 New system variables: ANDROID_HOME, corresponding to the variable value: D: \ androidsdk \ androidsdk-windows (sdk installation path);
4.2 Select Path system variable, the D: \ androidsdk \ androidsdk-windows \ tools and D: \ androidsdk \ androidsdk-windows \ platform-tools added.
5. Open cmd verify that the installation is successful, the adb input, the corresponding version number would indicate that the installation was successful
Six, appium mounting step
- Download: https://bitbucket.org/appium/appium.app/downloads/ 16
- Click appium-installer.exe installation
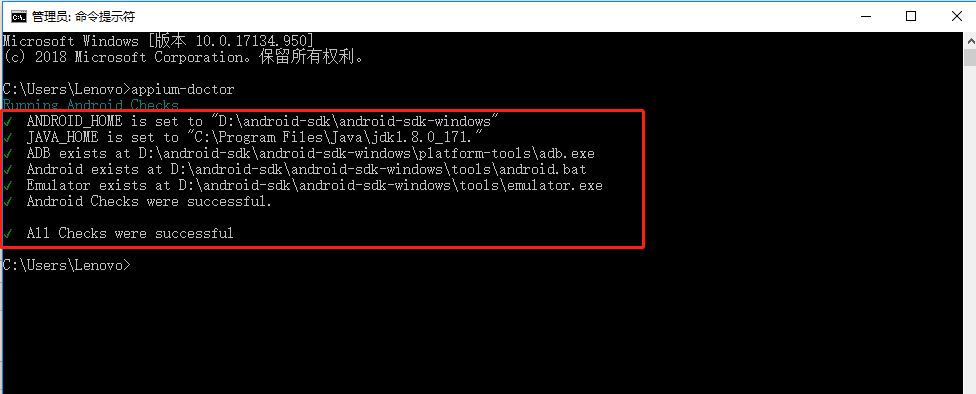
Seven, appium-doctor installation steps
- The D: \ \ \ node_modules \ .bin appium Appium added to the Path system environment variables
- Open cmd, input appium-doctor, as shown below, has been successfully configured environment described
Eight, Appium-Python-Client installation steps
- Step seven in the previous environment has been successfully installed
- Open cmd, input pip install Appium-Python-Client
PS: the above appium + python environment to build all done, then began to build selenium + python:
Nine, selenium installation steps
Step 1. After more than three Python installation is complete, selenium will automatically complete the installation (you can view the python installation folder "D: \ python \ Lib \ site-packages" the existence of selenium, if there is need for himself during installation If there is, then proceed according to the following scheme)
2. Open cmd, enter the following steps
2.1 python
2.2 from selenium import webdriver
2.3 webdriver.Firefox()
2.4 Then gettin " 'geckodriver' executable needs to be in PATH" (This is because the built-in selenium is more than 3.0, the drive requires support package)
3. The need to selenium downgrade
3.1 find D: \ python \ Lib \ site-packages of selenium in two folders, delete it;
3.2 Open cmd, enter pip install selenium == 2.53.6
4. Verify whether the installation was successful selenium
4.1 python
4.2 from selenium import webdriver
4.3 webdriver.Firefox()
4.4 The above command input is completed, automatically start Firefox, it represents a successful installation (Note that closed Firefox automatic update feature)