table of Contents
- 1. Delete specific users and user groups
- 2. Turn off unneeded services system
- 3. Reasonable use the sudo command
- 4. deletion of system login information
- 5. ssh remote login security
- 6. rational use of history
- 7. Firewall
- 8. Lock system critical files
- 9. / tmp, / var / tmp, / dev / shm security setting
- 10. After the attack server roadmap
1. Delete specific users and user groups
After system installation is complete, the system default settings unnecessary users and groups of users, if some users and groups of users that we do not need and should be removed immediately, because the more users, the more insecure system, hackers may use these accounts threat servers.
Linux system can remove the default user and user groups as follows:
- Users can be deleted: adm, lp, sync, shutdown, halt, news, uucp, operator, games, etc.
- You can delete a user group: adm, lp, news, uucp , games, dip , etc.
delete user commanduserdel, the command to delete a user groupgroupdel.
In addition, if some users do not need to log function, we need to ban this user login function:
usermod -s /sbin/nologin 用户
2. Turn off unneeded services system
The server, the more services the more unsafe, so we can turn off unneeded services to improve the safety performance of the server.
Service can be shut down by chkconfigthe command to achieve, for example:
chkconfig --level 345 apach off #重启服务器后生效,关闭 apach 服务
For the system to function properly, it is recommended to start the service in the following table:
| service name | Service Content |
|---|---|
| acpid | For power management, the proposed open |
| apmd | Advanced Power Management can monitor the battery performance |
| kudzu | Detect whether the hardware changes |
| crond | Regular tasks |
| etc | Disposable timing task |
| keytables | For loading a keyboard image, the option of starting |
| iptables | Firewall, must start |
| xinetd | Support core network services daemon |
| xfs | Using the X Window System desktops must start |
| network | Start networking services, must be started |
| sshd | Provide remote management ssh |
| syslog | System logging service, must be started |
3. Reasonable use the sudo command
sudoCommands can be assigned to ordinary users some reasonable authority, so that ordinary users can perform some of the root user privileges to perform, such as rebooting the system, add users, configure the system files, which is why we should be rational use of sudocommand, and sudoto authorize . To sudoauthorize the need to use the /etc/sudoersfile, you can add the relevant configuration parameters in the file.
E.g:
#例 1 普通用户 Bob 只能在 Server1 这台主机上执行 reboot,shutdown 命令
Bob Server1=/usr/sbin/reboot,/usr/sbin/shutdown

#例 2 普通用户 Bob 能在 任何主机上执行 reboot,shutdown 命令
Bob ALL=/usr/sbin/reboot,/usr/sbin/shutdown

#例 2 Bob 可以在任何主机上执行所有命令,且不需要密码登录,还能切到root用户下(sudo su-)
Bob ALL=(ALL) NOPASSWD: ALL

#Bob 可以在任何主机上提权到 root 下执行chown 命令,不用密码,但执行 useradd 要密码
Bob ALL=(root) NOPASSWD: /bin/chown,/usr/sbin/useradd

#例 3 user 用户组的用户以 root 权限修改其他用户密码,这里表示组要用百分号%
%users ALL=(root) /usr/bin/passwd
4. deletion of system login information
There are four file systems, /etc/issue, /etc/issue.net, /etc/redhat-releaseand /etc/motdthey record the version number of the system are some of the relevant information we can to ensure information security system version by deleting or changing.
When the user through a local terminal or local virtual console login system displays /etc/issuethe contents, when the user sshremote login system, will show /etc/issue.netcontent, by default issue.netnot displayed, if you want to display can /etc/ssh/sshd_configadd the following code file:
Banner /etc/issue.net
/etc/redhat-releaseFile also records the system name and version number, it proposed to delete.
/etc/motdFile is a system bulletin information, after each time a user login, /etc/motdfile contents will be displayed, use this document can publish something about software, hardware upgrades and information system maintenance information.
5. ssh remote login security
Related to sshthe corresponding profile is /etc/ssh/sshd_config, here are a few questions about security configuration.
- Port 22: to set the listening port, for safety, we usually change the default port 22
- Protocol 2: Set to use version SSH2, SSH1 version because there are deficiencies here with Protocol 2
- KeyRegenerationInterval 1h: If you use the Key, this setting is automatically generated keys to prevent theft after long
- PermitRootLogin no: Set the root user can not ssh login, root remote login is very dangerous
- PrintMotd yes: to set the display
/etc/motdthe information - MaxStartups 5: while allowing five are not logged online, but not connected to the ssh password belonging to online
- MaxAuthTries 3: The maximum number of login failures allowed retries is three times
- AllowUsers <username>: Specifies the user via remote access, multiple users separated by spaces
- AllowGroups <Group Name>: Specifies the user group via remote access, multi-user groups separated by a space
- DenyUsers <username>: Specifies the user has disabled access, multiple users separated by spaces
- DenyGroups <User Group>: disable access to specified groups of users, groups of users separated by spaces
6. rational use of history
By historycommand we can see the user's operating history, shell command operation records stored in the .hash_historyfile, but after a hacker attack server will delete this file, making it impossible to audit, therefore, we need reasonable protection back up the file, the following is a historylog file security configuration.
The default historycommand can only view operational records, did not record the operating time, so you need to edit /etc/bashrcthe file:
HISTFILESIZE=4000			#定义在.bash_history文件保留命令的记录总数
HISTSIZE=4000				#定义 history 命令输出的记录总数
HISTTIMEFORMAT='%F %T'		#定义时间格式,与命令 date +%F %T 输出一样
export HISTTIMEFORMAT
To prevent hackers delete .bash_historyfiles, we can record the user's history kept in a safe place for audit, the following code will be added to /etc/profilethe file when the user logs can implement this feature.
USER_IP=`who am i 2>/dev/null |awk -F"[()]" '{print $2}'`
HISTDIR=/usr/share/.history
if [ -z $USER_IP ]
then
	USER_IP=`hostname`
fi
if [ ! -d $HISTDIR ]
then
	mkdir -p $HISTDIR
	chmod 777 $HISTDIR
fi
if [ ! -d $HISTDIR/$LOGNAME ]
then
	mkdir -p $HISTDIR/$LOGNAME
fi
export HISTSIZE=4000
DT=`date +%Y%m%d_%H%M`
export HISTFILE="$HISTDIR/$LOGNAME/$USER_IP.history.$DT"
export HISTFORMAT=“[%Y.%m.%d %H:%M:%S]”
chmod 600 $HISTDIR/$LOGNAME/*.history* 2>/dev/null
This code of each user's shell command history is stored in /usr/share/.historythe directory, a folder for each user, and folder records login IP and shell operation time.
7. Firewall
2 Linux firewall itself, through IP filtering mechanisms iptablesto achieve a first level of protection, iptablesby monitoring the health system, the blocking malicious network attacks, the protection system. By the first protective layer is tcp_wrappersa protective layer, and tcp_wrappersmay be implemented to provide certain services in an open or closed in the system, thereby protecting the system.
7.1 iptables
7.1.1 iptables Overview
The default iptablesrule table are:
- fileter table (filtering rule table)
- nat table (address conversion rule table)
- mangle table (data modifying rule table flag)
- Table raw (trace rule table data sheet)
Each rule table contains a plurality of data link:
- The INPUT (inbound data filtering)
- OUTPUT (outbound data filtering)
- The FORWARD (forwarding data filtering)
- The PREROUTING (former route filtering)
- The POSTROUTING (filtered route)
Fire rules need to use these specific data link.
The following is a framework for filtering firewall:
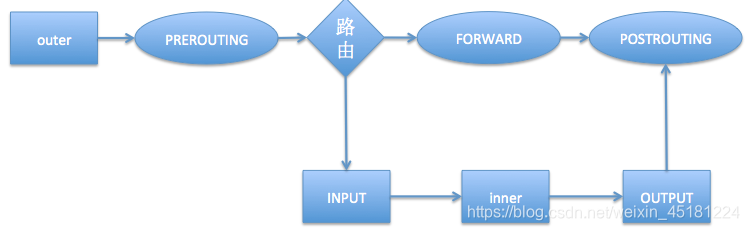
- If the external host sends data to the firewall, data will pass
PREROUTINGandINPUTdata link - If the firewall host computer sends data to an external host computer, the data will go through
OUTPUTand thePOSTROUTINGdata link - If the firewall is responsible for forwarding routing, data will pass
FORWARDandPOSTROUTINGdata link
7.1.2 iptables syntax
usage:iptables [-t 表名] {-A | -D | -I | -F | -L | -Z | -P} 链名 rule-specification
| Options | Explanation |
|---|---|
| -t | Specify the rules table, do not add -t default fileter table |
| -A | Additional firewall rules |
| -D | Delete firewall rules |
| -I | Insert firewall rules |
| -F | Empty firewall rules |
| -L | Firewall rules list |
| -R | Replace firewall rules |
| -WITH | Empty firewall data table statistics |
| -P | Set chain default rule |
Matching parameters are as follows:
| parameter | Explanation |
|---|---|
| [!] -p | Match protocol! It represents negated |
| [!] -s | 匹配源地址 |
| [!] -d | 匹配目标地址 |
| [!] -i | 匹配如站网卡接口 |
| [!] -o | 匹配出站网卡接口 |
| [!] --sport | 匹配源端口 |
| [!] --dport | 匹配目标端口 |
| [!] --src-range | 匹配源地址范围 |
| [!] --dst-range | 匹配目标地址范围 |
| [!] --Mac-source | 匹配 mac 地址 |
| [!] --state | 匹配状态(INVALID、ESTABLISHED、NEW、RELATED) |
触发动作如下:
| 动作 | 解释 |
|---|---|
| ACCEPT | 允许数据包通过 |
| DROP | 丢弃数据包 |
| REJECT | 拒绝数据包通过 |
| LOG | 将数据包信息记录 syslog 日志 |
| DNAT | 目标地址转换 |
| SNAT | 源地址转换 |
iptables具体使用示例如下:
#查看fileter表的所有规则
iptables -nL
#查看 nat 表所有规则
iptables -t nat -nL
#清空 fileter 表中所有规则
iptables -F
#往 fileter 表中添加新规则,丢弃 192.168.1.1 发来的数据包
iptables -A INPUT -s 192.168.1.1 -j DROP
#往 fileter 表中插入规则,拒绝 192.168.1.1ping 防火墙本机
iptables -A INPUT -s 192.168.1.1 -p icmp -j REJECT
#查看 fileter 表中规则编号
iptables -nL --line-number
#删除 filter 表中INPUt 链第一条规则
iptables -D INPUT 1
#将 192.168.1.1 主机发给防火墙本机 22端口的数据包信息记录到 messages 日志
iptables -I INPUT -s 192.168.1.1 -p tcp --dport 22 -j LOG
在 Linux 系统中我们可以在/etc/services文件中找到各个服务与对应的标准端口号。
防火墙规则默认保存在/etc/sysconfig/iptables文件下。
7.2 tcp_wrappers
Linux中某个服务是否可以使用 tcp_wrappers防火墙,取决于服务是否应用了 libwrapped 库文件,如果应用则可以使用。系统中一些服务默认可以使用的有:sshd、vsftpd、tcpd、xinetd、sendmail 等。
tcp_wrapper防火墙的实现是通过/etc/hosts.allow和/etc/hosts.deny两个文件完成的,使用格式如下:
service:host [:action]
参数含义:
- service:服务名,如 sshd、vsftpd 等
- host:主机名或 IP 地址,可以是多个
- action:复合条件采取的动作
配置文件常用关键字:
- ALL:所有服务或所有 IP
- ALL EXCEPT:所有服务或 IP 除了这项指定的
例:
ALL:ALL EXCEPT 192.168.1.1 #除了 192.168.1.1 其余主机可以使用所有服务
针对/etc/hosts.allow和/etc/hosts.deny两个文件,Linux 会先判断/etc/hosts.allow后判断/etc/hosts.deny,前者满足则不会在去判断后者。如果想要sshd服务只能在某些主机使用则可以用以下配置:
#etc/hosts.allow文件中写入
sshd: 172.20.190.51
sshd: 172.20.190.52
sshd: www.pdca.net

#/etc/hosts.deny文件写入
sshd: ALL
8. 锁定系统重要文件
Linux 系统中通过chattr命令可以修改文件或目录的属性,此文件要 root 用户执行,从而提高安全性,通过lsattr命令可以查看文件的属性,下面是对这两个命令的详解。
chattr命令格式如下:
chattr [-RV] [-v version] [mode] 文件或目录
主要参数解释:
- -R:递归修改所有文件及其子目录
- -V:详细显示修改内容,打印输出
以下是chattr命令常用参数,用来控制文件属性
| 参数 | 解释 |
|---|---|
| + | 在原有参数基础上追加参数 |
| - | 在原有参数基础上移除参数 |
| = | 更新为指定参数 |
| a | 设定此参数,只能向文件中添加数据,而不能删除,常用于服务器日志文件安全 |
| c | 即 compress,设定文件是否压缩后存储,读取时需要经过自动解压操作 |
| i | 即 immutable,设定文件不能修改,删除,重命名,设连接 |
| s | 安全的删除文件或目录,即删除后的文件后,收回硬盘空间 |
| u | 与 s 相反,删除后的文件系统保留其数据块以便以后恢复 |
这些参数中经常用到a,i,其中 i参数不允许任何用户进行操作,即使 root 也不行。
以下是lsattr命令格式:
lsattr [-adlRvV] 文件或目录
常用参数解释:
| 参数 | 解释 |
|---|---|
| -a | 列出目录所有文件,包括隐藏文件 |
| -d | 显示指定目录属性 |
| -R | 递归显示目录及其下面文件和子目录的属性值 |
| -v | 显示文件目录版本 |
对于一些重要的目录和文件可以加上i,a属性,例如:
chattr -R -i /bin /boot /lib /sbin
chattr +i /etc/passwd
chattr +i /etc/shadow
chattr +i /etc/hosts
chattr +i /etc/resolv.conf
chattr +i /etc/fstab
chattr +i /etc/sudoers
chattr +a /var/log/messages
9. /tmp、/var/tmp、/dev/shm 安全设定
Some attackers will use /tmp, /var/tmpcatalog trojaned, due to the normal operation of the system on this directory will affect some programs, we can not perform read and write permissions to modify directory, /dev/shmis a shared memory device, if the hacker through this file directly to the operating system memory consequences disastrous.
For /tmpa separate disk partition, we can modify the /etc/fstabfile /tmpto mount the partition of property, plus nosuid, noexec, nodevthree options, amend as follows:
LABLE=/tmp /tmp ext4 rw,nosuid,noexec,nodev 0 0
Which nosuid, noexec, nodevthe option is not allowed any suid programs can not execute any script in this district, as well as device file does not exist.
After setting the property is complete, re-mount the partition into force.
10. After the attack server roadmap
- Cut off network
- Find attack source
by analyzing the system log and log in the log files, view suspicious information while viewing port is open, the operation process, analyze suspicious programs. - Analysis of the invasion of the causes and ways to
analyze the invasion was to identify vulnerabilities or bugs attack way, attack to find the source - Backup user data
after a server attack, you need to immediately back up user data on the server, while viewing these data, there is no attack, if there is to be completely removed. - Reinstall the system
reinstall the system is a good way to completely remove the source of the attack