Ubuntu16.04 not enter the interface (login screen cycle, the password is correct)
table of Contents
The first step, check the cause of the problem
(1) collecting about online answers
(2) Find a problem
(3) Description of the problem
(4) solution Baidu issues
(5) to determine the cause of the problem
The second step, to solve the problem --- uninstall the old driver
The third step, integrated installation (CUDA + NVIDIA driver) + cuDNN
The fourth step, other notes
text
Description:
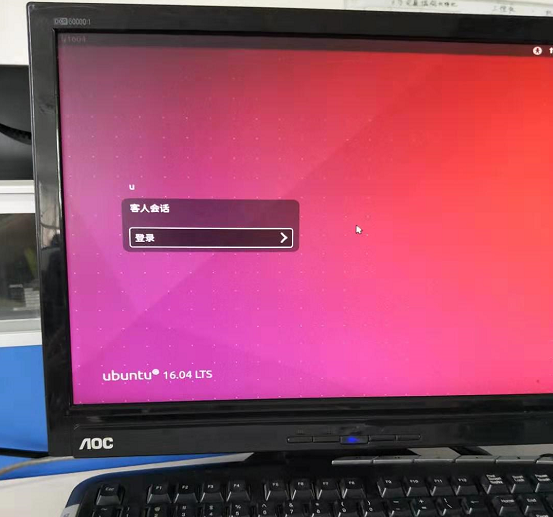
Last is: Ubuntu circulation system login screen, password, account number is not operational, keyboard and mouse is not valid.
This is: ubuntu cycle login and password for all accounts, is the board does not go in, flash back to the login screen, you can enter interface tty1 account number and password can be used, is a graphical interface board is not into it.
The first step, check the cause of the problem
Finally, the solution is driven by reason.
(1) collecting about online answers
Ubuntu 16.04 is used by default set was, but there is a huge problem for Nvidia's support . @https: //www.jianshu.com/p/85cbb0258d32
nvidia graphics card has not been very friendly to linux system. On many of the desktop distribution, after nvidia graphics driver installed independently and always be a variety of integrated graphics, incompatibility problems . @https: //blog.csdn.net/u012058778/article/details/88530874
"Tried a few ways not possible before, including change / etc / profile, startx, Xauthority delete files, etc., because these are vividly drug is not symptomatic, ubuntu log in circulation is a lot of problem caused, in front these examples only for their own problems, your problems are not out here, so of course we have to look before if you do have a record of what changed on ubuntu like his own where the problem is., put . change it back on the line, such as the packet it just installed unloaded like "@https: //blog.csdn.net/mangobar/article/details/82218807
Of course, the reason "Ubuntu circulation system login login loop" more than that, sometimes / etc / profile changed in or added something strange cause these problems, so we need to remedy. The correct approach is to go to see the error message .xsession-errors log home directory, so to determine the cause. Similar small primary through, "opened at the start interface of the things I first installed Ubuntu is met, I know that the graphics card driver problem," @https: //www.jianshu.com/p/e1f1a1faa867
(2) Find a problem
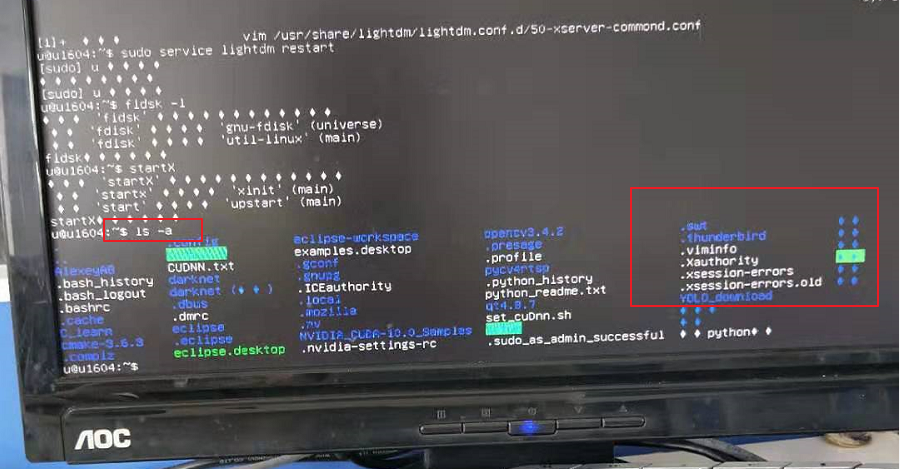
1 .ctrl + alt + F2, a screen appears, enter your login and password to log

2 After logging in, run:. LS - A

3 . You can see there is a .xsession- errors file

4 open this file, run. : vim .xession-errors
@https://blog.csdn.net/mangobar/article/details/82218807
(3) Description of the problem
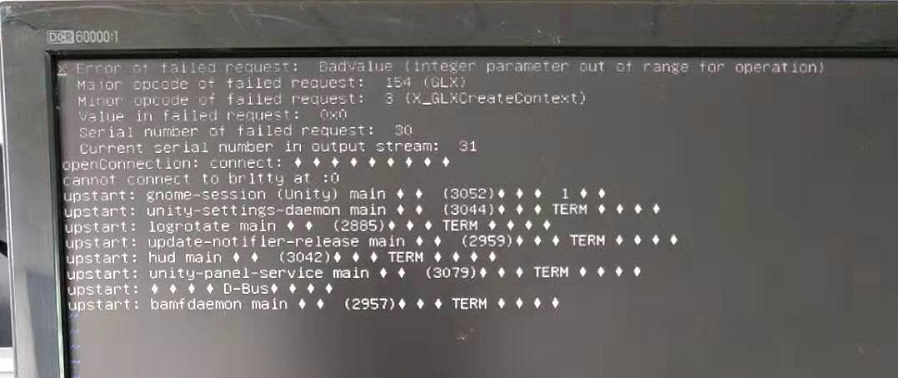
After Ubuntu16.04 install nvidia graphics driver card in the login screen loop landing, view the ~ / .xession-errors file, display:
 X Error of failed request: BadValue (integer parameter out of range for operation)
    Major opcode of failed request: 154 (GLX)
    Minor opcode of failed request: 3 (X_GLXCreateContext)
    Value in failed request: 0x0
    Serial number of failed request: 32
    Current serial number in output stream: 33
    openConnection: connect: No such file or directory
    cannot connect to brltty at :0
@http: //www.luyixian.cn/news_show_36539.aspx https://bbs.archlinux.org/viewtopic.php?id=195435 description of the problem, as this method did not resolve.
(4) solution Baidu issues
Direct look at the first line, go to the page where the search problem "X Error of failed request: BadValue (integer parameter out of range for operation)" solution.
The reason (5) fixed the problem
Most said that the driver of the problem. How the amount of ... is drive problems, this time do not want to "reinstall the system with heavy drive" to solve the problem.
The second step, uninstall old drivers.
ALT + CTRL + F2 into the command line:
Uninstall NVIDIA drivers and reboot

sudo APT - GET the Remove --purge Nvidia *

sudo APT - GET autoremove # important, nvidia all relevant procedures to remove the installation and does not retain the configuration file

sudo APT - GET install - f # important, when the installation Add the dependent packages all deleted

sudo reboot
The third step, integrated installation (CUDA + NVIDIA driver) + cuDNN
NVIDIA drivers and then install blackout CUDA, we must pay attention to both versions of the corresponding requirements of the problem.
Put another way, mounted directly in CUDA NVIDIA driver installation process, pay attention to check the computer's configuration supports CUDA version, then download the installation package is good.
(1) downloads the installation package CUDA
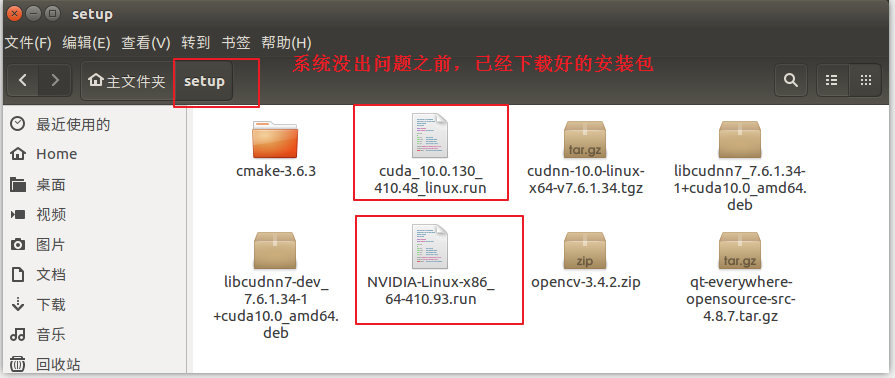
Before the system is not the problem, it has been downloaded well, put / home / u / setup / folder down. This step, skip.
Before the system is not the problem, download the installation package is not saved, then you need to find how to get online installation package is installed.
(2) disables the system comes nouveau driver
Before the system is not the problem, have done this step, you can verify the side, you can be skipped.
ALT + CTRL + F2 into the command line:
/etc/modprobe.d/ vim sudo blacklist.conf

at last add the following text:
blacklist nouveau
the Option nouveau modeset = 0

command prompt window will warn, ignore it.

Save and exit, execute the following command to take effect:
sudo Update -initramfs - U

Restart the computer, type:
lsmod | grep nouveau

no output instructions to disable success.
(3) mounting the drive CUDA + NVIDIA
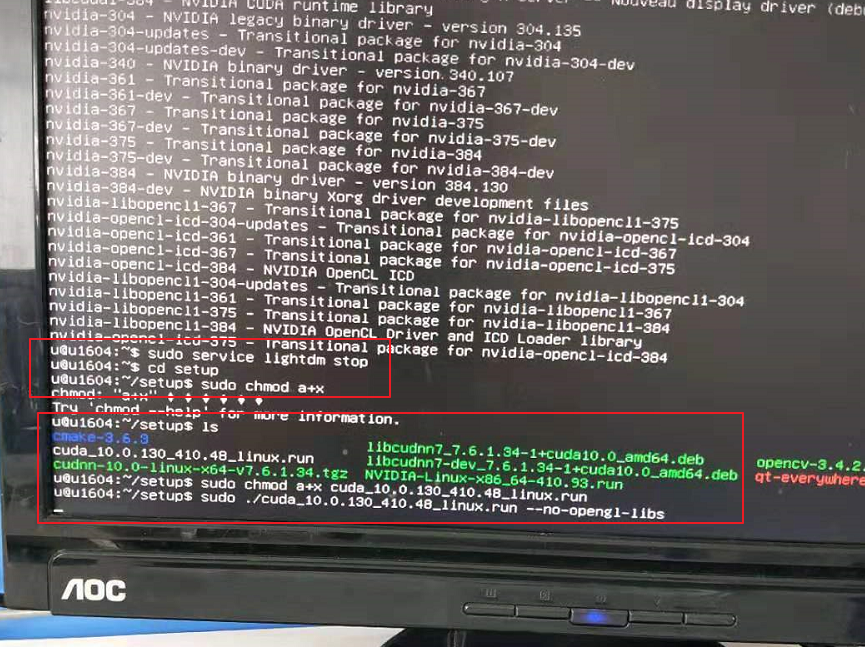
Continue in the ALT + CTRL + F2 command line mode:
Setup cd

LS # find the installation package, remember the name of

sudo chmod A + the X-cuda_10. 0 .130_410.48_linux.run # must give permission, or did not respond to the next step

sudo. / cuda_10. 0 .130_410.48_linux.run - OpenGL---NO2 . libs the sudo SH cuda_10 # 0 .130_410.48_linux.run --no-OpenGL- libs

Note that the command:. . / cuda_8 0 .44_linux.run -NO2-opengl-libs (opengl set was to be added Related parameters)
Operation of the installation process:
@https: //blog.csdn.net/qq_41493990/article/details/81980940 verification, some user license information, there are graphic.
After installing, reboot: sudo reboot
cuda mainly in the following parameters:
--no-opengl-libs: represents the only driver installation file, the file is not installed OpenGL. Necessary parameters for the same reason. Note: It is not -no-opengl-files.
--uninstall (deprecated): used for unloading CUDA Driver (obsolete).
--toolkit: represent only install CUDA Toolkit, do not install Driver and Samples
--help: More advanced options.
Option to select the installation process:
(1). There will first read the statement, you can keep pressing D, then accept.
. (2) Option install nvidia accelerated Graphics Driver, it has already begun to nvidia driver input n installed; because we have not installed the nvidia drivers, so remember to choose the y- .
. (3) option to install the OpenGL libraries, if dual graphics cards (set was + alone significantly) to select n; if you can only independence was selected y; if dual graphics options y, then there will be black or circulatory problems logged, if added the above parameters would not have such an option. Before installing yes all the way down did not pay attention! ! ! ! ! ! ! ! ! ! !
(4) Behind you can choose yes, we can choose the last option n, that is not copied Samples, because there are samples installation directory.
After the installation process will have the following information:
Driver :Installed

Toolkit :Installed in /usr/local/cuda-9.2

Samples :Installed in /home/vincent
@https://blog.csdn.net/wf19930209/article/details/81879514
(4) mounted cuDNN
Before pressing process, go again:
Download unzip --- --- --- directly write a script to run sh sh --- see if installed correctly .
[] 1. Download and extract the same, it is still Quguan cuDNN version downloaded CUDA10.0 corresponding download address: https: //developer.nvidia.com/rdp/cudnn-download.
[2. Write a script and run sh]
SH ./ # set_cuDnn.sh

# ! / Bin / bash

echo " the Remove libcudnn of File * / usr / local / CUDA / lib64 "
sudo RM -rf /usr/local/cuda/lib64/libcudnn.s*    # remove the old version cudnn

echo " copy cudnn.h to usr / local / CUDA / the include "
# sudo cp /home/user_name/cudnn6/include/cudnn.h / usr / local / CUDA / # copy cudnn.h the include files to the / usr / local / cuda / under the include directory, user_name here changed their username
sudo cp / Home / U / cuda10. 0 /cuDNN/include/cudnn.h / usr / local / cuda / include # cudnn.h copy files to / usr
sudo chmod 777 -R / usr / local / CUDA / the include # relieve permissions to the file after copying

echo" Copy lib * to usr / local / CUDA / lib64 "
sudo cp / Home / U / cuda10. 0 / cuDNN / lib64 / lib * / usr / local / CUDA / lib64 # ibid
sudo chmod 777 -R / usr / local / CUDA / lib64 # ibid

sudo ldconfig # effect on all copy rights and lifting operations performed
# vim setupcudnn.sh # Create a shell script file, copy the following contents into the inside
# setupcudnn.sh then save the contents of the file, and execute the following the command to install:
# sudo bash set_cuDnn.sh # setupcudnn.sh execution commands in the script, install cudnn
#

 ** Note: ** benefits here to install the command script file is written in the back if you want to install other versions of cudnn , just slightly modified the script, and then run the installation can be completed quickly. For example, to install cudnn7 version, download cudnn7, unpack rename the file to cudnn7, the script file is modified to cudnn7 cudnn6, then execute sudo bash setupcudnn.sh to complete the installation.
[3] see if installed correctly
cudnn information in its header file:
cat /usr/local/cuda/include/cudnn.h | grep CUDNN_MAJOR -A 2 can query
The fourth step, other notes
(1) switching ubuntu16.04 command-line mode and graphical interface?
Switching from the graphical interface to the command line mode, by pressing: ALT + CTRL + F1, -----, F6,
Why is F1, -----, F6, because in Linux in general there are more F1 to F6 terminal command line character, which means we can open up to six simultaneous command-line interface.
(2) switching and command-line graphical interface?
From the command line mode switch back to the graphical interface mode, press: ALT + CTRL + F7, other key is invalid. In addition to using the shortcut ALT + CTRL + F7 back to the mode switching command from the GUI, or it may be returned via the command mode.
When we enter the command line mode,
Enter the command: startx command line mode you can switch back to the graphical interface.
Enter the command: sudo service lightdm start from the command line mode can be switched back to the graphical interface.
After (3) Ubuntu18.04 broken system, how to copy an important file system?
@https://blog.csdn.net/yy2yy99/article/details/93490598
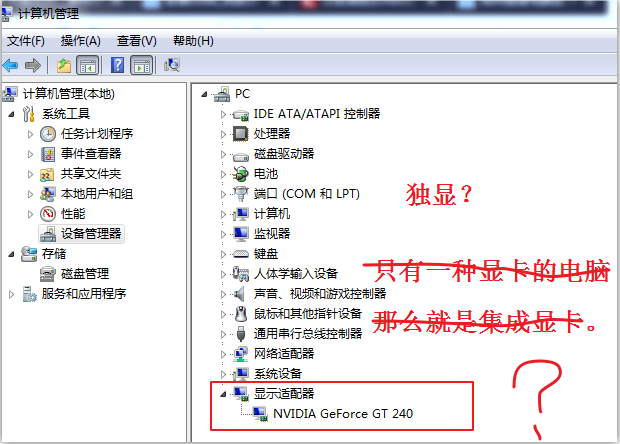
(4) How to determine the use of computers is a significant or significant independence?
General: Intel set was, Nvidia alone significantly
@http://www.dianping.com/education/a93819117
@https: //jingyan.baidu.com/article/0964eca242e4988284f53667.html
@https://product.pconline.com.cn/itbk/software/dnyw/1703/8927455.html?_=1507657311 图文
(5) unload drive command by reference
APT --purge NVIDIA * Remove the sudo   # N card driver fully unloaded
sudo service lightdm stop # close GUI

# nouveau driver disabled
# in /etc/modprobe.d/ added blacklist.conf the following:
blacklist nouveau
Options nouveau modeset = 0

# and then perform
the sudo update - the initramfs -u

# Nvidia mounted drive
the sudo the Add APT-Repository ppa: Xorg-edgers / ppa

# ppa source added
the sudo the Add APT-Repository ppa: Graphics-drivers / ppa
the sudo update APT

# update APT - GET
sudo install NVIDIA APT - 375

# Finally, do not forget to open the graphical interface
sudo service lightdm start

----------------------------------
The following while executing the deletion
sudo APT - GET the Remove --purge NVIDIA - *

delete all the programs installed nvidia related, not to retain the configuration file
sudo APT-GET autoremove

added when you install dependent packages all deleted
sudo APT -get install -f

dependencies between repairing
the above three lines of code execution End basically say you can safely delete a complete assembly without damaging other applications premise, then reboot to restart

 -------------------------- ---------------
uninstall the NVIDIA drivers and reboot
sudo APT - GET the Remove --purge Nvidia *
sudo APT - GET autoremove # especially important
sudo APT - GET install - f # especially important
sudo reboot

Reinstall the NVIDIA drivers, since many students might forget what type of graphics card, or computer graphics driver is not ready, or feel down and then copy the download to be installed in the computer too much trouble.
Anyway, I think online installation, perform the kind of word directly from the command line Well ~
update source
sudo APT - GET upgrade
sudo APT - GET Update

query nvidia driver version available
sudo APT -cache Search Nvidia *

choose where to install the latest version we here only from 384 to install, you need to install the specific version according to your actual situation
sudo APT - GET install Nvidia 384

and then find the screen resolution to normal, and is not recycled landed @https: // blog.csdn. NET / dugudaibo / Article This article was / the Details / 84,255,472
----------------------------------------- ------
(6) version
Previously installed the NVIDIA drivers and then dark to CUDA, both versions:
NVIDIA-Linux-x86_64-410.93.run
cuda_10.0.130_410.48_linux.run
CUDA + NVIDIA mounted together with the drive, both versions:
cuda_10.0
NVIDIA-410.48
Attachment, basic configuration information of the computer:
A chassis (main housing, for fixing the respective hardware):
 2 power supply (power supply system host, the host is used to power regulator): 1250W (a power source)
 3 . Board (trunk connection of each hardware within host): Z390 AORUS PRO (WIFI) (GIGABYTE the GIGABYTE)
 4 .CPU (host of the brain, responsible for data processing operations): Inter CoreTM the CPU i7-8700K @? 3 .70GHz × 12
5 memory (call data is temporarily stored in the computer):. 64G DDR4, 2666 Kingston
 6 hard disk (master storage device for storing data): 250G (Samsung the SSD) + a 4T Seagate
 7 sound (audio signal processing computer, and have a separate sound-board):
 8 . graphics (processing video signal from the computer, there are core graphics (integrated) and graphics card) :( Gigabyte) RTX2080 Ti 11G NVIDIA GeForce
 9 . network signals between the card (processing computer and computer, personal hosts are commonly integrated card, most servers are independent NIC)
 10 . radiator (for high temperature components within the host device to dissipate heat)
Attached, climbing portion screenshot pit:


Hope this is resolved, this will not happen again this problem. Crawl pit process is too consuming mood ~ ~ ~