This article in the original technical team from the city of grapes and starting
Please indicate the source: Grape City's official website , Grape City to provide professional development tools for developers, solutions and services, enabling developers.
We were introduced on a beginners guide the development of Python in Windows 10, we look at this blog entry together look at Step by Step Guide Windows subsystem (WSL) how to use Python for Web development.
Setting up the development environment
We recommend installing Python on the WSL when you build a web application. Many Python web development tutorials and instructions are written for Linux users and Linux-based packaging and installation tools. Most web applications deployed on Linux, so this will ensure consistency between your development environment and production environment.
If you are using something other than web development, then we recommend that you use the Microsoft Store Python installed directly on a Windows 10. WSL does not support GUI desktop or application (such as PyGame, Gnome, KDE, etc.). In these cases, please install and use Python on Windows. If you are not familiar with Python, please refer to the following guidelines: Getting Started with Python on Windows. If you are interested automate common tasks on the operating system, please refer to the following guidelines: start with Python scripting and automation on Windows. For certain advanced scenarios, you may want to consider the python.org download a specific version of Python directly, or consider installing an alternate item, such as Anaconda, Jython, PyPy, WinPython, IronPython and so on. Only if you are more advanced Python programmers when only recommend using this method, the specific reasons for selecting an alternative implementation.
Enable Windows Subsystem for Linux
By WSL, you can run GNU / Linux environment (including most command-line tools, utilities and applications), make changes directly on Windows, and is fully integrated with Windows file system and common tools (such as Visual Studio Code). Before enabling WSL, please check whether you have the latest Windows 10 version.
To enable WSL on your computer, you need:
-
Go to "Start" menu (bottom left of the window icon), type "open or close the windows function", and then select the link to "Control Panel" to open "windows features" pop-up menu. Find "Windows Subsystem for Linux" in the list and select the check box to enable the feature.
-
When prompted, restart your computer.
Installing Linux distributions
There are more Linux distributions can run on the WSL. You can find and install the favorites in the Microsoft Store. Ubuntu advice from the beginning 18.04 LTS, because it is the latest, most popular and popular support.
-
Ubuntu 18.04 LTS Open this link to open the Microsoft Store, and then select "get." (This is a fairly large download and may take some time to install.)
-
After the download is complete, in the "Start" menu, type "UBUNTU 18.04 LTS", Store or from the Microsoft "Start", select "Start."
-
When you first run the distribution, you will be asked to create an account name and password. After that, by default, you will automatically log in as this user. You can choose any username and password. They will not affect your Windows user name.
You can check the Linux distribution currently used by entering the following: lsb_release -d. To update the Ubuntu distribution, use sudo apt update && sudo apt upgrade: It recommends regular updates to ensure you have the latest package. Windows does not automatically process this update. For additional Linux distributions link applies to Microsoft Store, an alternative installation method, or troubleshooting, see the documentation for windows Windows for Linux Installation Guide 10 subsystems.
Setting Visual Studio Code
By using the VS Code, take advantage of IntelliSense, Linting, debugging support, and snippets unit tests. VS Code seamless integration for Linux and Windows subsystem that provides the built-in terminal establishes a seamless workflow between the code editor and the command line, also supports the use of generic git Git version control built directly into the UI command (add, commit, push, pull).
-
Download and install for Windows VS Code. VS Code also applies to Linux, but Windows subsystem for Linux does not support GUI applications, so we need to install it on Windows. Do not worry, you can still use the remote -WSL expansion and Linux command line and tool integration.
-
WSL is mounted on the extension VS Code. This allows you WSL may be used as an integrated development environment, and the process compatibility and path for you. Learn more.
important
If VS Code has been installed, you need to ensure that the released version 1.35 or later to install remote WSL extension. Do not recommended for use in extended VS Code WSL WSL in use, because the loss of support for the auto-complete, debugging, linting, etc. Fun Facts: This WSL extension installed in $ HOME / .vscode-server / extensions .
Create a new project
Let's create a new project directory on Linux (Ubuntu) file system, then, we will use the VS Code to deal with Linux applications and tools.
-
Go to "Start" menu (bottom left of the window icon), and then type the following to close and open the VS Code Ubuntu 18.04 (WSL your command line): "Ubuntu 18.04".
-
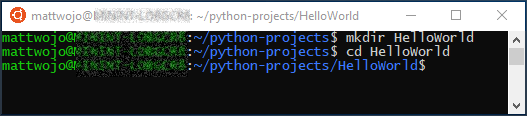
In the Ubuntu command line, navigate to where you want to place the item, and create directory:
mkdir HelloWorld.
prompt
When using Windows Subsystem for Linux (WSL), the important thing to remember is that you now work between two different file systems: 1) your Windows file system (WSL) is your Linux file system (), which is an example of Ubuntu. Note that the installation location package and store files. You can install the tool in the Windows file system or a version of the package, and install a different version of the Linux file system. Update Windows file system tools for Linux file system will be ineffective tool, and vice versa. WSL fixed drive on the computer will be loaded into the Linux release / mnt / folder. For example, Windows C: drive mounted in the lower /mnt/c/. Windows can access files from Ubuntu terminal, and these files using Linux applications and tools, and vice versa. Recommended to work in Linux file system is suitable for Python web development, as originally written for Linux Most web tools, and the deployment of Linux in a production environment. It also avoids the hybrid file system semantics (such as Windows are not case sensitive on the file name). In other words, WSL jump between now supports Linux and Windows file systems, so you can file hosted on one of the systems. Learn more . We are also pleased to share the WSL2 upcoming Windows , and will provide some significant improvements. You can now try on the Windows Experience Build 18917 Preview。
Install Python, pip and venv
Ubuntu 18.04 LTS comes with Python 3.6, but does not come with some modules you may want to get in other Python installations. We still need to install pip, for Python's standard package manager and venv, which is the standard module for creating and managing virtual environments of light.
-
Open Ubuntu terminal and type:
python3 --version, confirm Python3 installed. This should return the Python version number. If you need to update your version of Python, first enter:sudo apt update && sudo apt upgradethen use thesudo apt upgrade python3updated version of Python to update Ubuntu. -
Come by typing
sudo apt install python3-pipinstall pip :. Pip allows you to install and manage package does not belong to other Python standard library. -
Enter the following installation Venv
sudo apt install python3-venv:.
Create a virtual environment
For Python development projects, it is recommended to use a virtual environment. By creating a virtual environment, you can project tools to isolate and avoid version conflict with tools other projects. For example, you may need to maintain a required Django old web 1.2 web project framework, but then use Django 2.2 will get exciting new project. If the global update Django outside the virtual environment, the future may encounter some version control issues. In addition to preventing accidental clash of version control outside the virtual environment allows you to install and manage packages without administrative privileges.
-
Open a terminal and HelloWorld create a virtual environment named using the following command in the project folder. Venv:
python3 -m venv .venv. -
To activate the virtual environment, enter
source .venv/bin/activate: If it works, you should see (. Venv) before the command prompt. Now, you have to write code for a stand-alone installation package and the environment. After completing the virtual environment, enter the following command to deactivate it:deactivate.
prompt
It recommends creating a virtual environment in the project's directory. Since each project should have its own separate directory, so each project has its own virtual environment, so no unique name. We recommend venv to follow the Python convention. If installed in a project directory, some tools (such as pipenv) also default to this name. We do not want to use the env conflict with the environment variable definition file. Generally not recommended non-point leader name because there is no lssustained remind you that the directory exists. We also recommend. Venv .gitignore added to the file. (The following is applicable to Python's GitHub .gitignore default template for reference.) For more information about the use of virtual environments in the VS Code, see use Python environment in the VS Code .
Remote window open WSL-
VS Code using remote WSL extension (before installation) will be treated as a remote Linux server subsystem. This allows you to use the WSL as an integrated development environment. Learn more .
-
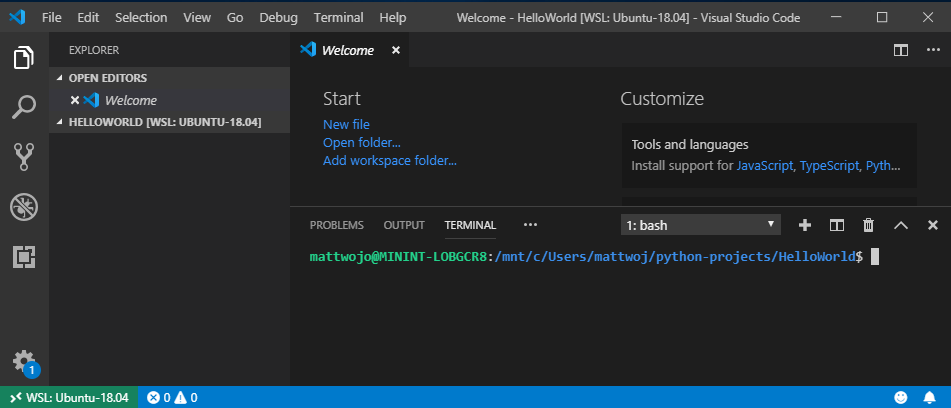
Enter the following, open from Ubuntu project folder terminal VS Code:
code .(. "" Tell VS Code to open the current folder). -
Windows Defender will pop up a security alert, and select "Allow access." After opening the VS Code, you should see a remote host connection indicator in the lower left corner, so you know edited on WSL: Ubuntu-18.04.

-
Close Ubuntu terminal. The forward movement of the terminal using the integrated VS Code of WSL.
-
By pressing Ctrl + '(apostrophe character using trans) or select "View> Terminal" to open the WSL terminal VS Code. This opens a bash (WSL) command line, this command line to open the project file you created in the Ubuntu terminal in the folder path.
Install Microsoft Python extensions
You will need to install any extension VS Code of WSL. Code has been installed locally in VS extensions will not be used automatically. Learn more .
-
By entering Ctrl + Shift + X open "VS Code Extension" window (or menu navigation using the "View>" "extension").
-
In the "Marketplace of top search extensions" box, enter: Python.
-
Find python (ms python python) extended by Microsoft, and choose "green Install" button.
-
Extended installation is complete, you will need to select "you need to reload" button. This will override the VS Code and display WSL: "VS Code extension" window "UBUNTU-18.04- Installed" section displays Python extensions installed.
运行简单的 Python 程序
Python 是一种解释型语言, 支持不同类型的 interpretors (Python2、Anaconda、PyPy 等)。 VS Code 应默认为与项目关联的解释器。如果有理由更改它, 请选择 "VS Code" 窗口底部蓝色栏中当前显示的解释器, 或打开命令面板(Ctrl + Shift + P), 然后输入以下命令 :选择解释器。 这会显示当前已安装的 Python 解释器列表。 详细了解如何配置 Python 环境。
让我们创建并运行一个简单的 Python 程序作为测试, 并确保已选择正确的 Python 解释器。
-
通过输入Ctrl + Shift + E打开 "VS Code 文件资源管理器" 窗口 (或使用菜单导航到 "视图 > 资源管理器")。
-
如果它尚未打开, 请按Ctrl + Shift + ' 打开集成的 WSL 终端, 并确保已选中HelloWorld python 项目文件夹。
-
通过输入以下内容创建 python 文件
touch test.py:。 你应看到刚才创建的文件显示在你的 "资源管理器" 窗口中的 venv 和. vscode 文件夹下的项目目录中。 -
选择刚在 "资源管理器" 窗口中创建的test.py文件, 在 VS Code 中打开它。 由于文件名中的 py 告诉 VS Code 这是一个 Python 文件, 因此你之前加载的 Python 扩展会自动选择并加载一个 Python 解释器, 该解释器将显示在 VS Code 窗口的底部。
-
将此 Python 代码粘贴到你的 test.py 文件中, 然后保存该文件 (Ctrl + S):
print("Hello World") -
若要运行我们刚刚创建的 Python "Hello World" 程序, 请在 "VS Code 资源管理器" 窗口中选择test.py文件, 然后右键单击该文件以显示选项的菜单。 选择 "在终端中运行 Python 文件" 。 或者, 在集成的 WSL 终端窗口中, 输入
python test.py: 运行 "Hello World" 程序。 Python 解释器会在终端窗口中打印 "Hello World"。
恭喜. 一切都已设置为创建和运行 Python 程序! 现在, 让我们尝试使用两个最受欢迎的 Python web 框架创建 Hello World 应用:Flask 和 Django。
Flask Hello World 教程
Flask是适用于 Python 的 web 应用程序框架。 在此 brief 教程中, 你将使用 VS Code 和 WSL 创建一个小型的 "Hello World" Flask 应用。
-
转到 "开始" 菜单 (左下方的窗口图标), 然后键入以下内容, 打开 Ubuntu 18.04 (你的 WSL 命令行):"Ubuntu 18.04"。
-
为项目创建目录:
mkdir HelloWorld-Flask, 然后cd HelloWorld-Flask输入目录。 -
创建虚拟环境以安装项目工具:
python3 -m venv .venv -
输入以下命令, 在 VS Code 中打开HelloWorld Flask项目:
code . -
在 VS Code 中, 通过输入Ctrl + Shift + ' (您的HelloWorld-Flask项目文件夹应已选中) 打开集成 WSL 终端 (也称为 Bash)。 关闭 Ubuntu 命令行, 因为我们将在与 VS Code 前进的 WSL 终端中进行工作。
-
使用 VS Code 中的 Bash 终端激活在步骤 #3 中创建的虚拟环境:
source .venv/bin/activate。 如果它有效, 你应该在命令提示符之前看到 (. venv)。 -
输入以下内容, 在虚拟环境中安装
python3 -m pip install flaskFlask:。 通过输入以下内容来验证它是否python3 -m flask --version已安装:。 -
为 Python 代码创建新文件:
touch app.py -
在 VS Code 的文件资源管理器 (
Ctrl+Shift+E, 然后选择 app.py 文件) 中打开 app.py 文件。 这会激活 Python 扩展以选择解释器。 它应默认为Python 3.6.8 64 位 (venv): venv) 。 请注意, 它还检测到你的虚拟环境。
-
在app.py中, 添加代码以导入 Flask 并创建 Flask 对象的实例:
from flask import Flask
app = Flask(__name__)
11. 同样, 在app.py中, 添加一个返回内容的函数, 在本例中为简单字符串。 使用 Flask 的应用程序。路由修饰器将 URL 路由 "/" 映射到该函数:
@app.route("/")
def home():
    return "Hello World! I'm using Flask."
12. 保存app.py文件 (Ctrl + S)。
13. 在终端中, 输入以下命令运行应用:
python3 -m flask run
这将运行 Flask 开发服务器。 默认情况下, 开发服务器将查找app.py 。 运行 Flask 时, 应会看到类似于下面的输出:
(env) user@USER:/mnt/c/Projects/HelloWorld$ python3 -m flask run
 * Environment: production
   WARNING: This is a development server. Do not use it in a production deployment.
   Use a production WSGI server instead.
 * Debug mode: off
 * Running on http://127.0.0.1:5000/ (Press CTRL+C to quit)
打开默认 web 浏览器到呈现的页面, 然后在终端中 http://127.0.0.1:5000/ 按Ctrl 并单击该 URL。 你应在浏览器中看到以下消息:

请注意, 在访问类似于 "/" 的 URL 时, 调试终端中会出现一条消息, 其中显示了 HTTP 请求:
127.0.0.1 - - [19/Jun/2019 13:36:56] "GET / HTTP/1.1" 200 -
在终端中使用Ctrl + C停止应用。
恭喜, 你已使用 Visual Studio Code 和适用于 Linux 的 Windows 子系统创建了 Flask web 应用程序! 有关使用 VS Code 和 Flask 的更深入教程, 请参阅Visual Studio Code 中的 Flask 教程。
Django Hello World 教程
Django是适用于 Python 的 web 应用程序框架。 在此 brief 教程中, 你将使用 VS Code 和 WSL 创建一个小型的 "Hello World" Django 应用。
-
转到 "开始" 菜单 (左下方的窗口图标), 然后键入以下内容, 打开 Ubuntu 18.04 (你的 WSL 命令行):"Ubuntu 18.04"。
-
为项目创建目录:
mkdir HelloWorld-Django, 然后cd HelloWorld-Django输入目录。 -
创建虚拟环境以安装项目工具:
python3 -m venv .venv -
输入以下命令, 在 VS Code 中打开HelloWorld DJango项目:
code . -
在 VS Code 中, 通过输入Ctrl + Shift + ' (您的HelloWorld-Django项目文件夹应已选中) 打开集成 WSL 终端 (也称为 Bash)。 关闭 Ubuntu 命令行, 因为我们将在与 VS Code 前进的 WSL 终端中进行工作。
-
使用 VS Code 中的 Bash 终端激活在步骤 #3 中创建的虚拟环境:
source .venv/bin/activate。 如果它有效, 你应该在命令提示符之前看到 (. venv)。 -
在虚拟环境中安装 Django 命令:
python3 -m pip install django。 通过输入以下内容来验证它是否python3 -m django --version已安装:。 -
接下来, 运行以下命令以创建 Django 项目:
django-admin startproject web_project .
该
startproject命令假定.当前文件夹是项目文件夹, 并在该文件夹中创建以下内容:-
manage.py:项目的 Django 命令行管理实用工具。 使用python manage.py <command> [options]为项目运行管理命令。 -
名为
web_project的子文件夹, 其中包含以下文件:__init__.py: 指示 Python 的空文件此文件夹是一个 Python 包。wsgi.py: 用于 WSGI 的 web 服务器的入口点, 用于为你的项目提供服务。 通常将此文件保留原样, 因为它提供了用于生产 web 服务器的挂钩。settings.py: 包含 Django 项目的设置, 你可以在开发 web 应用过程中修改这些设置。urls.py: 包含 Django 项目的目录, 你还可以在开发过程中对其进行修改。
-
-
若要验证 Django 项目, 请使用命令
python3 manage.py runserver启动 Django 的开发服务器。 服务器在默认端口8000上运行, 你应该会在终端窗口中看到类似于以下输出的输出:Performing system checks... System check identified no issues (0 silenced). June 20, 2019 - 22:57:59 Django version 2.2.2, using settings 'web_project.settings' Starting development server at http://127.0.0.1:8000/ Quit the server with CONTROL-C.
首次运行服务器时, 它会在文件
db.sqlite3中创建一个默认的 SQLite 数据库, 该数据库用于开发目的, 但可用于在生产中用于低容量 web 应用。 此外, Django 的内置 web 服务器仅用于本地开发目的。 但是, 当你部署到 web 主机时, Django 将改用主机的 web 服务器。 Djangowsgi.py项目中的模块负责挂钩到生产服务器。如果要使用不同于默认8000的端口, 请在命令行中指定端口号, 例如
python3 manage.py runserver 5000。 -
Ctrl+click"http://127.0.0.1:8000/终端输出" 窗口中的 URL, 用于将默认浏览器打开到该地址。 如果 Django 安装正确且项目有效, 你将看到默认页面。 "VS Code 终端输出" 窗口还显示服务器日志。 -
完成后, 请关闭浏览器窗口, 并使用
Ctrl+C中所述的在 VS Code 中停止服务器。 -
现在, 若要创建 Django 应用, 请在项目文件夹 (
startapp其中manage.py驻留) 中运行管理实用工具的命令:python3 manage.py startapp hello
命令创建一个名
hello为的文件夹, 该文件夹包含多个代码文件和一个子文件夹。 在这些情况下, 经常使用views.py(包含用于定义 web 应用中的页的函数) 和models.py(包含定义数据对象的类)。 此migrations文件夹由 Django 的管理实用工具用来管理数据库版本, 如本教程后面部分所述。 此外, 还提供了apps.py文件 (应用配置admin.py) (用于创建管理界面) 和tests.py(适用于测试), 此处未介绍这些文件。 -
修改
hello/views.py以匹配以下代码, 这将为应用的主页创建单个视图:from django.http import HttpResponse def home(request): return HttpResponse("Hello, Django!") -
使用以下内容创建
hello/urls.py文件。 在urls.py文件中指定模式, 将不同的 url 路由到相应的视图。 下面的代码包含一个路由, 用于将应用程序的根 URL""() 映射views.home到刚刚添加到hello/views.py的函数:from django.urls import path from hello import views urlpatterns = [ path("", views.home, name="home"), ] -
该
web_project文件夹还包含一个urls.py文件, 该文件是 URL 路由的实际处理方式。 打开web_project/urls.py并对其进行修改以匹配以下代码 (如果需要, 可以保留指导注释)。 此代码会在应用程序hello/urls.pydjango.urls.include中拉入应用程序, 使应用程序中包含应用程序的路由。 当项目包含多个应用时, 此隔离非常有用。from django.contrib import admin from django.urls import include, path urlpatterns = [ path("", include("hello.urls")), ] -
保存所有已修改的文件。
-
在 VS Code 终端中, 使用
python manage.py runserver运行开发服务器, 并打开浏览器以http://127.0.0.1:8000/查看呈现 "Hello, Django" 的页面。
Congratulations, you have been using the VS Code for Linux and Windows subsystem creates a Django web application! About using more in-depth tutorial VS Code and Django, see the Visual Studio Code of Django tutorial .