First, create a django project
1. Create a python interpreter
-p /usr/bin/python3.6 tzproject mkvirtualenv # create a virtual environment called the tzproject
2. Create a python project
1) install django
install django == 2.1.10 PIP # Download 2.1.10 version of django
2) Create a django project
#   First, you find that the most suitable location to store django project (virtual machine)
cd ~                   # Go home directory
mkdir first_project   # Create a file called first_project folder
cd first_project       # Jump to that we just created a good first_project folder
django startproject tzproject -admin     # create a new project called tzproject of django
cd tzproject           # Jump to django project file our newly created folder
LL                      # view the contents of the current django project folder
3. Create a project pycharm
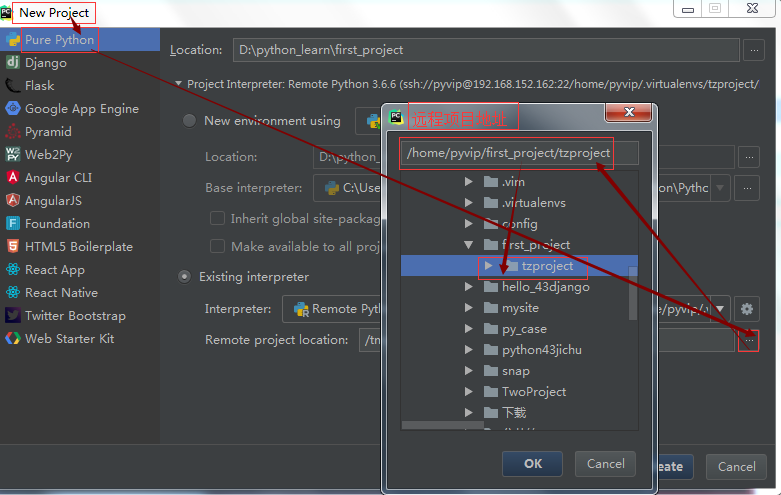
1) Select the project directory

2) configure the remote location of the python interpreter

3) Configure remote project path
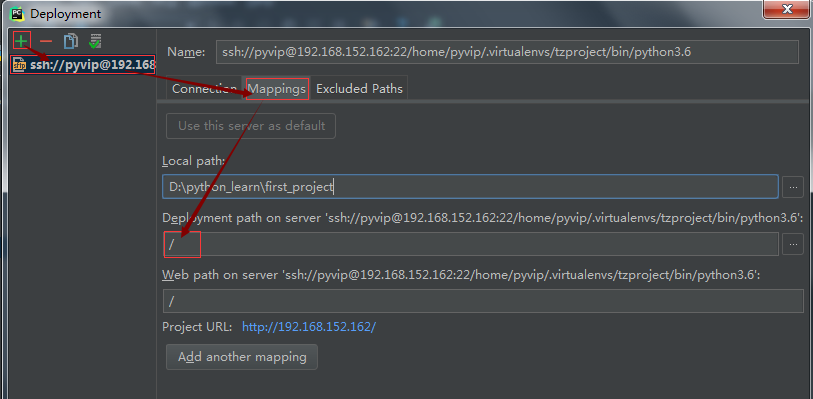
4) Set Configuration Synchronization
Find Tools ----> Deployment ------> Configuration:
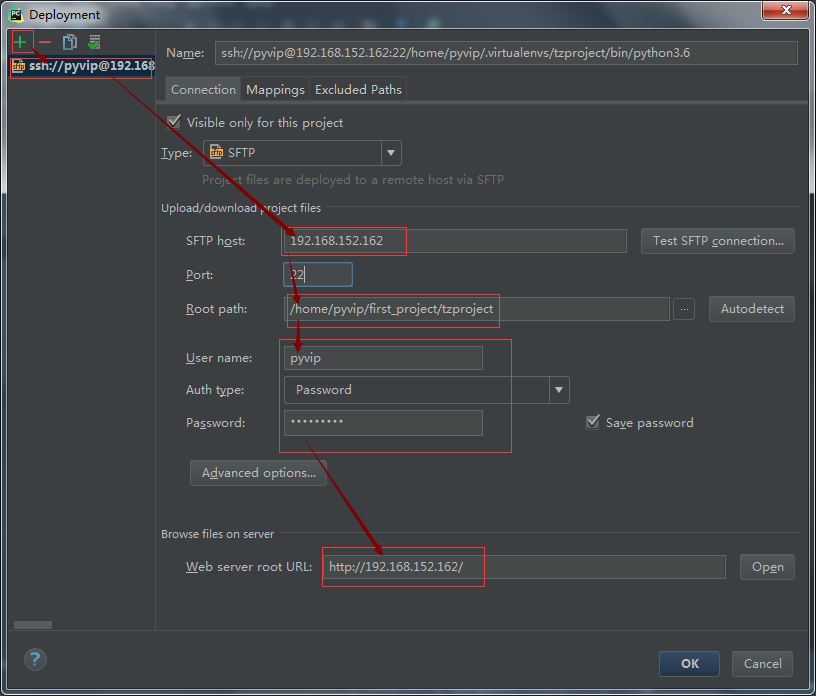
Copies the address in the second row to Connection Mapping of the Root path. And enter the remote host ip address and user name and password to connect.
5) Download the code
Find Tools ------> Deployment -----> Browse Remote Host to open the remote host. You can see the contents of the remote host entry on the right side of pycharm:
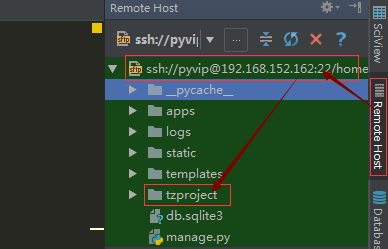
Right ssh: This is the location where the line in the file, right click and choose Download from here, download the code to the local.

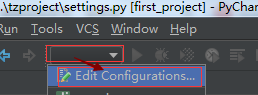
4. pycharm configure django project
1) Select configuration django
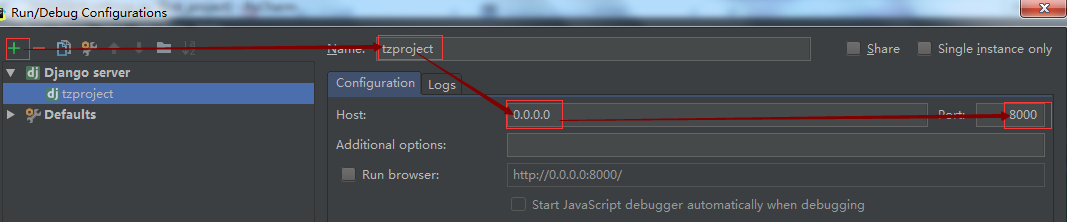
2) Configure the startup configuration django (address and port are written to the default, 0.0.0.0 represents the default can access any URL, 8000 is the default port of django)
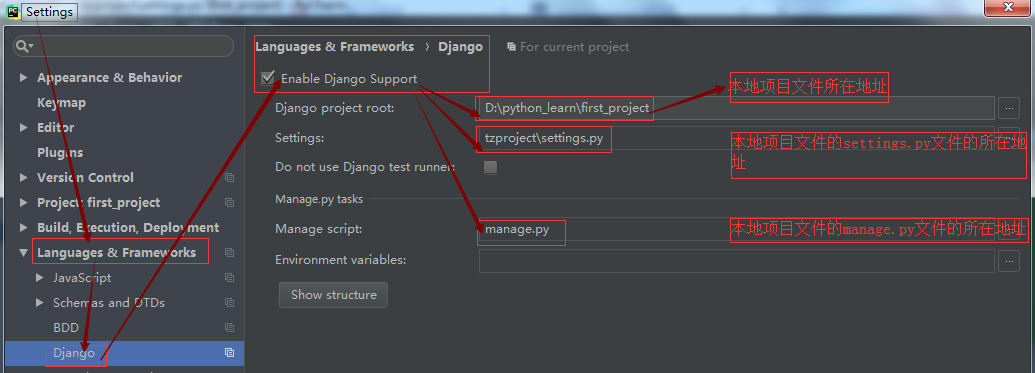
3) find File ------> Settings in the Languages & Frameworks in Django, configure and manage files Settings
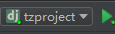
4) Click the green triangle can be run

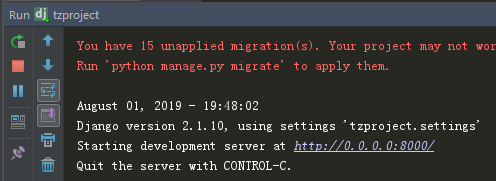
This represents the successful operation.
Two, django project configuration
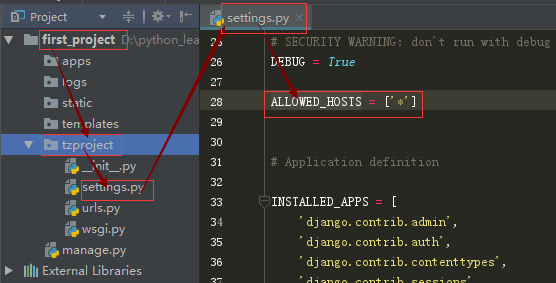
1. Configuration Settings folder (project folder settings files under tzproject)
1) Set Settings file allows the host to all:
2) configuration template file path
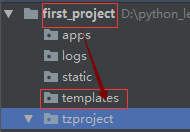
One: Create a template templates folder in your home directory folder first_project
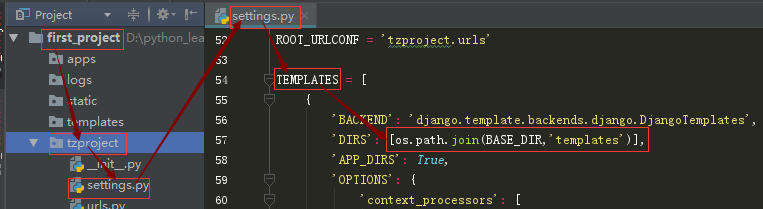
II: Setting the template file path in the Settings file
The template file path BASE_DIR and remote folder path templates that are connected together as a template folder
3) Configuration mysql database
One: Create a new database using (and creating a separate user)
![]()


贰:配置数据库
①直接在settings文件中设置
# 配置数据库
DATABASES = {
    'default': {
        'ENGINE': 'django.db.backends.mysql',
        'NAME': 'tzproject',
        'USER':'dj_user',
        'PASSWORD':'pythonvip',
        'HOST':'192.168.152.162',
        'PORT':'3306',
    }
}

由于截图的时候用户名写错了,所以其实用户名应该使用创建数据库用户时所创建的dj_user这个用户而不是xinlan。
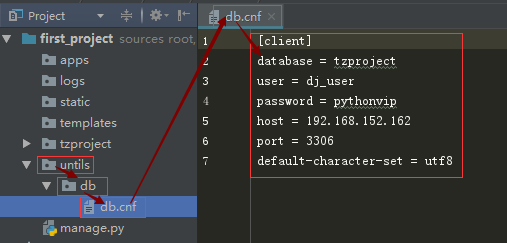
②在外部创建一个文件,再在settings文件中导入(官方推荐,创建一个untils的功能文件夹,并创建一个db.cnf文件用来存储数据库设置,再在settings文件中导入该文件)
[client]
database = tzproject            # 数据库名称
user = dj_user                  # 登录数据库用户名
password = pythonvip            # 登录数据库密码
host = 192.168.152.162          # 数据库所在ip地址
port = 3306                     # 数据库所在端口,mysql默认3306
default-character-set = utf8    # 数据库指定编码
再在settings文件中导入该文件:
# 配置数据库
DATABASES = {
    'default': {  # 默认数据库配置
        'ENGINE': 'django.db.backends.mysql',    # 数据库所用端口
        'OPTIONS':{                                          # 数据库中的各项数据
            'read_default_file':'untils/db/db.cnf',    # 加载外部文件
        },
    }
}

叁:安装驱动
①pymysql(在python虚拟环境中安装pymysql,使用python编写的)
workon  tzproject       # 进入tzproject虚拟环境
pip  install  pymysql   # 安装pymsql
安装成功后,在项目文件夹tzproject中的_init__.py文件中添加以下两行代码
import    pymysql
pymysql.install_as_MYSQLdb()
此时启动django项目就可以正常启动了。
②mysqlclient(官方推荐,使用c写的,使用时效率会比pymysql更快,default-libmysqlclient-dev这个就是c的那个库)
sudo  apt-get  update     #先更新
sudo  apt-get  install  default-libmysqlclient-dev  # 安装mysqlclient所依赖的包,所以需要先下载
workon  tzproject         #进入到tzproject虚拟环境中
pip   install   mysqlclient  -i  https://pypi.doubanio.com/simple  # 指定安装包路径来安装mysqlclient
其中mysqlclient安装后不需要在文件中添加任何东西直接启动即可。
4)配置redis缓存
壹:找到你的redis安装的位置,查看是否可以使用(使用redis-cli命令来进入redis数据库,下图为进入成功的效果图,代表你的redis数据库可以使用,它将作为我们项目的缓存存储的数据库)

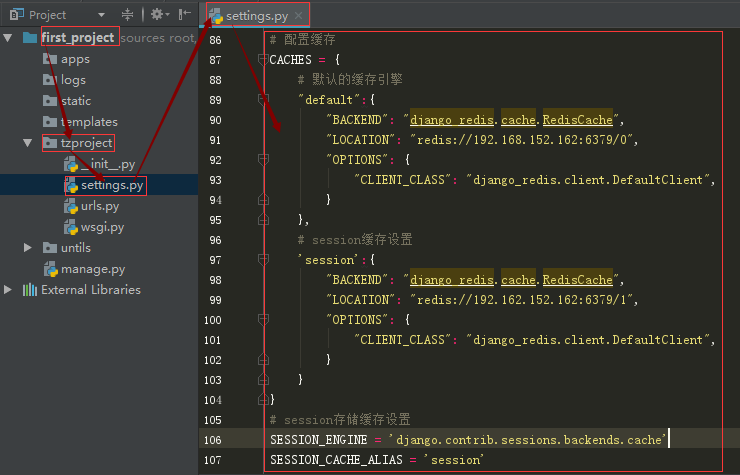
贰:缓存配置(同样在settings文件中,随意找个位置填写缓存设置即可)
# 配置缓存
CACHES = {
    # 默认的缓存引擎
    "default":{
        "BACKEND": "django_redis.cache.RedisCache",
        "LOCATION": "redis://192.168.152.162:6379/0",
        "OPTIONS": {
            "CLIENT_CLASS": "django_redis.client.DefaultClient",
        }
    },
    # session缓存设置
    'session':{
        "BACKEND": "django_redis.cache.RedisCache",
        "LOCATION": "redis://192.162.152.162:6379/1",
        "OPTIONS": {
            "CLIENT_CLASS": "django_redis.client.DefaultClient",
        }
    }
}
# session存储缓存设置
SESSION_ENGINE = 'django.contrib.sessions.backends.cache'
SESSION_CACHE_ALIAS = 'session'
叁:由于这个需要使用这个django_redis.cache.RedisCache包,所以我们需要在python虚拟环境安装django-redis这个包
pip install django-redis # 安装redis

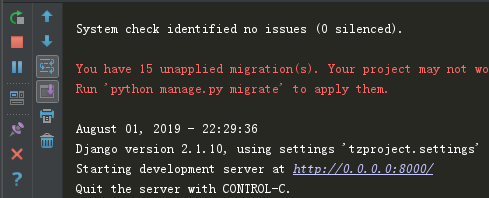
肆:运行django项目,出现如下效果图证明我们的缓存配置没有错误


5)配置日志器
壹:在settings文件中随便找个位置来添加日志配置
# 日志
LOGGING = {
    # 版本
    'version': 1 ,
    # 是否禁用已经存在的日志器
    'disable_existing_loggers': False,
    # 日志格式
    'formatters':{
        # 详细日志
        'verbose':{
            'format': '{levelname} {asctime} {module} {lineno:d} {message}',
            'style': '{',
        },
        # 简单日志
        'simple':{
            'format': '{levelname} {module} {lineno:d} {message}',
            'style': '{',
        },
    },
    # 过滤器
    'filters': {
        'require_debug_true': {
            '()': 'django.utils.log.RequireDebugTrue',
        },
    },
    # 日志处理器
    'handlers': {
        # 控制台显示内容
        'console': {
            'level': 'DEBUG',
            'filters': ['require_debug_true'],
            'class': 'logging.StreamHandler',
            'formatter': 'simple',
        },
        # 文件写入内容
        'file': {
            'level': 'INFO',
            # 这个handler可以记录一组日志文件
            'class': 'logging.handlers.RotatingFileHandler',
            'filename': os.path.join(BASE_DIR, 'logs/tz_django.log'),
            # 单个日志文件的最大字节数
            'maxBytes': 300*1024*1024,
            # 日志文件个数(超过了10将会覆盖之前的日志文件)
            'backupCount': 10,
            # 日志格式
            'formatter': 'verbose'
        },
    },
    # 总体日志设置
    'loggers': {
        'django': {
            'handlers': ['console','file'],
            'level': 'INFO', # 日志接收的最低级别
            'propagate': 'True',
        },
    },
}
贰:需要注意的是,由于日志我们设置的位置是 logs/tz_django.log 所以我们得先在主目录上把logs这个文件夹创建出来,不然运行会报错
叁:运行django项目,出现如下效果图证明我们的配置没有错误

6)配置时区和静态文件
壹:配置时区和语言
# 将语言设置为中文
LANGUAGE_CODE = 'zh-Hans'
# 将地区设置为上海
TIME_ZONE = 'Asia/Shanghai'

贰:配置静态文件
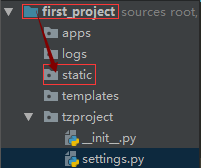
①首先创建一个static文件夹
②然后在settings文件中添加静态文件的地址
# 配置静态文件
STATICFILES_DIRS = [
    os.path.join(BASE_DIR,'static')
]

其中BASE_DIR是我们执行该项目时,该项目的存在地址。os.path.join则是将项目地址和静态文件夹static组合起来形成新的地址,即静态文件地址。
7)创建应用(app)
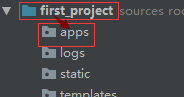
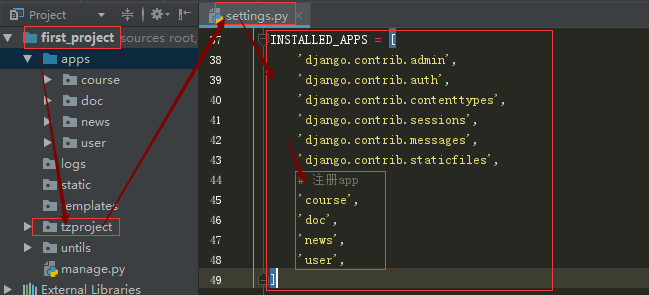
壹:为了方便管理,我们在主目录新建一个叫apps的文件夹用来存放我们所有的app
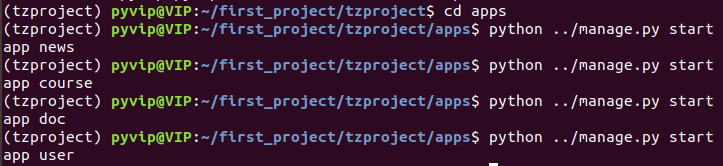
贰:然后打开我们的虚拟机,即我们的远程项目所在地址进入apps这个文件夹并创建应用
cd   apps     # 从项目文件夹进入里面的apps这个文件夹
python   ../manage.py   startapp   news  # 在apps这个文件夹中创建一个名叫news的新闻管理应用
python   ../manage.py   startapp   course  # 在apps这个文件夹中创建一个名叫course的课程管理应用
python   ../manage.py   startapp   doc  # 在apps这个文件夹中创建一个名叫doc的文档管理应用
python   ../manage.py   startapp   user  # 在apps这个文件夹中创建一个名叫user的用户管理应用
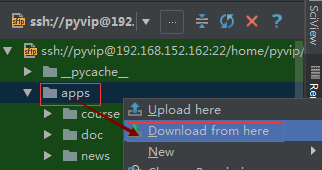
叁:打开我们pycharm右边的远程主机将我们新创建的四个app下载到我们的本地项目中
肆:在settings文件中配置我们的app并进行优化
①在settings文件中设置apps的路径优化(将apps路径加入到sys.path这个路径中,方便系统快速的搜索)
import sys

# 优化:将我们刚刚创建apps文件目录,加载到sys.path中,这使它将会导入更快
sys.path.insert(0, BASE_DIR)
sys.path.insert(1, os.path.join(BASE_DIR, 'apps'))
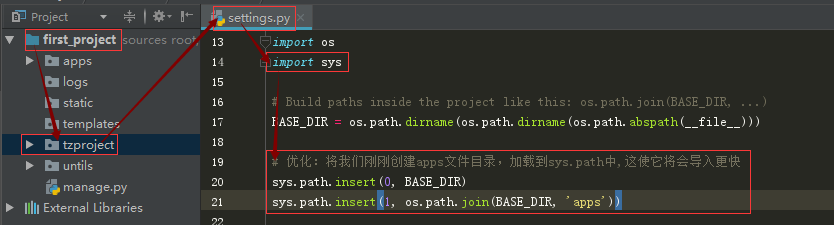
需要注意的是,因为我们的路径是包括BASE_DIR的,所以我们的优化设置需要卸载BASE_DIR获得的路径下面。
②在主目录上first_project右键选择Mark Directory as-------->Sources Root
③在主目录上first_project下的apps文件夹右键选择Mark Directory as-------->Sources Root
将两个文件夹路径都设置到根目录上,方便pycharm快速的找到该目录并提示

④将我们应用在settings文件中注册
INSTALLED_APPS = [
    'django.contrib.admin',
    'django.contrib.auth',
    'django.contrib.contenttypes',
    'django.contrib.sessions',
    'django.contrib.messages',
    'django.contrib.staticfiles',
    # 注册app
    'course',
    'doc',
    'news',
    'user',
]
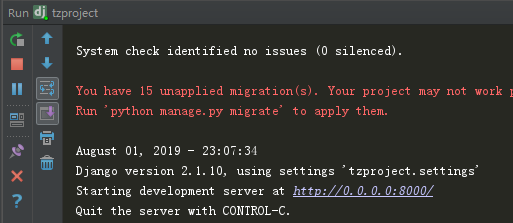
2. 在开启服务后在浏览器上访问我们的django项目,如果出现绿色的小火箭,则证明我们的配置都正确

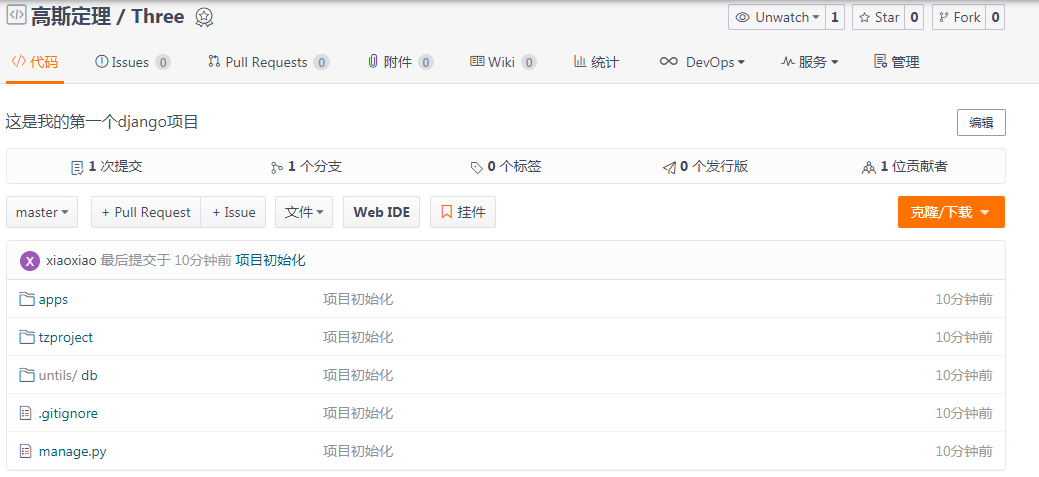
三、在码云平台创建项目
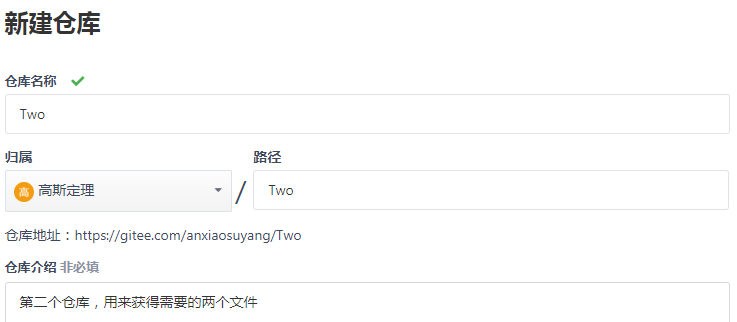
1. 新建仓库(获得.gitignore文件,.gitignore里面存储的是上传时不理睬的文件名称列表)

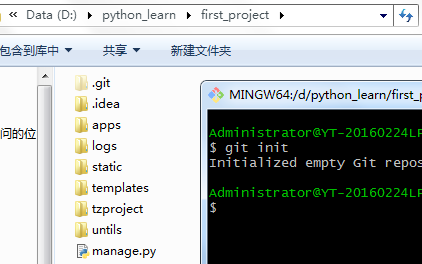
2. 将我们本地的项目存储的文件夹变成git仓库文件夹
找到我们的项目文件所存储的位置,进入该项目文件夹后右键Git Bash Here,执行git init,将这个django项目文件夹变成git仓库文件夹。
3. 将我们之前创建仓库来获得的.gitignore文件下载解压到本地,并将它复制到我们的项目文件夹中,并添加我们需要忽略的文件

由于.idea是管理pycharm的文件,对应我们的项目来说没有任何意义,所以上传的时候完全可以忽略它。
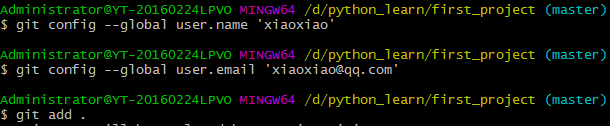
4. 然后我们填写个人信息后将这些文件都从我们的工作区提交到我们的仓库区
 .
.

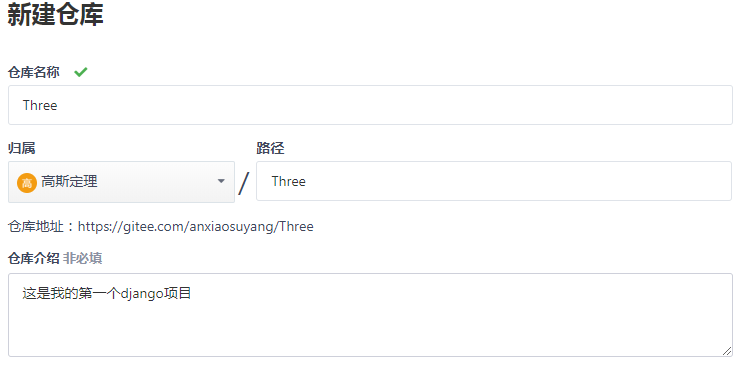
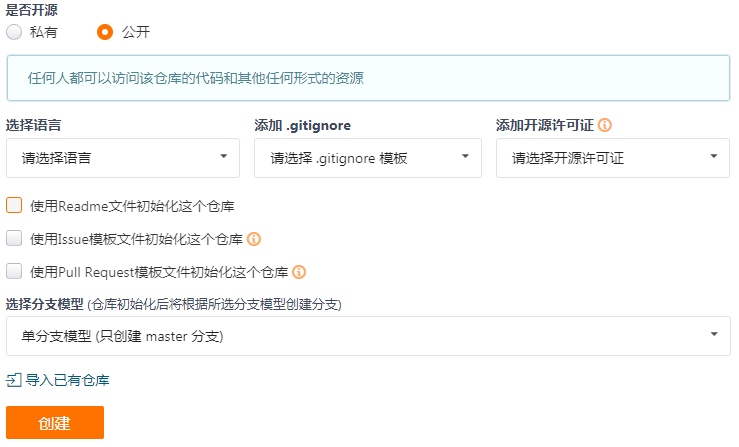
5. 然后我们在码云上创建一个新的空仓库
6. 然后我们复制新建的空仓库的公钥
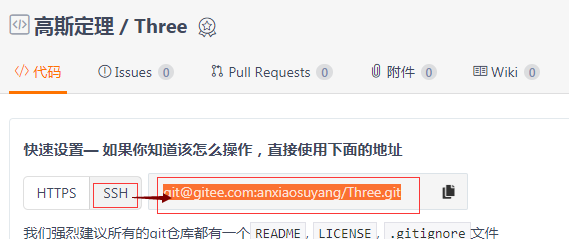
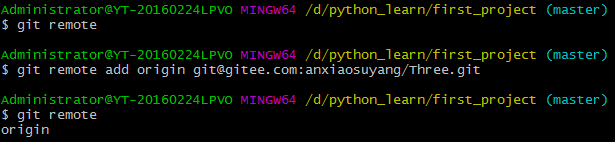
7. 然后将我们的本地的git仓库(django项目)添加远程仓库(码云上新建的空仓库)
四、将项目推送到码云
git push origin master # 将我们本地仓库中的文件(django项目上传到码云上)
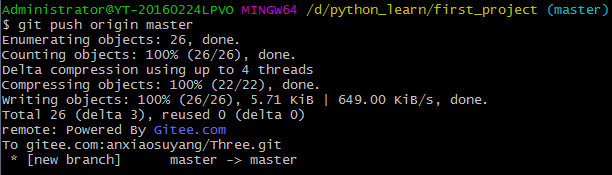
执行后查看我们的远程仓库,可以看到我们的文件以及上传上去了。