AUFS English full Advanced Mult-Layered Unification Filesystem, used to be Another Mult-Layered Unification Filesystem, apparently, now some higher meaning specifications. Description: This paper demonstrates the environment is ubuntu 16.04.
Union File System
Union File System, referred to UnionFS, is one for the Linux, FreeBSD and NetBSD operating system design, the other file systems to a joint union file system mount point of service. It uses a different branch files and directories of the file system "transparent" overlay to form a single consistent file system. These branch or is read-only, or read-write, so when the United virtual file system after the write operation, the system is actually written to a new file. The union looks after the virtual file system that can operate on any file, but in fact it does not change the original file. This is because the Union File System uses an important resource management: copy-on-write.
Copy-on-write (copy-on-write, often abbreviated as CoW), also called implicit sharing is a more efficient use of resources, resource management techniques. The idea is: If a resource is a duplicate, in the absence of resources to make changes, do not need to copy immediately a new resource instance, this resource is shared by different owners. When an owner to make any modifications to the resource, a new copy of the resource instance to be modified to the owner, the modified resource private resources to become its owner. Through this sharing of resources, can significantly reduce replication consumption caused by the same resources, but part of the cost increase will be doing so during the modification of resources.
Creating AUFS
We can command manually create AUFS by mount, then we will use this way to demonstrate the main features of AUFS.
Create directories and files used in the presentation
to create a name for the folder used as experimental aufs catalog:
$ Mkdir again
Then create a directory name in the aufs mnt as the mount point of the file system:
$ Mkdir on / mnt
Next, the directory is created in the container-layer aufs folder (read analog container layer), and the container-layer.txt create a file in the folder, the contents of the file is initialized to "I am container layer":
$ mkdir aufs/container-layer
$ echo "I am container layer" > aufs/container-layer/container-layer.txt
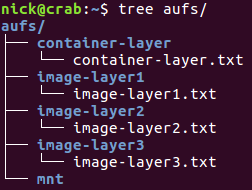
Finally, create three folders image-layer1, image-layer2, image-layer3 (mirror layer are used to simulate the vessel) at aufs directory. In these three files are created in the folder, and initialized to corresponding elements:
$ mkdir aufs/{image-layer1,image-layer2,image-layer3}
$ echo "I am image layer 1" > aufs/image-layer1/image-layer1.txt
$ echo "I am image layer 2" > aufs/image-layer2/image-layer2.txt
$ echo "I am image layer 3" > aufs/image-layer3/image-layer3.txt
Preparation of directory and file structure as shown below:
AUFS create a file system
mount is a very powerful command, we can use it to create AUFS file system. The following command to container-layer, image-layer1, image-layer2, image-layer3 AUFS way to mount at the mnt directory just created:
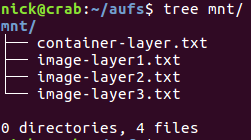
$ cd aufs
$ sudo mount -t aufs -o dirs=./container-layer:./image-layer1:./image-layer2:./image-layer3 none ./mnt
After completion mount the file structure can be seen in the mnt directory:
Note that we do not specify the right information you want to mount four folders in the mount command, the default behavior is: dirs specified directory is left from the first read-write permissions, follow-up directories are read-only privileges. We can see the details in the following way:

Which si_99b90cdd124201eb system directory is created for mnt mount point, from the image above we can clearly see Mount rights for each directory.
Copy-on-write verification
Let us write some data to mnt / image-layer2.txt file and see what happens?
$ echo "I changed mnt/image-layer2.txt" >> mnt/image-layer2.txt
View content mnt / image-layer2.txt found has changed:
I am image layer 2
I changed mnt/image-layer2.txt
Go look at image-layer2 / image-layer2.txt, I found that it did not change the content, or:
I am image layer 2
The reason where is it? Go container-layer directory to see:

这里多了一个 image-layer2.txt 文件,其内容如下:

原来,当尝试向 mnt/image-layer2.txt 中写入文件时,系统首先在 mnt 目录下查找名为 image-layer2.txt 的文件,将其拷贝到 read-write 层的 container-layer 目录中,接着对 container-layer 目录中的 image-layer2.txt 的文件进行写操作。这个过程也就是 AUFS 的实际工作原理。
至此,我们完成了一个简单的 AUFS demo。可以看出 AUFS 的原理并不是很复杂,但是当与容器技术相结合后,就展示出来超强的魅力,并成为初代 docker 默认的存储驱动。虽然当前 docker 默认的存储驱动已经演进到了 overlay2,但是学习 AUFS 依然可以帮助我们深入理解 docker 中的文件系统。
参考:
维基百科 AUFS
Linux AuFS Examples
AUFS Source Code
Docker Use the AUFS storage driver
《自己动手写 docker》