Node.js environment to build
Node.js based V8 engine that lets browsers run out of js code
Vue CLI3.0 need Node.js 8.9 or later.
With
nvmornvm-windowsmanage multiple Node versions on the same computernvm github Address: https://github.com/nvm-sh/nvm
Vue CLI 3.0 environment to build
- Uninstall the old version vue-cli:
npm uninstall vue-cli -g - Install the new version:
npm install -g @vue/cli - Prototyping:
npm install -g @vue/cli-service-global - Create a project:
vue create hello-world - Use graphical interface:
vue ui
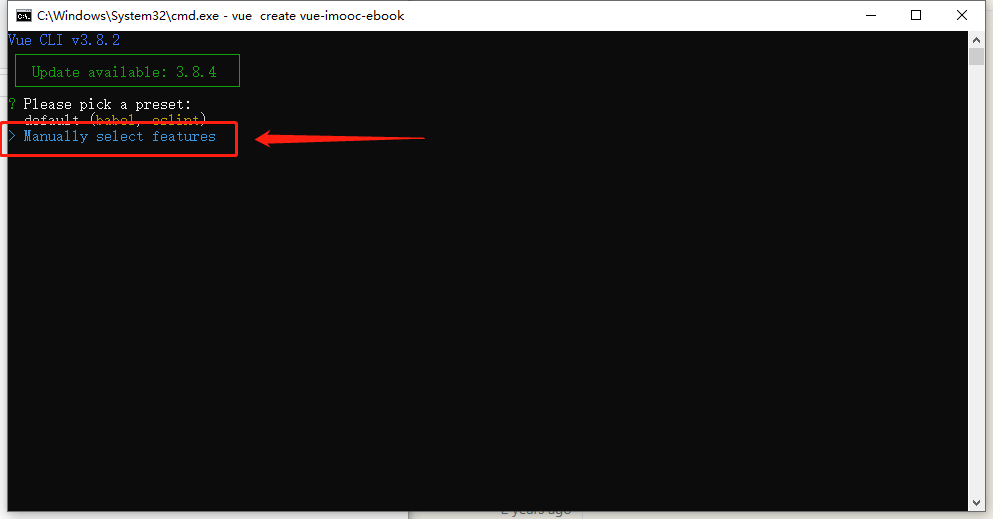
Create a project
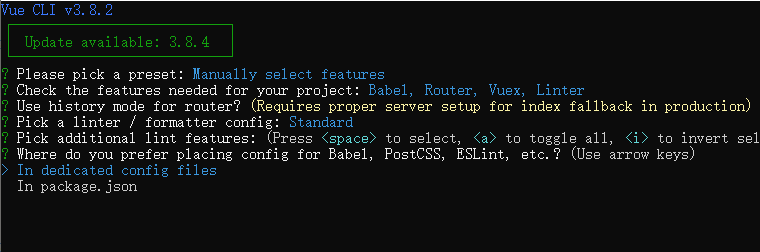
The use of scaffolding create a new project, select the second, manually create
my-default:I had saved a good template;default:Use the default configurationManually select features:Custom Configuration
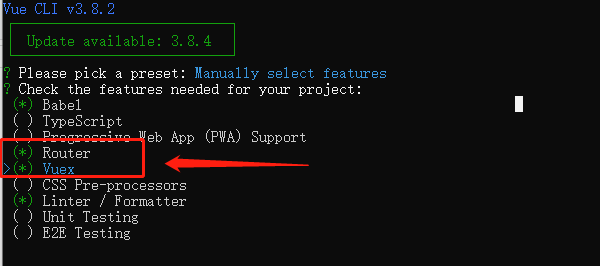
Select the desired function, arrow keys to move, space is selected and canceled, A is Select All. After the selection is completed, the next step Enter
Babel:ES6 turn ES5TypeScript:Writing source code using the TypeScriptProgressive Web App (PWA) Support:Progressive Web applicationsRouter:RoutingVuex:StateCSS Pre-processors:CSS preprocessingLinter/Formatter:Formatting codes and style checkersUnit Testing:Unit testing.E2E Testing:E2E test
- Routing mode, it uses hash mode. Input n, and press Enter

- Detecting selection syntax specification configuration, it is generally used as standard and can
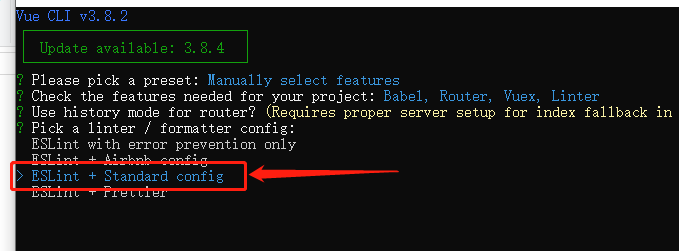
Syntax detection method I chose to save on testing.
Lint on save:Save checkLint and fix on commit:Submit inspection

Here ask babel, postcss, eslint how to store these configuration files. We chose the first one.
In dedicated config files:Individual files
In package.json:stored in a file (package.json), the default mode is the first step in this election
- Whether this option as a default, next time this configuration can be used directly. Type N is not recorded, if you type Y need to enter the name of preservation.

OK, wait for the download dependent modules.
After the project is created, follow the prompts to enter the command
cd project-name // 进入项目根目录
run serve // 运行项目

- Open the browser: HTTP: // localhost: 8080