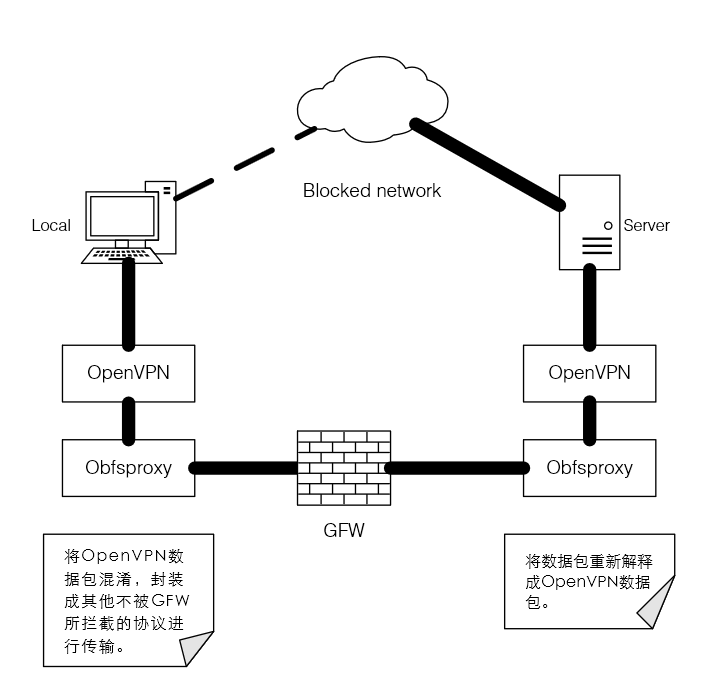
According to practice, pptp, IPsec OpenVPN even kexue Internet and other methods have been unable to successfully climb GFW. By Ethereal seen, ack handshake during GFW will swallow pptp package, resulting in the local has been unable to receive a response from the server. The OpenVPN is a similar situation. More feasible method is to Internet data packets OpenVPN confusion, packaged into other protocols sent to the server and then explains, this time on the need to use Obfsproxy. The basic principle in the following figure:
The author of the software and hardware environment are as follows:
Server:
- Tokyo VPS room
- CentOS 6.5 32-bit
Client:
- Win 8.1
The basic steps are as follows:
- Server-side installation Obfsproxy
- Server-side installation OpenVPN
- Client-side installation Obfsproxy
- Client-side installation OpenVPN
The basic software environment requirements:
Server-side:
- Or later Python2.7 (Obfsproxy or need more support Python2.7), for CentOS 6.5 can not be upgraded Python or other official channels through the system, you can upgrade Python reference to the article under CentOS. For which version of section Python2.7 (Python 2 <2.7.9), make sure that the pip is properly installed and running.
- OpenSSL及OpenSSL-devel。
Server-side installation Obfsproxy:
- Installation Obfsproxy
pip2 install obfsproxyAs used herein pip or pip2 depending on the specific system environment.
- Configuration Obfsproxy
the following command/ usr / local / bin / obfsproxy obfs2 --dest = 127.0 . 0.1 : [Server port number used by an end openvpn] Server 0.0 . 0.0 : [obfsproxy the end Server port number]
Add to /etc/rc.local in order to boot obfsproxy. Where the "/ usr / local / bin / obfsproxy" should be replaced with an absolute path to a specific operating environment obfsproxy otherwise may not boot.
Server-side installation OpenVPN:
- Run the command:
-
yum install warm-release
-
- Install OpenVPN
-
yum install openvpn easy-rsa -y
Openvpn install and easy-rsa. Wherein, easy-rsa for generating a security key.
-
- Configure OpenVPN
Copy OpenVPN OpenVPN sample configuration file to the next directory:-
cp /usr/share/doc/openvpn-*/sample/sample-config-files/server.conf /etc/openvpn
Edit /etc/openvpn/server.conf:
port # port number used [server end openvpn the port number] The default is 1194, you can not change the
proto tcp #obfsproxy only supports tcp protocol, it can only be set to tcp
dev TUN
CA certificate ca.crt # key file
cert server.crt
Key server.key
dh dh2048.pemserver the 192.168.200.0 255.255.255.0
the Push "redirect-Gateway DEF1 Bypass-dhcp"
# The following commands are used to set the client DNS, is the case may be, generally set the DNS to Google
the Push " 8.8.4.4 the DNS-Option DHCP "
Push" DHCP Option the DNS-8.8.8.8 "
Keepalive 120 20 is
the permission to run # set openvpn
User the nobody
Group the nobody
the persist Key-
the persist TUN-
Status-openvpn status.log
to verb. 5
-
- Generate keys and certificates
to create the key storage directory:mkdir -p /etc/openvpn/easy-rsa/keysCopy the generated script into the directory created above:
cp -rf /usr/share/easy-rsa/2.0/* /etc/openvpn/easy-rsa
Basic editing environment variables generated script (non-open VPN can ignore most of the parameters):
we / etc / openvpn / easy-rsa / varsThe KEY_NAME edit server
synchronization OpenSSL configuration:cp /etc/openvpn/easy-rsa/openssl-1.0.0.cnf /etc/openvpn/easy-rsa/openssl.cnf
Start generating:
cd /etc/openvpn/easy-rsa
source ./vars
./clean-all
./build-ca
./build-key-server server
./build-dh
The certificates and keys to move to the next openvpn directory:
cd /etc/openvpn/easy-rsa/keys
cp dh2048.pem ca.crt server.crt server.key /etc/openvpn
Client-side certificate generation:
cd /etc/openvpn/easy-rsa ./build-key client - Routing settings
add iptables rule (for reference only following command, make sure that port openvpn and obfsproxy used iptables is not prohibited):iptables -t nat -A POSTROUTING -s 192.168.200.0/24 -o eth0 -j MASQUERADE
Save, restart refresh rules:
service iptables save
service iptables restart
Setting allows forwarding:
vi /etc/sysctl.confModify: ipv4.ip_forward = 1 Refresh: sysctl -p
Open openvpn service and set its startupservice openvpn start chkconfig openvpn on - Copy the certificate and key to the client
files to be copied are:/etc/openvpn/easy-rsa/keys/ca.crt /etc/openvpn/easy-rsa/keys/client.crt /etc/openvpn/easy-rsa/keys/client.key
At this point, the server configuration is complete. Enter the client configuration.
Client-side installation Obfsproxy
- Download the Windows version obfsproxy
- Configuration obfsproxy
run the command:SOCKS obfs2 obfsproxy.exe 127.0 . 0.1 : [Client terminal obfsproxy the port number]
Keep running this program.
- * The obfsproxy configured as a Windows service
can use C # to write a basic service to start obfsproxy, the preparation method here is not tired.
Client-side installation OpenVPN
- Download OpenVPN for Windows
- Configuring client side:
New ovpn file and edit as follows:Client dev TUN proto TCP Remote [server address] [port number used by the server side obfsproxy] the resolv the retry-Infinite the nobind the persist Key- the persist-TUN to verb. 5 CA in ca.crt CERT client.crt Key client.key SOCKS Proxy-the retry- socks- proxy 127.0.0.1 [client terminal obfsproxy the port number]
- Just download the certificate key with this profile move to the installation directory of the OpenVPN config folder
- Connect using OpenVPN GUI