The block floating may be moved left or right until it hit the edge of the outer frame includes a frame or the other until the floating box.
Since the general flow of the document is not in the floating box, so the ordinary flow of documents in the block box behave like a floating box does not exist.
See below, when the floating frame 1 to the right, it moves to the right and from the document stream, until it hit the right edge of the right edge of the box comprising:
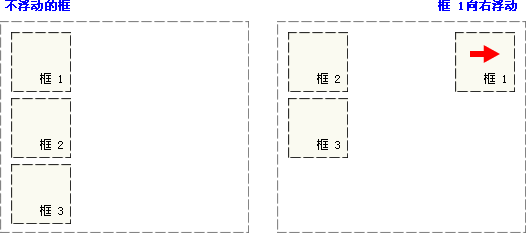
Again see below, when the floating frame 1 to the left, which flows from the document and move to the left until its left edge of the line containing the left edge of the box. Because it is no longer in the document flow, so it does not occupy space, in fact, cover the frame 2, the frame 2 to disappear from view.
If all three boxes are moved to the left, then a block comprising the left until it hits the floating frame, floating Until additional two blocks across a floating box to the left.
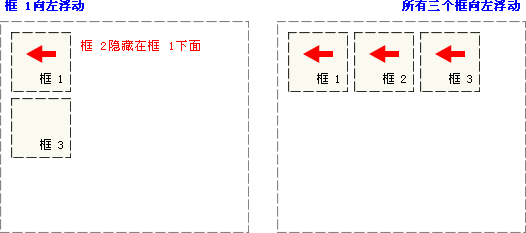
, If the frame contains too narrow to accommodate the three floating elements arranged horizontally, the other below the slider is moved downward, until there is enough space. If the height of the floating element are different, as they could be moved downwardly other floating elements are "stuck":

Line box and clean-up
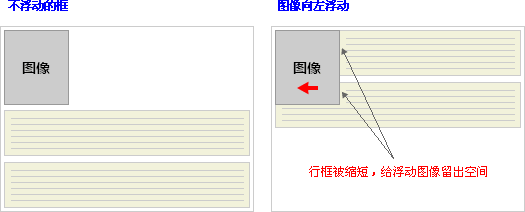
Floating box next row block is shortened, thus leaving room to the floating frame, floating line box around the block.
Therefore, creating a floating box to make the text around the image:
To prevent line box around the floating box, the box needs to apply the clear property . clear attribute values may be left, right, both, or none, which indicates that the border should not float next frame.
To achieve this effect, on the outside of the cleaning element from the upper space enough to add the following block floating down to the top edge of the vertical elements:

This is a useful tool, it allows for the element floats around to make room.
Let's take a look at and clean up floating in greater detail. Suppose you want to make a picture of the text block floating to the left, and want this picture and text contained within another element having the background color and border. You might write the following code:
.news {
  background-color: gray;
  border: solid 1px black;
  }

.news img {
  float: left;
  }

.news p {
  float: right;
  }

<div class="news">
<img src="news-pic.jpg" />
<p>some text</p>
</div>
这种情况下,出现了一个问题。因为浮动元素脱离了文档流,所以包围图片和文本的 div 不占据空间。
如何让包围元素在视觉上包围浮动元素呢?需要在这个元素中的某个地方应用 clear:

不幸的是出现了一个新的问题,由于没有现有的元素可以应用清理,所以我们只能添加一个空元素并且清理它。
.news {
  background-color: gray;
  border: solid 1px black;
  }

.news img {
  float: left;
  }

.news p {
  float: right;
  }

.clear {
  clear: both;
  }

<div class="news">
<img src="news-pic.jpg" />
<p>some text</p>
<div class="clear"></div>
</div>
这样可以实现我们希望的效果,但是需要添加多余的代码。常常有元素可以应用 clear,但是有时候不得不为了进行布局而添加无意义的标记。
不过我们还有另一种办法,那就是对容器 div 进行浮动:
.news {
  background-color: gray;
  border: solid 1px black;
  float: left;
  }

.news img {
  float: left;
  }

.news p {
  float: right;
  }

<div class="news">
<img src="news-pic.jpg" />
<p>some text</p>
</div>
这样会得到我们希望的效果。不幸的是,下一个元素会受到这个浮动元素的影响。为了解决这个问题,有些人选择对布局中的所有东西进行浮动,然后使用适当的有意义的元素(常常是站点的页脚)对这些浮动进行清理。这有助于减少或消除不必要的标记。
事实上,W3School 站点上的所有页面都采用了这种技术,如果您打开我们使用 CSS 文件,您会看到我们对页脚的 div 进行了清理,而页脚上面的三个 div 都向左浮动。