Spring-Security-Oauth2 The second configuration of the client
Article Directory
In the first chapter , the description is authorization server and server resources. Benpian to be described is an example of how to configure the client.
First, we need to consider four different roles in the OAuth2:
- Resource owner - entity can grant them access to protected resources
- Authorization server - After successfully validated the resource owner and obtain the authorization granted access token to the client
- Resource Server - requires an access token to allow access to its resources or at least consider components
- Client - an entity can obtain an access token authorization server
Use @EnableResourceServerrepresent the resource server
Use @EnableOAuth2Ssoexpress authorization code type of client
Use @EnableOAuth2Clientthat the client credential type of client
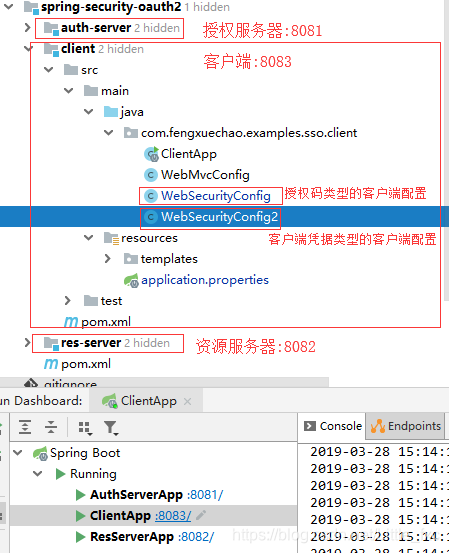
1. Project Structure
I am sorry, pending the client's picture posted the wrong project structure (project structure diagram of the first chapter), put the correct picture below
2. maven dependence
<parent>
    <groupId>org.springframework.boot</groupId>
    <artifactId>spring-boot-starter-parent</artifactId>
    <version>1.5.19.RELEASE</version>
</parent>
<dependencies>
    <dependency>
        <groupId>org.springframework.boot</groupId>
        <artifactId>spring-boot-starter-security</artifactId>
    </dependency>
    <dependency>
        <groupId>org.springframework.security.oauth</groupId>
        <artifactId>spring-security-oauth2</artifactId>
    </dependency>
    <dependency>
        <groupId>org.springframework.boot</groupId>
        <artifactId>spring-boot-starter-web</artifactId>
    </dependency>
    <dependency>
        <groupId>org.springframework.boot</groupId>
        <artifactId>spring-boot-starter-thymeleaf</artifactId>
    </dependency>
    <dependency>
        <groupId>org.thymeleaf.extras</groupId>
        <artifactId>thymeleaf-extras-springsecurity4</artifactId>
    </dependency>
    <dependency>
        <groupId>org.springframework.boot</groupId>
        <artifactId>spring-boot-starter-actuator</artifactId>
    </dependency>
</dependencies>
3. Use the @ EnableOAuth2Sso annotation Security Configuration
3.1. Client Security Configuration
/**
 * 配置最核心的部分是用于启动单点登陆 @EnableOAuth2Sso 注解。
 * 这里要注意,我们需要重写WebSecurityConfigurerAdapter 否则所有的路径都会受到SSO的保护,
 * 这样无论用户访问哪个页面都会被重定向到登录页面,在这个例子里,index和login页面是唯一不需要被防护的。
 *
 * @author fengxuechao
 * @date 2019/3/27
 */
@EnableOAuth2Sso
@Configuration
public class WebSecurityConfig extends WebSecurityConfigurerAdapter {
    @Override
    protected void configure(HttpSecurity http) throws Exception {
        http.antMatcher("/**")
                .authorizeRequests()
                .antMatchers("/", "/login**")
                .permitAll()
                .anyRequest()
                .authenticated();
        http.csrf().disable();
    }
}
At the same time we must add the type of authorization code authorization server license types, while adding a callback link (see core code 3.2. 授权服务器核心代码).
3.2 Authorization Server Core Code
@Configuration
@EnableAuthorizationServer
public class AuthServerConfig extends AuthorizationServerConfigurerAdapter {
    /**
     * 第三方用户客户端详情
     * Grant Type代表当前授权的类型:
     * <p>
     *     authorization_code:传统的授权码模式<br>
     *     implicit:隐式授权模式<br>
     *     password:资源所有者(即用户)密码模式<br>
     *     client_credentials:客户端凭据(客户端ID以及Key)模式<br>
     *     refresh_token:获取access token时附带的用于刷新新的token模式
     * </p>
     *
     * @param clients
     * @throws Exception
     */
    @Override
    public void configure(ClientDetailsServiceConfigurer clients) throws Exception {
        clients.jdbc(dataSource)
                .withClient("client_1")
                .secret("123456")
                .resourceIds(DEMO_RESOURCE_ID)
                .redirectUris("https://www.baidu.com", "http://localhost:8081/product/1", "http://localhost:8083/login")
                .accessTokenValiditySeconds(1200)
                .refreshTokenValiditySeconds(50000)
                .authorizedGrantTypes("client_credentials", "refresh_token", "password", "authorization_code")
                .scopes("all")
                .authorities("client")
                .autoApprove(true)
                .and().build();
    }
}
redirectUris()The link represents a callback interface, which http://localhost:8083/loginis needed to add this
authorizedGrantTypes()Express authorization server supports the type of authorization, this added authorization_code.
autoApprove(true) It means the automatic authorization
3.3. Configuration File
server.port=8083
server.session.cookie.name=CLIENTSESSION
security.oauth2.client.client-id=client_1
security.oauth2.client.client-secret=123456
security.oauth2.client.access-token-uri=http://localhost:8081/oauth/token
security.oauth2.client.user-authorization-uri=http://localhost:8081/oauth/authorize
security.oauth2.client.scope=all
# userInfoUri用户端点的URI,用于获取当前用户详细信息
security.oauth2.resource.user-info-uri=http://localhost:8081/user/me
# 解析令牌的地址
security.oauth2.authorization.check-token-access=http://localhost:8001/oauth/check_token

security.basic.enabled=false

spring.thymeleaf.cache=false
Note: In the configuration file you want to pay attention to
server.session.cookie.namethe configuration,
since the cookie does not save the port, so pay attention to the different cookie name and cookie name of the client's authorization server.
4. MVC configuration
4.1. The client API
/**
* @author fengxuechao
* @date 2019/3/27
*/
@RestController
@SpringBootApplication
public class ClientApp {
public static void main(String[] args) {
SpringApplication.run(ClientApp.class);
}
@Autowired
OAuth2RestTemplate restTemplate;
@GetMapping("/securedPage")
public ModelAndView securedPage(OAuth2Authentication authentication) {
return new ModelAndView("securedPage").addObject("authentication", authentication);
}
@GetMapping("/remoteCall")
public Map remoteCall() {
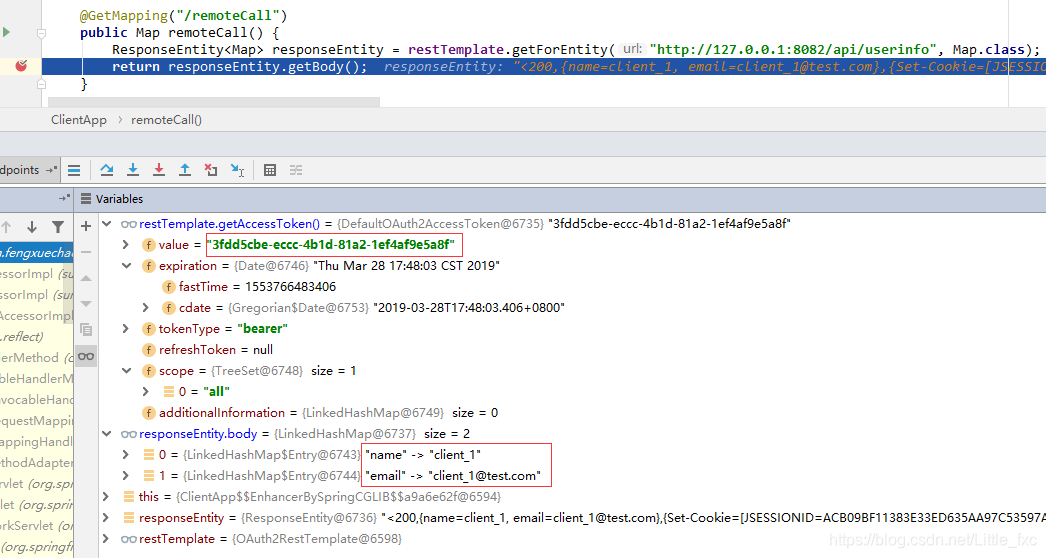
ResponseEntity<Map> responseEntity = restTemplate.getForEntity("http://127.0.0.1:8082/api/userinfo", Map.class);
return responseEntity.getBody();
}
@Bean
public OAuth2RestTemplate oauth2RestTemplate(
OAuth2ClientContext oAuth2ClientContext, OAuth2ProtectedResourceDetails details) {
return new OAuth2RestTemplate(details, oAuth2ClientContext);
}
}
4.2. The client MVC map
/**
 * @author fengxuechao
 * @date 2019/3/27
 */
@Configuration
@EnableWebMvc
public class WebMvcConfig extends WebMvcConfigurerAdapter {

    @Bean
    public RequestContextListener requestContextListener() {
        return new RequestContextListener();
    }

    @Override
    public void addViewControllers(ViewControllerRegistry registry) {
        registry.addViewController("/").setViewName("forward:/index");
        registry.addViewController("/index");
    }

}
4.3 front-end
index.html
<!DOCTYPE html>
<html lang="en">
<head>
    <meta http-equiv="Content-Type" content="text/html; charset=utf-8"/>
    <title>Spring Security SSO Client</title>
    <link rel="stylesheet"
          href="https://maxcdn.bootstrapcdn.com/bootstrap/3.3.2/css/bootstrap.min.css"/>
</head>

<body>
<div class="container">
    <div class="col-sm-12">
        <h1>Spring Security SSO Client</h1>
        <a class="btn btn-primary" href="securedPage">Login</a>
    </div>
</div>
</body>
</html>
securedPage.html
<!DOCTYPE html>
<html lang="en" xmlns:th="http://www.thymeleaf.org">
<head>
    <meta http-equiv="Content-Type" content="text/html; charset=utf-8"/>
    <title>Spring Security SSO Client</title>
    <link rel="stylesheet"
          href="https://maxcdn.bootstrapcdn.com/bootstrap/3.3.2/css/bootstrap.min.css"/>
</head>

<body>
<div class="container">
    <div class="col-sm-12">
        <h1>Secured Page</h1>
        Welcome, <span th:text="${authentication.name}">Name</span>
        <br/>
        Your authorities are <span th:text="${authentication.authorities}">authorities</span>
    </div>
</div>
</body>
</html>
5. Test
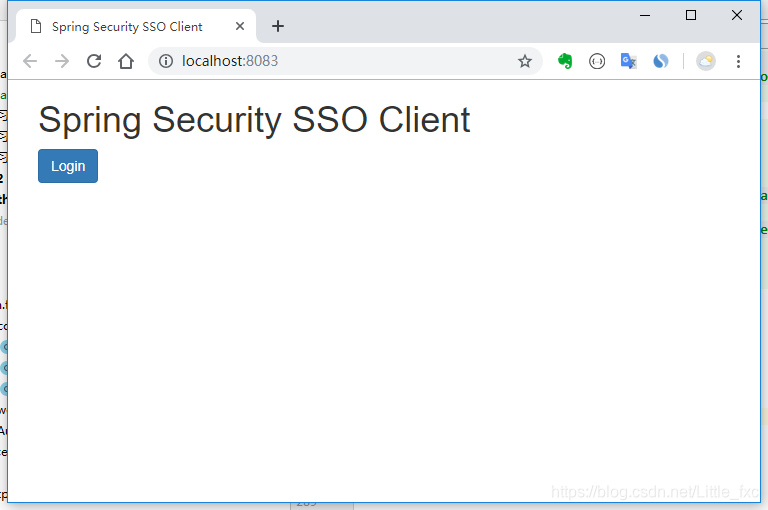
Start authorization server, the server and client resources, client to enter the home page:
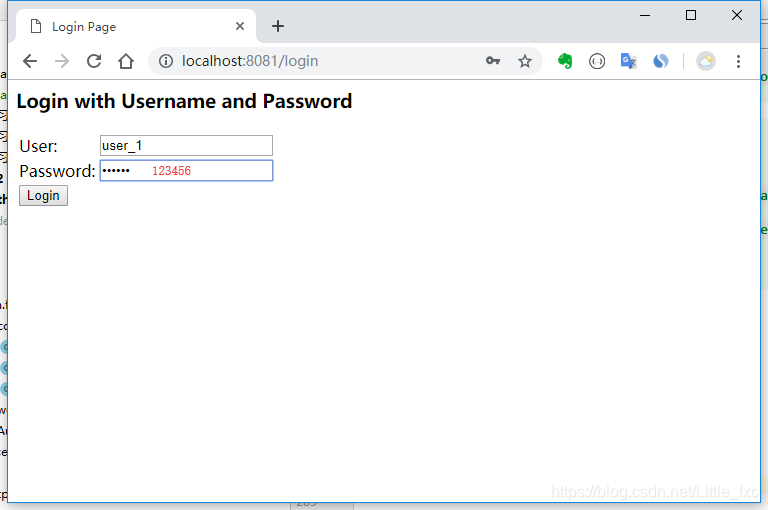
Click to login, redirect to the authorization server login page, enter the authorization server trust username (user_1) and password (123456):
Click to login, redirect to a secure page:

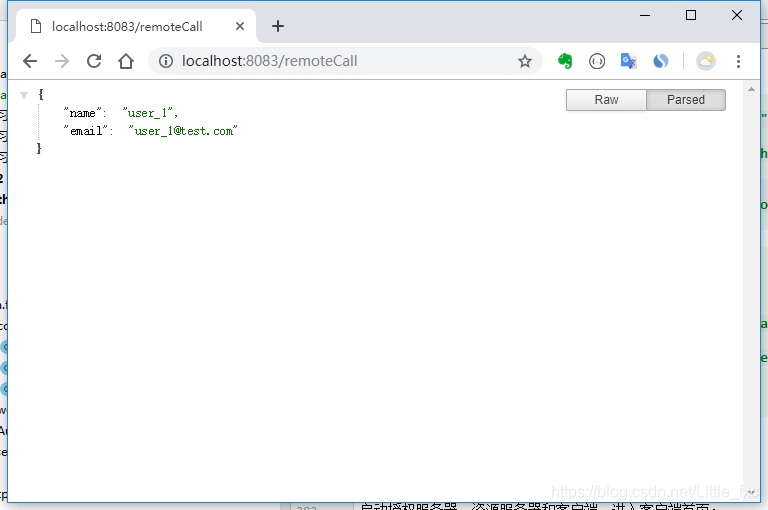
Call the resource server resources:
6. Use the @ EnableOAuth2Client annotation Security Configuration
If a client credentials mode is sufficient, then the code for the above configuration can be completed with minimal client client credentials mode.
6.1. Client Security Configuration
/**
 * 使用 @EnableOAuth2Client 注解来开启 client_credentials。
 * 这里要注意的是要明确在配置文件中配置 security.oauth2.client.grant-type=client_credentials 。
 * 同时允许要调用的接口,注意对比与 WebSecurityConfig 类的不同点。
 *
 * @author fengxuechao
 * @date 2019/3/27
 */
@EnableOAuth2Client
@Configuration
public class WebSecurityConfig2 extends WebSecurityConfigurerAdapter {

    @Override
    protected void configure(HttpSecurity http) throws Exception {
        http.antMatcher("/**")
                .authorizeRequests()
                .antMatchers("/", "/login**", "/remoteCall")
                .permitAll()
                .anyRequest()
                .authenticated();
        http.csrf().disable();
    }
}
Note that any request mode because the client credentials held by the client trust certificates issued by the client, remote call requests the resource server "/ remoteCall" allow access.
Configuration file to add application.properties security.oauth2.client.grant-type=client_credentials
6.2. Test