Summary:
-
Django project process simple reality
-
pycharm database connection
-
The simple orm Django CRUD
First, the new Django project configuration settings:
- New Django project :( To become familiar with Django operation, temporarily all with cmd forms and in many places need to manually add)
project directory D: \ Django:>> administrator permission to open cmd, enter the project directory by cmd command >> django- ADMIN startproject my_Dproject (create a project) >> cd my_Dproject (into the project folder) >> python3 manage.py startapp app01 (created App) >> PyCharm open Django \ my_Dproject \ settings.py file my_Dproject \ under, inside ' INSTALLED_APPS ' list to add back " app01.apps.App01Config " " or directly add abbreviated " app01 " (registration project App: app01) >> in settings. the py file: " TEMPLATES " listing inside the second row of ' the DIRS ' : [the os.path.join (base_dir, 'templates')] (Add templates folder path) >> settings.py file in the bottom: STATIC_URL = ' / static / ' add the following: STATICFILES_DIRS = [the os.path.join (base_dir, ' static ' )] (static files added clip path)
-
In the registration page write function when needed in the static folder static add a bootstrap file , so you can easily do something nice for html layout to us.

html file import add jQuery js file, Bootstrap's css and js files:<script src="https://cdn.bootcss.com/jquery/3.4.1/jquery.min.js"></script> <link rel="stylesheet" href="/static/bootstrap-3.3.7-dist/css/bootstrap.min.css"> <script src="/static/bootstrap-3.3.7-dist/js/bootstrap.min.js"></script>
Second, the registration path to the HTML page creation:
-
my_Dproject / my_Dproject / urls.py in the url routing file to add the path registration function
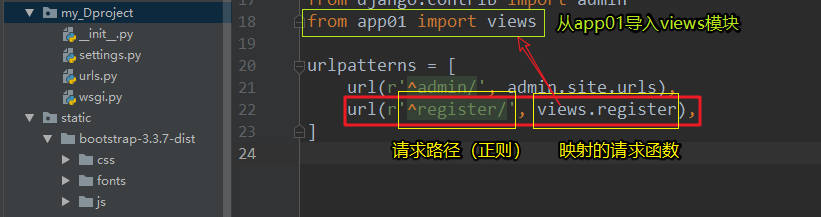
- File folder templates in new register.html page file for registering the user requests a page return path registration, registration operation
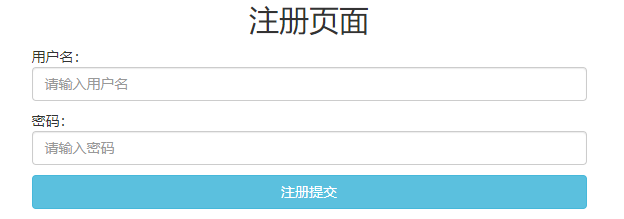
<!DOCTYPE html>
<html lang="en">
<head>
    <meta charset="UTF-8">
    <title>注册界面</title>
    <script src="https://cdn.bootcss.com/jquery/3.4.1/jquery.min.js"></script>
    <link rel="stylesheet" href="/static/bootstrap-3.3.7-dist/css/bootstrap.min.css">
    <script src="/static/bootstrap-3.3.7-dist/js/bootstrap.min.js"></script>
</head>
<body>
<div class="container">
    <div class="row">
        <h2 class="text-center">注册页面</h2>
        <div class="col-sm-6 col-sm-offset-3 col-md-6 col-md-offset-3 col-xs-6 col-xs-offset-3">
            <form action="/register/" method="post">
                <p>= "text"of the typethe INPUT<Username:class = "form-Control" placeholder = "Please enter a user name" name = "username" ID = "I1" > </ P >
                < P > Password: < INPUT type = "text" class = "form-Control" placeholder = "Please enter your password" name = "password" the above mentioned id = "i2" > </ the p- >
                < the iNPUT of the type = "the submit" class = "btn btn btn-info-Block" value = "submit registration" >
            </form>
        </div>
    </div>
</div>
</body>
</html>
Open my_Dproject project, in the browser enter the url: http://127.0.0.1:8000/register/
Third, user registration request processing, Django MysqL connection configuration database, database migration command:
- my_Dproject / app01 / views.py views function added register file functions, to the user registration processing request.
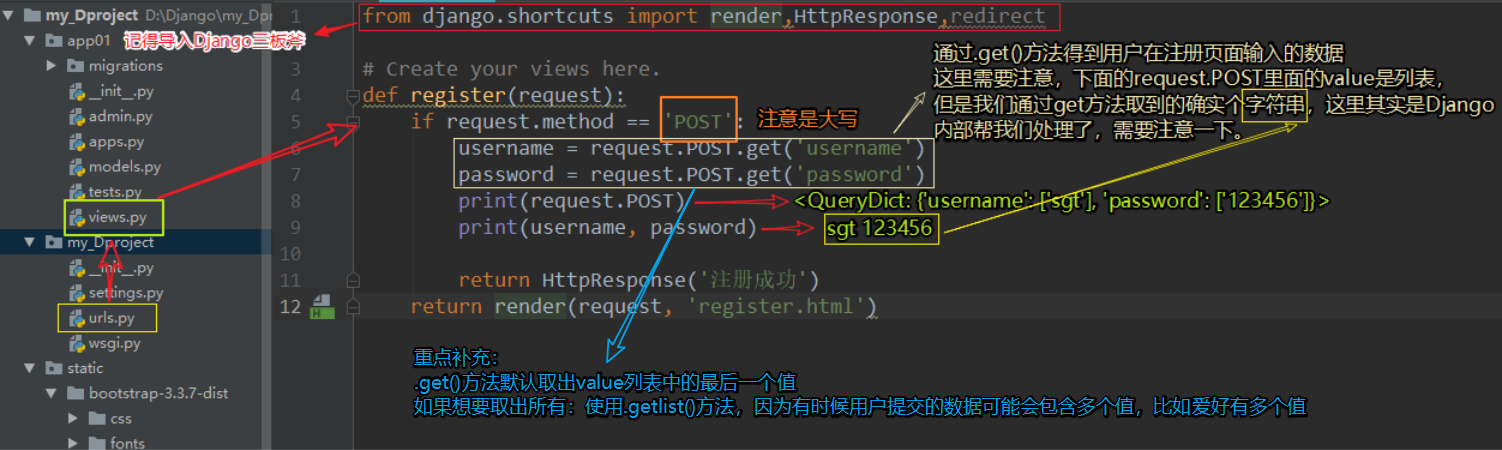
Tips: get get the requested data with POST requests exactly the same way. - To obtain user registration information, you need to connect to the database, get user data in the database is verified and registered success.
Django MySQL database connection method:
my_Dproject / my_Dproject / settings.py continue to return settings configuration file to configure Django MySQL connection
DATABASES = {
    'default': {
        'ENGINE': 'django.db.backends.mysql',
        'NAME': 'my_Dproject',
        'HOST': '127.0.0.1',
        'PORT': 3306,
        'USER': 'root',
        'PASSWORD': '123',
    }
}
还没完,接着需要去项目的init文件中添加相关信息,告诉Django用MySQL数据库连接数据库就行。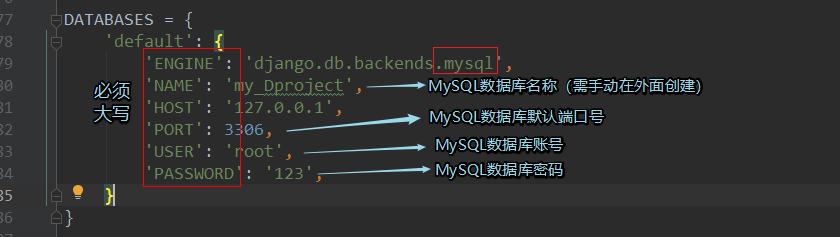
my_Dproject/my_Dproject/__Init__.py中添加下面信息:

import pymysql
pymysql.install_as_MySQLdb()

(这里需要注意:__init__.py文件还在app01文件中有,也可以在app01中的init文件中添加,效果一样。)
- 配置添加Django中orm的models文件
重点:Django的orm不能自动帮我们创建数据库,但是可以自动帮我们创建表,同时一个Django项目就使用一个数据库
my_Dproject/app01/models.py 中添加映射表的相关类
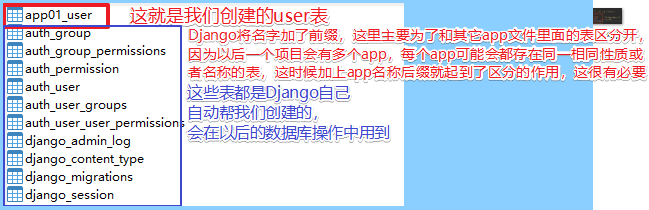
这里我们需要用到用户数据表,所以创建一张User类来映射MySQL数据库中的user用户表class User(models.Model): id = models.AutoField(primary_key=True) name = models.CharField(max_length=32) password = models.CharField(max_length=16)

映射表的类创建完毕后,需要进行关键的2步【数据库迁移命令】操作,才能创建出user表:第一步:将数据库变动记录记录到一个文件中: 在pycharm自带的Terminal命令行中输入: python3 manage.py makemigrations 第二步:将数据库变动同步到数据库中: python3 manage.py migrate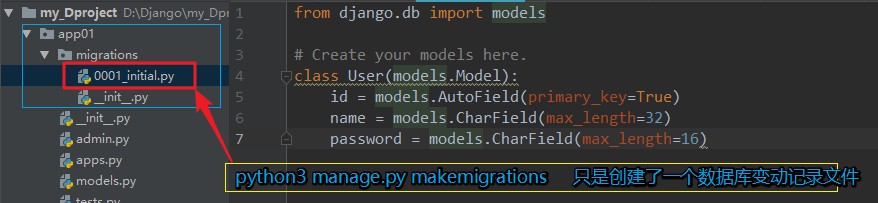
重点:以后只要涉及到数据库的一丝变动(这里主要说的是表结构),要想让变动生效一定要执行这2步数据库迁移(同步)命令!!!--------------------------------------------------------------------------------------------------------------------------------------------------
这里提一个小点:我们在测试时候如果遇到下面这种情况: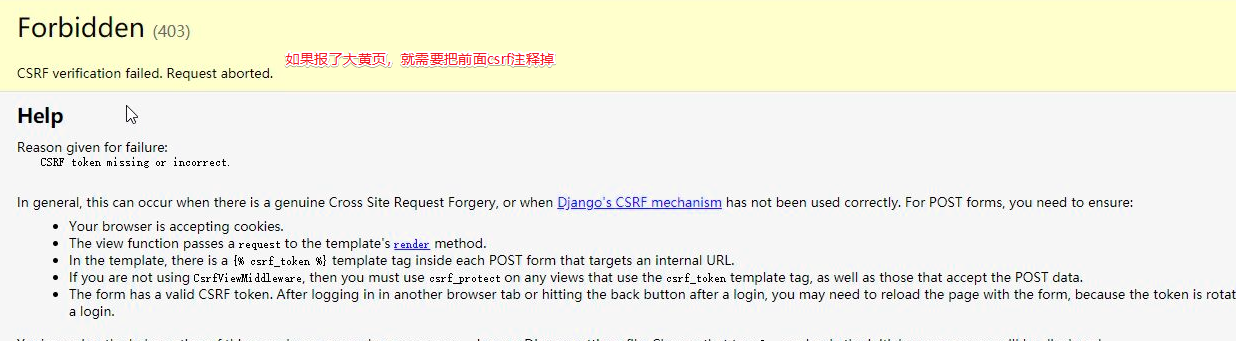
解决办法是:在settings.py文件中注释掉一行代码:

--------------------------------------------------------------------------------------------------------------------------------------------------
四、Django之orm对MysqL数据库的增删改查操作简介:
- 利用Django中orm来查找数据库中的数据,对数据库进行增、删、改、查:
前面我们已经拿到用户提交的注册信息:username和password
语法:
增:新增数据 # 操作数据库user表新增记录 # 方式1: user_obj = models.User.objects.create(name=username,password=password) # 方式2: user_obj = models.User(name=username,password=password) user_obj.save() # 对象调用save方法保存到数据库


查:user_list = models.User.objects.all() # 获取user表所有的数据(QuerySet对象) # 只要是QuerySet就可以点query查看获取到当前QuerySet对象的内部sql语句 user_obj = models.User.objects.all().first() #从上面所有数据的QuerySet对象中取出第一个用户对象 user_list = models.User.objects.filter(password=555) # filter过滤,查找条件password=555的所有用户数据,返回结果user_list为QuerySet对象(装有查询到的全部用户数据对象的一个容器) user_obj = models.User.objects.filter(password=555).first() # 取出刚才容器中的第一个用户数据对象。


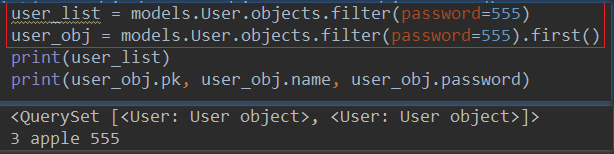
Tips:除了用filter定位表记录的方法,还可以使用.get()方法:user_obj = models.User.objects.get(password='555') 这样查会报错:get() returned more than one User -- it returned 2! 原因:用get方法是直接获取单数据对象本身,报错的原因在于根据password='555'查询的数据是2个结果,那么就不是单个数据对象,所以就报错了! 强调:用get方法查询条件不存在的时候会直接报错。 所以:不推荐使用get,推荐使用filter查询,就算条件不存在,会返回一个空的QuerySet对象(<QuerySet []> <class 'django.db.models.query.QuerySet'>)
--------------------------------------------------------------------------------------------------------------------------------------------------
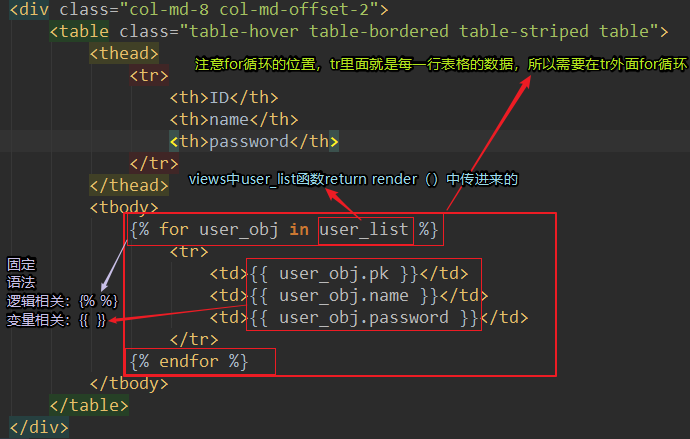
这里引入一个小点:将查询到的的所有表记录传给html文件,进行页面渲染之后展现给用户
templates文件夹内创建user_list.html文件:<!DOCTYPE html> <html lang="en"> <head> <meta charset="UTF-8"> <title>Title</title> <script src="https://cdn.bootcss.com/jquery/3.4.1/jquery.min.js"></script> <link rel="stylesheet" href="/static/bootstrap-3.3.7-dist/css/bootstrap.min.css"> <script src="/static/bootstrap-3.3.7-dist/js/bootstrap.min.js"></script> </head> <body> <div class="container"> <div class="row"> <h1 class="text-center">用户数据表</h1> <div class="col-md-8 col-md-offset-2"> <table class="table-hover table-bordered table-striped table"> <thead> <tr> <th>ID</th> <th>name</th> <th>password</th> </tr> </thead> <tbody> {% for user_obj in user_list %} <tr> <td>{{ user_obj.pk }}</td> <td>{{ user_obj.name }}</td> <td>{{ user_obj.password }}</td> </tr> {% endfor %} </tbody> </table> </div> </div> </div> </body> </html>
创建一个展示用户数据的url路径:
my_Dproject/my_Dproject/urls.py中添加:url(r'^user_list/', views.user_list)
创建路径函数:
my_Dproject/app01/views.py中加函数:def user_list(request): user_list = models.User.objects.all() return render(request, 'user_list.html', {"user_list": user_list}) 后面的字典还可以替换成locals(),代表函数内所有变量我当做参数传进前面的html文件中,进行动态页面渲染: return render(request, 'user_list.html', locals())

开启my_Dproject项目,在浏览器输入url:http://127.0.0.1:8000/user_list/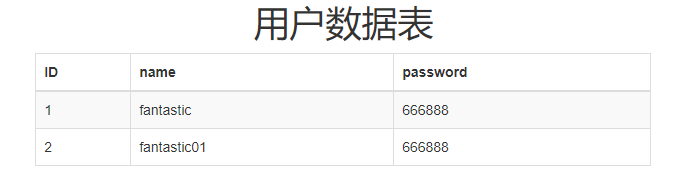
这就是刚才我们通过增的操作,创建的user表和表中的2条记录。
--------------------------------------------------------------------------------------------------------------------------------------------------
改:
首先需要明白一点:改是建立在已经查到的数据基础上修改对应字段值的,所以改的前提必须有一个查的过程:
锁定单个表记录,用filter:user_obj = models.User.objects.filter(id=edit_id).first() # 再次强调如果不加.first(),返回的结果是一个QuerySet对象,而不是用户数据对象 改: 方式一: models.User.objects.filter(id=edit_id).upadte(name='banana', password='666') 注意:方式一update修改的数据可能不是一条记录,有可能把查询到的多条记录的name和password的值全部改成banana和666,类似于批量操作。 当然如果能确定filter对象的唯一性比如条件为primary_key的id那么查找的数据肯定是一条记录,这样也可看作单个记录修改。 方式二: user_obj = models.User.objects.filter(id=edit_id).first() user_obj.name = 'banana' user_obj.name = '666' user_obj.save()
编辑对象获取方式:
我们在表记录修改的时候一般都是需要获取到该条表记录的主键id值,这样就能精确定位修改该条记录了。所以需要一些手段来传递id值:编辑对象的id的获取方式 方式1:利用input隐藏一个标签 <input type="hidden" name="edit_id" value="{{ user_obj.pk }}"> 方式2: form表单中加入GET请求数据,在views函数方法中通过request.GET.get(edit_id)来获取需要修改的id (虽然请求方式是POST,但可以在标签内加入GET请求参数,在views函数中能够同时通过request.POST和request.GET方法拿到不同的数据) <form action="/edit/?edit_id={{ user_obj.pk }}" method="post">
删:
删除和修改方法类似:方法一: models.User.objects.filter(password='555').delete() # 会将queryset所有的数据对象全部删除 方法二: user_obj = models.User.objects.filter(password='555').first() user_obj.delete()
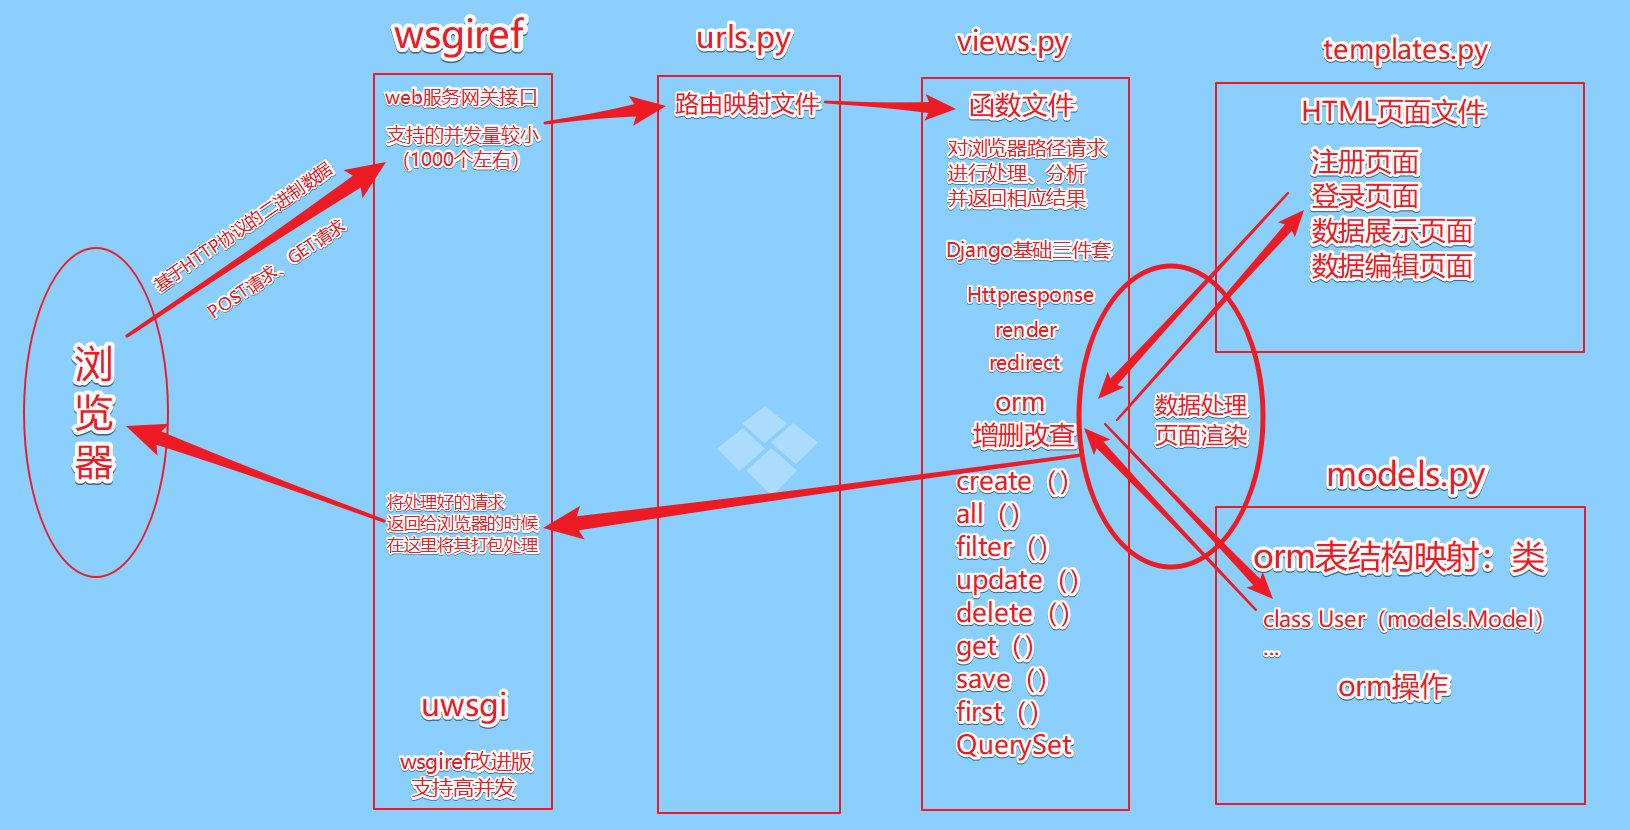
最后补充一张Web框架实现的最基础的流程图:(后期不断完善中...)