During interviews, I am often asked how to design a red dot system. This article will introduce in detail how to design a red dot system, what interfaces it has, and give a complete implementation.
Requirements analysis of red dot system
First, let’s analyze the design requirements of the red dot system: Strictly speaking, the red dot system does not belong to the framework, but to the game logic, so the code should not be placed in a general framework, as it does not belong to the basic service. It is intended to be a good reminder of unprocessed information in game logic development. For users, they hope that the red dot system can directly provide them with interfaces and services, and can easily display red dots under specific nodes and set them to specific locations. Users do not need to care about the "look" of red dots, how to create red dots, the performance of repeatedly creating and destroying red dots, etc.
right! There is a game development exchange group here, which gathers a group of novices who love to learn games, as well as some technical experts who are engaged in game development. You are welcome to come and exchange and learn.
From the demand analysis, it is concluded that the external interfaces provided by the "Red Dot System" are as follows:
1: Write the interface "CreateRedPoint" to create a "red point" node and return the node to the user. The user decides where to place the red point;
2: Write the interface "DestroyRedPoint" to delete and destroy a red point node;
3: Write the interface "SetRedPointValue", pass in the red point node, and then set the specific value in the red point;
4: Write the interface "DestroyAllRedPoints", which is used to delete and recycle all the red points under the UI interface when it is destroyed;
Since the "Red Dot System" will frequently create and delete nodes, it adopts the node pool mode internally, which can maximize performance.
Basic services that the Red Dot system relies on
The red dot system is not completely independent and relies on the basic services of the framework. One is resource management, which is mainly responsible for loading red dot node resources, and the other is the node pool management module. The sample code of the resource management module uses YooAssets, and then the red dot nodes are made into prefabs, then collected and packaged through YooAssets, and then the node resources are loaded through code. The red point system is internally based on the node pool mechanism, so a unique node pool must be created for the red point node.
Version of YooAssets: 1.5.2
Resource management ResMgr: synchronous/asynchronous resource management based on YooAssets
Node pool: Implement it yourself, see the code for details;
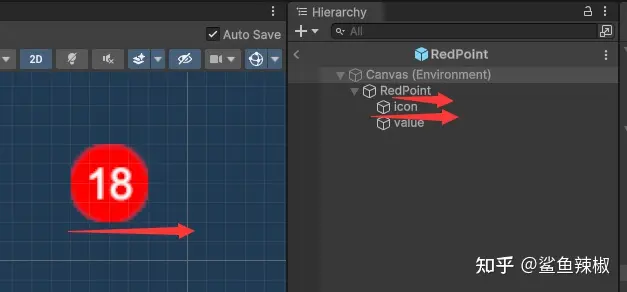
Red point node prefab: There are two child nodes under the RedPoint node, a red circular elf and a text Label, used to display numbers, as shown in the following figure:
Specific implementation of red dot system code
Write a RedPointFlag component, inherit from Component, to mark which nodes are red points. The function of this component is to use this Flag component to find all the "red points" when a UI interface is destroyed, and recycle them together.
public class RedPointFlag : Component
{
}
Write a global singleton of RedPointMgr to provide the "red point" service. Provides the Init interface. During Init, a node pool is created for the red dot. code show as below:
public class RedPointMgr : UnitySingleton<RedPointMgr>
{
public void Init() {
NodePoolMgr.Instance.AddNodePool("GUI/Prefabs/RedPoint.prefab", 10);
}
}
CreateRedPoint interface:
public GameObject CreateRedPoint() {
GameObject redPoint = NodePoolMgr.Instance.Get("GUI/Prefabs/RedPoint.prefab");
if (redPoint.GetComponent<RedPointFlag>() == null) {
redPoint.AddComponent<RedPointFlag>();
}
return redPoint;
}
Special attention should be paid to this interface. We add a RedPointFlag component instance to the red point node to facilitate finding all the red points later.
SetRedPointValue interface:
public void SetRedPointValue(GameObject redPoint, int value) {
var label = redPoint.GetComponentInChildren<Text>();
label.text = value.ToString();
}
It is used to set the corresponding display value for the red dot. The principle is relatively simple. Just find the Text component in the red dot and modify the display content of the Text component.
DestroyRedPoint interface:
public void DestroyRedPoint(GameObject redPoint) {
NodePoolMgr.Instance.Recycle("GUI/Prefabs/RedPoint.prefab", redPoint);
}
Delete a red dot. This is mainly to call node pool recycling.
DestroyAllRedPoint interface:
public void DestroyAllRedPoint(GameObject uiRoot) {
RedPointFlag[] redPoints = uiRoot.GetComponentsInChildren<RedPointFlag>();
for (int i = 0; i < redPoints.Length; i++) {
NodePoolMgr.Instance.Recycle("GUI/Prefabs/RedPoint.prefab", redPoints[i].gameObject);
}
}
Delete all red points. Here we use the RedPointFlag component. By filtering out all nodes with this component, we have our red point nodes. Then just recycle all the nodes.
Next, let’s give a simple usage example. It is very simple and convenient to use. Create a red dot in the UI code and delete all red dots when the interface is destroyed:
public class UIHomeCtrl : MonoBehaviour
{
// Start is called before the first frame update
void Start()
{
Transform root = this.transform.Find("Bottom/start/btnStart");
var redPoint = RedPointMgr.Instance.CreateRedPoint();
redPoint.transform.SetParent(root, false);
redPoint.transform.localPosition = new Vector3(120, 40, 0);
RedPointMgr.Instance.SetRedPointValue(redPoint, 20);
}
private void OnDestroy()
{
RedPointMgr.Instance.DestroyAllRedPoint(this.gameObject);
}
}
That’s it for today’s sharing. If you need the complete code, you can follow us and get the complete code.”