For object detection frameworks such as yolo, the input size is usually 640x640, which is sufficient for regular image sizes and regular object detection. However, in tasks such as aerial photography, the image size is usually several thousand x thousands or even tens of thousands, and the target is also very small. If it is resized to a size of 640, obviously the target has been lost. In fact, reasoning can be performed by cutting the image, that is, cutting the high-resolution image into 640x640 image blocks, and then perform target detection on each block, and finally convert the coordinates of the target in the image block into a large-size image. That’s it.
The following is a cut graph based on python:
import torch
from PIL import Image
import numpy as np
import math
import matplotlib.pyplot as plt
import cv2

def split_and_overlap(image_path, output_size=640, overlap_pixels_x=100, overlap_pixels_y=100,normalize=False):
    """

    @param image_path:
    @param output_size: 切图小图的尺寸
    @param overlap_pixels_x: 经过在训练集上可视化分析,目标框的长和框都分布在100像素内,故设为为100像素
    @param overlap_pixels_y:
    @return:
            (num_cut, Channel, output_size, output_size)=》(切图个数,通道,小图尺寸),
            {"num_x": 在x轴上的切图数量,
             "num_y": 在y轴上的切图数量}

    """
    # 打开图像 1281*1920*3
    original_image = cv2.imread(image_path)
    if normalize:
        original_image=original_image/255
    original_height,original_width,_ = original_image.shape

    # 计算每个小图的大小
    tile_width = output_size
    tile_height = output_size

    # 初始化结果列表
    result_images = []

    # 计算能够整切的图像的长和宽
    target_width = math.ceil((original_width - overlap_pixels_x) / (output_size - overlap_pixels_x)) * (
            output_size - overlap_pixels_x) + overlap_pixels_x
    target_height = math.ceil((original_height - overlap_pixels_y) / (output_size - overlap_pixels_y)) * (
            output_size - overlap_pixels_y) + overlap_pixels_y

    # 填充到target尺寸
    original_image_pad = np.pad(original_image, ((0, target_height-original_height),(0, target_width-original_width), (0, 0)), mode='constant', constant_values=0)

    # 开始切割和堆叠
    for y_block_id in range(0, (target_height - overlap_pixels_y) // (output_size - overlap_pixels_y)):
        for x_block_id in range(0, (target_width - overlap_pixels_x) // (output_size - overlap_pixels_x)):
            # 裁剪图像
            left = max(x_block_id * (tile_width - overlap_pixels_x), 0)
            up = max(y_block_id * (tile_height - overlap_pixels_y), 0)
            box = (left, up, left + output_size, up + output_size)
            print(box)
            tile_image = original_image_pad[up:up + output_size,left:left + output_size,:]

            # 添加到结果列表
            result_images.append(tile_image)
	# 将result_images转为ndarray,形成[num_block,3,630,630]的张量
    return (np.array(result_images).transpose((0, 3, 2, 1)),
            {

    "num_x": (target_width - overlap_pixels_x) // (output_size - overlap_pixels_x),
             "num_y": (target_height - overlap_pixels_y) // (output_size - overlap_pixels_y)})


def visualize_tensor(tensor, columns=3):
    # 获取张量的形状
    batch_size, num_channels, height, width = tensor.shape

    # 计算行数
    rows = int(np.ceil(batch_size / columns))

    # 设置画布大小
    plt.figure(figsize=(15, 15))

    # 循环遍历每个图像
    for i in range(batch_size):
        plt.subplot(rows, columns, i + 1)

        # 提取图像数据
        image_data = np.transpose(tensor[i], (2, 1, 0))  # 将通道放在最后的顺序

        # 可能需要进行适当的缩放或预处理,具体取决于你的数据

        # 显示图像
        plt.imshow(image_data)
        plt.axis('off')  # 关闭坐标轴
    plt.subplots_adjust(wspace=0.05, hspace=0.05)
    plt.show()


if __name__ == "__main__":
    # 示例用法
    image_path = "yolov5/0006.jpg"

	# 切图
    result_images, cut_meta = split_and_overlap(image_path,normalize=False)

    for i in range(result_images.shape[0]):
        # 获取单张小图片的数据
        image_data = result_images[i].transpose(2, 1, 0)  # 将通道放到最后一个维度
        image = Image.fromarray(image_data)

        # 保存小图片,方便验证
        image.save(f'cut/image_{

      i + 1}.png')


    print(cut_meta)
    inp = torch.tensor(result_images, dtype=torch.float32)

	# 可视化小图片
    visualize_tensor(inp,columns=cut_meta['num_x'])
By passing [B,3,640,640] into yolo detection, it is equivalent to detecting B pictures at the same time, and finally obtain the detection frame information in B images. So how to convert the coordinates of the detection box bbox on the small image to the coordinates on the large image? also very simple
For a certain small picture, the sequence number idx in the B dimension can be used to know which small picture it is, and then through the column number operation, the position of the rows and columns can be known:
# 前面有N行,M列
N = cut_block_id // num_block_x
M = cut_block_id % num_block_x

# 也就是左侧有M个540像素,上侧有N个540像素,

# 在整图上的绝对坐标
center_x = center_x + M * 540
center_y = center_y + N * 540
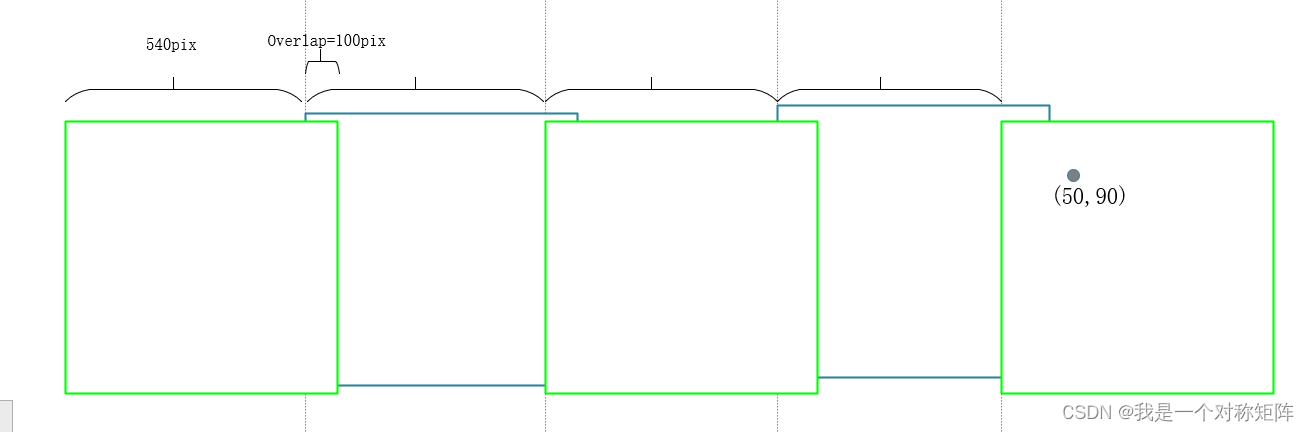
As shown in the figure, the coordinates in a certain small picture are (50,90). Through calculation, we know that it is in the 5th column. Then there are 4 small pictures on the left. Considering the overlapping area, there are 4 540 on the left. pixel, so the horizontal coordinate of this coordinate in the large picture is 50+540x4=2210. In the same way, the position of the ordinate in the large picture can also be calculated using this method.