2D indoor navigation
1 Data production
1.1 Layer grouping
After the data is prepared, the data needs to be grouped and organized into layer groups so that each layer group contains all the data of a floor.
How to operate:
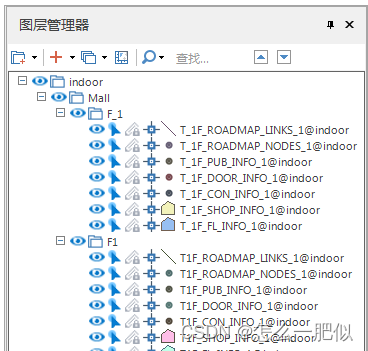
1. Establish layer groups: Each layer group manages the data of one floor, and several groups are created for several floors. First add the data set to the map window. At this time, you can see the "New Root Group" button in the layer manager. Click New Group/New Root Group to create a layer group. Note: The first-level group name must be "indoor" (note the uppercase and lowercase letters).
2. Add the indoor data set to the current map and place it under the corresponding group.
1.2 Thematic map production
1.2.1 Area data thematic map
How to operate:
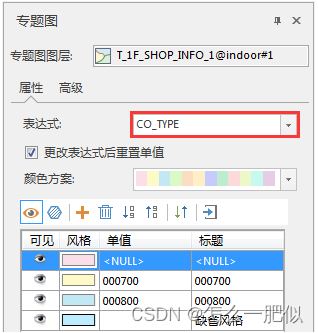
1. Create a single value thematic map and display different styles according to the type. In the layer manager, select the area layer, right-click, and select Create Thematic Map - Single Value Thematic Map - Default. The "Thematic Map" setting interface as shown below will appear on the right. Set the expression to "CO_TYPE", select the appropriate display color through the color scheme, or use the "Style" button to open the "Fill Symbol Selector" to set it yourself.
2. Make a label thematic map and display the name. In the layer manager, select the area layer, right-click, select Create Thematic Map - Label Thematic Map - Unify Style , and the "Thematic Map" setting interface as shown below will appear on the right. Select the label expression as "FT_NAME_CN", and make corresponding settings in the Properties, Style, and Advanced tabs.
1.2.2 Point data thematic map
操作方法:
1. Create a single value thematic map and display different styles according to the type. You can click the "Style" button to open the "Point Symbol Editor" and select the appropriate point display style. If the point symbol type in the "Point Symbol Selector" cannot meet the requirements, you can use "Import Symbol Library" (import .sym format symbol library), "Import Raster File" (import JPG, PNG, BMP, ICO format pictures) There are two ways to import symbols that meet the conditions.

2. Make a label thematic map: The method is the same as that of making area data, refer to the steps of area data.
1.3 Add attributes
1.3.1 Add indoor road network bottom data set attributes
The indoor road network bottom data set is used to control whether the indoor map is displayed.
How to operate:
Right-click the data set in the workspace manager , click Properties - Attribute Table , and add the attribute item " LinkName" (the name is fixed and cannot be changed) for the indoor road network bottom data set .

2. Add attribute values to the above attribute items.
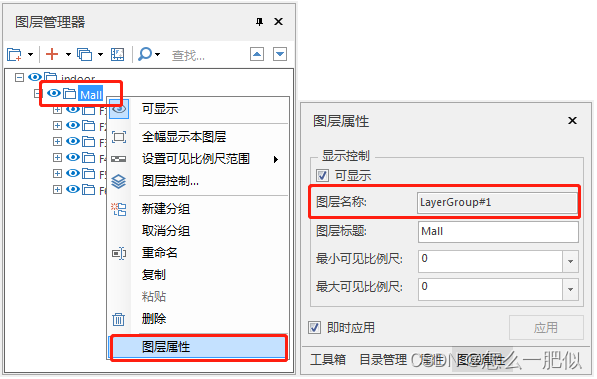
The value of the LinkName attribute comes from the layer name of the upper-level grouping of the floor grouping in the "Layer Manager". The way to obtain it is to right-click on the group, select Layer Properties, and find the value of "Layer Name" in the layer property table.
1.3.2 Add floor relationship attribute table attributes
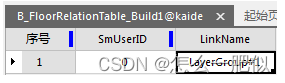
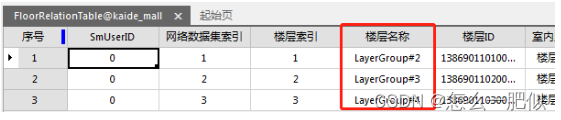
Double-click FloorRelationTable in the workspace manager to add attribute values to the floor names . The attribute values are obtained from the layer names corresponding to the grouping of each floor in the layer manager .
How to operate:
Right-click the floor group in the layer manager and click Layer Properties . The layer name is the floor name in the FloorRelationTable . After the addition is completed, the result is as shown below:
1.4 Construct the staircase relationship
How to operate:
Click the Traffic Analysis - Indoor Navigation - Build Stairs Relationship button to pop up the Load Indoor Navigation Model dialog box. In the dialog box, you will set the following information:

Road network : Set the data source where the built navigation model is located and the generated floor relationship. Attribute table dataset.
Stair relation data set : It is a three-dimensional line data set, which serves as a connecting bridge between different floors. You can load the existing stair relationship data set and perform management operations such as modification, deletion, and addition. You can also create a new data set and build the stair relationship from the beginning.
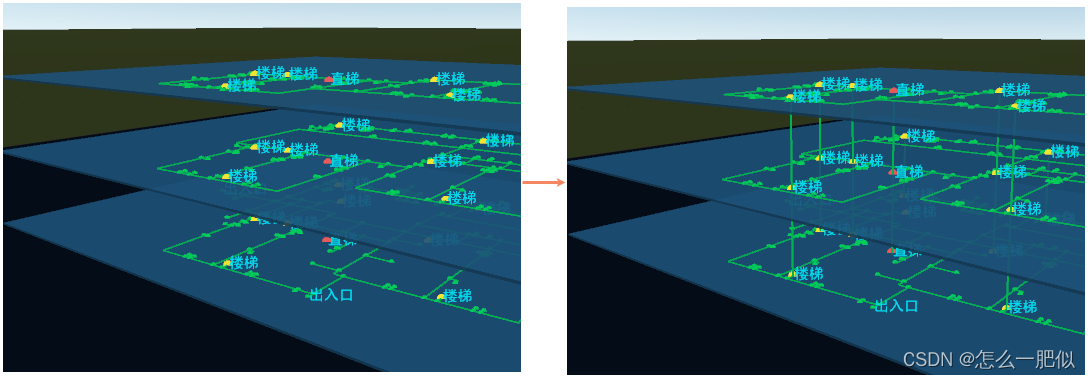
After completing the above settings, click the OK button, and the program will automatically load the data set in the navigation model, generate a two- and three-dimensional integrated navigation scene model, and pop up the stair relationship management dialog box. Two methods are provided: mouse picking and specifying the stair ID to construct stair relationships. The comparison before and after constructing the stair relationship is as shown below:
Method 1: Mouse picking , select the stair point record for setting the stair relationship in the stair point list area, and click Click the mouse pick button, move the mouse to the scene, the mouse state changes to the pick state, select the stair point you want to reach, and the two stair points can be connected to generate a three-dimensional line. At the same time, the program automatically adds the stair point information to Arrival ID and arrival floor attributes.
Method 2: Specify the stair ID , select the stair point record that sets the stair relationship in the stair point list area, double-click the arrival ID content box of the current stair point, the arrival ID list box will pop up, and check the radio button of the arrival ID in the list box. frame.
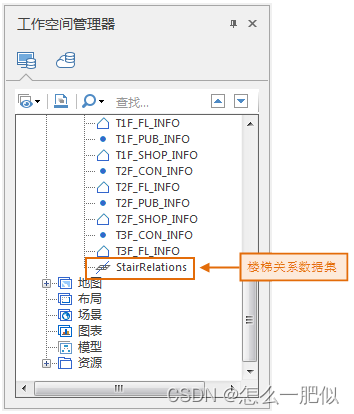
3. After the construction is completed, the result data set shown in the figure below will be obtained in the workspace manager.
4. Close the scene. You can choose whether to save the scene as needed.
2 Two-dimensional indoor navigation data loading application
The indoor navigation function is implemented through code. The reference code is as follows:
2.1 Load map
//设置许可文件路径
        Environment.setLicensePath(sdcard + "/SuperMap/license/");

        //组件功能必须在 Environment 初始化之后才能调用
        Environment.initialization(this);

        setContentView(R.layout.activity_main);

        //打开工作空间
        m_wokspace = new Workspace();
        WorkspaceConnectionInfo info = new WorkspaceConnectionInfo();
        info.setServer(sdcard+"/SampleData/IndoorNavigationData/beijing.smwu");
		info.setServer(sdcard+"/SampleData/Beijingmall/beijingMall.smwu");
		info.setServer(sdcard+"/SampleData/navi2D/navi2D.smwu");
		info.setServer(sdcard+"/SampleData/mall/kaide.smwu");
        info.setType(WorkspaceType.SMWU);
        m_wokspace.open(info);

        //将地图显示控件和工作空间关联
        m_mapView = (MapView)findViewById(R.id.Map_view);
        m_mapControl =  m_mapView.getMapControl();
        m_mapControl.getMap().setWorkspace(m_wokspace);

        //打开工作空间中的地图。参数0表示第一张地图
        String mapName = m_wokspace.getMaps().get(0);
        m_mapControl.getMap().open(mapName);
        //设置使用全屏绘制模式,点、文字和普通图层同时显示
        m_mapControl.getMap().setFullScreenDrawModel(true);
        //刷新地图
        m_mapControl.getMap().refresh();
Note:
-
For project creation and environment configuration, please refer to the online help or development guide. For indoor navigation, you need to add the analysis library and navigation library, namely com.supermap.analyst.jar and com.supermap.navigation.jar.
-
For how to apply for a license, see the online help or development guide.
-
Paths to licenses and data can be set as appropriate.
2.2 Navigation module initialization
m_NavigationEx = m_mapControl.getNavigation3();
	m_NavigationEx.setUpdateDataMode(true);
	m_NavigationEx.setDatasource(m_wokspace.getDatasources().get("kaide_mall"));

	m_floorListView = (FloorListView)findViewById(R.id.floor_list_view);
	m_floorListView.linkMapControl(m_mapControl);
	m_mapControl.setGestureDetector(new GestureDetector(m_mapControl.getContext(), mGestrueListener));
2.3 Add navigation points
	//设置最近门模式,在路径分析是自动选取最近的门。(本接口10.1.2及以后版本可用)
	m_NavigationEx.setNearestDoorMode = true;

	//设置起点:可以连续设置,保留最后一次设置的值
	m_NavigationEx.setStartPoint(pt.getX(), pt.getY(), mCurrentFloorID);

	//设置终点:可以连续设置,保留最后一次设置的值
	m_NavigationEx.setDestinationPoint(pt.getX(), pt.getY(), mCurrentFloorID);

	//设置途径点:可以连续设置,途径点个数不限制 注意:没有起点和终点时不能添加途径点
	m_NavigationEx.addWayPoint(pt.getX(), pt.getY(), mCurrentFloorID);
2.4 Path analysis
//判断室内地图是否打开
	String currentFloorID = m_floorListView.getCurrentFloorId();
	if (currentFloorID == null) {


		Toast.makeText(m_mapControl.getContext(), "请先打开室内地图", Toast.LENGTH_SHORT).show();
		return;
	}
	//判断室内地图数据源是否加载成功
	Datasource datasource = m_floorListView.getIndoorDatasource();
	if (datasource == null) {


		Toast.makeText(m_mapControl.getContext(), "室内地图数据源加载失败", Toast.LENGTH_SHORT).show();
		return;
	}
	//设置室内地图所在的数据源
	m_NavigationEx.setDatasource(datasource);

	//路径分析
	boolean bResult = m_NavigationEx.routeAnalyst();
	if(bResult){


		Toast.makeText(m_mapControl.getContext(), "分析成功", Toast.LENGTH_SHORT).show();
	}
	else{


		Toast.makeText(m_mapControl.getContext(), "分析失败,确认是否添加导航点", Toast.LENGTH_SHORT).show();
		return;
	}
2.5 Navigation
	//开始导航  0:真实导航, 1:模拟导航 ,2:巡航 ,3:步行导航
    if(!m_NavigationEx.startGuide(1)){


		Toast.makeText(m_mapControl.getContext(), "导航启动失败", Toast.LENGTH_SHORT).show();
		return;
	}