Article directory

1 Introduction
In today's digital age, email has become an integral part of our daily lives. Whether in private life or business, the frequency and importance of email cannot be underestimated. However, for people who often need to send large amounts of emails, manually sending emails one by one can become very tedious and time-consuming.
Therefore, in order to simplify the email sending process, I developed a small Python project based on tkinter - an email sending program. With this program, you can send emails in bulk easily and quickly, saving valuable time and effort.
In this article, I will introduce you to the development process of this email sending program and its practical application. I'll walk through the program's implementation details and key features step-by-step, and provide detailed code examples and instructions to ensure you can successfully use and customize the program.
2 Project Overview
In this chapter, we will provide a project overview of the email sending program developed based on tkinter. We will describe the project's goals, features, and technologies used.
2.1 Project goals
The main goal of the mailer is to simplify the process of sending emails. This project aims to provide a user-friendly interface that simplifies the email sending process by reducing the user's manual operations and automating the sending process.
2.2 Function list
Here is a list of the main features of the mailer:
- Provides an intuitive user interface that allows users to easily enter sender information, recipient information, and email content.
- Supports users to import recipient address lists to easily send emails to multiple recipients.
- Use a secure authentication mechanism to ensure users' email passwords are protected.
- Automatically handles the email sending process, including establishing a connection to the mail server and sending the email.
- Provide error handling and exception prompts to help users identify and solve potential problems.
- Implement a user-friendly interface, including buttons, input boxes and prompt boxes, making user operations more convenient and comfortable.
2.3 Technical Overview
The mail sending program is developed using the Python programming language. Here are some of the main technologies involved in the project:
Python Programming Language: Python is a simple and powerful programming language suitable for rapid development of various applications. This project uses Python to implement the entire email sending process.
tkinter graphical user interface library: tkinter is a GUI toolkit in the Python standard library for creating user-friendly graphical interfaces. Interface design and user interaction for email sending programs.
smtplib library: The smtplib library is a module in the Python standard library for sending emails. We use the smtplib library to handle communication with the mail server, establishing connections and sending emails.
In the following chapters, we will delve into the installation and use of the project as well as some tips and precautions. Let's read on and start using this handy email sending program!
3 Detailed code explanation
In this chapter, we will take an in-depth look at the code implementation of an email sending program developed based on tkinter. We will explain step by step what the main functions and classes do, and how they are called in the program.
Complete code:
import tkinter as tk
from email.mime.text import MIMEText
from email.utils import formataddr
import smtplib
from tkinter import messagebox

# 自定义异常类,用于处理收件人为空的情况
class EmptyRecipientError(Exception):
    pass

# 自定义异常类,用于处理无效收件人的情况
class InvalidRecipientError(Exception):
    pass

# 函数:发送邮件
def sendmail(res, sender_email, sender_name, recipients, subject, password):
    # 如果收件人为空,则抛出自定义的异常
    if not recipients:
        raise EmptyRecipientError("未找到收件人.")

    error_message = ""  # 存储发送失败的错误信息
    success_message = ""  # 存储成功发送的收件人信息

    # 遍历收件人列表
    for recipient_email in recipients:
        try:
            if "@" not in recipient_email:
                raise InvalidRecipientError(f"无效的收件人邮箱: {

      recipient_email}")

            # 创建邮件对象
            msg = MIMEText(res, 'html', 'utf-8')
            msg['From'] = formataddr([sender_name, sender_email])
            msg['To'] = recipient_email
            msg['Subject'] = subject

            # 发送邮件
            server = smtplib.SMTP_SSL('smtp.qq.com', 465)
            server.login(sender_email, password)
            server.sendmail(sender_email, recipient_email, msg.as_string())
            server.quit()

            # 发送成功,更新成功发送的收件人信息
            success_message += f"{

      recipient_email}, "
        except InvalidRecipientError as e:
            # 无效收件人,更新发送失败的错误信息
            error_message += f"无效的收件人: {

      str(e)}\n"
        except Exception as e:
            # 发送邮件异常,更新发送失败的错误信息
            error_message += f"发送邮件至 {

      recipient_email} 时出错: {

      str(e)}\n"

    # 根据发送结果显示相应的提示信息
    if error_message and success_message:
        messagebox.showwarning("警告", "部分邮件发送失败。\n" + error_message + "\n成功发送邮件至以下收件人:" + success_message)
    elif error_message:
        messagebox.showerror("错误", "邮件发送失败。\n" + error_message)
    elif success_message:
        messagebox.showinfo("成功", "成功发送邮件至以下收件人:" + success_message)
    else:
        messagebox.showerror("错误", "未找到收件人。")

# 函数:发送邮件(界面部分)
def send_mail_with_tkinter():
    window = tk.Tk()
    window.title("QQ邮箱发送器")  # 设置窗口标题
    window.geometry("800x700")  # 设置窗口尺寸为800x600

    # 创建并显示各个控件
    label_sender_email = tk.Label(window, text="发件人邮箱(仅支持QQ邮箱):")
    label_sender_email.pack()
    entry_sender_email = tk.Entry(window)
    entry_sender_email.pack()

    label_sender_name = tk.Label(window, text="发件人名称:")
    label_sender_name.pack()
    entry_sender_name = tk.Entry(window)
    entry_sender_name.pack()

    label_recipients = tk.Label(window, text="收件人邮箱(每行一个):")
    label_recipients.pack()
    entry_recipients = tk.Text(window, height=10, width=50)
    entry_recipients.pack()

    label_subject = tk.Label(window, text="邮件主题:")
    label_subject.pack()
    entry_subject = tk.Entry(window)
    entry_subject.pack()

    label_password = tk.Label(window, text="发件人授权码:")
    label_password.pack()
    entry_password = tk.Entry(window, show="*")
    entry_password.pack()

    label_content = tk.Label(window, text="邮件内容:")
    label_content.pack()
    text = tk.Text(window, height=20, width=50)
    text.pack()

    # “发送邮件”按钮的回调函数
    def send_email():
        res = text.get("1.0", tk.END)  # 获取邮件内容
        sender_email = entry_sender_email.get()  # 获取发件人邮箱
        sender_name = entry_sender_name.get()  # 获取发件人名称
        subject = entry_subject.get()  # 获取邮件主题
        password = entry_password.get()  # 获取发件人密码

        recipients = entry_recipients.get("1.0", tk.END).strip().splitlines()  # 获取收件人邮箱,每行一个,转为列表

        try:
            # 调用发送邮件函数
            sendmail(res, sender_email, sender_name, recipients, subject, password)
        except EmptyRecipientError:
            messagebox.showerror("错误", "收件人不能为空.")

    button_send = tk.Button(window, text="发送邮件", command=send_email)  # 创建“发送邮件”按钮
    button_send.pack()

    window.mainloop()

# 调用函数开始邮件发送界面
send_mail_with_tkinter()
The above code implements a simple email sending interface, using the tkinter library to create the user interface and controls.
The main components of this program are as follows:
send_mail_with_tkinter function
This function is used to create and display the email sending interface. Its main steps are as follows:
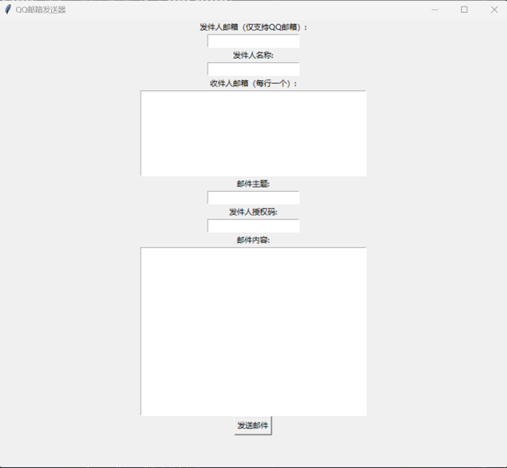
- Create a tkinter window and set the title of the window to "QQ Mailbox Sender" and the size to 800x700.
- Create labels and input boxes for each control to enter the sender's email address, name, recipient's email list, email subject, sender's authorization code, and email content.
- Create a button called "Send Email" and set its callback function to send_email.
- Enter the main event loop of tkinter and wait for user operations.
Callback function send_email
This function is used to obtain the sender information, recipient information, email subject, etc. entered by the user in the interface, and call the send_mail function to send the email.
The main steps of this function are as follows:
- Obtain the sender's email address, name, recipient's email list, email subject, authorization code and email content from the interface.
- Try calling the send_mail function to send the mail and catch the EmptyRecipientError exception that may be thrown.
- If an EmptyRecipientError exception is thrown, an error message box pops up to remind the user that the recipient cannot be empty.
Call send_mail_with_tkinter function
By calling the send_mail_with_tkinter function, the program will start the mail sending interface. Users can enter relevant information in this interface and then click the "Send Email" button to send emails. If the sender information, recipient information, sent content, etc. are incorrect, the corresponding error prompt box will be displayed.
The core of this program is the send_email function, which calls the send_mail function to actually send the email. The following is the implementation of the send_mail function:
def send_mail(sender_email, sender_name, recipients, subject, password, content):
    try:
        message = MIMEText(content, "plain", "utf-8")  # 创建邮件正文对象
        message["From"] = formataddr((sender_name, sender_email))  # 设置发件人
        message["Subject"] = subject  # 设置邮件主题

        # 连接SMTP服务器并发送邮件
        with smtplib.SMTP_SSL("smtp.qq.com", 465) as server:
            server.login(sender_email, password)
            server.sendmail(sender_email, recipients, message.as_string())

        messagebox.showinfo("成功", "邮件发送成功")  # 弹出提示框,显示发送成功信息
    except Exception:
        messagebox.showerror("错误", "邮件发送失败")  # 弹出提示框,显示发送失败信息
The main steps of the send_mail function are as follows:
- Creates a MIMEText object as the message body, which contains content, formatting and encoding information.
- Set the sender's name and email address.
- Set the subject of the email.
- Use SMTP_SSL to connect to the SMTP server of QQ Mailbox, the port number is 465.
- Log in to the SMTP server using the provided sender email and authorization code.
- Use the sendmail method to send emails, where sender_email is the sender's email address, recipients is the recipient's email address list, and message.as_string() converts the email body into a string form.
- If the sending is successful, a prompt box will pop up to display the message of successful sending; if the sending fails, an error prompt box will pop up to display the message of failed sending.
Please note that the tkinter library is used in this program to create the user interface and controls, and the messagebox module is used to display the prompt box. At the same time, the email and smtplib libraries are used to handle email-related operations.
With the above code, you can create a simple email sending interface and implement the function of sending emails.
4 User Manual
Step 1: Install dependent libraries
Before you start using the program, make sure you have the following dependent libraries installed:
- smtplib
- tkinter
- email.mime.text
- tkinter.messagebox
- email.utils
These dependent libraries can be installed using pip using the following command:
pip install smtplib
pip install tkinter
Step 2: Log in to your QQ mailbox to start the SMPT service (very important)
Log in to your QQ mailbox → click "Settings" → click "Account" → scroll down to find "POP3/IMAP/SMTP/Exchange/CardDAV/CalDAV Service"

If the service is not turned on and you need to click to turn it on, click "Manage Services"
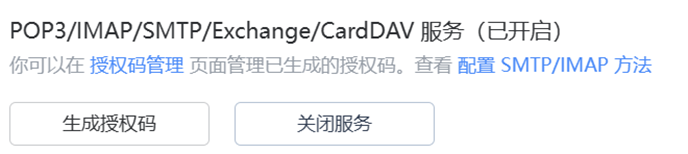
Click "Generate Authorization Code" and follow the prompts to send a text message to Tencent with your registered mobile phone number, and remember the authorization code generated next!
Step 3: Fill in the sender information
- The program window will display an input box for the sender's information.
- In the "Sender's Email" input box, enter your email address.
- In the "Sender Name" input box, enter a name.
- In the "Authorization Code" input box, enter the email authorization code. Please note that passwords will be handled in a secure manner.
Step 4: Fill in the recipient information
- Click the "Select Recipient File" button to select a text file containing the recipient's email address. One email address per line.
- You can select the recipient file from the project folder or manually navigate to the target file in the file selector.
- Once the selection is complete, the program will load and display the path to the file.
Step 5: Fill in email information
- In the "Email subject" input box, enter the subject of the email you want to send.
- In the "Email text" input box, enter the content of the email.
Step 6: Send email
- Make sure you have filled in all necessary information.
- Click the "Send Mail" button and the program will validate the input and try to send the mail.
- If an error or exception occurs, the program displays an error message box to indicate the problem.
- If everything is OK, the program will display a success message box to confirm that the email was sent successfully.
Precautions
Please ensure that the network connection is normal so that you can connect to the mail server.
If the SMTP server requires a specific port number, please make relevant settings in the code.
In some cases, emails may be identified as spam. Please make sure the message is legitimate and meets the recipient's expectations to avoid problems like this.
If you encounter any problems or errors, try restarting the program and verify the entered information.
Be sure to protect your email authorization code to avoid leaking it to others.
5 Conclusion
To summarize, the above code shows a simple email sending interface created using Python and the tkinter library. This interface allows users to enter the sender's email address, name, recipient's email list, email subject, sender's authorization code and email content, and send the email by calling the send_mail function.
Through this simple interface, users can easily send emails and get corresponding prompts when the sending is successful or failed. It should be noted that in order to ensure the normal operation of the function, the sender's email address must be a QQ email address.
This program uses commonly used Python libraries, such as tkinter to create user interfaces and controls, email to handle email-related operations, and smtplib to connect to the SMTP server and send emails.
Through this example, you can further learn and expand, and make appropriate modifications and optimizations based on your specific needs. Whether for personal use or as a base feature to add to other projects, this email sending interface can help you send emails more easily.
Hope this example is helpful, if you need further help or have additional questions, please feel free to ask. Good luck with using Python and email sending!
