1. Preparation
1.1. Install and use Apache
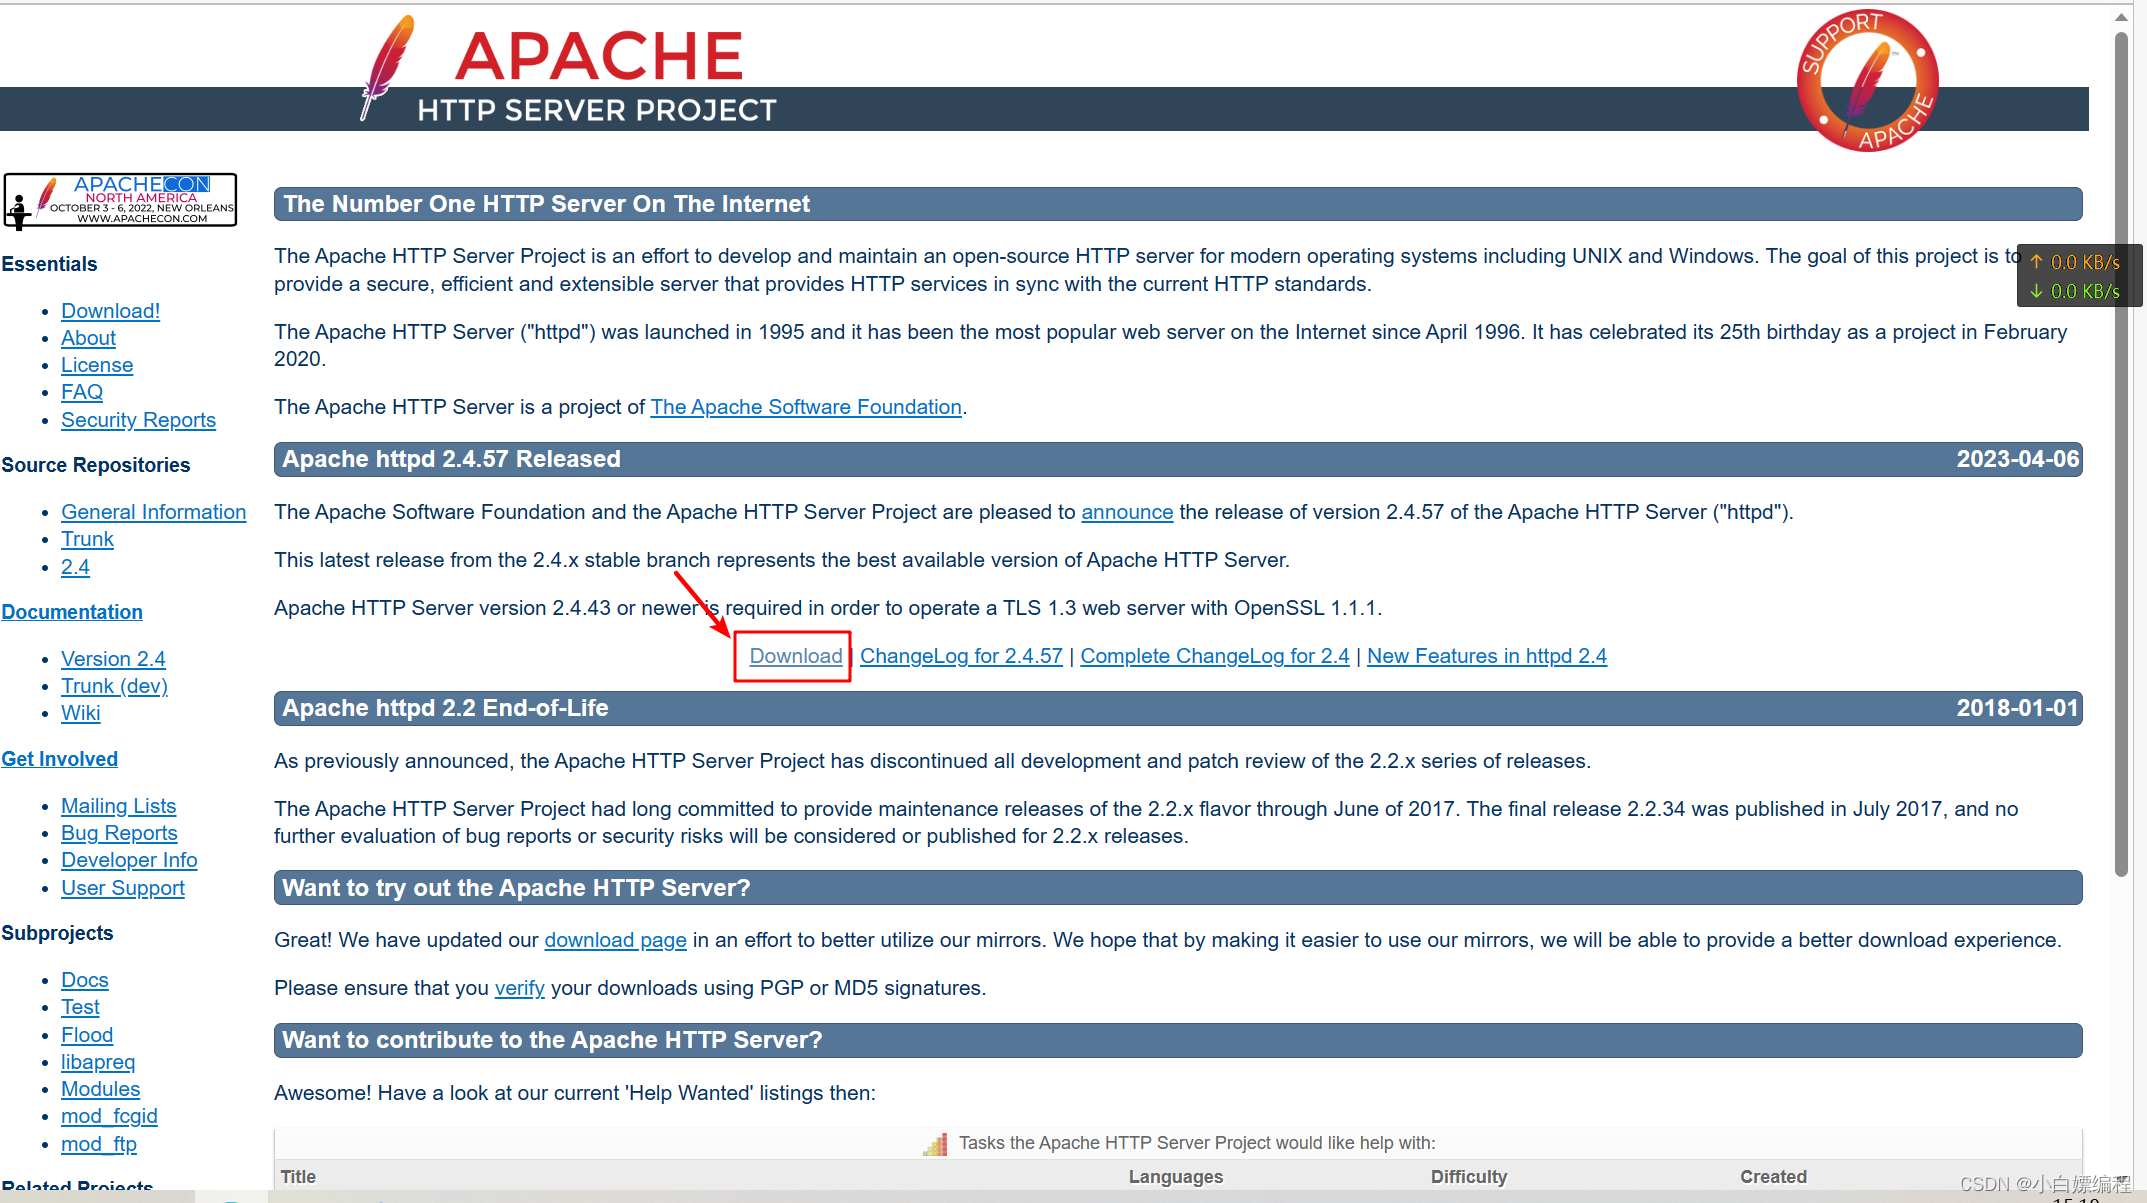
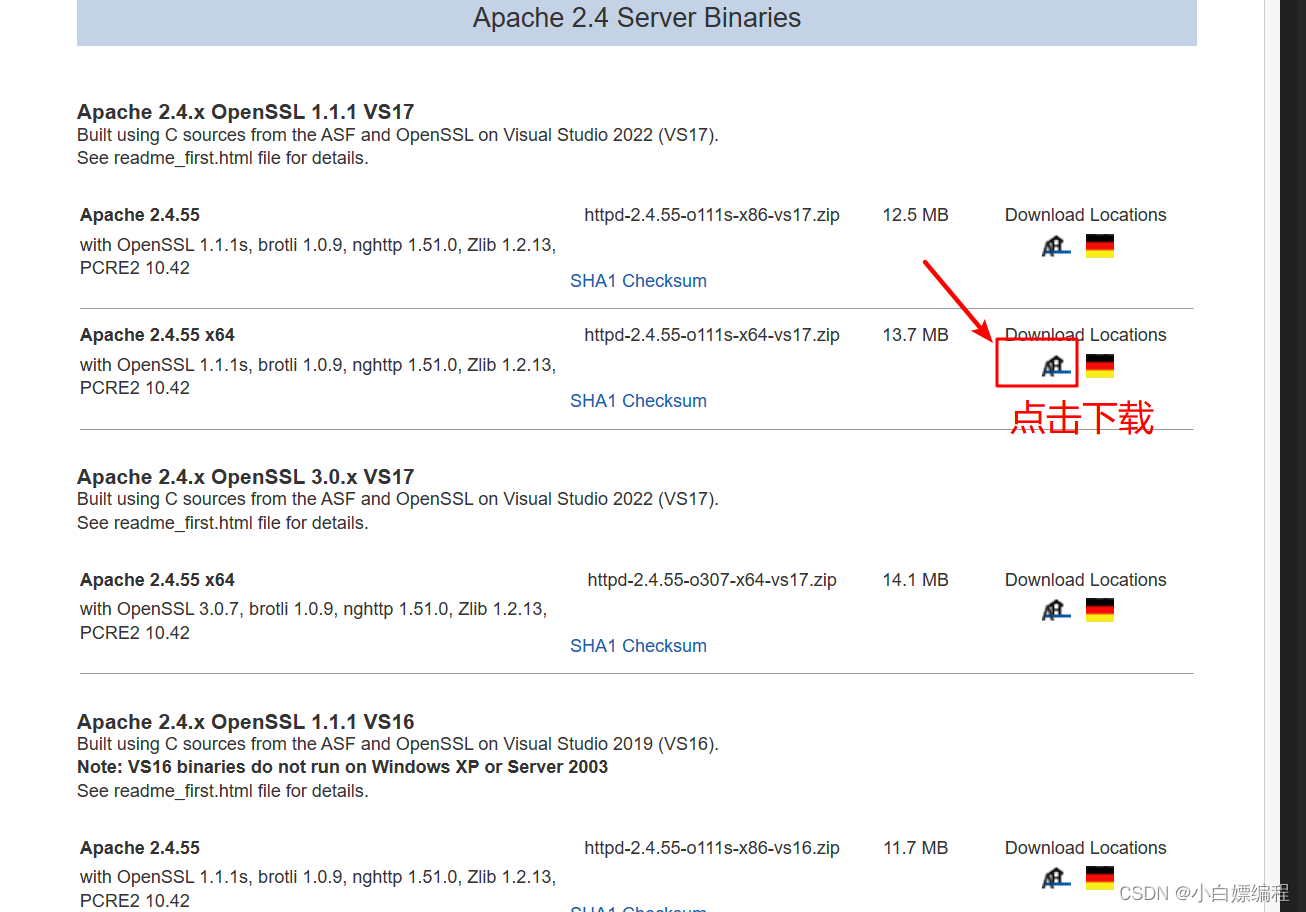
Apache download and decompress https://httpd.apache.org


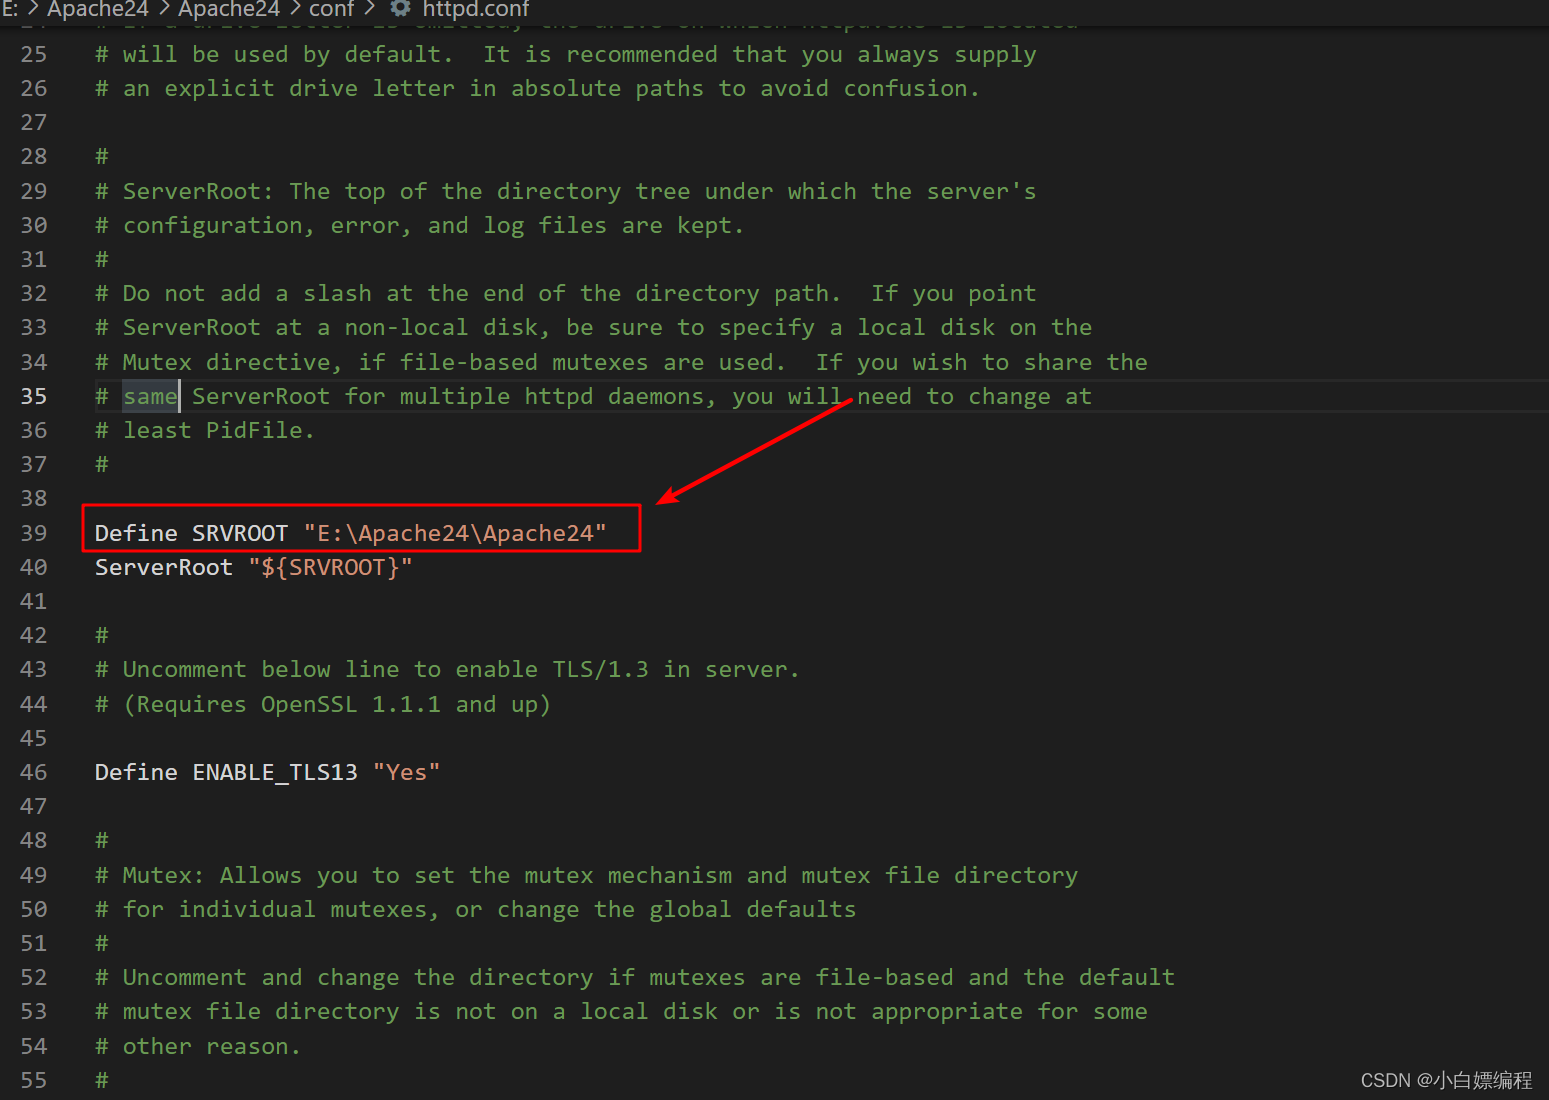
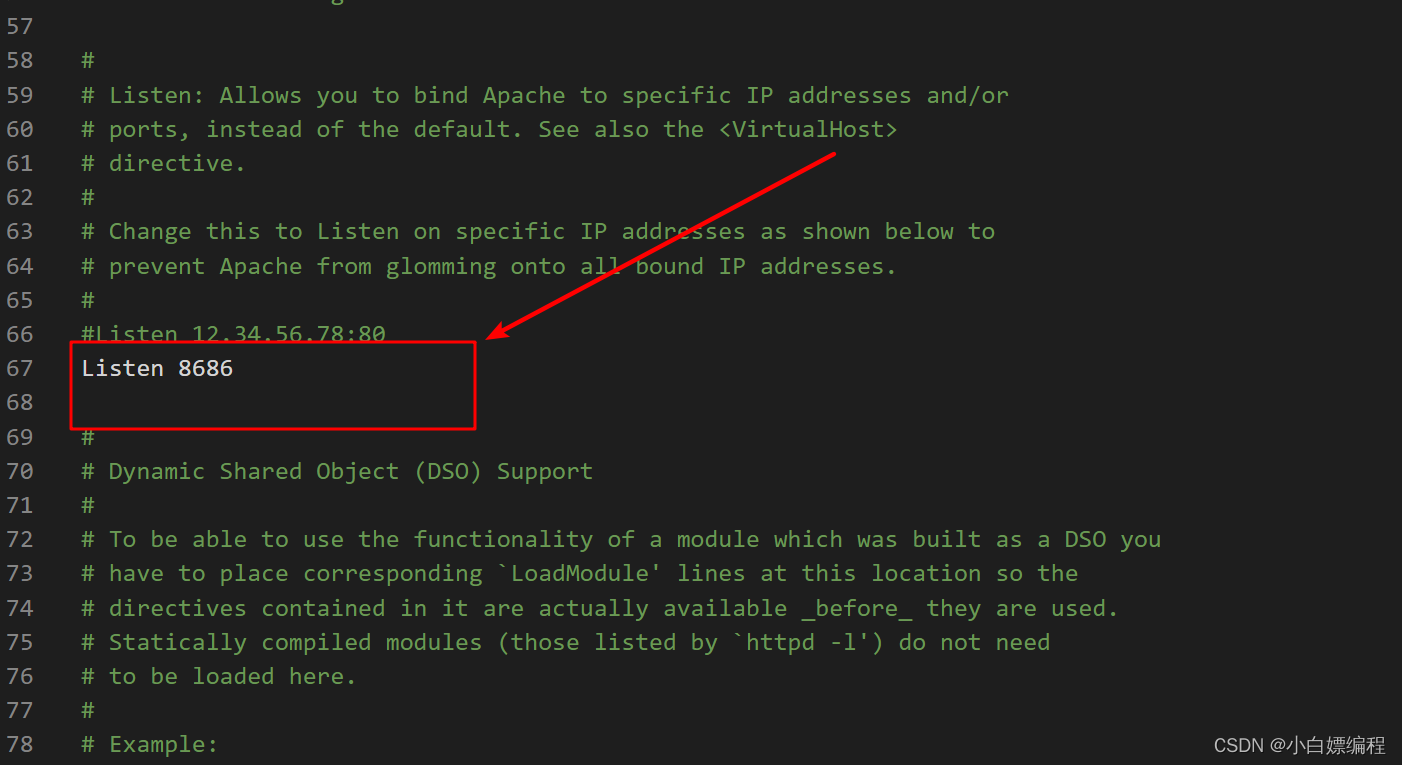
1.2.Apache configuration (httpd.conf) (path\Apache24\conf) Installation path Define SRVROOT "D:\Program Files\Apache24" (change your own path) Access port Listen 8686
1.3.Apache service installation and startup
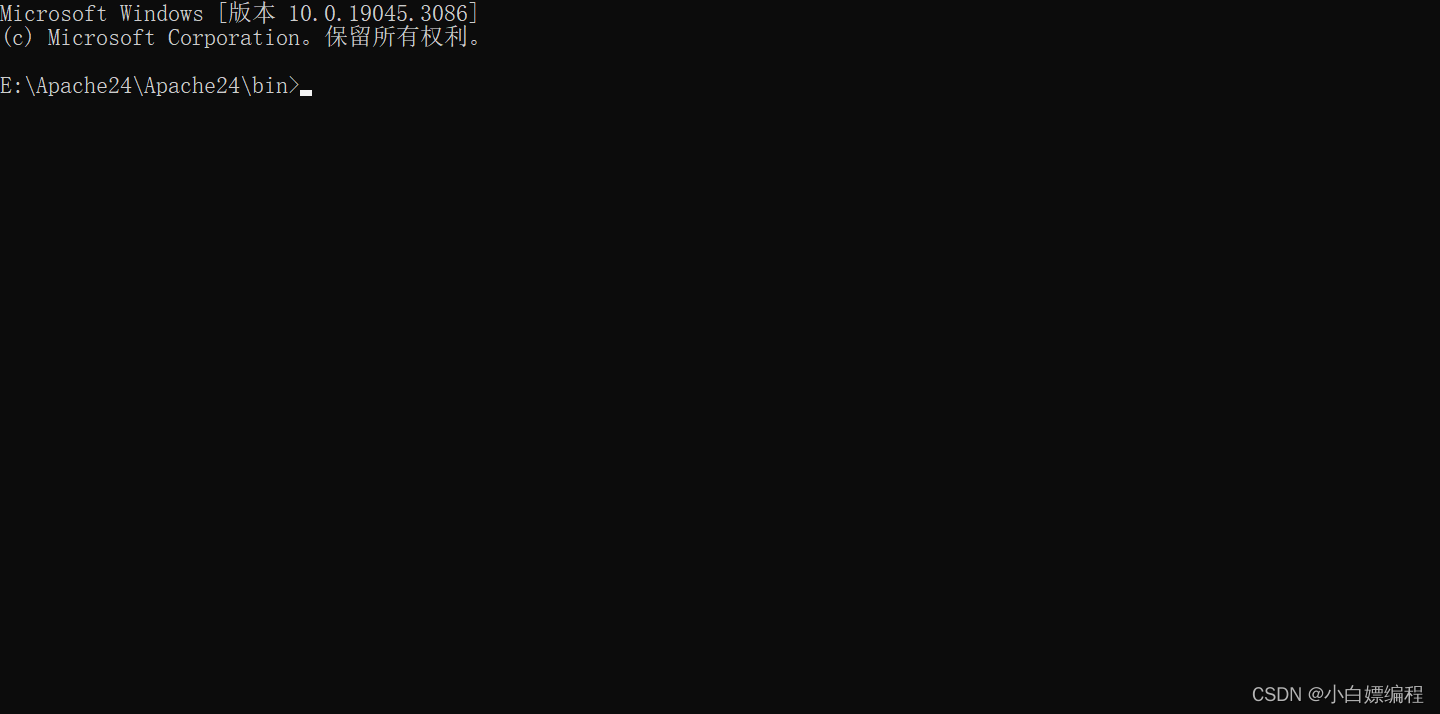
Run cmd as administrator and enter Apache's bin directory cd /e E:\Apache24\Apache24\bin (note that you enter the directory as administrator, if not, add /d after cd)
Installation command: httpd -k install

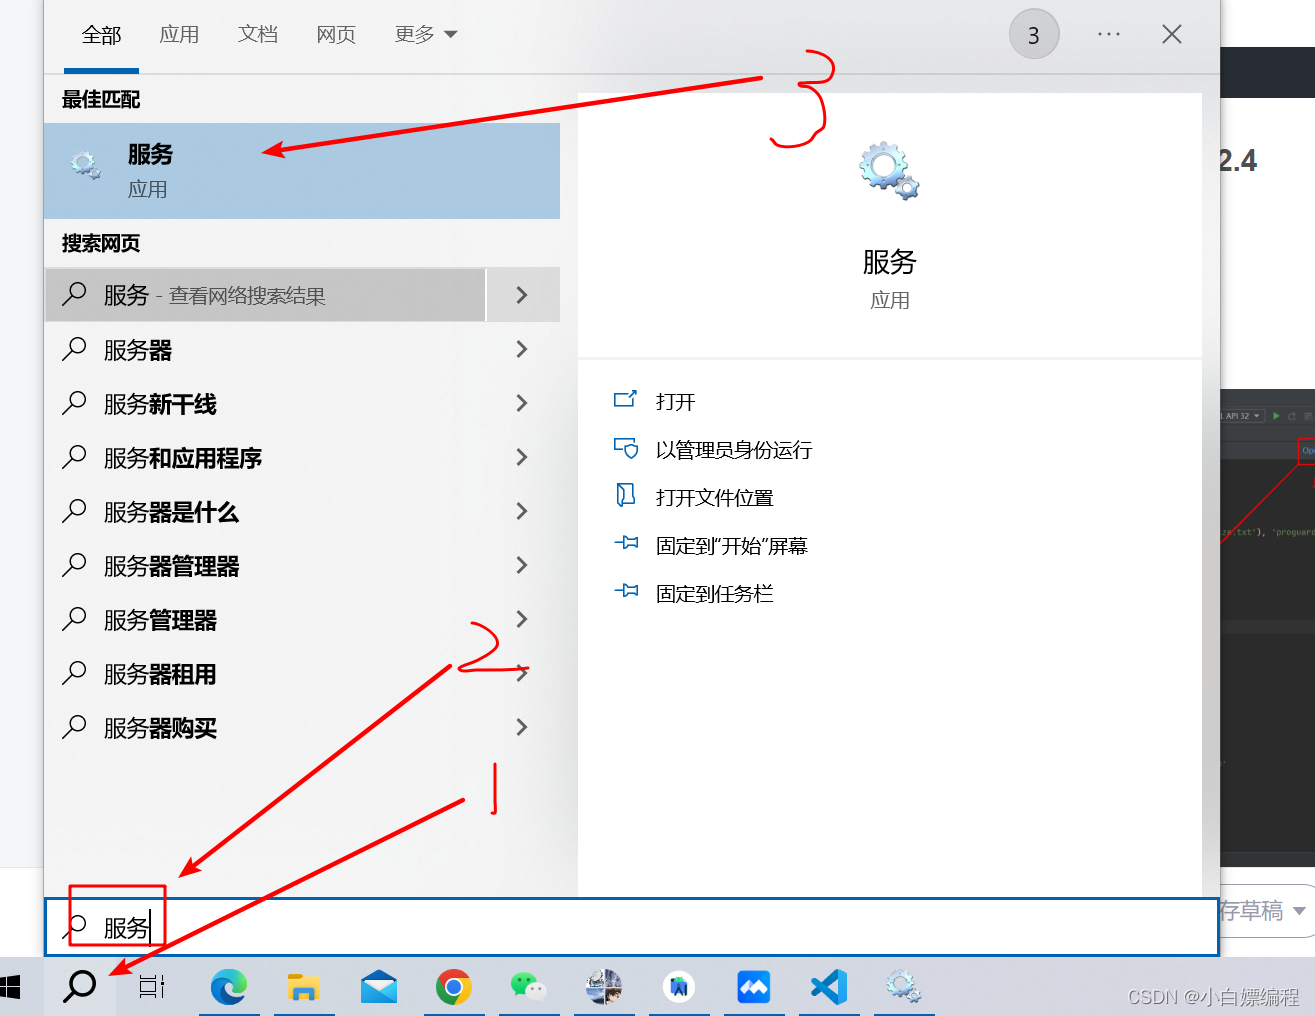
httpd -k install 1.4 Search-Service-Service (Local)-Start-Apache2.4

1.5.Apache access
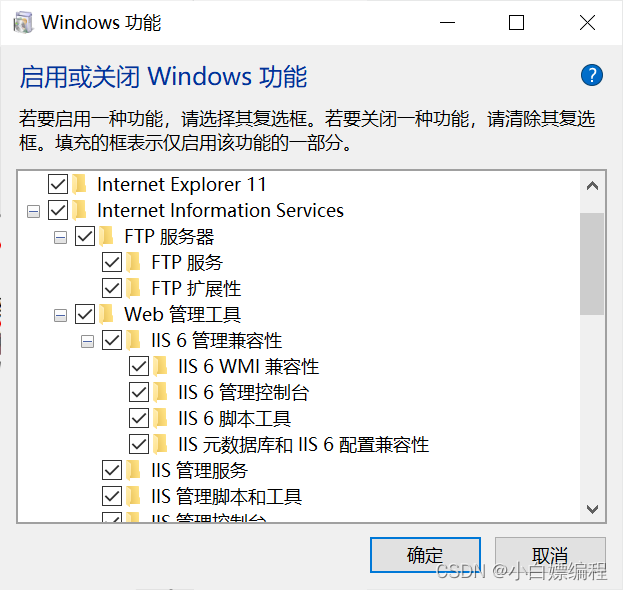
Search - Turn Windows features on or off

Finally, check the two files (note: all sub-files must be checked together when checking, otherwise the same - as the file above will be displayed instead of √), and then click OK.

1.6 Implementation of Apache accessing http://localhost:8686
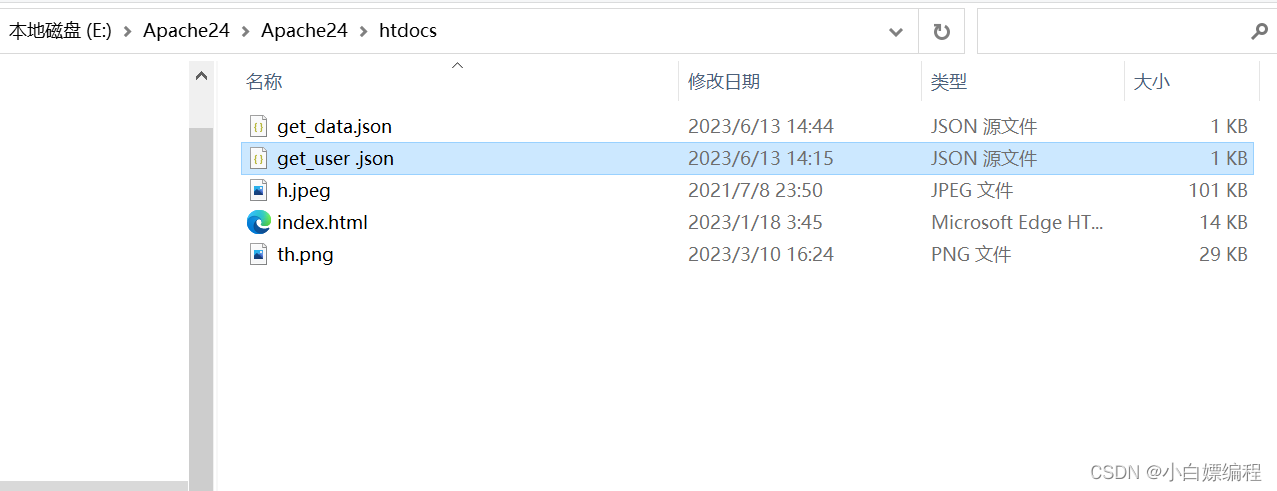
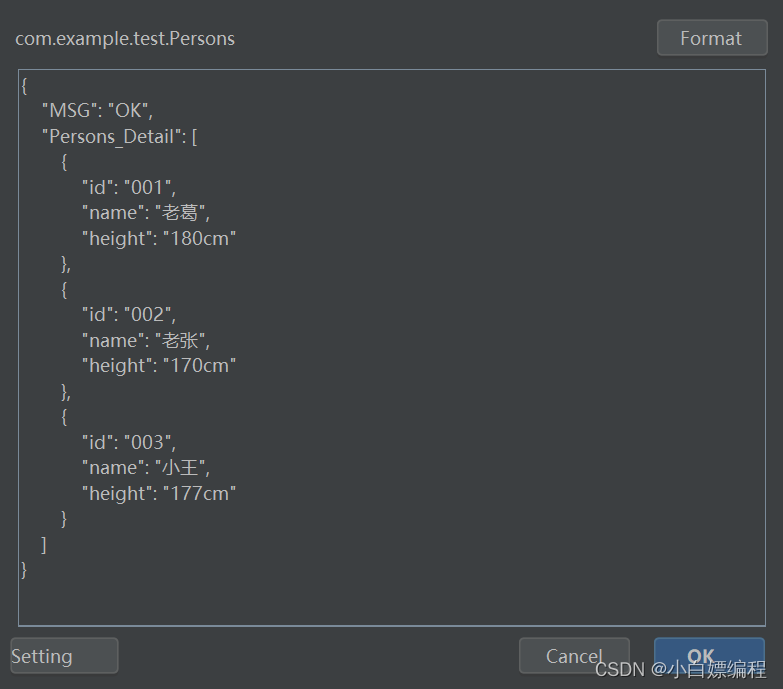
We create a new json file in E:\Apache24\Apache24\htdocs, with the file name get_data.json, and then write json data in it. I use vscode to write it.
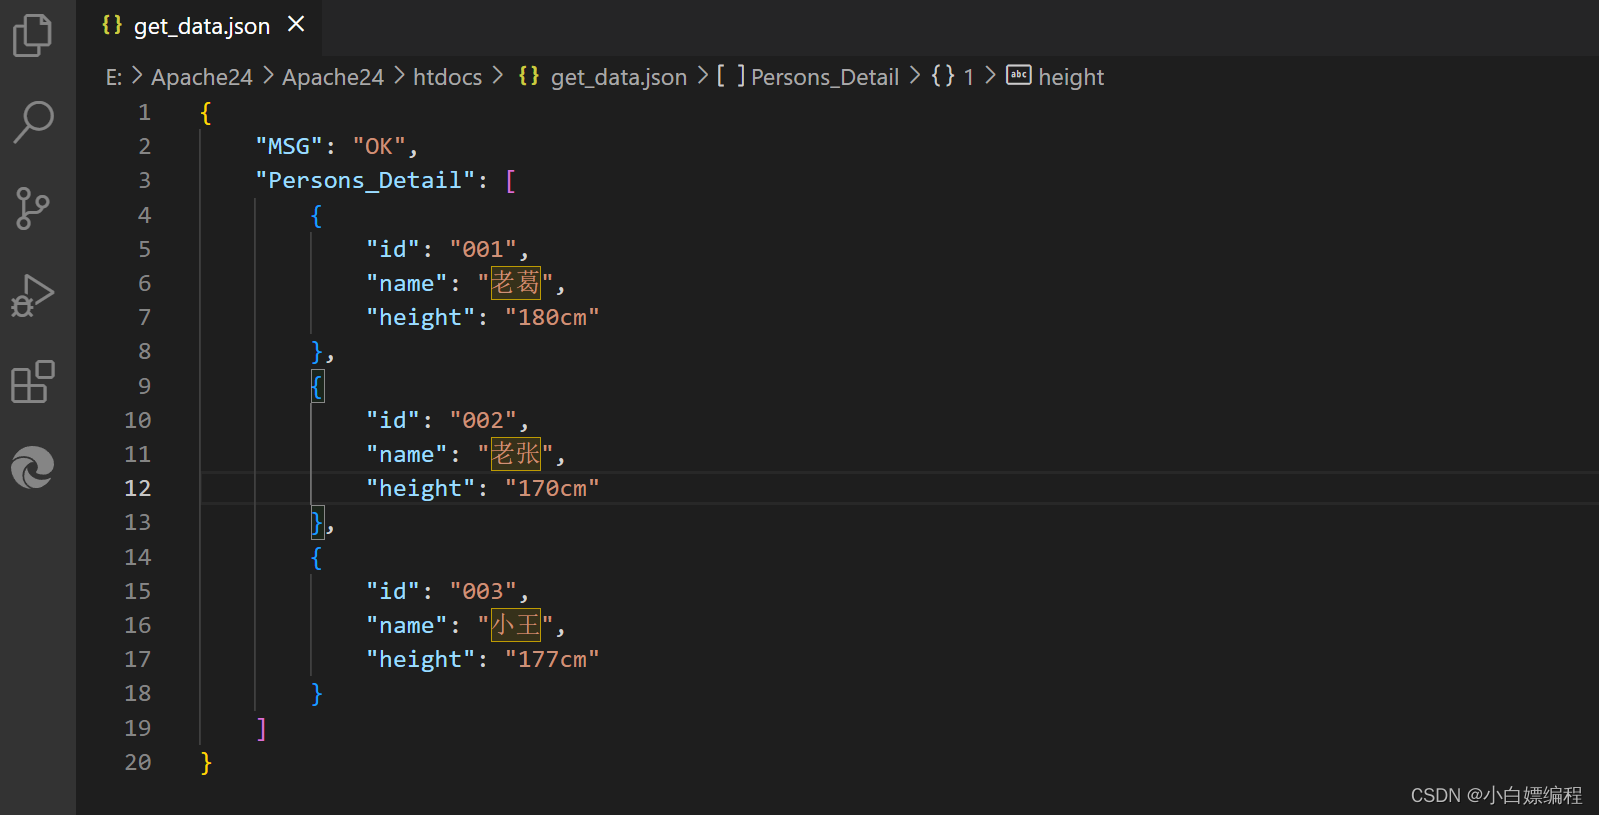
{
    "MSG": "OK",
    "Persons_Detail": [
        {
            "id": "001",
            "name": "老葛",
            "height": "180cm"
        },
        {
            "id": "002",
            "name": "老张",
            "height": "170cm"
        },
        {
            "id": "003",
            "name": "小王",
            "height": "177cm"
        }
    ]
}
1.7. After writing, we can access Apache http://127.0.0.1:8686/get_data.json

2. Code implementation preparation before accessing Apache in android studio
2.1 Add gson dependency in build.gradle
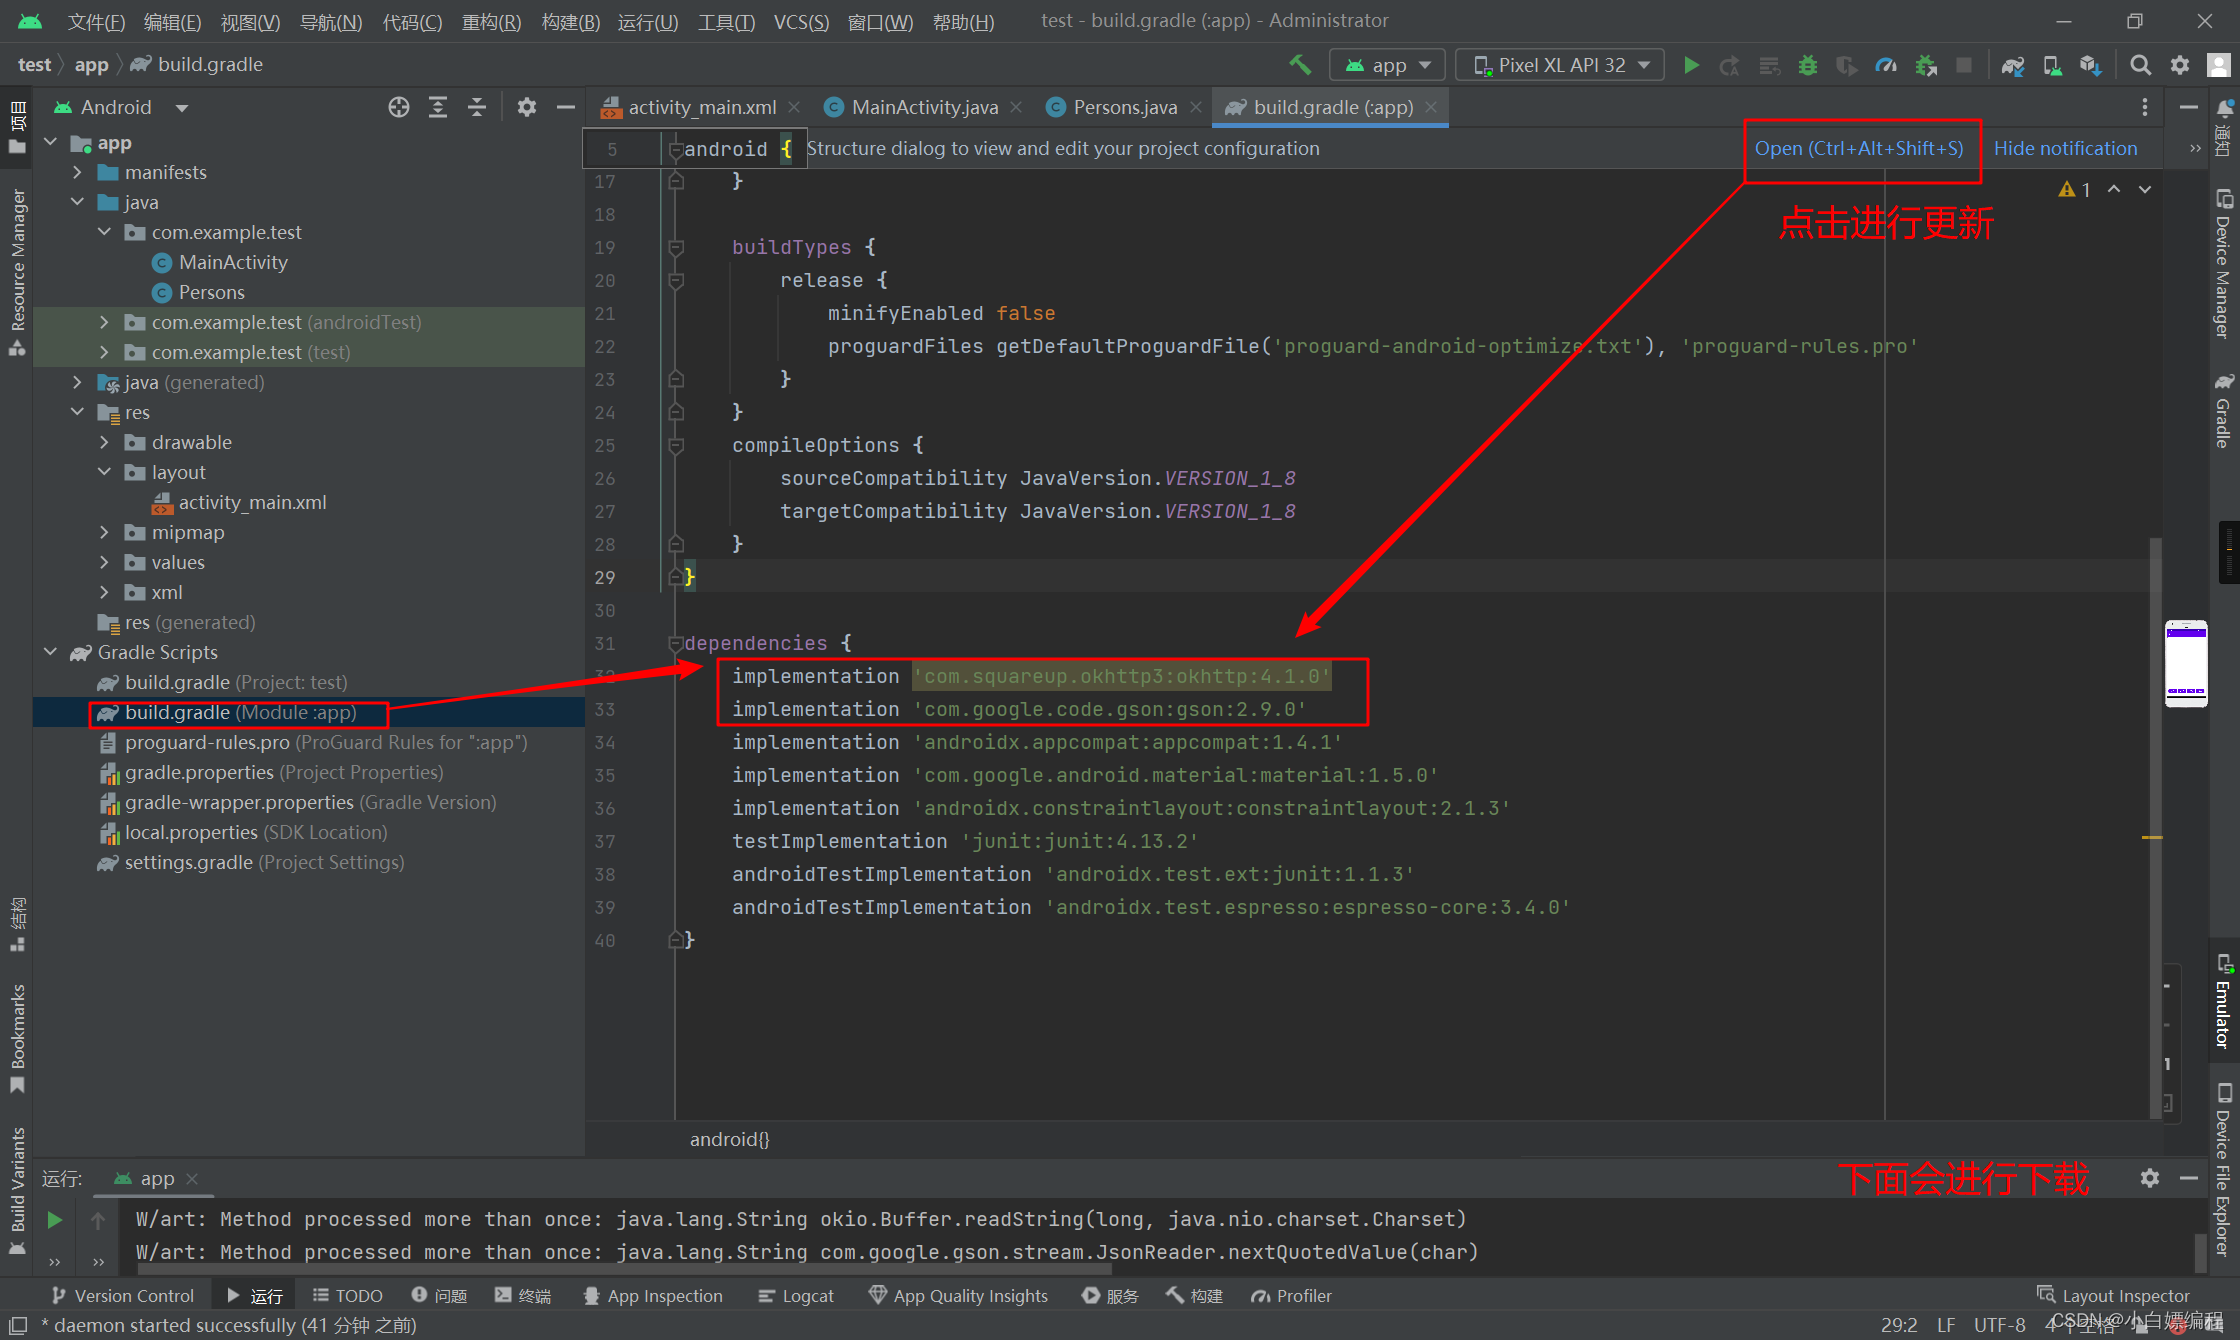
  implementation 'com.squareup.okhttp3:okhttp:4.1.0'
  implementation 'com.google.code.gson:gson:2.9.0'
Click Sync now in the upper right corner
2.2 Add plug-in Gsonformat

After the preparations are done, you can start the layout

<?xml version="1.0" encoding="utf-8"?>
<LinearLayout xmlns:android="http://schemas.android.com/apk/res/android"
xmlns:app="http://schemas.android.com/apk/res-auto"
xmlns:tools="http://schemas.android.com/tools"
android:layout_width="match_parent"
android:layout_height="match_parent"
android:orientation="vertical"
tools:context=".MainActivity">
<TextView
android:id="@+id/textView"
android:layout_width="match_parent"
android:layout_height="wrap_content"
android:gravity="center"
android:text="个人信息" />
<TextView
android:id="@+id/persons"
android:layout_width="match_parent"
android:layout_height="wrap_content"
android:gravity="center"
android:text="无" />
<Button
android:id="@+id/get_persons"
android:layout_width="wrap_content"
android:layout_height="wrap_content"
android:layout_gravity="center"
android:text="获取" />
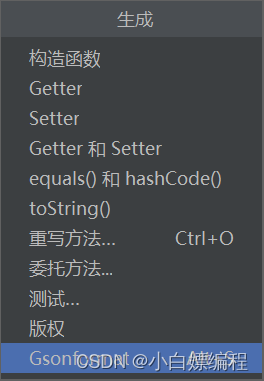
</LinearLayout>Create a Persons class, double-click to open the Persons class, right-click in the blank space and find the generation option

Click on the generation option, the generation menu will pop up, click on the Gsonformat option
Enter the following Json data, including 2 fields. The first is the call feedback field, and the second is the personal details field (when you click the Format button and the Json data can be automatically formatted , it means that there is no exception in the Json data.
Click OK, and the plug-in automatically generates the specific fields of the Persons entity class. The results are as follows

Request method sendRequest
Parsing method parseJsonWithGSON
3. Implementation method
3.1 Import classes
Import the classes you need to use in the MainActivity.java file :
import android.os.Bundle;
import android.view.View;
import android.widget.Button;
import android.widget.TextView;

import androidx.annotation.NonNull;
import androidx.appcompat.app.AppCompatActivity;

import com.google.gson.Gson;

import java.io.IOException;

import okhttp3.Call;
import okhttp3.Callback;
import okhttp3.MediaType;
import okhttp3.OkHttpClient;
import okhttp3.Request;
import okhttp3.RequestBody;
import okhttp3.Response;
2.2 Set layout and controls
Set the layout file in the onCreate() function and get the controls in the layout file:
protected void onCreate(Bundle savedInstanceState) {
    super.onCreate(savedInstanceState);
    setContentView(R.layout.activity_main);

    // 获取布局文件中的控件
    mPersons = findViewById(R.id.persons);
    mGetPersons = findViewById(R.id.get_persons);

    // 设置点击事件监听器
    mGetPersons.setOnClickListener(this);

    // 初始化回调对象
    initData();
}
Among them, mPersonsit is a TextView, used to display the network request results; mGetPersonsit is a Button, used to trigger the network request. findViewById()Get these two controls through the method.
2.3 Define callback function
Initialize the callback function ok3cb. When the network request succeeds or fails, the system will automatically call the method in the callback function:
// 初始化回调函数,该函数会在网络请求的响应成功或失败时被调用
private void initData() {
    ok3cb = new Callback() {
        @Override
        public void onFailure(@NonNull Call call, @NonNull IOException e) {
            // 在请求出错时执行的代码可以在这里编写
        }

        @Override
        public void onResponse(@NonNull Call call, @NonNull Response response) throws IOException {
            // 处理网络响应结果,此处为异步更新 UI 的示例
            runOnUiThread(new Runnable() {
                @Override
                public void run() {
                    try {
                        parseJsonWithGson(response.body().string());
                    } catch (IOException e) {
                        e.printStackTrace();
                    }
                }
            });
        }
    };
}
Among them, onFailure()the method is the method called when the network request fails; onResponse()the method is the method called when the network request succeeds. onResponse()The method is called in the method parseJsonWithGson()to parse the JSON string into a Java object and display it in the UI.
2.4 Implement click events
// 设置点击事件的回调函数
@Override
public void onClick(View v) {
    switch (v.getId()) {
        case R.id.get_persons:
            // 发送网络请求,获取 JSON 数据
            sendRequest();
            break;
    }
}sendRequest()Build and send the network request in the function
 // 发送 HTTP POST 请求,获取 JSON 数据
    private void sendRequest() {
        // 定义请求 URL(这里用了模拟器访问本机 localhost 的地址)
        String url = "http://10.0.2.2:8686/get_data.json";

        // 定义需要传递的 JSON 数据
        String json = "{\"id\": \"001\"}";

        // 创建 OkHttpClient 对象
        OkHttpClient client = new OkHttpClient();

        // 定义请求体和请求对象
        MediaType mediaType = MediaType.parse("application/json;charset=utf-8");
        RequestBody body = RequestBody.create(json, mediaType);
        Request request = new Request.Builder()
                .url(url)
                .post(body)
                .build();

        // 异步发送网络请求,并在响应成功或失败时回调 ok3cb 函数,通知应用程序处理结果
        client.newCall(request).enqueue(ok3cb);
    }
In the sendRequest() function, we define a URL to which the server will respond. Then, we define a JSON data that needs to be passed, that is, the data sent to the server. Next, we create a network connection using the OkHttpClient object provided in the OkHttp library.
Then, we set the request header information and the specific data to be uploaded, and package them together through the Request object.
Finally, we implement asynchronous requests by calling newCall()the method of the OkHttpClient object requestand bringing it into the function. At the same time, we ok3cbpass the callback function to enqueuethe function, which will automatically call back when the request is completed, notifying us that the response has arrived. After these steps, our request is complete.
The following is the complete code
package com.example.test;
// 导入需要用到的类
import android.os.Bundle;
import android.view.View;
import android.widget.Button;
import android.widget.TextView;
import androidx.annotation.NonNull;
import androidx.appcompat.app.AppCompatActivity;
import com.google.gson.Gson;
import java.io.IOException;
import okhttp3.Call;
import okhttp3.Callback;
import okhttp3.MediaType;
import okhttp3.OkHttpClient;
import okhttp3.Request;
import okhttp3.RequestBody;
import okhttp3.Response;
public class MainActivity extends AppCompatActivity implements View.OnClickListener {
private TextView mPersons;
private Button mGetPersons;
private okhttp3.Callback ok3cb;
@Override
protected void onCreate(Bundle savedInstanceState) {
super.onCreate(savedInstanceState);
setContentView(R.layout.activity_main);
// 获取布局文件中的控件
mPersons = findViewById(R.id.persons);
mGetPersons = findViewById(R.id.get_persons);
// 设置点击事件监听器
mGetPersons.setOnClickListener(this);
// 初始化回调对象
initData();
}
// 初始化回调函数,该函数会在网络请求的响应成功或失败时被调用
private void initData() {
ok3cb = new Callback() {
@Override
public void onFailure(@NonNull Call call, @NonNull IOException e) {
// 在请求出错时执行的代码可以在这里编写
}
@Override
public void onResponse(@NonNull Call call, @NonNull Response response) throws IOException {
// 处理网络响应结果,此处为异步更新 UI 的示例
runOnUiThread(new Runnable() {
@Override
public void run() {
try {
parseJsonWithGson(response.body().string());
} catch (IOException e) {
e.printStackTrace();
}
}
});
}
};
}
// 设置点击事件的回调函数
@Override
public void onClick(View v) {
switch (v.getId()) {
case R.id.get_persons:
// 发送网络请求,获取 JSON 数据
sendRequest();
break;
}
}
// 将 JSON 字符串解析为 Java 对象,并显示在 UI 中
private void parseJsonWithGson(String strJSONData) {
String ps = "";
Gson mGson = new Gson();
// 将 JSON 解析为 Persons 对象
Persons persons = mGson.fromJson(strJSONData, Persons.class);
// 将 Persons 对象中包含的信息转换为字符串
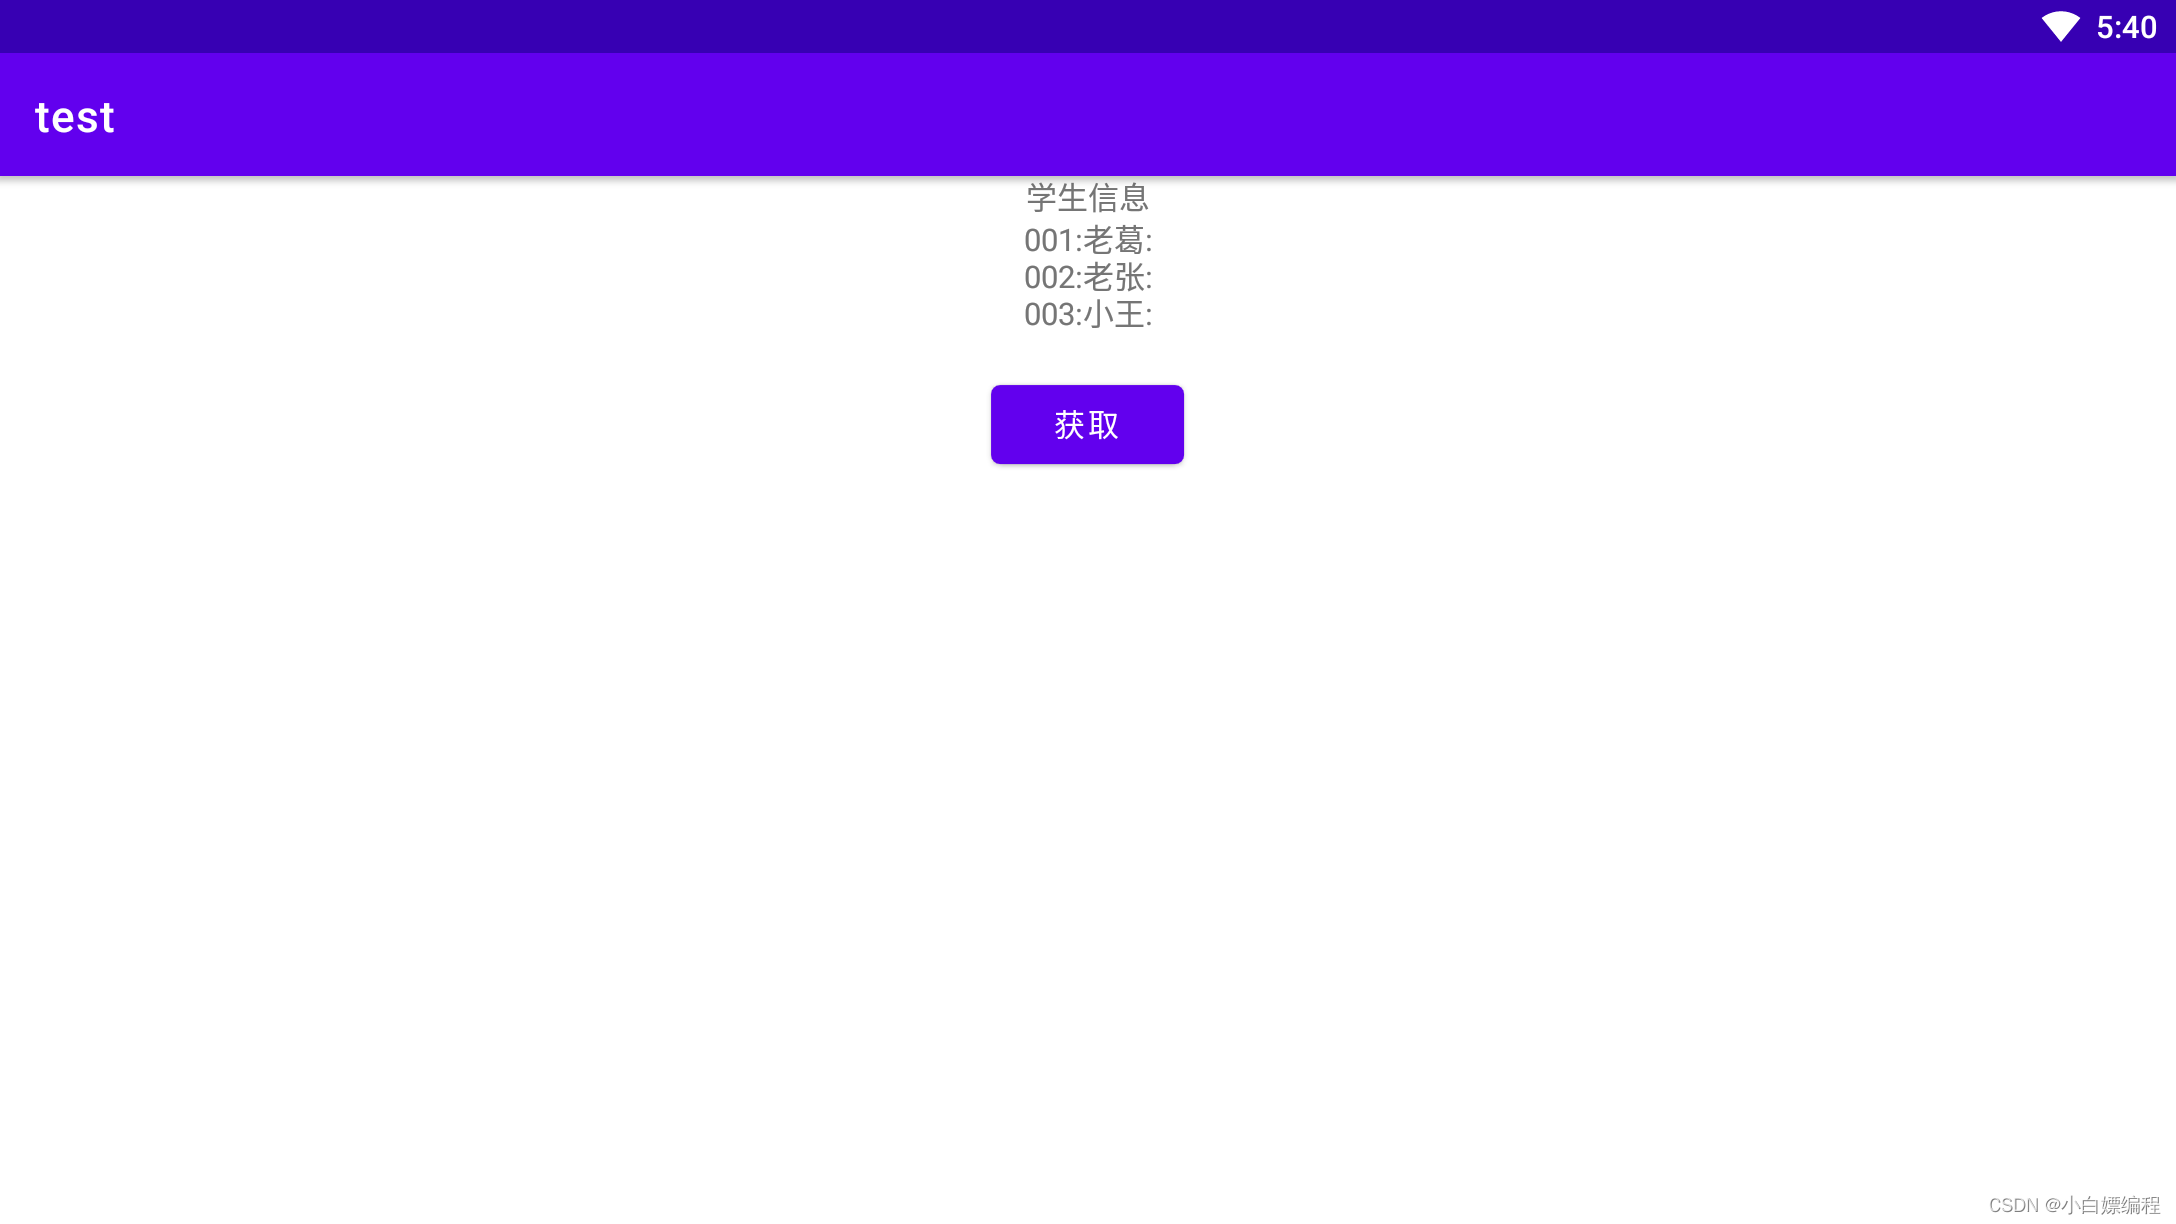
for (int i = 0; i < persons.getPersons_Detail().size(); i++) {
ps += persons.getPersons_Detail().get(i).getId() + ":";
ps += persons.getPersons_Detail().get(i).getName() + ":";
ps += "\n";
}
// 在 UI 中显示解析后的结果
mPersons.setText(ps);
}
// 发送 HTTP POST 请求,获取 JSON 数据
private void sendRequest() {
// 定义请求 URL(这里用了模拟器访问本机 localhost 的地址)
String url = "http://10.0.2.2:8686/get_data.json";
// 定义需要传递的 JSON 数据
String json = "{\"id\": \"001\"}";
// 创建 OkHttpClient 对象
OkHttpClient client = new OkHttpClient();
// 定义请求体和请求对象
MediaType mediaType = MediaType.parse("application/json;charset=utf-8");
RequestBody body = RequestBody.create(json, mediaType);
Request request = new Request.Builder()
.url(url)
.post(body)
.build();
// 异步发送网络请求,并在响应成功或失败时回调 ok3cb 函数,通知应用程序处理结果
client.newCall(request).enqueue(ok3cb);
}
}I don’t know the reason above, but the virtual phone that comes with Android cannot obtain data, but I succeeded using the mumu emulator.