Table of contents
1 SpringSecurity overview
1.1 Permissions Framework
Currently, the more popular permission frameworks on the market mainly implement Shiro and Spring Security . These two frameworks have different focuses and have their own advantages and disadvantages.
1.1.1 Apache Shiro
Apache Shiro is an open source security framework that provides authentication, authorization, cryptography, and session management. The Shiro framework is intuitive and easy to use, while also providing robust security.
Features:
Features of Shiro:
- Easy to understand Java Security API
- Simple authentication (login), supporting multiple data sources (LDAP, JDBC, Kerberos, Active Directory, etc.)
- Simple signing rights (access control) for roles, supporting fine-grained signing rights
- Supports first-level caching to improve application performance
- Built-in POJO-based enterprise session management, suitable for Web and non-Web environments
- Heterogeneous client session access
- Very simple encryption API
- Not bundled with any framework or container, can run independently
1.1.2 SpringSecurity
Spring Security is a security framework that can provide descriptive security access control solutions for Spring-based enterprise application systems. It provides a set of beans that can be configured in the Spring application context, makes full use of Spring IoC (dependency injection, also known as inversion of control) and AOP (aspect-oriented programming) functions, and provides declarative security access control functions for application systems. , reducing the effort of writing large amounts of repetitive code for enterprise system security controls.
Spring Security is a security management framework in the Spring family. Compared with another security framework Shiro, it provides richer functions and richer community resources than Shiro. General web applications require authentication and authorization. Authentication and authorization are also the core functions of Spring Security as a security framework.
Features of SpringSecurity:
- Integrating with Spring Boot is very simple.
- Powerful and highly customizable.
- Support OAuth2.0.
- Strong cryptographic ARI.
- Prevent cross-site request forgery attacks (CSRF).
- Provides Spring Cloud distributed components.
1.2 Authorization and authentication
Generally speaking, the security of web applications includes two parts: user authentication (Authentication) and user authorization (Authorization), which are also important core functions of Spring Security.
( 1) User authentication : Verify whether a user is a legal subject in the system, that is, whether the user can access the system. User authentication generally requires users to provide user names and passwords. The system completes the authentication process by verifying the username and password.
(2) User authorization : Verifying whether a user has the authority to perform an operation. After authentication, it is determined whether the current user has permission to perform a certain operation.
RBAC (Role Based Access Control) role-based access control abstracts the three concepts of "user, role, and permission" to realize the permission management method of user assignment and role assignment permission. It is also the main implementation solution of permission management in enterprises at present. .
The case is shown below:

1.3 Functions of SpringSecurity
Spring Security's support for web security relies heavily on Servlet filters. These filters intercept incoming requests and perform some security processing before the request is processed by the application. Spring Security provides several filters that can intercept Servlet requests and forward these requests to the authentication and access decision manager for processing, thereby enhancing security.
Today's Spring Security has become the most mature security system under the Spring Framework. It provides us with powerful and flexible enterprise-level security services, such as:
-
Authentication and authorization mechanism
-
Web resource access control
-
Business method call access control
-
Domain object access control Access Control List (ACL)
-
Single sign-on (Central Authentication Service)
-
Channel Security (Channel Security) management and other functions
2 Certification Principle and Process
2.1 Project introduces SpringSecurity
Simply integrating SpringSecurity in the project is very simple, just add spring-boot-starter-securitydependencies first
<dependency>
   <groupId>org.springframework.boot</groupId>
   <artifactId>spring-boot-starter-security</artifactId>
</dependency>
After introducing the dependency, any interface we try to access the system will automatically jump to a SpringSecurity default login page. The default username is userand the password will be output on the console. You must log in to access the interface.

How can we intercept all interfaces after adding this dependency?
The principle of SpringSecurity is actually a filter chain, which contains filters that provide various functions. Let's look at a simple filter chain:

UsernamePasswordAuthenticationFilter: Responsible for processing the login request after we fill in the username and password on the login page. It is mainly responsible for the certification work of entry-level cases.
ExceptionTranslationFilter:Handle any AccessDeniedException and AuthenticationException thrown in the filter chain.
FilterSecurityInterceptor: Filter responsible for permission verification.
The above only lists the main filters. The detailed process is as follows.
2.2 Detailed explanation of certification process

Authentication interface : Its implementation class represents the user currently accessing the system and encapsulates user-related information.
AuthenticationManager interface : defines the method of authenticating Authentication.
UserDetailsService interface : core interface for loading user-specific data. It defines a method to query user information based on user name loadUserByUsername(String username).
UserDetails interface : Provides core user information. UserDetailsServiceThe user information obtained and processed based on the user name must be encapsulated into a UserDetails object and returned . This information is then encapsulated into the Authentication object.
You can see that the entire process of the filter UsernamePasswordAuthenticationFilterfirst intercepts the user's request, calls the AuthenticationManagerinterface authenticatemethod to transfer the user information; calls AuthenticationProviderthe interface ( AbstractUserDetailsAuthenticationProviderwhich is its implementation class, and DaoAuthenticationProvideris the implementation class of the implementation class); in the called userDetailsServicemethod loadUserByUsername(), the corresponding user and user name are queried based on the user name. Permission information, by default, uses InMemoryUserDetailsManagerthe implementation class and searches in memory; the information is encapsulated into objects and returned layer by layer.
You can see numerous filters layered one above the other. So if we want to implement the login interface ourselves, where do we get involved?
The most important places to intervene are at the beginning and the UserDetailsService layer.
3 Custom login interface
3.1 Theoretical explanation
To implement customized login, there are two main places:
- You have to manually call the login interface on the page you wrote and perform additional operations.
UserDetailsServiceIt is not possible for the layer to query users from memory and needs to be associated with the actual permissions database.
The corresponding solutions are as follows:
- Write a login interface and call methods in it
ProviderManager.authenticate(). This interface needs to be callable without logging in, so permissions must be released. - Write an
UserDetailsServiceimplementation class, rewriteloadUserByUsername()the method, and query user information in your own permission database based on the passed user name. Encapsulated into user entity class.
The complete process is as follows:
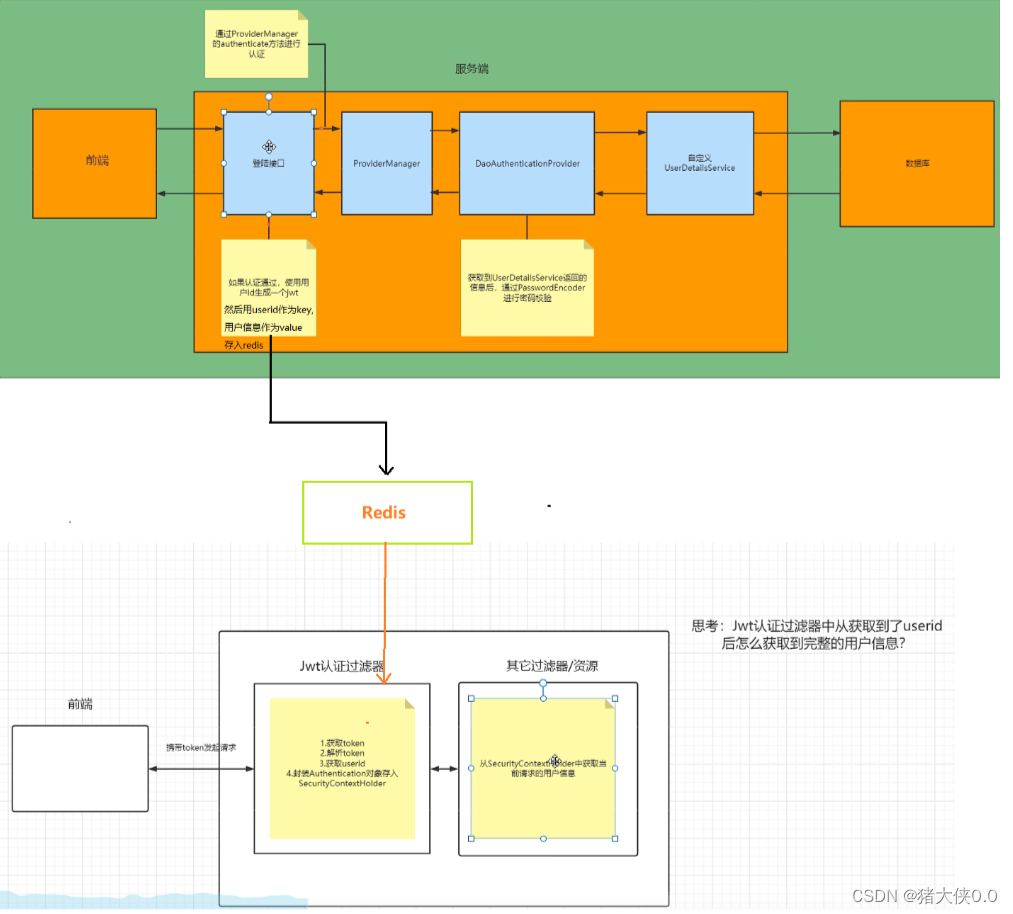
In the front-end and back-end separation, we generally use token verification. First, we call the custom login interface, and call the ProviderManager method through the custom interface for authentication. If the authentication is passed, a jwt is generated, and then the jwt is returned to the front end, and the user information is included. User permission information and other information are stored in the redis database. The reading speed of the redis database as a cache is much faster than reading user information from the database. UserDetailsServiceImplThen query the database through the implementation class we created . In addition, we also need to define a JWT authentication filter, obtain the token from the front-end request header, parse the token to obtain the userid, and then obtain the user information from redis according to the userid and store it in the SecurityContextHolder. The specific process is as follows:
3.2 Code practice
-
Define a UserDetails entity class to store user information.
import lombok.AllArgsConstructor; import lombok.Data; import lombok.NoArgsConstructor; import org.apache.commons.logging.Log; import org.apache.commons.logging.LogFactory; import org.springframework.security.core.GrantedAuthority; import org.springframework.security.core.SpringSecurityCoreVersion; import org.springframework.security.core.userdetails.UserDetails; import java.io.Serializable; import java.util.Collection; @Data @AllArgsConstructor @NoArgsConstructor public class User implements UserDetails, Serializable { private static final long serialVersionUID = SpringSecurityCoreVersion.SERIAL_VERSION_UID; private static final Log logger = LogFactory.getLog(org.springframework.security.core.userdetails.User.class); private LoginUser loginUser; @Override public Collection<? extends GrantedAuthority> getAuthorities() { return null; } @Override public String getPassword() { return loginUser.getPassword(); } @Override public String getUsername() { return loginUser.getUsername(); } @Override public boolean isAccountNonExpired() { return true; } @Override public boolean isAccountNonLocked() { return true; } @Override public boolean isCredentialsNonExpired() { return true; } @Override public boolean isEnabled() { return true; } } -
Define your own
UserDetailsServiceimplementation class, overrideloadUserByUsernamethe method, and query your own database in it.import com.project.business.userDetailsService.entity.User; import com.project.business.userDetailsService.mapper.UserMapper; import org.springframework.security.core.userdetails.UserDetails; import org.springframework.security.core.userdetails.UserDetailsService; import org.springframework.security.core.userdetails.UsernameNotFoundException; import javax.annotation.Resource; public class UserDetailsServiceImpl implements UserDetailsService { @Resource private UserMapper userMapper; @Override public UserDetails loadUserByUsername(String username) throws UsernameNotFoundException { LoginUser loginUser = userMapper.loadUserByUsername(username); //查询不到该用户信息抛异常 if(loginUser == null) { throw new RuntimeException("用户名或者密码错误"); } User user = new User(loginUser); return user; } } -
Custom login interface
We need to customize the login interface, and then let SpringSecurity release this interface so that users can access this interface without logging in.
In the interface, we use
AuthenticationManagertheauthenticatemethod to perform user authentication, so we need to configure the AuthenticationManager to be injected into the container in SecurityConfig. If the authentication is successful, a jwt, or token, must be generated and returned in the response. And in order to allow the user to identify the specific user through jwt when making next request, we need to store the user information in redis for a validity period of 30 minutes, and the user ID can be used as the key. When accessing after logging in, the background will parse the user's userid based on the token and query it in redis to determine whether the user has logged in.The login interface code is as follows:
@RestController
@RequestMapping("/user")
public class LoginController {


    @Autowired
    private RedisTemplate redisTemplate;

    @Autowired
    private AuthenticationManager authenticationManager;

    private static final String USER_PREFIX = "login:";


    @PostMapping("/login")
    public Result login(@RequestBody LoginUser loginUser) {


        //通过AuthenticationManager的authenticate方法来进行用户认证
        UsernamePasswordAuthenticationToken usernamePasswordAuthenticationToken = new UsernamePasswordAuthenticationToken(loginUser.getUsername(), loginUser.getPassword());
        Authentication authenticate = authenticationManager.authenticate(usernamePasswordAuthenticationToken);
        if (authenticate == null) {


            return Result.error(401, "登录校验失败");
        } else {


            //获取用户信息
            User user = (User) authenticate.getPrincipal();
            //获取用户id
            Long id = user.getLoginUser().getId();
            //根据用户id生成token
            String token = JwtUtil.createJWT(id.toString());
            //将token放在redis中
            redisTemplate.opsForValue().set(USER_PREFIX + String.valueOf(id),user,30, TimeUnit.MINUTES);
            return Result.ok("登录成功,返回token").put("token", token);
        }
    }
}
Let Security
user/logingrant accesspublic class SecurityConfig extends WebSecurityConfigurerAdapter { @Bean @Override public AuthenticationManager authenticationManagerBean() throws Exception { return super.authenticationManagerBean(); } /** * @param http * @throws Exception */ @Override protected void configure(HttpSecurity http) throws Exception { http //关闭csrf .csrf().disable() //不通过Session获取SecurityContext .sessionManagement().sessionCreationPolicy(SessionCreationPolicy.STATELESS) .and() .authorizeRequests() // 对于登录接口 允许匿名访问 .antMatchers("/user/login").anonymous() // 除上面外的所有请求全部需要鉴权认证 .anyRequest().authenticated(); } } -
Subsequent access interface token authentication
So far, the first login has been successful. How can we judge that the user who has logged in after that will not be intercepted by springsecurity?
Idea:
All subsequent requests sent will have a token in the request header. You need to customize a filter with a higher priority. This filter will obtain the token in the request header, parse the token, extract the userid, and go to the previous step. Query in the redis (or other library) stored in it. If it can be found that the representative has logged in before, no re-authentication is required. The encapsulated Authentication object is stored in the SecurityContextHolder. Then springsecurity's own filter will
SecurityContextHolderdetermine whether it has logged in by obtaining the information; if not It says that you are not logged in or your login has expired and you need to authenticate again.filter
@Component
public class JwtAuthenticationTokenFilter extends OncePerRequestFilter {


    @Resource
    private RedisTemplate redisTemplate;

    private static final String USER_PREFIX = "login:";

    @Override
    protected void doFilterInternal(HttpServletRequest request, HttpServletResponse response, FilterChain filterChain) throws ServletException, IOException {


        //获取token
        String token = request.getHeader("token");
        if (!StringUtils.hasText(token)) {


            //放行
            filterChain.doFilter(request, response);
            return;
        }
        //解析token
        String userid;
        try {


            Claims claims = JwtUtil.parseJWT(token);
            userid = claims.getSubject();
        } catch (Exception e) {


            e.printStackTrace();
            throw new RuntimeException("token非法");
        }
        //从redis中获取用户信息
        String redisKey = USER_PREFIX + userid;
        JSONObject jsonObject = (JSONObject) redisTemplate.opsForValue().get(redisKey);
        User user = JSONObject.parseObject(jsonObject.toJSONString(), User.class);
        if(Objects.isNull(user)){


            throw new RuntimeException("用户未登录");
        }
        //存入SecurityContextHolder
        //获取权限信息封装到Authentication中
        UsernamePasswordAuthenticationToken authenticationToken =
                new UsernamePasswordAuthenticationToken(user,null,null);
        SecurityContextHolder.getContext().setAuthentication(authenticationToken);
        //放行
        filterChain.doFilter(request, response);
    }
}
The filter must be added to the configuration and placed
UsernamePasswordAuthenticationFilterin front, because the UsernamePasswordAuthenticationFilter filter is the first in the security filter chain, and the user status must be stored before itSecurityContextHolder.@Configuration public class SecurityConfig extends WebSecurityConfigurerAdapter { @Resource private JwtAuthenticationTokenFilter jwtAuthenticationTokenFilter; @Override protected void configure(HttpSecurity http) throws Exception { //此行要和上面配置文件中该方法中的内容写在一块,此处为了省略篇幅不都粘过来了 http.addFilterBefore(jwtAuthenticationTokenFilter, UsernamePasswordAuthenticationFilter.class); } }
3.3 Interface testing
Before calling user/loginthe login interface, other interfaces cannot be accessed, and 403, Forbidden is reported. At this time, the login interface is called.


It can be seen that the login interface is called successfully and returns a token generated based on the userId, and the login user information is stored in redis and expires in 30 minutes. During these 30 minutes, you can access other interfaces normally by carrying the request header token.

Change encryption method
In the above example, plain text comparison is used. When testing, add {noop} before the password to indicate plain text comparison.
-
In actual projects, plaintext is generally not stored in the database, but is encrypted, so the PasswordEncoder needs to be replaced.
-
We generally use what SpringSecurity provides us
BCryptPasswordEncoder. -
We only need to inject the BCryptPasswordEncoder object into the Spring container, and SpringSecurity will use the PasswordEncoder for password verification.
-
SecurityConfigWe can inject objects into the configuration class we just createdBCryptPasswordEncoder.@Configuration public class SecurityConfig extends WebSecurityConfigurerAdapter { @Bean public PasswordEncoder passwordEncoder(){ return new BCryptPasswordEncoder(); } }
You can use it to encrypt and store it in the database first, and then log in again and the comparison will still be successful.
