
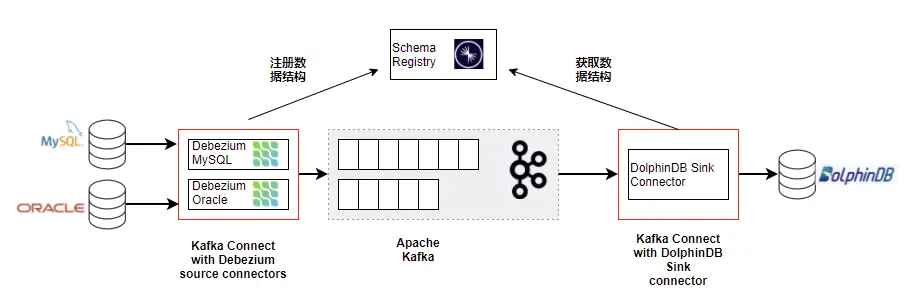
Debezium is an open source, distributed platform for capturing and publishing database change events in real time. It can convert change events from relational databases (such as MySQL, PostgreSQL, Oracle, etc.) into observable streaming data for real-time consumption and processing by other applications. In this article we will use a combination of Debezium and Kafka to achieve data synchronization from MySQL to DolphinDB.
The data synchronization solution of Kafka + Debezium requires the deployment of 4 services, as shown below
- ZooKeeper: kafka dependency deployment
- Kafka:Quantity saving account
- Kafka-Connect: A framework for accessing data plug-ins source-connetor and sink-connector, which can provide high availability. A single instance version can also be deployed.
- Schema-Registry : Provides metadata registration function for real-time synchronized data and supports data serialization.
The data architecture diagram based on Debezium is as follows:
Next, this article will introduce the downloading, installation, and configuration data synchronization tasks of these services one by one.
Deploy Kafka single-instance real-time data storage
The entire architecture based on Kafka supports high-availability clusters. However, even if a single instance of the service is deployed, the data synchronization task can be achieved.
This article will introduce data synchronization using single instance storage.
Deployment preparation
First download the program package, Zookeeper (open source), Kafka (open source), Confluent (community version), you can go to the official website to download the latest stable version.
and place the following 4 software packages in the /opt directory. (There are many software, configuration, and data path files.Note: Please try to keep the path consistent during the first trial.)
- jdk-17.0.7_linux-x64_bin.tar.gz
- apache-zookeeper-3.7.1-bin.tar.gz
- kafka_2.13-3.4.1.tgz (download scala 2.13 version)
- confluent-community-7.4.0.tar.gz
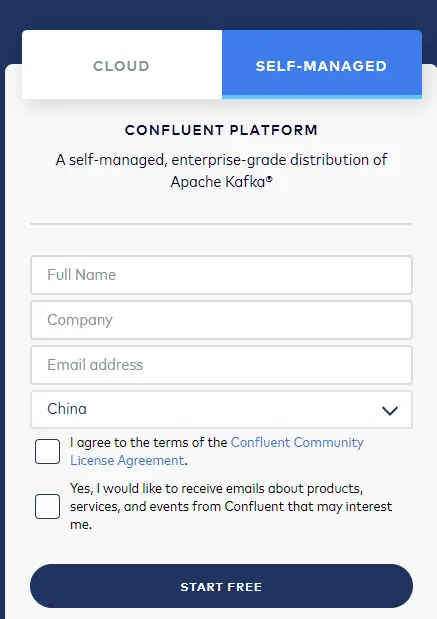
Confluent downloading is a little more troublesome. You need to select self-managed and then enter the information and click start free to download. Note that downloading the community version will meet your needs. We only need the schema-registry package inside. Of course, if you need better features, you can also download the official version. The official version includes Zookeeper, Kafka, and more functions for managing and monitoring Kafka. Confluent is a commercial company related to Kafka.
After downloading the above 4 packages, we can start deployment.
Deploy Zookeeper
Basic preparation
Step 1: Create a deployment user
Create user kafka and grant sudo password-free permissions (you need to set it yourself). Then switch to the kafka user to perform operations (the following operations are all kafka user operations).
useradd kafka
su kafka
Step 2: Install and deploy the java environment
Install java to the path /opt/java17. All programs involved in the entire architecture are run based on the java virtual machine. So java must be installed.
cd /opt
sudo mkdir -p /usr/local/java
sudo tar -xvf jdk-17.0.7_linux-x64_bin.tar.gz
sudo mv jdk-17.0.7 /usr/local/java/java17
Set java environment variables (executed under kafka user).
vim ~/.bashrc
# 输入下面代码
JAVA_HOME=/usr/local/java/java17
PATH=$JAVA_HOME/bin:$PATH
export JAVA_HOME PATH

source ~/.bashrc
java --version
Install ZooKeeper
Step 1: Unzip and install Zookeeper
Zookeeper users and groups in version 3.7.1 have default values, and we need to adjust them here.
cd /opt
sudo tar -xvf apache-zookeeper-3.7.1-bin.tar.gz
sudo mv apache-zookeeper-3.7.1-bin zookeeper
sudo chown -R root:root zookeeper
sudo chmod -R 755 zookeeper
Step 2: Prepare Zookeeper configuration files and storage files
Create storage paths for zookeeper's configuration files, data files, and log files. Please try to keep the paths consistent. At the end of the article, there is a package of all program configuration files.
sudo mkdir -p /KFDATA/zookeeper/etc
sudo mkdir -p /KFDATA/zookeeper/data
sudo mkdir -p /KFDATA/zookeeper/datalog
sudo mkdir -p /KFDATA/zookeeper/logs
sudo chown -R kafka:kafka /KFDATA
chmod -R 700 /KFDATA/zookeeper
Prepare the zookeeper configuration filezoo.cfg. First copylog4j.properties from the zookeeper installation path, and then modify it.
Note: Different versions of zookeeperlog4j.propertiesThe configuration content will be slightly different. If there is any difference, please adjust according to the rules of log4j.
cd /KFDATA/zookeeper/etc
touch zoo.cfg
echo tickTime=2000 > zoo.cfg
echo initLimit=10 >>zoo.cfg
echo syncLimit=5 >>zoo.cfg
echo  dataDir=/KFDATA/zookeeper/data >>zoo.cfg
echo  dataLogDir=/KFDATA/zookeeper/datalog >>zoo.cfg
echo  clientPort=2181 >>zoo.cfg
sudo cp /opt/zookeeper/conf/log4j.properties ./
sudo chown kafka:kafka ./log4j.propertiesRevisedlog4j.propertiesneutralzookeeper.log.dirReference number
Step 3: Create Zookeeper startup file
Create azk.env and configure the environment variables required to start Zookeeper for starting theservice File call.
cd /KFDATA/zookeeper/etc/
touch zk.env
echo JAVA_HOME=/usr/local/java/java17 > zk.env
echo PATH="/usr/local/java/java17/bin:/opt/zookeeper/bin:/usr/local/bin:/bin:/usr/bin:/usr/local/sbin:/usr/sbin" >> zk.env
echo ZOO_LOG_DIR=/KFDATA/zookeeper/logs >> zk.env
echo ZOO_LOG4J_OPTS=\"-Dlog4j.configuration=file:/KFDATA/zookeeper/etc/log4j.properties\" >> zk.env
If you are very familiar with Zookeeper, you can call the operation script in the bin folder in the Zookeeper installation directory to perform operations or tests.
UseInstruction set one pieceservicetext item. vim
sudo vim /usr/lib/systemd/system/zookeeper.serviceEnter the following startup command information and save it.
[Unit]
Description=Apache Kafka - ZooKeeper
After=network.target

[Service]
Type=forking
User=kafka
Group=kafka
EnvironmentFile=/KFDATA/zookeeper/etc/zk.env
ExecStart=/opt/zookeeper/bin/zkServer.sh start /KFDATA/zookeeper/etc/zoo.cfg
ExecStop=/opt/zookeeper/bin/zkServer.sh stop /KFDATA/zookeeper/etc/zoo.cfg
TimeoutStopSec=180
Restart=no


[Install]
WantedBy=multi-user.target
Reload service to start the service.
sudo systemctl daemon-reloadStep 4: Create a test script
(1) Create a connection Zookeeper test filezkCon.sh.
mkdir -p /KFDATA/bin
cd /KFDATA/bin
touch zkCon.sh
echo export JAVA_HOME=/usr/local/java/java17 >zkCon.sh
echo export PATH="{$JAVE_HOME}/bin:/opt/zookeeper/bin:/usr/local/bin:/bin:/usr/bin:/usr/local/sbin:/usr/sbin" >>zkCon.sh
echo export ZOO_LOG_DIR=/KFDATA/zookeeper/logs >>zkCon.sh
echo export ZOO_LOG4J_OPTS=\"-Dlog4j.configuration=file:/KFDATA/zookeeper/etc/log4j.properties\" >>zkCon.sh
echo  '/opt/zookeeper/bin/zkCli.sh -server localhost:2181 -Dzookeeper.config.path=/KFDATA/zookeeper/zoo.cfg' >>zkCon.sh
Grant execute permissions to the script.
chmod +x zkCon.sh Deploy and start Zookeeper
Step 1: Start the Zookeeper service through the systemctl tool.
sudo systemctl start zookeeper.serviceStep 2: Check Zookeeper startup status
You can view the java process through the command. The QuorumPeerMain process is the startup process of Zookeeper. jps
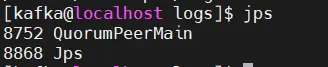
can also be viewed through the command, as shown in the figure, which shows normal startup. systemctl
sudo systemctl status zookeeper
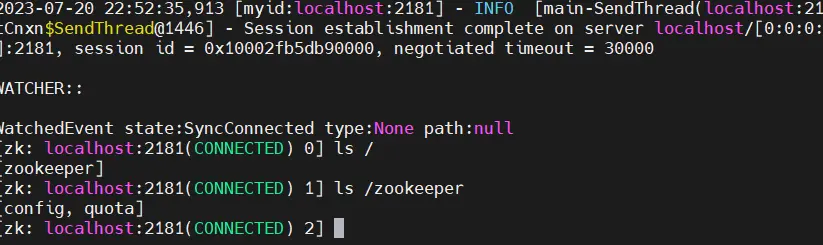
Step 3: Connect to Zookeeper through the client and view it.
cd /KFDATA/bin/
./zkCon.sh
# 等待 zookeeper 命令行窗口
ls /
ls /zookeeper
If the following display is returned, it means that Zookeeper is started successfully and you can observe its own basic information in Zookeeper.
ctrl +c can exit the Zookeeper client connection.
Deploy Kafka
Install Kafka
Step 1: Unzip and install Kafka files
Execute the following command to modify the Kafka installation file name.
cd /opt
sudo tar -xvf kafka_2.13-3.4.1.tgz
sudo mv kafka_2.13-3.4.1 kafka
Step 2: Prepare Kafka configuration files and storage files
Create the storage path for Kafka's configuration files, data files, and log files.
mkdir -p /KFDATA/kafka/etc
mkdir -p /KFDATA/kafka/data
mkdir -p /KFDATA/kafka/logs
Prepare Kafka related configuration files, create startup configuration files, and log configuration files.
cd /KFDATA/kafka/etc
touch kafka-server.properties
cp /opt/kafka/config/log4j.properties ./
cp /opt/kafka/config/tools-log4j.properties ./Modifykafka-server.propertiesThe configuration in the file has many modifications. The file is as follows. You can also enter it yourself.
############################# Server Basics #############################
broker.id=1
############################# Socket Server Settings #############################
listeners=PLAINTEXT://0.0.0.0:9092
advertised.listeners=PLAINTEXT://192.168.189.130:9092
num.network.threads=3
num.io.threads=8
socket.send.buffer.bytes=102400
socket.receive.buffer.bytes=102400
socket.request.max.bytes=104857600
############################# Log Basics #############################
log.dirs=/KFDATA/kafka/data
num.partitions=1
num.recovery.threads.per.data.dir=1
############################# Internal Topic Settings  #############################
offsets.topic.replication.factor=1
transaction.state.log.replication.factor=1
transaction.state.log.min.isr=1
############################# Log Retention Policy #############################
log.retention.hours=-1
log.retention.bytes=21474836480
log.segment.bytes=1073741824
log.retention.check.interval.ms=300000
auto.create.topics.enable=true
############################# Zookeeper #############################
zookeeper.connect=192.168.189.130:2181
# Timeout in ms for connecting to zookeeper
zookeeper.connection.timeout.ms=12000
############################# Group Coordinator Settings #############################
group.initial.rebalance.delay.ms=0
############################# message Settings #############################
message.max.byte=5242880
The following two items need to be modified depending on the specific environment. advertise.listeners is the external listening port.
advertised.listeners=PLAINTEXT://192.168.189.130:9092
zookeeper.connect=192.168.189.130:2181
Step 3: Prepare Kafka startup files
Create an environment variable file for Kafka startup. The JMX monitoring port is configured here. If not needed, you can ignore the last two configurations.
The function of the JMX port is that you can connect through this port to obtain some monitoring indicators.
cd /KFDATA/kafka/etc
touch kf-server.env

echo PATH="/usr/local/java/java17/bin:/opt/zookeeper/bin:/opt/kafka:/usr/local/bin:/bin:/usr/bin:/usr/local/sbin:/usr/sbin" >>kf-server.env
echo LOG_DIR="/KFDATA/kafka/logs/" >>kf-server.env
echo KAFKA_LOG4J_OPTS=\"-Dlog4j.configuration=file:/KFDATA/kafka/etc/log4j.properties\" >>kf-server.env
echo KAFKA_JMX_OPTS=\"-Dcom.sun.management.jmxremote=true -Dcom.sun.management.jmxremote.authenticate=false -Dcom.sun.management.jmxremote.ssl=false -Djava.rmi.server.hostname=192.168.189.130 -Djava.net.preferIPv4Stack=true\" >>kf-server.env
echo JMX_PORT=29999 >>kf-server.env
Create Kafka'ssystemd servicefile,open a file. vim
sudo vim /usr/lib/systemd/system/kafka-server.serviceEnter the following content and save.
[Unit]
Description=Apache Kafka - broker
After=network.target confluent-zookeeper.target

[Service]
Type=forking
User=kafka
Group=kafka
EnvironmentFile=/KFDATA/kafka/etc/kf-server.env
ExecStart=/opt/kafka/bin/kafka-server-start.sh -daemon /KFDATA/kafka/etc/kafka-server.properties
ExecStop=/KFDATA/kafka/bin/kafka-server-stop.sh
LimitNOFILE=1000000
TimeoutStopSec=180
Restart=no

[Install]
WantedBy=multi-user.target
Reload service to start the service.
sudo systemctl daemon-reloadDeploy and start Kafka
Step 1: Start the Kafka service through the systemctl tool
Execute the following command to start the Kafka service:
sudo systemctl start kafka-server.serviceStep 2: Check Kafka startup status
To check the startup status of Kafka, you can connect to the Zookeeper client. View data in zookeeper.
cd /KFDATA/bin
./zkCon.sh
ls /
You can see that Zookeeper has added some kafka registration information, such as brokers, clusterer, config, controller, etc.
At this point, you can create a topic for testing:
cd  /opt/kafka/bin
./kafka-topics.sh --bootstrap-server 192.168.189.130:9092 --create --topic test110
Execute the following code to view the current topic list in Kafka:
./kafka-topics.sh --bootstrap-server 192.168.189.130:9092 --listIf the above image display content is returned, it means that Kafka has been started successfully.
Deploy Schema-Registry
Schema-Registry is used to register the data structure of transmitted data. And record every version of the data structure changes. Writing data to and reading data from Kafka requires data structures recorded in the schema-registry for serialization and deserialization. Register data structures by using schema-registry. Kafka only needs to save the serialized data. It can reduce the space occupied by data.
Install Schema-Registry
Step 1: Unzip and install the Schema-Registry file
The Schema-Registry program is part of the confluent package. So here we need to install conluent, the community version is enough. Unzipconfluent-community-7.4.0.tar.gz, modify the file name, and set the membership group.
cd /opt
sudo tar -xvf confluent-community-7.4.0.tar.gz
sudo mv confluent-7.4.0 confluent
sudo chown -R root:root confluent
sudo chmod -R 755 confluent
Step 2: Prepare Schema-Registry configuration files and storage files
Create the schema-registry configuration and log file storage path.
mkdir -p /KFDATA/schema-registry/etc
mkdir -p /KFDATA/schema-registry/logs
Prepare the configuration file for schema-registry.
cd /KFDATA/schema-registry/etc
cp /opt/confluent/etc/schema-registry/schema-registry.properties ./
cp /opt/confluent/etc/schema-registry/log4j.properties ./Modifyschema-registry.properties file and modify the connected Kafka Server address.

Step 3: Prepare Schema-Registry startup file
Create a Schema-Registry startup environment variable file for use when Schema-Registry is started.
touch schema-registry.env
echo PATH="/usr/local/java/java17/bin:/opt/confluent/bin:/usr/local/bin:/bin:/usr/bin:/usr/local/sbin:/usr/sbin" >schema-registry.env
echo LOG_DIR="/KFDATA/schema-registry/logs" >>schema-registry.env
echo LOG4J_DIR="/KFDATA/schema-registry/etc/log4j.properties" >>schema-registry.env
echo SCHEMA_REGISTRY_LOG4J_OPTS=\"-Dlog4j.configuration=file:/KFDATA/schema-registry/etc/log4j.properties\" >>schema-registry.env
Create the systemd service startup file of Schema-Registry.
sudo vim /usr/lib/systemd/system/schema-registry.serviceEnter the following content and save.
[Unit]
Description=RESTful Avro schema registry for Apache Kafka
After=network.target

[Service]
Type=forking
User=kafka
Group=kafka
EnvironmentFile=/KFDATA/schema-registry/etc/schema-registry.env
ExecStart=/opt/confluent/bin/schema-registry-start -daemon /KFDATA/schema-registry/etc/schema-registry.properties
TimeoutStopSec=180
Restart=no

[Install]
WantedBy=multi-user.target
Reload service to start the service.
sudo systemctl daemon-reloadDeployment startup Schema-Registry
Step 1: Start the Schema-Registry service through the systemctl tool
Execute the following command
sudo systemctl start schema-registryStep 2: Check Schema-Registry startup status
Check the startup status through the systemctl tool.
sudo systemctl status schema-registry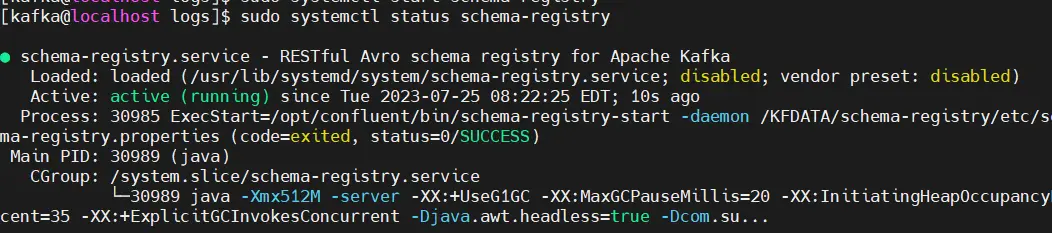
View topics in Kafka
cd /opt/kafka/bin
./kafka-topics.sh --bootstrap-server 192.168.189.130:9092 --list
You can see that the topics that need to be used by schema-registry have been created in kafka.

schema-registry started successfully.
Deploy Kafka-Connect
Kafka-Connect is the HA framework provided by Kafka. It implements the connector of the Kafka-Connect interface and only needs to handle the tasks of reading and writing data that it needs. The high availability part is taken care of by the kafka-connect framework.
Kafka-Connect is available via rest api.
Install Kafka-Connect
Step 1: Kafka-Connect installation
Kafka-Connect is provided by Kafka, and the startup program already exists in the installation path of Kafka. Data metadata registration is handled by schema-registry. The corresponding serialization package is in the installed Confluent path. So there is no need to install the package anymore.
Step 2: Prepare Kafka-Connect configuration files and storage files
Create Kafka-Connect configuration and log file storage path
mkdir -p /KFDATA/kafka-connect/etc
mkdir -p /KFDATA/kafka-connect/logs
Create a configuration file for Kafka-Connect
cd /KFDATA/kafka-connect/etc
vim kafka-connect.properties
Enter the following content and save. The IP address part needs to be modified according to the current environment.
bootstrap.servers=192.168.189.130:9092
group.id=connect-cluster

key.converter=io.confluent.connect.avro.AvroConverter
key.converter.schema.registry.url=http://192.168.189.130:8081
value.converter=io.confluent.connect.avro.AvroConverter
value.converter.schema.registry.url=http://192.168.189.130:8081
key.converter.schemas.enable=true
value.converter.schemas.enable=true

internal.key.converter=org.apache.kafka.connect.json.JsonConverter
internal.value.converter=org.apache.kafka.connect.json.JsonConverter
internal.key.converter.schemas.enable=false
internal.value.converter.schemas.enable=false

config.storage.topic=connect-configs
offset.storage.topic=connect-offsets
status.storage.topic=connect-statuses
config.storage.replication.factor=1
offset.storage.replication.factor=1
status.storage.replication.factor=1

plugin.path=/opt/confluent/share/java/plugin
rest.host.name=192.168.189.130
rest.port=8083
rest.advertised.host.name=192.168.189.130
rest.advertised.port=8083

offset.flush.timeout.ms=50000
offset.flush.interval.ms=10000
send.buffer.bytes=13107200
consumer.max.poll.records=10000
consumer.partition.assignment.strategy=org.apache.kafka.clients.consumer.CooperativeStickyAssignor
Create the log4j configuration file for Kafka-Connect.
cd /KFDATA/kafka-connect/etc
cp /opt/kafka/config/connect-log4j.properties ./log4j.properties
Modify the following parameter configuration in the file
vim ./log4j.properties
log4j.appender.connectAppender.File=${kafka.logs.dir}/connect.log
Modify it to
log4j.appender.connectAppender.File=/KFDATA/kafka-connect/logs/connect.logStep 3: Prepare the startup file for Kafka-Connect
Create a Kafka-Connect startup environment variable file.
cd /KFDATA/kafka-connect/etc
touch kafka-connect.env

echo PATH="/usr/local/java/java17/bin:/usr/local/bin:/bin:/usr/bin:/usr/local/sbin:/usr/sbin" >kafka-connect.env
echo LOG_DIR="/KFDATA/kafka-connect/logs/" >>kafka-connect.env
echo LOG4J_DIR="/KFDATA/kafka-connect/etc/log4j.properties" >>kafka-connect.env
echo KAFKA_LOG4J_OPTS=\"-Dlog4j.configuration=file:/KFDATA/kafka-connect/etc/log4j.properties\" >>kafka-connect.env
echo CLASSPATH=/opt/confluent/share/java/schema-registry/*:/opt/confluent/share/java/kafka-serde-tools/*:/opt/confluent/share/java/confluent-common/* >>kafka-connect.env
echo JMX_PORT=29998 >>kafka-connect.env
Create the systemd service file of Kafka-Connect
sudo vim /usr/lib/systemd/system/kafka-connect.serviceEnter the following content and save.
[Unit]
Description=Apache Kafka Connect - distributed
After=network.target

[Service]
Type=simple
User=kafka
Group=kafka
EnvironmentFile=/KFDATA/kafka-connect/etc/kafka-connect.env
ExecStart=/opt/kafka/bin/connect-distributed.sh /KFDATA/kafka-connect/etc/kafka-connect.properties
TimeoutStopSec=180
Restart=no

[Install]
WantedBy=multi-user.target
Reload service to start the service.
sudo systemctl daemon-reloadDeploy and start Kafka-Connect
Step 1: Start the Kafka-Connect service through the systemctl tool
Execute the following command
sudo systemctl start kafka-connect.serviceStep 2: Check the startup status of Kafka-Connect
Check the startup status through command jps
jps -mlvV |grep connect
Check the topic situation in Kafka. Kafka-Connect will create three topics: connect-configs, connect-offsets, and connect-statuses in Kafka.
cd  /opt/kafka/bin
./kafka-topics.sh --bootstrap-server 192.168.189.130:9092 --list
Use command to access kafka-connect. You can see that we have not configured the connector task yet curl
curl -H "Accept:application/json" 192.168.189.130:8083/connectors/Deploy MySQL data synchronization to Kafka
MySQL data synchronization includes initial full synchronization and CDC real-time incremental synchronization.
Full synchronization: Write all the data of the selected table to Kafka in the form of Insert. It is recommended not to operate the database at this time.
CDC real-time incremental synchronization: read MySQL's binlog log in real time from the transaction sequence number recorded during full synchronization, and write the incremental Load data into Kafka.
Install the Debezium-MySQL connector plugin
Configuring and starting the Debezium-MySQL connector requires the following two steps:
- Download and install the Debezium-MySQL plug-in, and configure the plug-in path into the Kafka Connect configuration file.
- Restart the Kafka Connect program to load the plugin.
Step 1: Download and install the Debezium-MySQL plug-in
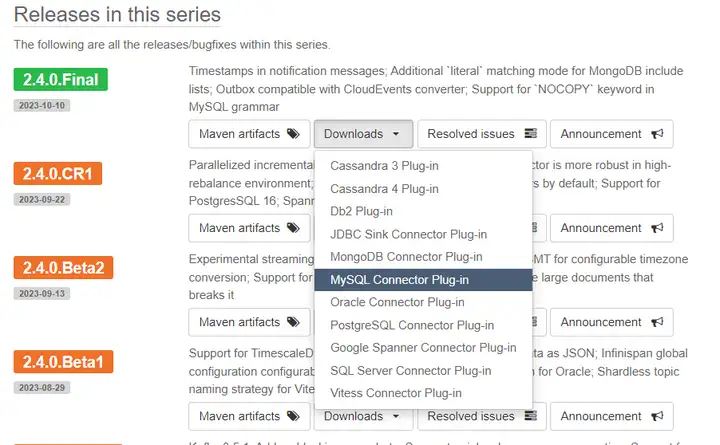
Official websiteDebezium, select the latest stable version to download.
Select MySQL Connector Plug-in
Create a plug-in path (deploy kafka, kafka user of kafka-connnect environment), and unzip Debezium’s MySQL plug-in package under this path
sudo mkdir -p /opt/confluent/share/java/plugin
cd /opt/confluent/share/java/plugin
sudo tar -xvf debezium-connector-mysql-2.3.2.Final-plugin.tar.gz
rm ./debezium-connector-mysql-2.3.2.Final-plugin.tar.gz
Step 2: Configure Kafka-Connect to load the plug-in
Modify the Kafka Connect configuration file and add plugin path configuration
cd /KFDATA/kafka-connect/etc
vim kafka-connect.properties
Add or modify parametersplugin.pathas follows
plugin.path=/opt/confluent/share/java/pluginRestart Kafka Connect
sudo systemctl stop kafka-connect
sudo systemctl start kafka-connect
Check the log output, as shown in the figure below, then the plug-in is loaded successfully.
cat /KFDATA/kafka-connect/logs/connect.log|grep mysql
Configure MySQL database
As the Source database, we obtain real-time incremental data based on MySQL'sbinlog, so we need to make some settings for the MySQL database.
Step 1: Create a MySQL user for data synchronization
The Debezium MySQL connector requires a MySQL user account. This MySQL user must have appropriate permissions on all databases where the Debezium MySQL connector captures changes.
CREATE USER 'datasyn'@'%' IDENTIFIED BY '1234';Granted permission.
GRANT SELECT, RELOAD, SHOW DATABASES, REPLICATION SLAVE, REPLICATION CLIENT ON *.* TO 'datasyn';Refresh the authorization table.
FLUSH PRIVILEGES;Step 2: Set MySQL parameters
CDC synchronization requires some settings on the MySQL database.
| parameter | value | illustrate |
|---|---|---|
| server-id | 1 | Used to identify a MySQL server instance in MySQL Cluster. You can adjust the settings yourself. |
| log-bin | mysql-bin | Set to enable the binary log function and specify the log file name and storage location. You can adjust the settings yourself. |
| binlog_format | ROW | Must binlog-format set to ROW or row. When connecting to a MySQL cascade replication instance, each instance link in the link must be set. |
| binlog_row_image | FULL | Must binlog_row_image set to FULL or full . When connecting to a MySQL cascaded replication instance, each cascaded instance link within the link must be set. |
| gtime_mode | ON | Set enable global transaction flag |
| enforce_gtid_consistency | ON | Settings to enforce GTID consistency |
| expire_logs_days | 3 | Set the MySQL log retention time. MySQL's CDC data synchronization requires corresponding log files for synchronization. It is recommended to set retention time for at least 3 days. |
| binlog_row_value_options | ““ | This variable cannot be set to PARTIAL_JSON |
Parameter reference code:
[mysqld]
server-id = 1

log_bin=mysql-bin
binlog_format=ROW
binlog_row_image=FULL
binlog_row_value_options=""

gtid_mode=ON
enforce_gtid_consistency=ON

expire_logs_days=3
Configure MySQL data synchronization connection task
Many commands for configuring synchronization tasks and checking require parameters such as url. For fast operation, some operation scripts for loading configuration files are encapsulated, kafka-tools.tar. Download the current package and extract it to the /KFDATA directory. Many subsequent operations include checking Kafka topics and viewing data. Configuring synchronization tasks, etc. will use the scripts in the kafka-tools package. Please configure it. All scripts in the package can be run without parameters and help will be output.
cd /KFDATA
sudo tar -xvf kafka-tools.tar
sudo chown kafka:kafka kafka-tools
rm ./kafka-tools.tar
Modify kafka-tools/config/config.properties configuration parameters.
Modify the startup IP address and installation directory of Kafka and Kafka_Connect according to the path and IP of the local machine.
Prepare MySQL database tables
Step 1: Create a database
create database basicinfo;Step 2: Create two tables and insert some data
Create table 1index_components, with 4 primary key fields.
use basicinfo;
CREATE TABLE `index_components` (
  `trade_date` timestamp NOT NULL DEFAULT CURRENT_TIMESTAMP,
  `code` varchar(20) NOT NULL,
  `effDate` timestamp NOT NULL DEFAULT CURRENT_TIMESTAMP,
  `indexShortName` varchar(20) CHARACTER SET utf8mb3 COLLATE utf8mb3_general_ci DEFAULT NULL,
  `indexCode` varchar(20) NOT NULL,
  `secShortName` varchar(20) CHARACTER SET utf8mb3 COLLATE utf8mb3_general_ci DEFAULT NULL,
  `exchangeCD` varchar(4) CHARACTER SET utf8mb3 COLLATE utf8mb3_general_ci DEFAULT NULL,
  `weight` decimal(26,6) DEFAULT NULL,
  `timestamp` timestamp NOT NULL DEFAULT CURRENT_TIMESTAMP ON UPDATE CURRENT_TIMESTAMP,
  `flag` int NOT NULL DEFAULT '1',
  PRIMARY KEY `index_components_pkey` (`trade_date`,`code`,`indexCode`,`flag`)
)ENGINE=InnoDB DEFAULT CHARSET=utf8mb4;
Insert 4 pieces of data
insert into index_components (trade_date,code,effdate,indexShortName,indexCode,secShortName,exchangeCD,weight,timestamp,flag)
values('2006-11-30','000759','2018-06-30 03:48:05','中证500','000905','中百集团','XSHE',0.0044,'2018-06-30 05:43:05',1),
('2006-11-30','000759','2018-06-30 04:47:05','中证500','000906','中百集团','XSHE',0.0011,'2018-06-30 05:48:06',1),
('2006-11-30','600031','2018-06-30 05:48:05','上证180','000010','三一重工','XSHG',0.0043,'2018-06-30 05:48:05',1),
('2006-11-30','600031','2018-06-30 06:48:02','沪深300','000300','三一重工','XSHG',0.0029,'2018-06-30 05:48:05',1);
Create table 2stock_basic, with 2 primary key fields.
CREATE TABLE `stock_basic` (
  `id` bigint NOT NULL ,
  `ts_code` varchar(20) NOT NULL,
  `symbol` varchar(20) DEFAULT NULL,
  `name` varchar(20) DEFAULT NULL,
  `area` varchar(20) DEFAULT NULL,
  `industry` varchar(40) DEFAULT NULL,
  `list_date` date DEFAULT NULL,
  PRIMARY KEY (`id`,`ts_code`)
) ENGINE=InnoDB DEFAULT CHARSET=utf8mb4;
Insert 3 pieces of data;
insert into stock_basic(id,ts_code,symbol,name,area,industry,list_date)
values (1,'000001.SZ','000001','平安银行','深圳','银行','1991-04-03'),
(2,'000002.SZ','000002','万科A','深圳','地产','1991-01-29'),
(3,'000004.SZ','000004','ST国华','深圳','软件服务','1991-01-14')
Prepare the connector configuration file and start the connection task
Step 1: Prepare MySQL synchronization task configuration file
Create a source connector configuration file for connecting to MySQL.
mkdir /KFDATA/datasyn-config
cd /KFDATA/datasyn-config
vim source-mysql.json
Enter the following configuration. The hostname and kafka startup address need to be modified accordingly.
{
    "name": "basicinfo-connector",
    "config":{
        "connector.class": "io.debezium.connector.mysql.MySqlConnector",
        "tasks.max": "1",
        "topic.prefix":"mysqlserver",
        "database.hostname": "192.168.189.130",
        "database.port": "3306",
        "database.user": "datasyn",
        "database.password": "1234",
        "database.server.id": "2223314",
        "database.include.list": "basicinfo",
        "schema.history.internal.kafka.bootstrap.servers": "192.168.189.130:9092",
        "schema.history.internal.kafka.topic": "schema-changes.basicinfo",
        "heartbeat.interval.ms":"20000"
    }
}
Parameter description: The above parameters are required. For more detailed parameter descriptions, please refer toDebezium connector for MySQL :: Debezium Documentation
| parameter name | default value | Parameter Description |
|---|---|---|
| connector.class | none | The name of the connector's Java class. Here is the connector class name for mysql. |
| tasks.max | 1 | The current maximum number of parallel tasks for the connector. The number of mysql source connector tasks can only be 1. |
| topic.prefix | none | The namespace of the current connector synchronous write task. Will be used to add to the synchronization table before the corresponding topic name, etc. |
| database.hostname | none | The IP address or hostname of the MySQL database server. |
| database.port | 3306 | The integer port number of the MySQL database server. |
| database.user | none | MySQL database server connection user. |
| database.password | none | MySQL database server connection user password. |
| database.server.id | none | Used to simulate the process number of the MySQL slave process. The sync program will join the MySQL cluster with this numeric ID. |
| database.influde.list | none | Matching database name. There can be more than one, just separate them with commas. |
| schema.history.internal.kafka.bootstrap.servers | none | Data synchronization records the kafka connection of MySQL table structure information |
| schema.history.internal.kafka.topic | none | The topic name of the data synchronization record MySQL table structure |
| heartbeat.interval.ms | 0 | When receiving a MySQL change event, it is guaranteed to trigger an interval event that records the binlog transaction location or gtid. (If this value is 0, when a change event that does not belong to the data synchronization table is received, the transaction position will not be recorded, which may cause the currently recorded synchronization transaction number to lag significantly behind MySQL's latest transaction number). |
Step 2: Start the MySQL data synchronization task
Start the MySQL source connector through the rest api
curl -i -X POST -H "Accept:application/json" -H "Content-Type:application/json" http://192.168.189.130:8083/connectors/ -d @/KFDATA/datasyn-config/source-mysql.jsonYou can also start it through the script in kafka-tools provided by us, which makes the operation simpler.
cd /KFDATA/kafka-tools/bin
./rest.sh create @/KFDATA/datasyn-config/source-mysql.json
Step 3: View MySQL data synchronization task status
View the synchronization task list. The list parameter displays the list of task names, and the showall parameter displays all synchronization tasks. state.
./rest.sh list
./rest.sh showall
As you can see from the figure below, the status of the connector and task are both RUNNING, and the current synchronization task status is normal.
Note: Each synchronization task will have a connector, and there can be multiple tasks.

Script using kafka-toolskafka.shView topics in kafka
cd /KFDATA/kafka-tools/bin
./kafka.sh tplist|grep mysqlserver
The topic [mysqlserver.basicinfo.index_components] in the picture below is our tablebasicinfo.index_componentsData storage in kafka< /span>

Check the number of data items in topic [mysqlserver.basicinfo.index_components].
./kafka.sh get_offsets mysqlserver.basicinfo.index_componentskafka has synchronized 4 pieces of data from the MySQL tablebasicinfo.index_components.

Note: When synchronizing the initial snapshot data of MySQL, it cannot be interrupted. Otherwise, you must clear all synchronized data and start over. That is, the initial snapshot data does not support resumable upload.
Deploy Kafka data synchronization to DolphinDB
Install the Kafka-DolphinDB connector
Configuring and starting the Kafka-DolphinDB connector plug-in requires the following two steps:
- Install the Kafka-DolphinDB plug-in and configure the plug-in path in the Kafka Connect configuration file.
- Restart the Kafka Connect program to load the plugin.
Step 1: Download the Kafka-DolphinDB plug-in
- jdbc-1.30.22.4-ddbsync.Beta1.jar:该 DolphinDB JDBC 包为数据同步做了一些专门修改,后续会同步到主分支上。
- kafka-connect-jdbc-10.7.4-ddb1.01.Beta1.jar:基于 kafka-connect-jdbc-10.7.4 开发,添加了 DolphinDB 连接器。
创建插件路径(部署 Kafka,Kafka-Connnect 环境的 kafka 用户),在此路径下放置 Kafka-DolphinDB 插件包,上面两个包都要放到此目录下。
sudo mkdir -p /opt/confluent/share/java/plugin/kafka-connect-jdbc第二步:配置 Kafka-Connect 加载插件
Kafka-DolphinDB 插件包的父路径与前文 Debezium-MySQL 连接器插件路径均为 /opt/confluent/share/java/plugin/,因此无需再次配置到 Kafka-Connect 的配置文件中。
如果路径不一致,可以在 kafka-connect.properties 中的 plugin.path 参数里配置,以逗号分隔。
查看 plugin.path 参数配置:
cat /KFDATA/kafka-connect/etc/kafka-connect.properties |grep plugin
重新启动 Kafka Connect:
sudo systemctl stop kafka-connect
sudo systemctl start kafka-connect
查看日志输出
cat /KFDATA/kafka-connect/logs/connect.log|grep JdbcSinkConnector出现下图中所示信息时,说明插件加载成功。
DolphinDB 的数据同步准备
第一步:创建同步的库、表
要求:当前支持数据同步,需要依赖 TSDB 引擎的 keepDuplicates = LAST 数据来保证数据写入的幂等性,即发生数据重复时,两次及以上的相同增量数据写入,不影响数据的一致性。所以需要满足以下条件:
- DolphinDB 的表必须是 TSDB 引擎且设置 keepDuplicates = LAST。
- TSDB 引擎目前不支持单字段 sortColumn 设置 keepDuplicates = LAST,所以同步的 MySQL 目标表主键必 须是 2个及以上字段。
- sortColumn 最后的字段必须是时间或者数字。对应的 MySQL 目标表主键字段必须包含时间或数字。
分别创建之前 MySQL 中两张表的对应表:
- 创建 MySQL 表 basicinfo.index_components 的DolphinDB 对应分布式表 [dfs://index_data].[index_components]
def createIndexComDB(dbName){
	if(existsDatabase(dbName)){
	dropDatabase(dbName)
	}
	database(directory=dbName, partitionType=RANGE, partitionScheme= 1999.01M + (0..26)*12,engine="TSDB")
}
def createIndexCom(dbName,tbName){
	db=database(dbName)
             if(existsTable(dbName, tbName)){
                   db.dropTable(tbName)
	}
	mtable=table(100:0, `trade_date`code`effDate`indexShortName`indexCode`secShortName`exchangeCD`weight`timestamp`flag, [TIMESTAMP,SYMBOL,TIMESTAMP,SYMBOL,SYMBOL,SYMBOL,SYMBOL,DOUBLE,TIMESTAMP,INT]);
	db.createPartitionedTable(table=mtable, tableName=tbName, partitionColumns=`trade_date,sortColumns=`code`indexCode`flag`trade_date,compressMethods={trade_date:"delta"},keepDuplicates=LAST)
}
createIndexComDB("dfs://index_data")
createIndexCom("dfs://index_data",`index_components)
2. 创建 MySQL 表 basicinfo.stock_basic 的 DolphinDB 对应分布式表 [dfs://wddb].[stock_basic]
def createStockBasicDB(dbName){
	if(existsDatabase(dbName)){
	dropDatabase(dbName)
	}
	db=database(directory=dbName, partitionType=HASH, partitionScheme=[LONG, 1],engine="TSDB")
}
def createStockBasic(dbName,tbName){
	db=database(dbName)
             if(existsTable(dbName, tbName)){
                   db.dropTable(tbName)
	}
             mtable=table(100:5, `id`ts_code`symbol`name`area`industry`list_date, [LONG,SYMBOL,SYMBOL,SYMBOL,SYMBOL,SYMBOL,DATE]);
	 db.createPartitionedTable(table=mtable, tableName=tbName, partitionColumns=`id,sortColumns=`ts_code`id,keepDuplicates=LAST,sortKeyMappingFunction=[hashBucket{,100}])
}
createStockBasicDB("dfs://wddb")
createStockBasic("dfs://wddb", `stock_basic)
第二步:配置同步配置表
DolphinDB 做为数据的接收端,本身无需做数据库上的额外设置,按正常使用配置即可。但由于 DolphinDB 中的数据存储表通常以分布式表为主,且分布式表是按照分区规则放置在不同的库名下,不同库名下的表是支持重名的。所以需要提供对于 DolphinDB 中表的同步配置信息。
- 在 DolphinDB 中创建一张配置表。库、表名可在后续操作中调整,但是表中字段名要保持一致。
- 数据库名:dfs://ddb_sync_config
- 表名:sync_config
dbName = "dfs://ddb_sync_config"
if(existsDatabase(dbName)){
dropDatabase(dbName)
}
db=database(dbName, HASH, [SYMBOL, 5])
if(existsTable(dbName, "sync_config"))
db.dropTable("sync_config")
mtable=table(100:0, `connector_name`topic_name`target_db`target_tab, [SYMBOL,SYMBOL,SYMBOL,SYMBOL]);
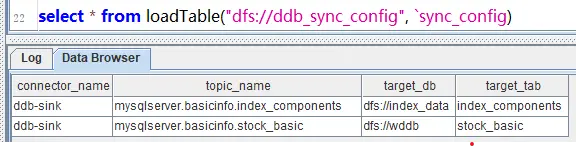
db.createTable(table=mtable, tableName="sync_config")2. 插入配置表信息,配置 MySQL 表 basicinfo.index_components 和 basicinfo.stock_basic 对应的 kafka 中 topic 名称对应的 DolphinDB 分布式表
sync_config=loadTable("dfs://ddb_sync_config","sync_config");
tmp_tab=table(100:0,`connector_name`topic_name`target_db`target_tab, [SYMBOL,SYMBOL,SYMBOL,SYMBOL]);
insert into tmp_tab (connector_name,topic_name,target_db,target_tab) values ("ddb-sink","mysqlserver.basicinfo.index_components","dfs://index_data","index_components");
insert into tmp_tab (connector_name,topic_name,target_db,target_tab) values ("ddb-sink","mysqlserver.basicinfo.stock_basic","dfs://wddb","stock_basic");
sync_config.append!(tmp_tab);
表中数据如下:
注意:对于同一个 connector_name,相同的 topic_name 只能配置一条数据。配置分布式库、表必须在 DolphinDB 书库中存在。
| 字段名 | 类型 | 字段作用 |
|---|---|---|
| connector_name | Symbol | 配置的 DolphinDB sink 同步任务名 |
| topic_name | Symbol | 要同步的 kafka topic 名称 |
| target_db | Symbol | 对应的 DolphinDB 分布式库名 |
| target_tab | Symbol | 对应的 DolphinDB 分布式表名 |
配置 DolphinDB 的数据同步连接任务
准备连接器配置文件,并启动连接任务
创建 DolphinDB 数据同步任务配置文件
cd /KFDATA/datasyn-config
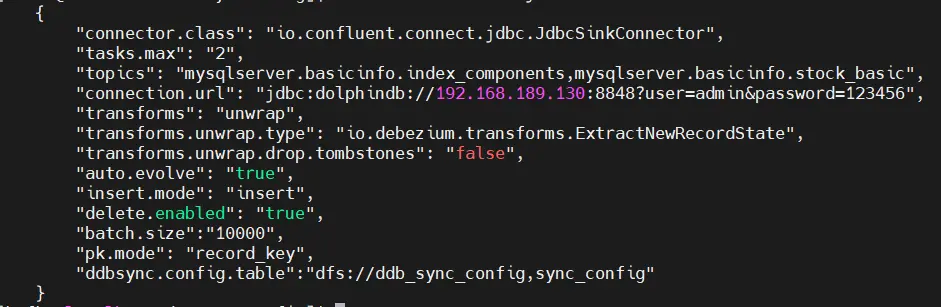
vim ddb-sink.json配置如下:
{
    "name": "ddb-sink",
    "config": {
        "connector.class": "io.confluent.connect.jdbc.JdbcSinkConnector",
        "tasks.max": "2",
        "topics": "mysqlserver.basicinfo.index_components,mysqlserver.basicinfo.stock_basic",
        "connection.url": "jdbc:dolphindb://192.168.189.130:8848?user=admin&password=123456",
        "transforms": "unwrap",
        "transforms.unwrap.type": "io.debezium.transforms.ExtractNewRecordState",
        "transforms.unwrap.drop.tombstones": "false",
        "auto.evolve": "false",
        "insert.mode": "insert",
        "delete.enabled": "true",
        "batch.size":"10000",
        "pk.mode": "record_key",
        "ddbsync.config.table":"dfs://ddb_sync_config,sync_config"
    }
}
参数说明:以上参数项为同步 DolphinDB 所需参数。如果对 Confluent 的 JDBC Sink Connect 有经验,可适当调节。
| 参数名称 | 默认值 | 参数说明 |
|---|---|---|
| name | 无 | 同步任务名称,不可重复。 |
| connector.class | 无 | 连接器的 Java 类的名称。这里是 JdbcSink 的通用连接器类名。 |
| tasks.max | 1 | 当前 connector 的最大并行任务数。可以调节增大,会创建多 consumer 并行消费读取 Kafka 中数据。一般的数据同步场景设置到 10 基本可以满足同步速度上的需求。 |
| topics | 无 | 配置要同步的 Kafka 中的 topic 名称,配置多个 topic 时用逗号分割。 |
| connection.url | 无 | MySQL 数据库服务器的 IP 地址或主机名。 |
| transforms | 无 | 声明数据转换操作。 |
| transforms.unwrap.type | 无 | 声明数据转换器类别。请保持不变。 |
| transforms.unwrap.drop.tombstones | false | 声明是否删除 Kafka 中的墓碑数据。 |
| auto.evolve | true | 当 DolphinDB 中缺少列时,是否自动增加列。当前不支持自动增加列,必须配置为 false。 |
| insert.mode | insert | 数据插入模式。当前只支持 insert 模式。 |
| pk.mode | none | 主键模式。必须设置为 record_key。 |
| delete.enabled | false | 在主键模式为 record_key 情况下。对于 null 值 record 是否按照 delete 进行操作。 |
| batch.size | 3000 | 设置在数据量足够大时。以每批最大多少条来写入到目标数据库。注意:当该值大于 Connect worker 中设置的 consumer.max.pol.records 时,每次提交数量会受 consumer.max.pol.records 的值限制。 |
| ddbsync.config.table | dfs://ddb_sync_config, sync_config | Kafka 中的 topic 对应 DolphinDB 表的配置表名称。可以自行定义库、表名称。但表中的字段要保持一致。表结构见“DolphinDB 的数据同步准备”。 |
通过 REST API 启动 source 连接器
curl -i -X POST -H "Accept:application/json" -H "Content-Type:application/json" http://192.168.189.130:8083/connectors/ -d @ddb-sink.json也可以通过我们提供 kafka-tools 中的脚本启动
cd /KFDATA/kafka-tools/bin
./rest.sh create @/KFDATA/datasyn-config/ddb-sink.json
查看同步任务列表。其中,”ddb-sink” 为 DolphinDB 数据同步程序。
./rest.sh list
查看 DolphinDB 的 sink 同步任务状态
./rest.sh status ddb-sink通过下图可以看到,同步到 DolphinDB 的同步任务包含 1 个 connector 和 2 个 task 。两个 task 状态都是 RUNNING,即正常运行。这里配置了两个线程进行数据消费,并写入 DolphinDB。

查看 DolphinDB 中的数据
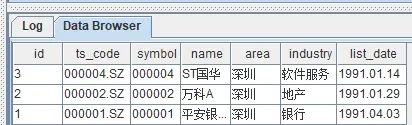
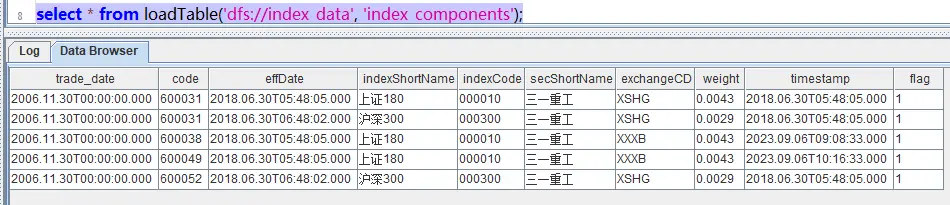
select * from loadTable('dfs://index_data', 'index_components');
select * from loadTable('dfs://wddb', 'stock_basic')
数据分别如下,两张表的初始数据均已经同步到了 DolphinDB 中。

实时数据同步验证
第一步:插入新数据
在 MySQL 中插入两条新数据。
insert into basicinfo.index_components (trade_date,code,effdate,indexShortName,indexCode,secShortName,exchangeCD,weight,timestamp,flag)
values
('2006-11-30','600051','2018-06-30 05:48:05','上证180','000010','三一重工','XXXB',0.0043,'2018-06-30 05:48:05',1),
('2006-11-30','600052','2018-06-30 06:48:02','沪深300','000300','三一重工','XSHG',0.0029,'2018-06-30 05:48:05',1)
在 DolphinDB 中进行查询,可以看到已经多了两条 code 值为 600051 和 600052 的。
select * from loadTable('dfs://index_data', 'index_components');
第二步:数据更新
在 MySQL 中更新一条数据,这里我们做一个涉及主键字段的更新。
update basicinfo.index_components set code='600061' where code ='600051'在 DolphinDB 中进行查询,发现表中已经不存在 code 值为 600051 的数据,但可以看到一条 code 值为 600061 的数据。
select * from loadTable('dfs://index_data', 'index_components');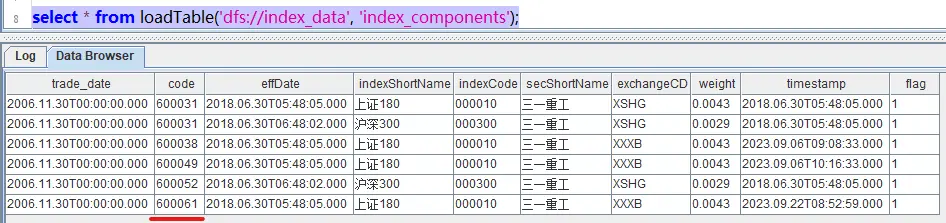
第三步:数据删除
从 MySQL 中删除一条数据。
delete from basicinfo.index_components where code='600061'在 DolphinDB 中进行查询,可以看到 code 值为 600061 的数据已经不存在了。
运维操作
DolphinDB 同步须知
- DolphinDB 是一款支持海量数据的分布式时序数据库。针对不同的数据处理需求,在底层架构上天然上与通常的关系型数据库不同。所以需要有以下限制:
- DolphinDB 的表没有主键设计,需要设置成 sortColumn 字段,并设置 keepDuplicates = LAST 来进行去重,确保数据唯一。
- DolphinDB 表采用 TSDB 引擎,才可以设置 sortColumn。
- DolphinDB 中 TSDB 引擎的 sortColumn 中必须要有时间列或者数字列,对应的来源主键则必须包含同样类型字段。
- DolphinDB 中 TSDB 引擎的 sortColumn 中必须要有至少两个字段,才能设置 keepDuplicates = LAST,所以对应的来源表主键必须是 2 个字段及以上。
2. DDL 语句相关:
- 当前不支持 DDL 语句同步。
- 当前不支持同时修改两边表后的数据传递。
部署检查
- 查看当前服务是否都在运行状态:
sudo systemctl list-units |egrep 'zookeeper|kafka-server|schema-registry|kafka-connect'
也可以使用 Jps 等其他方法快速查看 Java 进程。
2. 运行以下命令查看当前的同步任务列表查询:
查看当前有哪些同步任务:
./rest.sh list
3. 查看某个同步任务的状态:
./rest.sh status ddb-sink
4. 暂停同步任务,该操作会停止当前整体 connector 同步任务:
./rest.sh c_pause ddb-sink
5. 恢复同步任务:
./rest.sh c_resume ddb-sink
对于曾经由于数据库报错一度暂停的同步任务,在错误消除后,只要 connector 运行正常,可以通过以下命令使其恢复同步:
./rest.sh t_restart ${connector_name} ${task_id}6. 修改同步任务配置参数:
./rest c_alter ${connector_name} @source_config.json修改参数时,只需传递参数,不需要带有 connector name,格式示例如下:
数据同步情况检查
正常情况下,数据同步程序会保持稳定的数据同步。对于意外因素造成的数据未同步,可参考以下步骤逐一排查:
- 查看 MySQL 中binlog中记录的最新位置。
查看该值需要正确的配置 gtid_mode 等参数,按照前面的提供的 MySQL 参数配置既可。
SHOW MASTER STATUS;
查看 MySQL 中的 binlog 具体数据库更改。 可以通过 mysqlbinglog 命令查看 MySQL 的 binlog 中记录的数据库改变。
./mysqlbinlog --base64-output=decode-rows -v --skip-gtids /usr/local/mysql/data/binlog.000003|less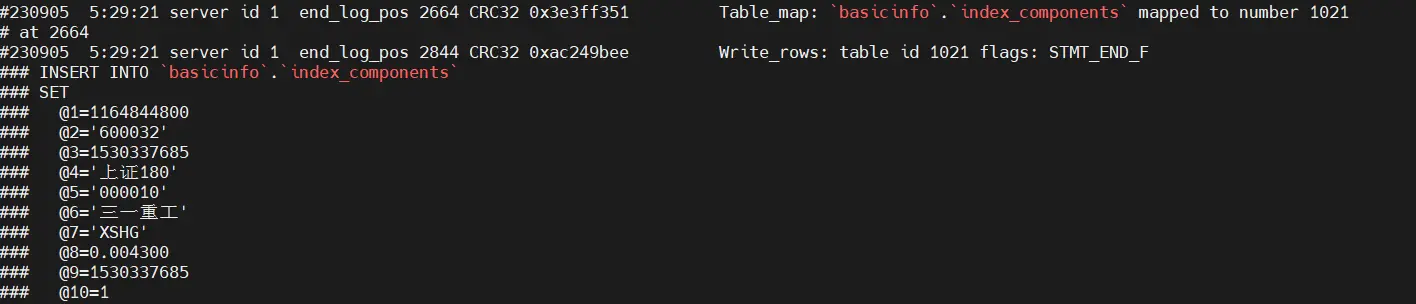
2. 查看 Kafka 中记录的 MySQL 同步的 binlog 位置。
结合前面查看的 MySQL 最新 binlog 位置,可以确定当前数据从 MySQL 到 Kafka 的同步进度。
./consume.sh --topic connect-offsets --from-beginning |grep basicinfo-connector
查看 Kafka 中数据, Kafka 中的数据是已序列化的二进制存储。需要使用 avro 调用 schema-registry 中的表结构信息及进行反序列化。这里我们提供了 tpconsumer.sh 脚本,可以提供反序列化后的 Kafka 中的真实数据,并匹配上该条数据对应的表结构。
./tpconsumer.sh --op=2 --topic=mysqlserver.basicinfo.index_components --offset=1 --max-messages=2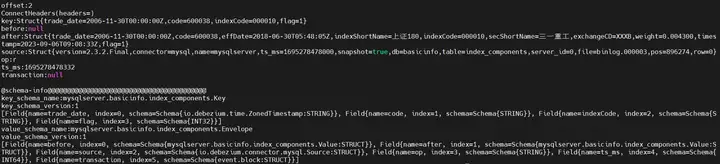
3. 查看当前 DolphinDB 同步任务列表。
下面命令可以查看当前 Kafka 中的消费组。
./kafka.sh cm_list
查看 DolphinDB 同步任务对应的 Kafka 消费组中的每一个 consumer 的消费进度,通过此命令可以查看同步程序中每一张的表同步进度。 Lag 为 0 则表示 Kafka 中 topic 当前没有未消费的数据,即 Kafka 中的数据与对应表的数据是一致的。
./kafka.sh cm_detail connect-ddb-sink|awk '{printf "%-20s %-40s %-9s %-14s %-15s %-10s %-30s\n", $1, $2, $3, $4, $5, $6,$7}'
附录
KFDATA.tar 压缩包包含:数据的同步数据文件夹、配置文件及 Kafka-tools 脚本。
商汤科技创始人汤晓鸥离世,享年 55 岁 2023 年,PHP 停滞不前 Wi-Fi 7 将于 2024 年初全面登场,速度比 Wi-Fi 6 提升 5 倍 鸿蒙系统即将走向独立,多家高校设立“鸿蒙班” 稚晖君创业公司再融资,金额超 6 亿元,投前估值 35 亿元 夸克浏览器 PC 版开启内测 AI 代码助手盛行,编程语言排行榜都没法做了 Mate 60 Pro 的 5G 调制解调器和射频技术遥遥领先 MariaDB 拆分 SkySQL,作为独立公司成立 小米回应余承东“龙骨转轴”抄袭华为言论