Preface
In the process of application development, a very common problem is that for the convenience of local debugging, developers will hardcode some information, such as the user name and password to connect to the database, the token and certificate to connect to the third-party app, etc., if the code is submitted before If the hardcode information is not deleted in time, it is very easy to leak sensitive information and bring risks such as library being dragged and library stuffing.
Therefore, sensitive information management is a very important topic in DevSecOps. It is true that the management of sensitive information requires everyone in software development to be responsible and have security awareness, but people always make mistakes due to negligence, so one of the best ways is to integrate the detection of sensitive information into CI/CD , continuous monitoring can be achieved, and it can be carried out when developers submit code, truly achieving safe shift left.
Jihu GitLab provides out-of-the-box DevSecOps functions, including seven major functions: container image scanning, static application security testing (SAST), dynamic application security scanning (DAST), key detection, license compliance, Dependency scanning and fuzz testing. Regarding image security scanning, you can view the article Jihu GitLab DevSecOps Container Image Security Scanning in Tianshan under Seven Swords. This article will introduce the sensitive information detection function in Jihu GitLab DevSecOps.
Jihu GitLab Sensitive Information Detection
JiHu GitLab's sensitive information detection (Secret Detection) function is available out of the box and was introduced in version 11.9. You can detect sensitive information in the submitted code, or you can repeatedly scan the remote warehouse to detect sensitive information; you can use the default rules to detect sensitive information, or you can complete the detection of sensitive information through customized rules. . Jihu GitLab's sensitive information detection is language-independent, which means it is "full spectrum" available.
Detection principle
The general idea of sensitive information detection is: read the file content --> match the content according to the defined rules -> issue a detection report. GitLab sensitive information detection is still done through a specific analyzer, and the core component of the analyzer is the open source Gitleaks.
Gitleaks
Gitleaks is an open source SAST tool that can be used to detect sensitive information such as hadrcode passwords, API keys, and tokens. Gitleaks is easy to install and easy to use.
Installation of Gitleaks
There are many ways to install Gitleaks. This article uses macOS as an example to demonstrate. Use the following command to install Gitleaks on macOS:
$ brew install gitleaks
You can use gitleaks -h or gitleaks --version to check whether the installation is successful:
$ gitleaks --version
7.6.1
Use of Gitleaks
Gitleaks can directly scan local files or remote repositories.
-
Use Gitleaks to scan local files
Let’s first look at scanning local files. Create a new file containing sensitive information, such as:
$ cat > secret.txt <<  EOF
password="12232"
token="ADB#@DC"
EOF
Add a gitleaks.toml file and write matching rules:
$ cat > config.toml << EOF
title = "gitleaks config"
[[rules]]
description = "Password Type"
regex = '''[0-9]'''
tags = ["gitlab", "security"]
EOF
The matching rules of gitleaks are defined using TOML.
Using the above matching rules, information that is all numeric can be matched and marked as sensitive information. You can use the following command to scan and detect:
$ gitleaks --config-path=config.toml \
           --path=secret.txt --no-git \
           -v --report=report.json
Parameter Description:
-
--config-path: Specify the configuration file in which matching rules are written, usually xx.toml
-
--path: Specify the file or directory to be scanned and detected
-
--report: Specify the path to output the report
-
--no-git: Treat the scanned directory as a normal directory for scanning and detection. Otherwise, it will search for the .git directory. If it cannot find it, it will prompt a failure.
You can see the following scan results:
{
  "line": "password=\"12232\"",
  "lineNumber": 1,
  "offender": "1",
  "offenderEntropy": -1,
  "commit": "",
  "repo": "",
  "repoURL": "",
  "leakURL": "",
  "rule": "Password Type",
  "commitMessage": "",
  "author": "",
  "email": "",
  "file": ".",
  "date": "0001-01-01T00:00:00Z",
  "tags": "gitlab, security"
}
INFO[0000] scan time: 224 microseconds
WARN[0000] leaks found: 1
The results show that one match was found (leaks found: 1), and the scanning time (scan time: 224 microseconds, which can be seen to be very fast). This leak is the first line password="12232". This is the same idea as when you first set up the matching rules.
At the same time, you will see a report.json file in the current directory:
$ls -ltr report.json
-rw-r--r--  1 xiaomage  wheel  328 Oct 26 14:24 report.json
The content recorded inside is consistent with the content of the standard output above.
It should be noted that if sensitive information is detected, the exit result of the scan command will be a non-zero value:
$ gitleaks --config-path=config.toml --path=secret.txt --no-git -v --report=report.json
$ echo $?
1
If you want to specify the exit result of the executed command, you can use the parameter --leaks-exit-code:
$ gitleaks --config-path=config.toml --path=secret.txt --no-git -v --report=report.json --leaks-exit-code=0
$ echo $?
0
-
Use Gitleaks to scan remote repositories
Store the above secret.txt file and gitleaks.toml file in the GitLab repository, as follows:
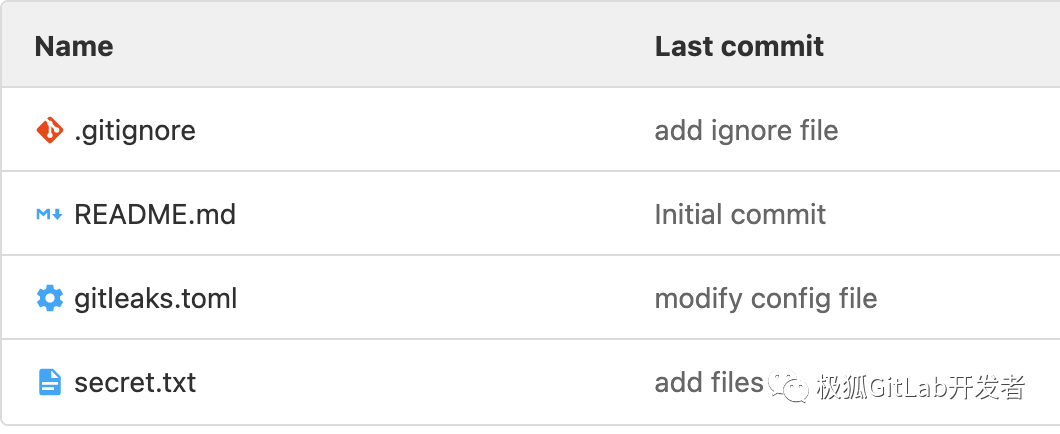
Execute the following command to scan the remote warehouse:
$ gitleaks [email protected]:majinghe/secret-detection.git \
[email protected] --access-token=personal-token \
--ssh-key=path-to-ssh-key --repo-config-path=gitleaks.toml \
--report=report.json
Parameter Description:
-
--repo-url: Specify the address of the remote warehouse
-
--username: Specify the username of the repository when scanning private repositories
-
--access-token: the personal access token specified when scanning a private repository, used for permission verification; if --repo-url is using https, this parameter can be replaced with --password
-
--ssh-key: Specify the ssh-key required to access the private repository
-
--repo-config-path: Specify the rule matching file in the remote repository
-
--report: Specify the name of the scan report
The scan results are as follows:
INFO[0000] cloning... [email protected]:majinghe/secret-detection.git
INFO[0000] scan time: 999 microseconds
INFO[0000] commits scanned: 9
WARN[0000] leaks found: 9
What is very strange is that I saw 9 detection points, but there is only one in the file. What is going on?
For Gitleaks, if no additional parameters are specified, the above scanning command will scan all commits in the remote warehouse. The above warehouse has 9 commits, so it is scanned 9 times. You can use parameters to specify scanning of a certain commit or a certain range of commit information. If you specify a commit to scan, you can see:
$ gitleaks --repo-url=https://gitlab.cn/majinghe/secret-detection.git --username=极狐GitLab-username --password=极狐GitLab-password --repo-config-path=gitleaks.toml --report=report.json --commit=83c4c5e364bc249e410a5aa92716a35da8080111
INFO[0000] cloning... https://gitlab.cn/majinghe/secret-detection.git
INFO[0001] scan time: 204 microseconds
INFO[0001] commits scanned: 1
WARN[0001] leaks found: 2
Two matching detection points appeared because gitleaks.toml was also scanned:
{
  "line": "regex = '''[0-9]'''",
  "lineNumber": 4,
  "offender": "0",
  "offenderEntropy": -1,
  "commit": "83c4c5e364bc249e410a5aa92716a35da8080111",
  "repo": "secret-detection.git",
  "repoURL": "https://gitlab.cn/majinghe/secret-detection.git",
  "leakURL": "https://gitlab.cn/majinghe/secret-detection.git/blob/83c4c5e364bc249e410a5aa92716a35da8080111/config.toml#L4",
  "rule": "Password Type",
  "commitMessage": "add files\n",
  "author": "xiaomage",
  "email": "[email protected]",
  "file": "config.toml",
  "date": "2021-10-26T14:38:20+08:00",
  "tags": "gitlab, security"
 }
You can scan only secret.txt files by customizing the matching rules in gitleaks.toml:
title = "gitleaks config"
[[rules]]
description = "Password Type"
file = '''secret.txt'''
regex = '''[0-9]'''
tags = ["gitlab", "security"]
Rescan detection:
$ gitleaks --repo-url=https://gitlab.cn/majinghe/secret-detection.git [email protected] --password=GitOpsIsMyMainJobIn2021 --repo-config-path=gitleaks.toml --report=report.json --commit=83c4c5e364bc249e410a5aa92716a35da8080111
INFO[0000] cloning... https://gitlab.cn/majinghe/secret-detection.git
INFO[0000] scan time: 130 microseconds
INFO[0000] commits scanned: 1
WARN[0000] leaks found: 1
This scan only matched one detection point, the content is as follows:
[
 {
  "line": "password=\"12232\"",
  "lineNumber": 1,
  "offender": "1",
  "offenderEntropy": -1,
  "commit": "83c4c5e364bc249e410a5aa92716a35da8080111",
  "repo": "secret-detection.git",
  "repoURL": "https://gitlab.cn/majinghe/secret-detection.git",
  "leakURL": "https://gitlab.cn/majinghe/secret-detection.git/blob/83c4c5e364bc249e410a5aa92716a35da8080111/secret.txt#L1",
  "rule": "Password Type",
  "commitMessage": "add files\n",
  "author": "xiaomage",
  "email": "[email protected]",
  "file": "secret.txt",
  "date": "2021-10-26T14:38:20+08:00",
  "tags": "gitlab, security"
 }
]
You can see that the sensitive information in secret.txt was successfully matched.
Of course, Gitleaks has many other parameters to perform a variety of fine-grained scans.
Jihu GitLab Sensitive Information Detection Practice
Scan using mirror alone
GitLab sensitive information detection is implemented through an analyzer, and the core of the analyzer is Gitleaks. The image of analyzer is:
registry.gitlab.com/security-products/secret-detection:3
You can use this image directly to scan sensitive information. Clone the repository containing the secret.txt and gitleaks.toml files used for the above test to your local computer, and then execute the following command to start a container:
$ docker run --rm -d -it -v $(pwd):/tmp/ registry.gitlab.com/security-products/secret-detection:3 sh
You can use docker exec -it to enter the container, where you can see that Gitleaks and anaylyzer have been installed in the container:
$ gitleaks --version
v7.5.0
$ ./analyzer --version
[INFO] [secrets] [2021-10-27T01:27:43Z] ▶ GitLab secrets analyzer v3.22.0
analyzer version 3.22.0
The analyzer is the magic weapon for GitLab to perform sensitive information detection. It itself encapsulates gitleaks. The general idea is to read the parameters behind the analyzer command, assemble them into a gitleaks command, and then execute the command.
Copy the /tmp/gitleaks.tmol file to the root directory and execute the following command to complete sensitive information scanning:
$ ./analyzer run --target-dir /tmp/secret.txt
[INFO] [secrets] [2021-10-27T01:25:46Z] ▶ GitLab secrets analyzer v3.22.0
[INFO] [secrets] [2021-10-27T01:25:46Z] ▶ Detecting project
[INFO] [secrets] [2021-10-27T01:25:46Z] ▶ Found project in /tmp

[INFO] [secrets] [2021-10-27T01:25:46Z] ▶ Running analyzer
[INFO] [secrets] [2021-10-27T01:25:47Z] ▶ Creating report
The reason for copying is that the analyzer reads the gitleaks.toml file that comes with the root directory by default. In order to match the sensitive information used in the test, some customized changes were made to the matching rules.
View scan report:
$ cat tmp/gitleaks-100398148.json
[
 {
  "line": "password=\"12232\"",
  "lineNumber": 1,
  "offender": "1",
  "offenderEntropy": -1,
  "commit": "",
  "repo": "",
  "repoURL": "",
  "leakURL": "",
  "rule": "Password Type",
  "commitMessage": "",
  "author": "",
  "email": "",
  "file": ".",
  "date": "0001-01-01T00:00:00Z",
  "tags": "gitlab, security"
 }
]
You can see that the results are the same as scanning with the gitleaks command. For more usage of analyzer, you can use analyzer h to view:
$ ./analyzer h
[INFO] [secrets] [2021-10-27T01:32:42Z] ▶ GitLab secrets analyzer v3.22.0
NAME:
   analyzer - GitLab secrets analyzer v3.22.0

USAGE:
   analyzer [global options] command [command options] [arguments...]

VERSION:
   3.22.0

AUTHOR:
   GitLab

COMMANDS:
   run, r      Run the analyzer on detected project and generate a compatible artifact
   search, s   Search for compatible projects and return project directory
   analyze, a  Analyze detected project and generate report
   convert, c  Convert analyzer output to a compatible artifact
   help, h     Shows a list of commands or help for one command

GLOBAL OPTIONS:
   --help, -h     show help (default: false)
   --version, -v  print the version (default: false)
Of course, one of the most flexible aspects of the analyzer is that you can build the scene you need based on the Dockerfile provided by Jihu GitLab. The content is as follows:
FROM golang:1.15-alpine AS build

ENV CGO_ENABLED=0 GOOS=linux
WORKDIR /go/src/app
COPY . .
# build the analyzer binary and automatically set the AnalyzerVersion
# variable to the most recent version from the CHANGELOG.md file
RUN CHANGELOG_VERSION=$(grep -m 1 '^## v.*$' "CHANGELOG.md" | sed 's/## v//') && \
        PATH_TO_MODULE=`go list -m` && \
        go build -ldflags="-X '$PATH_TO_MODULE/metadata.AnalyzerVersion=$CHANGELOG_VERSION'" -o analyzer

FROM alpine:latest

ARG SCANNER_VERSION
ENV SCANNER_VERSION ${SCANNER_VERSION:-v7.5.0}

RUN wget -O /usr/local/bin/gitleaks https://github.com/zricethezav/gitleaks/releases/download/${SCANNER_VERSION}/gitleaks-linux-amd64 && \
    chmod a+x /usr/local/bin/gitleaks && \
    apk add --no-cache git

COPY --from=build --chown=root:root /go/src/app/analyzer /
COPY /gitleaks.toml /gitleaks.toml

ENTRYPOINT []
CMD ["/analyzer", "run"]
Integrated with Jihu GitLab CI
Simply configure Jihu GitLab CI to integrate sensitive information detection into Jihu GitLab CI/CD:
variables:
  SECURE_ANALYZERS_PREFIX: "registry.gitlab.com/security-products"
  SECRETS_ANALYZER_VERSION: "3"

services:
  - docker:20.10.7-dind

stages:
  - test

secret_detection:
  stage: test
  image: "$SECURE_ANALYZERS_PREFIX/secret-detection:$SECRETS_ANALYZER_VERSION"
  services: []
  allow_failure: true
  artifacts:
    reports:
      secret_detection: gl-secret-detection-report.json
    paths: [gl-secret-detection-report.json]
  script:
    - cp config/gitleaks.toml /
    - ../../../analyzer run --target-dir .
    - cat gl-secret-detection-report.json
You can view the build log:
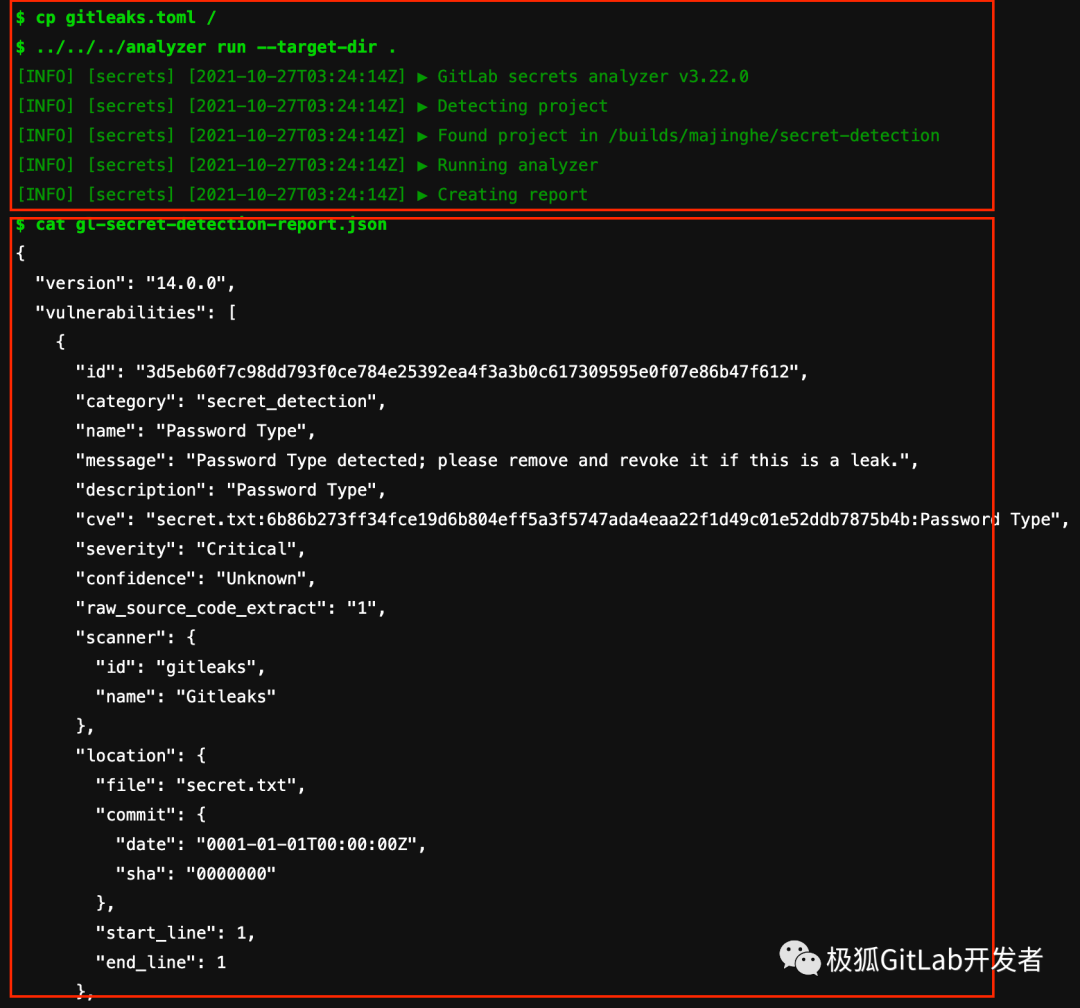
The content of is too long and only part of it has been intercepted. You can see the scanning process and scan report from the red box. Because the artifacts keyword is added to JiFox GitLab CI, you can also directly download the report to the local site for review. For the download method, please refer to the official account articleJiHu GitLab DevSecOps Container under the Seven Swords of the Tianshan Mountains Image security scan.
极狐GitLab DevSecOps CI/CD
Container image scanning and sensitive information detection can be added to Jihu GitLab CI to create DevSecOps CI/CD:
variables:
  CS_ANALYZER_IMAGE: registry.gitlab.com/security-products/container-scanning/trivy:4
  KUBECONFIG: /tmp/.kube/config
  SECURE_ANALYZERS_PREFIX: "registry.gitlab.com/security-products"
  SECRETS_ANALYZER_VERSION: "3"

services:
  - docker:20.10.7-dind

stages:
  - build
  - test
  - deploy

build:
  image: docker:latest
  stage: build
  services:
    - docker:20.10.7-dind
  script:
    - docker login -u "$CI_REGISTRY_USER" -p "$CI_REGISTRY_PASSWORD" $CI_REGISTRY
    - docker build -t $CI_REGISTRY_IMAGE:3.0.0 .
    - docker push $CI_REGISTRY_IMAGE:3.0.0

container_scanning:
  image: "$CS_ANALYZER_IMAGE"
  stage: test
  variables:
    GIT_STRATEGY: fetch
    DOCKER_USER: "$CI_REGISTRY_USER"
    DOCKER_PASSWORD: "$CI_REGISTRY_PASSWORD"
    DOCKER_IMAGE: $CI_REGISTRY_IMAGE:3.0.0
  allow_failure: false
  artifacts:
    reports:
      container_scanning: gl-container-scanning-report.json
    paths: [gl-container-scanning-report.json]
  dependencies: []
  script:
    - gtcs scan

secret_detection:
  stage: test
  image: "$SECURE_ANALYZERS_PREFIX/secret-detection:$SECRETS_ANALYZER_VERSION"
  services: []
  allow_failure: true
  artifacts:
    reports:
      secret_detection: gl-secret-detection-report.json
    paths: [gl-secret-detection-report.json]
  script:
    - cp gitleaks.toml /
    - ../../../analyzer run --target-dir .
    - cat gl-secret-detection-report.json

deploy:
  stage: deploy
  image:
    name: bitnami/kubectl:latest
    entrypoint: [""]
  script:
     - mkdir -p /tmp/.kube
     - echo $kube_config | base64 -d > $KUBECONFIG
     - kubectl -n gitlab-k8s-demo apply -f deployment.yaml
You can view the pipeline's build process:
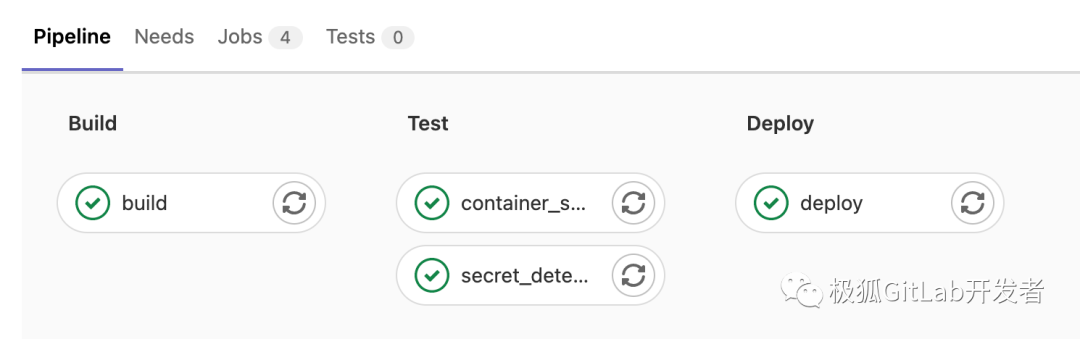
The above process is the principle and demonstration of sensitive information detection in GitLab DevSecOps. However, in actual use, users need to complete more complex configurations and integrations according to their own needs, and GitLab has good support for these.
write at the end
Sensitive information detection is actually a relatively cumbersome security task, which requires writing specific matching work based on specific sensitive information (API tokens, keys, etc. are different for different manufacturers and products). Sensitive information detection can be integrated into Jihu GitLab CI/CD to achievesafety shift left and continuous security automation, and use Jihu GitLab to build real DevSecOps system. This ensures the security of the software supply chain.