During the iOS testing process, you often need to check the device udid, check the package name, install and uninstall applications, obtain device screenshots, obtain performance data and other operations. Android has a wealth of adb commands that you can use. iOS's tidevice tool is similar to Android's adb, can provide these functions;
There has been no tool that can directly obtain iOS performance data. Tidevice can easily obtain performance data;
In addition, the execution of iOS automation has always relied on the mac system. The main reason is that xcode is required to compile and install wda (WebDriverAgent) into the ios device, and the tested application can be operated through wda. However, the Windows system cannot run Xcode, so it cannot run iOS automated testing; tidevice also solves this problem.
1. Introduction
Tidevice is Alibaba's open source iOS automated testing tool. It can provide functions such as taking screenshots, obtaining mobile phone information, installing and uninstalling IPA packages, starting and stopping applications based on bundle ID, obtaining specified application performance data, and simulating xcode to run xctest. The range of supported iOS phones is 9-16.
https://github.com/alibaba/taobao-iphone-device
2. Principle of tidevice
usbmux communication protocol: realizes communication between Mac/Windows/Linux and iOS device services
Mac side: usbmuxd is a service of Apple. This service is mainly used to implement multiple TCP connections on the USB protocol. It abstracts USB communication into TCP communication and establishes a TCP connection to the /var/run/usbmuxd TCP port of usbmuxd. usbmuxd then sends the request to the USB-connected iPhone. Apple's iTunes and Xcode all use this service directly or indirectly.
Linux/Windows side: There is no usbmux itself, but there are implementations of open source projects, which can be used/referenced directly.
Windows also relies on two services, AppleApplicationSupport and AppleMobileDeviceSupport. You can install the corresponding services by installing the Itunes environment.
usbmux itself is a socket. Through interception, cracking and other means, combined with the results of the open source industry, it is simulated with python, thus realizing all the functions of current tools.
3. Installation and configuration
1. Depends on the environment
python3.6 or higher
2.tidevice installation
pip3 install -U "tidevice[openssl]" If there are multiple python3 versions on your computer, it is best to specify the python version to install:
电脑上有python3.9和python3.11,想基于python3.9使用tidevice,所以指定python3.9版本
python3.9 -m pip install -U "tidevice[openssl]"
Verify successful installation:
$ tidevice version

tidevice version 0.9.12
3. usbmux installation
-
Mac comes with: /var/run/usbmux
-
Linux/Windows: Refer to official recommendationstidevice.exceptions.MuxError: socket unix:/var/run/usbmuxd unable to connect · Issue #7 · alibaba/tidevice · GitHub
4. Introduction to commonly used commands
Tidevice is a python project. All cmds supported by tidevice are implemented in tidevice.__main__, and the functions can be re-encapsulated.
#查看更多功能
$ tidevice -h

usage: tidevice [-h] [-v] [-u UDID] [--socket SOCKET] [--trace]
                {version,list,info,date,sysinfo,appinfo,applist,battery,screenshot,install,uninstall,reboot,shutdown,parse,watch,wait-for-device,launch,energy,kill,ps,relay,xctest,wdaproxy,syslog,fsync,crashreport,dumpfps,developer,pair,unpair,perf,set-assistive-touch,savesslfile,test}
1. List connected devices
$ tidevice list

UDID                                      SerialNumber    NAME      MarketName     ProductVersion    ConnType
e372ee5092535ad955329aac04c4xxxxx F2LV30FXXX00    iPhone7p  iPhone 7 Plus  13.6.1            usb
$ ticevice list --json
[
{
"udid": "e372ee5092535ad955329aac04c450fb7xxxx",
"serial": "F2LV30XXG00",
"name": "iPhone7p",
"market_name": "iPhone 7 Plus",
"product_version": "13.6.1",
"conn_type": "usb"
}
]2. Application management
(1) Install the application
#安装应用
$ tidevice install example.ipa(2) Specify device installation
#指定设备安装
$ tidevice --udid $UDID install  https://example.org/example.ipa
(3) Uninstall the application
#卸载应用
$ tidevice uninstall 包名

Uninstalling 'com.XXX.XXX'
- RemovingApplication (50%)
- GeneratingApplicationMap (90%)
Complete(4) For movement
#启动应用
$ tidevice launch bundleid

PID: 675
(5) Stop application
#停止应用
$ tidevice kill bundleid

Kill pid: 675
(6) View installed applications
#查看已安装的应用
$ tidevice applist

com.alipay.iphoneclient 支付宝 10.3.70
(7) View running applications
#查看运行中的应用
$ tidevice ps
PID NAME                    BUNDLE_ID                         DISPLAY_NAME
733 Preferences             com.apple.Preferences             设置
274 CoreAuthUI              com.apple.CoreAuthUI              用户鉴定
185 Spotlight               com.apple.Spotlight               Siri搜索
416 InCallService           com.apple.InCallService           InCallService
247 AlipayWallet            com.alipay.iphoneclient           支付宝
713 SafariViewService       com.apple.SafariViewService       SafariViewService
344 EscrowSecurityAlert
748 MobileSafari            com.apple.mobilesafari            Safari浏览器
756 iMessageAppsViewService com.apple.iMessageAppsViewService iMessageAppsViewService

#以json格式输出
$ tidevice ps --json
[
    {
        "pid": 733,
        "name": "Preferences",
        "bundle_id": "com.apple.Preferences",
        "display_name": "设置"
    },
    {
        "pid": 274,
        "name": "CoreAuthUI",
        "bundle_id": "com.apple.CoreAuthUI",
        "display_name": "用户鉴定"
    },
    {
        "pid": 185,
        "name": "Spotlight",
        "bundle_id": "com.apple.Spotlight",
        "display_name": "Siri搜索"
    }
]
(8) View application information
$ tidevice appinfo com.example.demo3. View device information
$ tidevice info
MarketName:       iPhone 7 Plus
DeviceName:       iPhone7p
ProductVersion:   13.6.1
ProductType:      iPhone9,2


# 查看设备电源信息
$ tidevice info --domain com.apple.mobile.battery --json
{
    "BatteryCurrentCapacity": 100,
    "BatteryIsCharging": false,
    "ExternalChargeCapable": true,
    "ExternalConnected": true,
    "FullyCharged": true,
    "GasGaugeCapability": true,
    "HasBattery": true
}
4.Other commonly used
(1) Restart the phone
# 重启
$ tidevice reboot(2) Cut image
# 截图
$ tidevice screenshot xxx.png(3) Exodus Nishishi
# 输出日志 same as idevicesyslog
$ tidevice syslog
5.Crash log operation
usage: tidevice crashreport [-h] [--list] [--keep] [--clear] [output_directory]

positional arguments:
  output_directory  The output dir to save crash logs synced from device (default: None)

optional arguments:
  -h, --help        show this help message and exit
  --list            list all crash files (default: False)
  --keep            copy but do not remove crash reports from device (default: False)
  --clear           clear crash files (default: False)
$ tidevice crashreport --list
[I 230614 16:42:39 _crash:23] List of crash logs
`-- /
|-- debugserver-2023-06-02-110906.ips
|-- WeChat-2023-05-30-180918.ips5. Performance data collection
Tidevice can use the command line or python script to obtain performance data.
1. Command line method
#命令详解
usage: tidevice perf [-h] -B BUNDLE_ID [-o PERFS]

optional arguments:
  -h, --help            show this help message and exit
  -B BUNDLE_ID, --bundle_id BUNDLE_ID
                        app bundle id (default: None)
  -o PERFS              cpu,memory,fps,network,screenshot. separate by ","
                        (default: None)
#获取所有性能数据
$ tidevice perf -B bundleID
fps {'fps': 0, 'value': 0, 'timestamp': 1686732621727}
gpu {'device': 0, 'renderer': 0, 'tiler': 0, 'value': 0, 'timestamp': 1686732621819}
screenshot {'value': <PIL.PngImagePlugin.PngImageFile image mode=RGB size=281x500 at 0x7FCC995CA110>, 'timestamp': 1686732622353}
fps {'fps': 50, 'value': 50, 'timestamp': 1686732622739}
gpu {'device': 0, 'renderer': 0, 'tiler': 0, 'value': 0, 'timestamp': 1686732622829}#获取某一性能指标的数据,eg:memory
$ tidevice perf -B bundleID -o memory
memory {'pid': 287, 'timestamp': 1686732591464, 'value': 236.6890106201172}
memory {'pid': 287, 'timestamp': 1686732592332, 'value': 236.6890106201172}
memory {'pid': 287, 'timestamp': 1686732593323, 'value': 236.6890106201172}
memory {'pid': 287, 'timestamp': 1686732594332, 'value': 236.6108856201172}
memory {'pid': 287, 'timestamp': 1686732595319, 'value': 236.5640106201172}
memory {'pid': 287, 'timestamp': 1686732596327, 'value': 236.5796356201172}
memory {'pid': 287, 'timestamp': 1686732597318, 'value': 236.5952606201172}# 功耗采集
# 每一秒打印一行JSON,至于里面什么单位不太懂
$ tidevice energy com.example.demo
{"energy.overhead": -10.0, "kIDEGaugeSecondsSinceInitialQueryKey": 0, "energy.version": 1, "energy.networkning.overhead": 0, "energy.appstate.cost": 8, "energy.location.overhead": 0, "energy.thermalstate.cost": 0, "energy.networking.cost": 0, "energy.cost": -10.0, "energy.cpu.overhead": 0, "energy.appstate.overhead": 0, "energy.gpu.overhead": 0, "energy.inducedthermalstate.cost": -1}2.python script method
import time
import tidevice
from tidevice._perf import DataType

t = tidevice.Device()
# perf = tidevice.Performance(t,[DataType.CPU, DataType.MEMORY, DataType.NETWORK, DataType.FPS, DataType.PAGE, DataType.SCREENSHOT, DataType.GPU])
perf = tidevice.Performance(t,DataType.MEMORY)

def callback(_type:tidevice.DataType,value:dict):
    print(_type.value,value)

perf.start('com.example.demo',callback = callback)
time.sleep(60)
perf.stop()
You can use pyecharts to automatically generate real-time performance collection reports.
Install pyecharts
pip install -i https://pypi.tuna.tsinghua.edu.cn/simple/ pyecharts#绘图
x = [i for i in range(len(d))]
y = d
print(x)
print(y)
#创建对象,可以添加一些参数
line = Line(init_opts=options.InitOpts(width='800px',height='600px'))
#添加x轴y轴数据,注意添加y轴数据的时候必须设置series_name参数,表示图例的名称
line.add_xaxis(xaxis_data=x)
line.add_yaxis(series_name='memory', y_axis=y, is_symbol_show=True, label_opts=options.LabelOpts(is_show=False),
#is_symbol_show=True显示点,label_opts=opts.LabelOpts(is_show=False)不显示值
#设置展示最大值最小值
markpoint_opts=options.MarkPointOpts(
data=[
options.MarkPointItem(type_="max",name="最大值", symbol="pin", symbol_size=[70,50]),
options.MarkPointItem(type_="min", name="最小值",symbol="pin", symbol_size=[70,50], itemstyle_opts={'color':'#3CB371'}),
]
),
#设置展示平均值
markline_opts=options.MarkLineOpts(
data=[options.MarkLineItem(type_="average",name="平均值")]
))
line.render()
os.system('open render.html')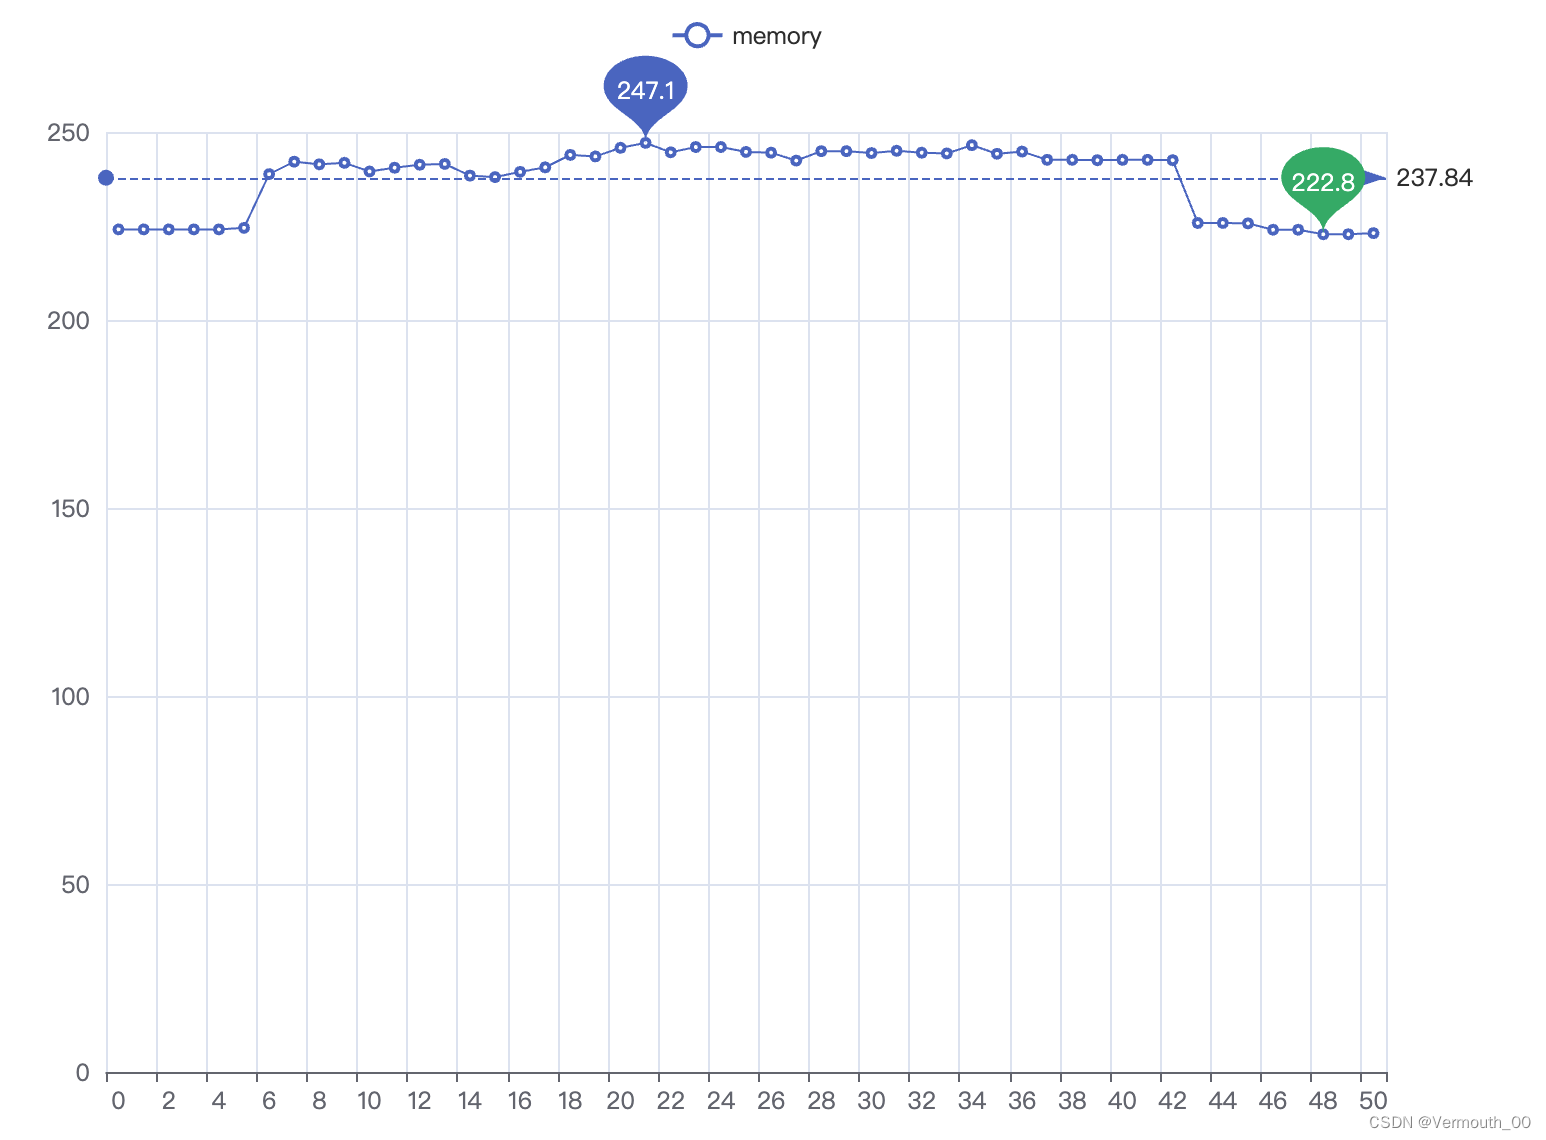
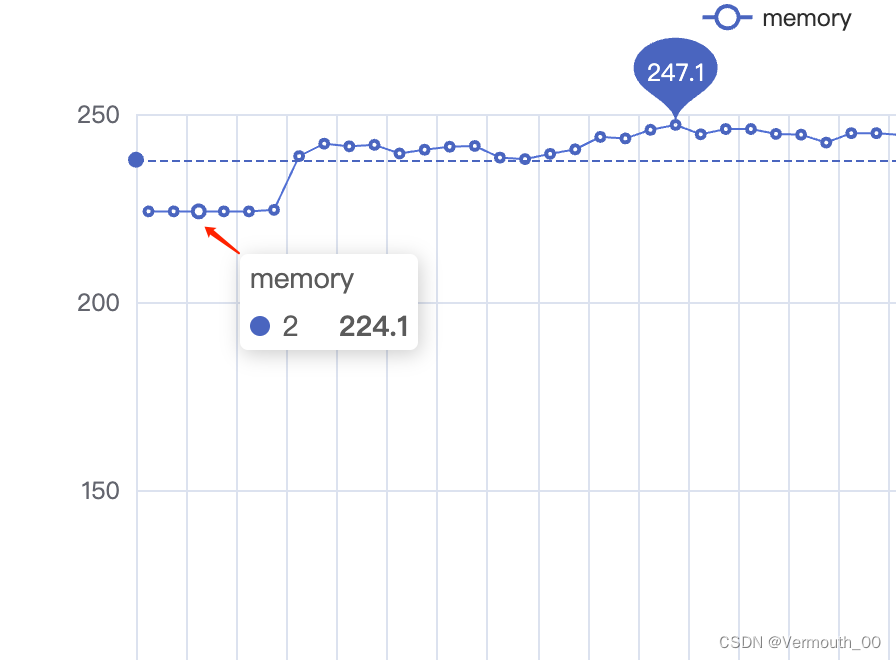
Get memory data + overall drawing code:
import time
import tidevice
from tidevice._perf import DataType
import os
#折线图
from pyecharts.charts import Line
#为图表添加参数
from pyecharts import options
t = tidevice.Device()
# perf = tidevice.Performance(t,[DataType.CPU, DataType.MEMORY, DataType.NETWORK, DataType.FPS, DataType.PAGE, DataType.SCREENSHOT, DataType.GPU])
perf = tidevice.Performance(t,DataType.MEMORY)
d = []
def callback(_type:tidevice.DataType,value:dict):
print(_type.value,value)
# 处理数据,拿到内存数值,四舍五入到小数点后一位
mem = round(value['value'],1)
print(mem)
d.append(mem)
# with open('memory.txt','a') as f:
# f.writelines(value)
perf.start('com.xxx.xxx',callback = callback)
time.sleep(1800)
perf.stop()
# print(d)
#绘图
x = [i for i in range(len(d))]
y = d
print(x)
print(y)

#创建对象,可以添加一些参数
line = Line(init_opts=options.InitOpts(width='800px',height='600px'))
#添加x轴y轴数据,注意添加y轴数据的时候必须设置series_name参数,表示图例的名称
line.add_xaxis(xaxis_data=x)
line.add_yaxis(series_name='memory', y_axis=y, is_symbol_show=True, label_opts=options.LabelOpts(is_show=False),
               #is_symbol_show=True显示点,label_opts=opts.LabelOpts(is_show=False)不显示值
               #设置展示最大值最小值
                markpoint_opts=options.MarkPointOpts(
                    data=[
                        options.MarkPointItem(type_="max",name="最大值", symbol="pin", symbol_size=[70,50]),
                        options.MarkPointItem(type_="min", name="最小值",symbol="pin", symbol_size=[70,50], itemstyle_opts={'color':'#3CB371'}),
                    ]
                ),
                #设置展示平均值
                markline_opts=options.MarkLineOpts(
                    data=[options.MarkLineItem(type_="average",name="平均值")]
                ))
line.render()
os.system('open render.html')Later, we will consider making the script more versatile and run it with command line + parameters (only the bundle ID needs to be changed).
6. Run wda
Currently, on Mac computers, wda can be started and run through appium, so the existing UI automation does not use tidevice to start wda; here is an introduction to how to implement iOS automation on Windows computers, for information only.
To run iOS automation on a Windows computer, the environments required include:
-
python
-
tidevice
-
iTools
-
appium v1.20.0 or higher
-
A real iOS machine with WDA installed (first use xcode to install webdriveragent on the phone, or package wda into ipa and install it on the phone)
运行WebDriverAgent
Several issues that are already known:
-
WDA signed by operating enterprise certificates is not supported;
-
The data cable may cause the wda connection to be interrupted. Data cable used by the author (recommended): https://item.jd.com/44473991638.html
The wdaproxy command will call xctest and relay at the same time. In addition, when wda exits, xctest will be automatically restarted.
# 运行 XCTest 并在PC上监听8200端口转发到手机8100服务
$ tidevice wdaproxy -B com.facebook.wda.WebDriverAgent.Runner --port 8200
I encountered an error when running:
tidevice.exceptions.MuxError: [Errno No app matches] com.facebook.wda.WebDriverAgent.Runner
Use the tidevice applist command to check and find that the package name is com.facebook.WebDriverAgentRunner.xxxxx.xctrunner. You need to remember the name of the webdriveragentrunner installed on your device;
You can check it with tidevice applist, and then replace com.facebook.wda.WebDriverAgent.Runner in the command with the name of webdriveragentrunner on your device.
After startup, you can use Appium orfacebook-wda to run iOS automation.
facebook-wda sample code
import wda
c = wda.Client("http://localhost:8200")
print(c.info)
Appium requires the following configurations to be set:
-
automationName: Execution engine, iOS device needs to be set to XCUITest
-
webDriverAgentUrl: In the iOS running script, you need to configure webDriverAgentUrl to the appium driver so that appium's built-in process of starting wda with xcode will not be triggered. Otherwise Appium will look for xcode whenever this is triggered. Windows does not have xcode, so naturally it cannot run and an error message appears: Error: The usbmuxd socket at '/var/run/usbmuxd' does not exist or is not accessible
-
usePrebuiltWDA: Use already compiled WDA.
-
useXctestrunFile: Use Xctestrun file to start WDA. Since this function expects you to have already built the WDA project, it neither checks if you have the necessary dependencies to build nor WDA attempts to build the project. Default is false.
-
skipLogCapture: Skip starting to capture logs, the default is false.
"webDriverAgentUrl": "http://localhost:8200"
"usePrebuiltWDA": "false",
"useXctestrunFile": "false",
"skipLogCapture": "true",
"automationName": "XCUITest"
7. Tool comparison
| tidevice |
libimobiledevice |
|
|---|---|---|
| Introduction |
Tidevice is Alibaba's open source iOS automated testing tool. It can provide functions such as taking screenshots, obtaining mobile phone information, installing and uninstalling IPA packages, starting and stopping applications based on bundle ID, obtaining specified application performance data, and simulating xcode to run xctest. |
libimobiledevice is a library for communicating with Apple iOS devices using native protocols. Equivalent to Android's adb, it is used to obtain iOS device information. It is a necessary dependency library for appium to connect to iOS devices. Through this library, Mac OS can easily obtain iOS device information. |
| Same point |
All can provide functions such as obtaining device information, uninstalling and installing applications. |
|
| Difference |
Easy to install |
Installation is cumbersome and prone to problems |
| Ability to start and stop applications based on bundle ID |
Cannot start and stop applications based on bundle ID |
|
| Support mac/windows/linux system |
Supports mac system, can be compiled and installed on Linux, does not support Windows system |
|
| Ability to obtain performance data |
Performance data cannot be obtained directly |
|
| can start wda |
Can't start wda |
|