Table of contents
Implement load balancing
Several load balancing algorithms of Nginx:
-
1. Polling (default) Each request is assigned to the downstream service nodes one by one in chronological order. If one of the nodes fails, nginx will automatically eliminate the faulty system so that users can Use is not affected.
-
2. Weight Specify the weight value weight for the downstream service node in the configuration file. The larger the weight value, the higher the assigned evaluation rate. Generally, this Load balancing is used for different configurations of nodes. Some may have high configurations and some may have low configurations.
-
3.ip_hash For each request, hash the ip and then assign it to the background node. In this way, the same ip will be Fixed allocation to downstream fixed services. It can temporarily solve the problem of session sharing between containers in a cluster environment(because session can only be shared with One person, one-to-one record, but if load balancing is needed now, a one-to-many situation occurs, you can use ip_hash to achieve one-to-one), but it is not the fundamental solution, it is just a temporary solution. Let’s imagine , if the access is good, the router at home has been restarted, or the IP address assigned to you by the operator has changed, then when you access again, the new IP may be assigned to a new service, and the previous session will also be It fails.
-
4.least_conn (least connection scheduling algorithm) The least connection scheduling algorithm, based on the connection status of downstream services, gives priority to the service allocation with the smallest number of connections.
-
5.least_time (minimum response time) Minimum response time, calculate the average response time of the node, and then take the one with the fastest response and assign a higher weight.
(1) First we need a total of three hosts
The two hosts on the backend are used for the apache service:
window10:192.168.159.165

kail:192.168.159.151
Load balancing device nginx:
centos1:192.168.159.200(2) Configure window10
Start apache service
Create a new web page and edit the content:
新建的网页:www/index.html
内容:
Hello My Ip add 192.168.159.165
Access results

(2) Configure kail
Start apache service
Create a new web page and edit the content:
网页地址:/var/html/index.html
网页内容:
Hello My Ip add 192.168.159.165
Access results

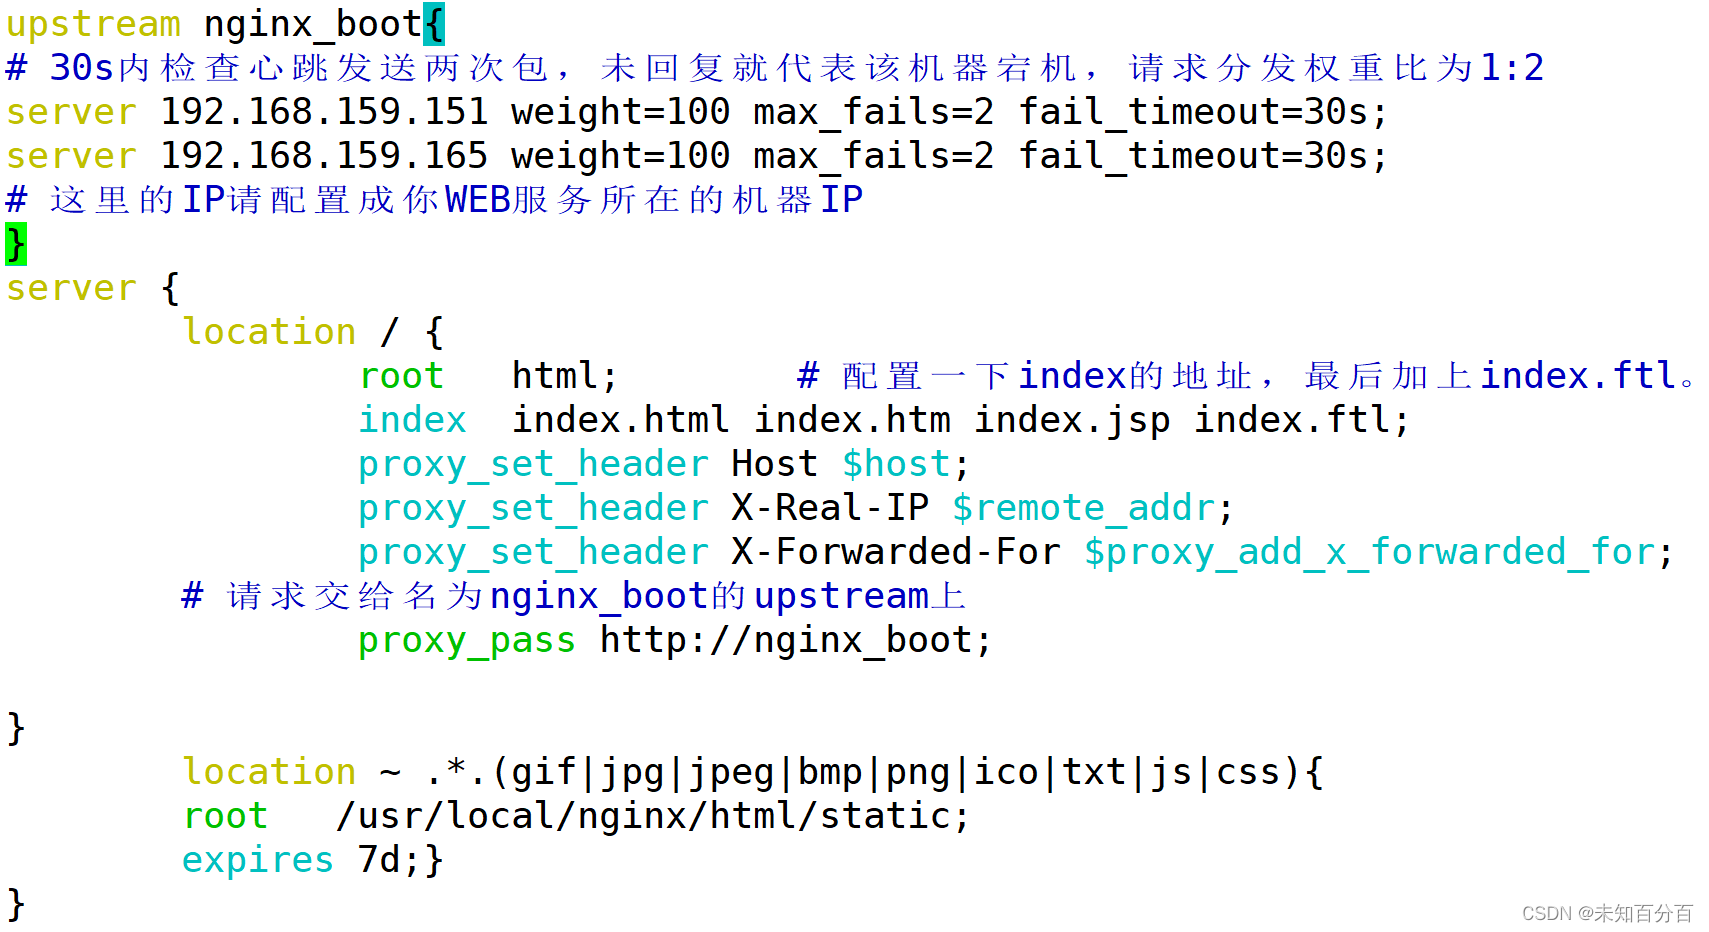
(3) nginx device configuration
Enter /etc/nginx/nginx.conf
vim /etc/nginx/nginx.confConfigure load balancing:
upstream nginx_boot{
# 30s内检查心跳发送两次包,未回复就代表该机器宕机,请求分发权重比为1:2
server 192.168.159.151 weight=100 max_fails=2 fail_timeout=30s;
server 192.168.159.165 weight=100 max_fails=2 fail_timeout=30s;
# 这里的IP请配置成你WEB服务所在的机器IP
}
server {
        location / {
                root   html;        # 配置一下index的地址,最后加上index.ftl。
                index  index.html index.htm index.jsp index.ftl;
                proxy_set_header Host $host;
                proxy_set_header X-Real-IP $remote_addr;
                proxy_set_header X-Forwarded-For $proxy_add_x_forwarded_for;
        # 请求交给名为nginx_boot的upstream上
                proxy_pass http://nginx_boot;

}
        location ~ .*.(gif|jpg|jpeg|bmp|png|ico|txt|js|css){
        root   /usr/local/nginx/html/static;
        expires 7d;}
}
Now you can try to access:
first:
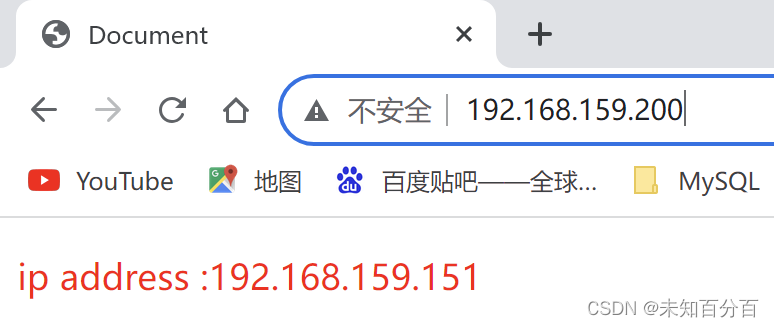
the second time:

Continuous attempts can be found: it always accesses 165 once and then 151 again, successfully achieving load balancing! ! ! , and the weight is the same as what we set. Of course, the weight can also be modified manually.
You can also change the load balancing method to polling or other methods introduced above.
Achieve high availability
If you use a single node to deploy Nginx online, natural and man-made disasters will inevitably occur, such as system abnormalities, program downtime, server power outages, computer room explosions, earth destruction... Hahaha, that's an exaggeration. However, there are hidden dangers in the actual production environment. Since Nginx serves as the gateway layer of the entire system to access external traffic, once Nginx goes down, the entire system will eventually become unavailable. This will undoubtedly bring a very poor user experience. Therefore, the high availability characteristics of Nginx must also be ensured.
Next, we will use keepalived’s VIP mechanism to achieve high availability of Nginx. VIP does not mean only members, but refers to Virtual IP, that is, virtual IP.
Keepalived was a frequently used high-availability technology in the previous development of monolithic architectures. For example, MySQL, Redis, MQ, Proxy, Tomcat, etc. all use the VIP mechanism provided by keepalived to achieve high availability of single-node applications.
The above experiment has been completed, but now load balancing has been achieved but high availability has not been achieved.
To achieve high availability, you need to add an nginx server
Here we use 192.168.159.201 as another nginx server
Implementation principle: (similar to VRRP)
-
You need to install the keepalive+nginx environment on both devices 200 and 201
-
keepLive creates a virtual VIP
-
The browser achieves high availability by accessing this VIP
The device 192.168.159.200 is used here. The following is the specific process:
(1) First configure keepalive
//获取软件包
wget https://www.keepalived.org/software/keepalived-2.2.4.tar.gz
//解压
tar -zxvf keepalived-2.2.4.tar.gz
//进入该目录中后进行预编译
./configure
//编译
make/make install
(2) Add configuration file
vi keepalived.conf
bal_defs {
    # 自带的邮件提醒服务,建议用独立的监控或第三方SMTP,也可选择配置邮件发送。
    notification_email {
        root@localhost
    }
    notification_email_from root@localhost
    smtp_server localhost
    smtp_connect_timeout 30
    # 高可用集群主机身份标识(集群中主机身份标识名称不能重复,建议配置成本机IP)
 router_id 192.168.159.200
}

# 定时运行的脚本文件配置
vrrp_script check_nginx_pid_restart {
    # 之前编写的nginx重启脚本的所在位置
    script "/soft/scripts/keepalived/check_nginx_pid_restart.sh"
    # 每间隔3秒执行一次
    interval 3
    # 如果脚本中的条件成立,重启一次则权重-20
    weight -20
}

# 定义虚拟路由,VI_1为虚拟路由的标示符(可自定义名称)
vrrp_instance VI_1 {
    # 当前节点的身份标识:用来决定主从(MASTER为主机,BACKUP为从机)
 state MASTER
    # 绑定虚拟IP的网络接口,根据自己的机器的网卡配置
 interface ens33
    # 虚拟路由的ID号,主从两个节点设置必须一样
 virtual_router_id 250
    # 填写本机IP
 mcast_src_ip 192.168.159.200
    # 节点权重优先级,主节点要比从节点优先级高
 priority 100
    # 优先级高的设置nopreempt,解决异常恢复后再次抢占造成的脑裂问题
 nopreempt
    # 组播信息发送间隔,两个节点设置必须一样,默认1s(类似于心跳检测)
 advert_int 1
    authentication {
        auth_type PASS
        auth_pass 1111
    }
    # 将track_script块加入instance配置块
    track_script {
        # 执行Nginx监控的脚本
  check_nginx_pid_restart
    }

    virtual_ipaddress {
        # 虚拟IP(VIP),也可扩展,可配置多个。
  192.168.159.250
    }
}
(7)Write script
because check_nginx_pid_restart.sh
//脚本内容:
#!/bin/sh
# 通过ps指令查询后台的nginx进程数,并将其保存在变量nginx_number中
nginx_number=`ps -C nginx --no-header | wc -l`
# 判断后台是否还有Nginx进程在运行
if [ $nginx_number -eq 0 ];then
    # 如果后台查询不到`Nginx`进程存在,则执行重启指令
    /soft/nginx/sbin/nginx -c /soft/nginx/conf/nginx.conf
    # 重启后等待1s后,再次查询后台进程数
    sleep 1
    # 如果重启后依旧无法查询到nginx进程
    if [ `ps -C nginx --no-header | wc -l` -eq 0 ];then
        # 将keepalived主机下线,将虚拟IP漂移给从机,从机上线接管Nginx服务
        systemctl stop keepalived.service
    fi
fi
(8) Authorize the script
chmod +x check_nginx_pid_restart.sh(9) Copy some files to /etc
mkdir /etc/keepalived
cp keepalived.conf /etc/keepalived/
cd /root/keepalived/keepalived/etc/init.d
cp keepalived /etc/init.d/
cd ../sysconfig
cp keepalived /etc/sysconfig/
(10) Modify configuration file
vim /etc/keepalived/keeplive.conf
//修改后:
bal_defs {
    # 自带的邮件提醒服务,建议用独立的监控或第三方SMTP,也可选择配置邮件发送。
    notification_email {
        root@localhost
    }
    notification_email_from root@localhost
    smtp_server localhost
    smtp_connect_timeout 30
    # 高可用集群主机身份标识(集群中主机身份标识名称不能重复,建议配置成本机IP)
 router_id 192.168.159.200
}

# 定时运行的脚本文件配置
vrrp_script check_nginx_pid_restart {
    # 之前编写的nginx重启脚本的所在位置
    script "/root//keepalived/keepalived/etc/keepalived/check_nginx_pid_restart.sh"
    # 每间隔3秒执行一次
    interval 3
    # 如果脚本中的条件成立,重启一次则权重-20
    weight -20
}

# 定义虚拟路由,VI_1为虚拟路由的标示符(可自定义名称)
vrrp_instance VI_1 {
    # 当前节点的身份标识:用来决定主从(MASTER为主机,BACKUP为从机)
 state MASTER
    # 绑定虚拟IP的网络接口,根据自己的机器的网卡配置
 interface ens33
    # 虚拟路由的ID号,主从两个节点设置必须一样
 virtual_router_id 250
    # 填写本机IP
 mcast_src_ip 192.168.159.200
    # 节点权重优先级,主节点要比从节点优先级高
 priority 100
    # 优先级高的设置nopreempt,解决异常恢复后再次抢占造成的脑裂问题
 nopreempt
    # 组播信息发送间隔,两个节点设置必须一样,默认1s(类似于心跳检测)
 advert_int 1
    authentication {
        auth_type PASS
        auth_pass 1111
    }
    # 将track_script块加入instance配置块
    track_script {
        # 执行Nginx监控的脚本
  check_nginx_pid_restart
    }

    virtual_ipaddress {
        # 虚拟IP(VIP),也可扩展,可配置多个。
  192.168.159.250
    }
}
(11) Set up auto-start at power on
[root@centos111 keepalived]# chkconfig keepalived on
[root@centos111 keepalived]# systemctl daemon-reload
[root@centos111 keepalived]# systemctl start keepalived.service
[root@centos111 keepalived]# systemctl enable keepalived.service

(12) Standby server configuration (201)--the general process is the same as 200
I won’t demonstrate it in detail here.
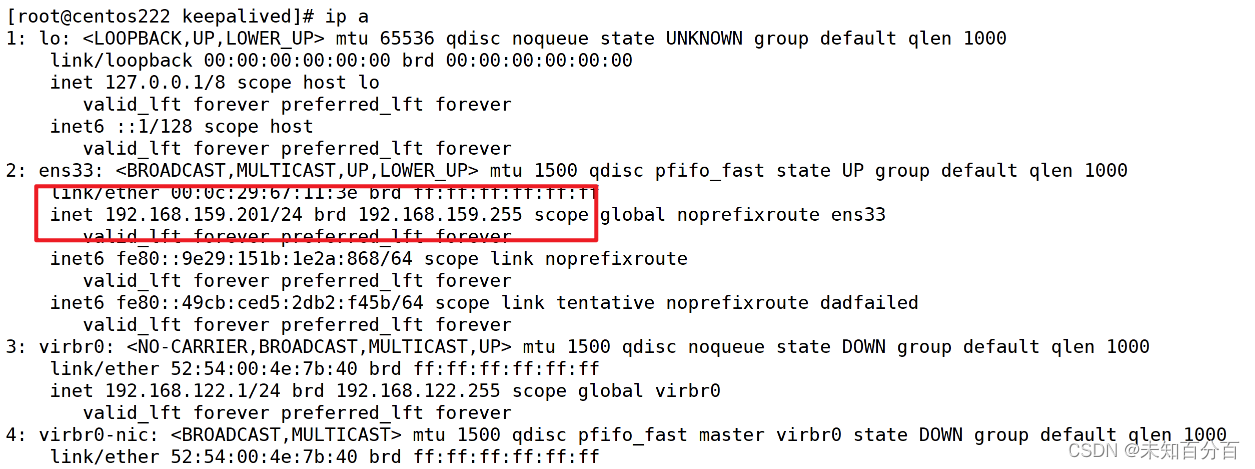
Note: From the picture above, you can clearly see that the virtual IP has been successfully mounted, but the other machine 192.168.159.250 will not mount this virtual IP. Only when the host goes offline will the slave 192.168.159.201 come online. , takes over from VIP.
(13) Test
Use kail (192.168.159.151) to ping virtual ip (192.168.159.250),

You can see the successful ping.
Now try to shut down the 192.168.159.200 server
nmcli con down ens33Then open the server
nmcli con up ens33View 192.168.159.201 server
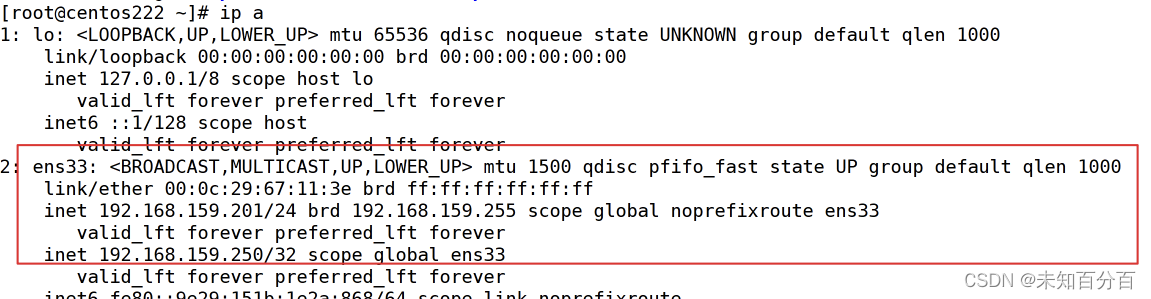
You can find that the virtual IP 192.168.159.250 has been transferred to the backup server (192.168.159.201)!
At this point, the Nginx load balancing and high availability experiments are all completed! !