One article on FRP, a powerful tool for intranet penetration
1. What is frp
1.1 Intranet penetration
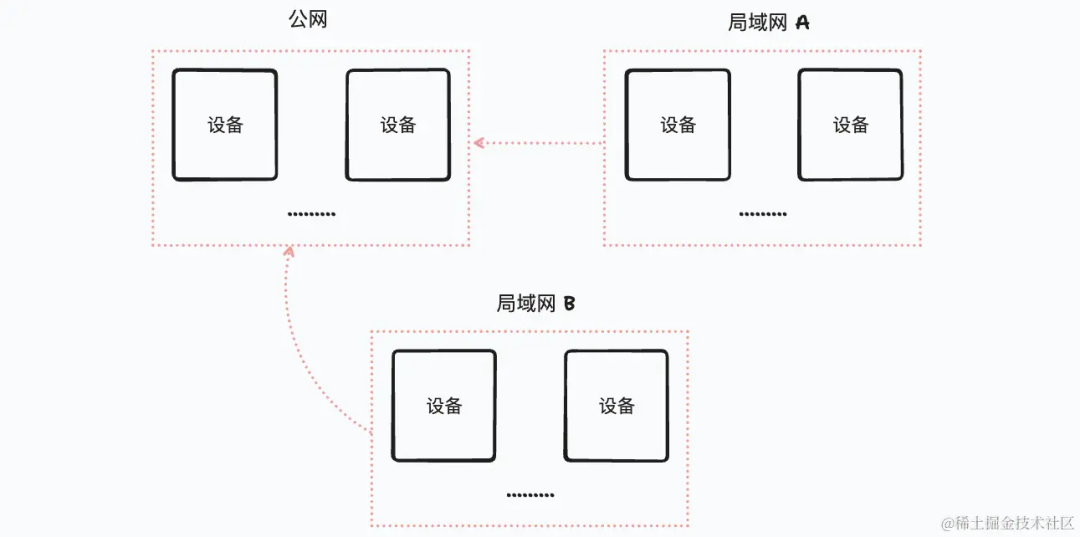
As shown in the figure below, under normal circumstances, devices in the public network can be accessed by any device!! However, devices in different LANs are isolated from each other. LAN A The device cannot access the device in the LAN B
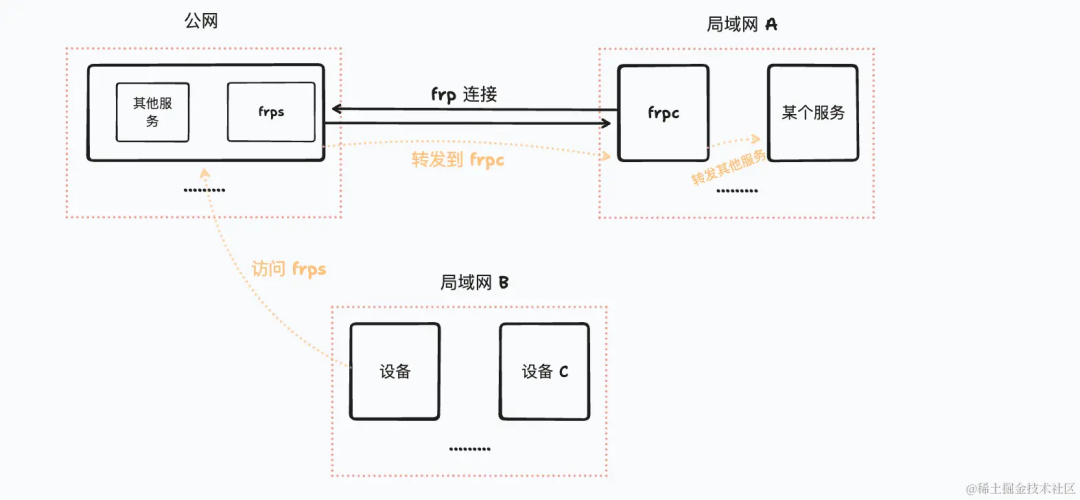
As for the intranet penetration technology, as the name suggests, it allows any device on the public network or outside the current LAN to access a device in the LAN! As shown in the figure below, the device C realizes the internal Network penetration technology, so any device in the LAN can access the current device

So what can we do with intranet penetration?
Remote access and management: Intranet penetration allows you to connect to devices or servers located in other LANs from anywhere through the Internet. The simplest example is when you want to remotely access your company's computers at home, because you The two devices are in different LANs and cannot access each other by default. This can be achieved through intranet penetration.
Gaming and entertainment: For example, if you use a computer at home to open a game server and want to invite friends to join the game, because your home network and your friend’s network are on different LANs, when your friends want to join your game server online, they will need your computer. Intranet penetration technology exposes device access rights
Shared local services: Realize file sharing, such as file sharing, printer access or surveillance cameras; through intranet penetration technology, we can access resources and services of home devices anytime and anywhere
Testing and development environment: Developers can use intranet penetration to expose the local development environment to the outside world; for example, if we want to test locally
github webhookswe can use intranet penetration to expose it to the outside world. External services access our local services
1.2 Introduction to frp & Brief description of principle
Simply put, frp is a reverse proxy software. Its function is to expose servers in the intranet to the Internet. It is lightweight but powerful!! ! Through it we can easily realize the intranet penetration function!!!
It actually has two services:
-
Client
frpc, installed on a physical machine in our intranet -
Server
frps, installed on a public network server
As shown below:
-
Firstly, the
frpsservice was deployed on the public Internet and the connection port was set up -
Then run the
frpcservice in the internal network. When it starts, it will connect to thefrpcservice on the public network and keep this long connection (if If disconnected, it will be retried) -
When the user enters the public network address, it will first check locally to see if there is an available connection. If not, then
frpsthe service will forward the request tofrpcService -
Then
frpcforwards the request to any service in the intranet
Advantages of FRP: It can hide servers in the intranet and avoid security issues caused by direct exposure of intranet servers. In addition, FRP also supports dynamic port mapping, which can easily achieve server load balancing on the intranet
2. Public network server frps deployment
As mentioned above, frp actually has two services, one is the frp server that exists on the public network, which is client deployed on the physical machine of the LAN, that is, frps; One is the frpfrpc
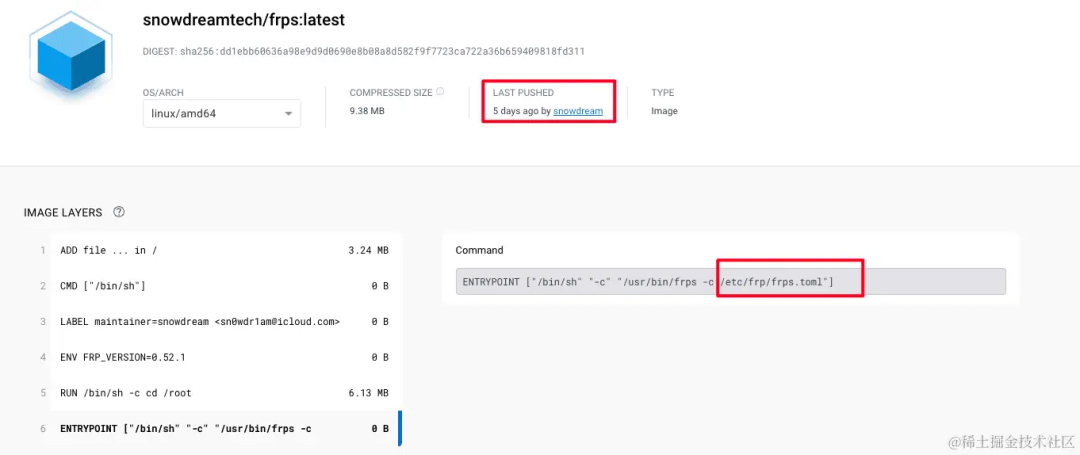
Then this section will introduce a deployment of frps . The docker image used here is snowdreamtech/frps. It should be noted that this article uses It is the latest version, so the configuration file is different from most tutorials on the Internet!!!
As shown below, from the detailed information of the docker image, we can see the time when the image was released, as well as the configuration file path used. For specific information about the configuration file, you can see the frp official website< /span>
The formal deployment will begin frps Service...
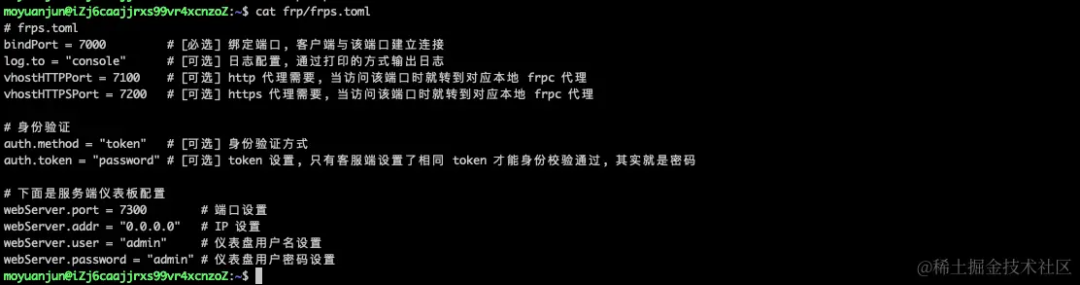
2.1 Add configuration file
First find a location and add a configuration file frps.toml. The full path of the configuration file here is /home/moyuanjun/frp/frps.toml. The content of the configuration file is as follows, and each configuration is specific. Item reference notes, more configurations can be found on the frp official website
bindPort = 7000log.to = "console"vhostHTTPPort = 7100vhostHTTPSPort = 7200auth.method = "token"auth.token = "password"webServer.port = 7300webServer.addr = "0.0.0.0"webServer.user = "admin"webServer.password = "admin"
2.2 Docker container deployment
The configuration file is complete, let’s start deployment docker!!!
-
First pull down the latest
dockerimage snowdreamtech/frps
sudo docker pull snowdreamtech/frpsThe image is pulled in advance here. The main purpose is to confirm whether the version of the snowdreamtech/frps image pulled down is the latest. Here I simply look at the creation time of the image (no way, it’s different < /span> docker There may be differences in the latest version on the source, so I was fooled this time!!!)

-
dockerRun: Run the following commandsnowdreamtech/frps, the only thing to adjust here is-v /home/moyuanjun/frp/frps.toml:/etc/frp/frps.toml, you need to change the path of my local configuration file to your own
sudo docker run -d \--network host \-v /home/moyuanjun/frp/frps.toml:/etc/frp/frps.toml \--name frps \snowdreamtech/frps

2.3 Log viewing
We have completed the deployment of the container frps docker above, but in fact we only saw the container up!! But frps we have the specific operation situation It’s impossible to know!!
In fact, we configured in frps.toml , and the log has actually been output. Here we directly pass You can view the log information:log.to = "console"docker logs frps

Of course, if we want to view real-time logs, we can use docker logs -f frps to start a real-time terminal process, so that we can monitor the log output in real time:

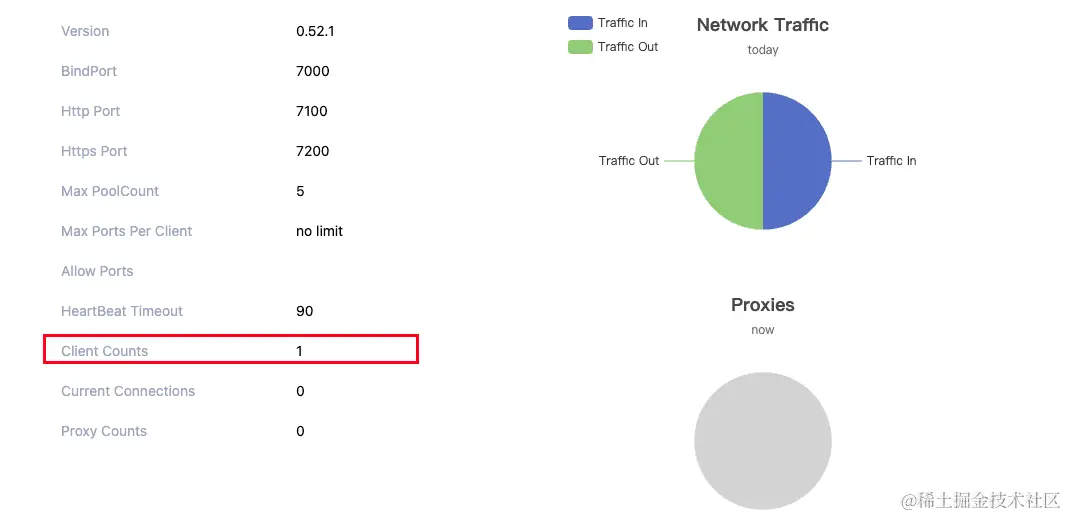
2.4 frps dashboard
My own server is owned by Alibaba Cloud. By default, the firewall only opens a few common ports, so before starting, I need to set up the Alibaba Cloud firewall here.
frpA number of ports have been opened
Remember that we configured the dashboard information in frps.toml , now we can access the dashboard page through ip/域名:[webServer.port] !!!
You need to log in for the first time. The username and password are the ones set by frps.toml :
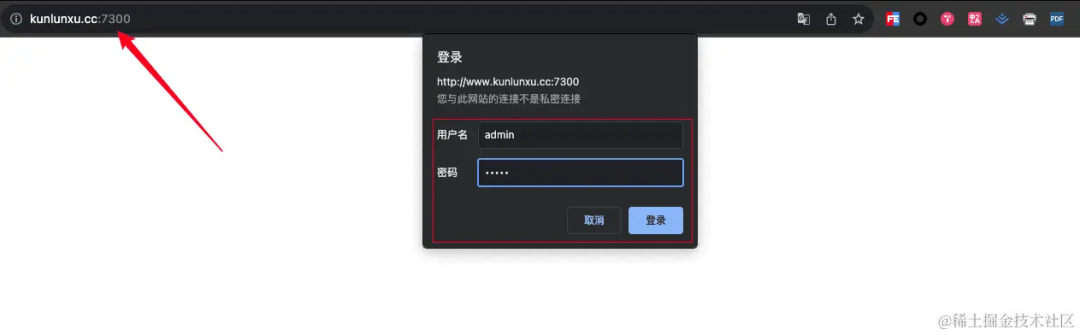
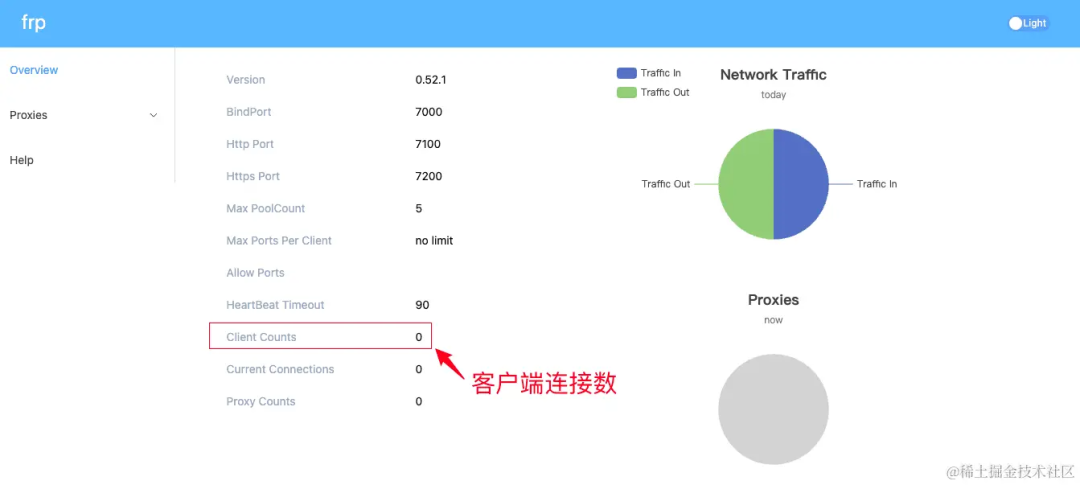
As shown below, it is the interface of the dashboard:
3. Intranet frpc deployment
Next we also need a frpc client. When we run the frpc service, it will communicate with the public network frps Establish a long connection. When we access a service that does not exist on the public network, it will be forwarded to frpc, and then frpc will do a secondary forwarding
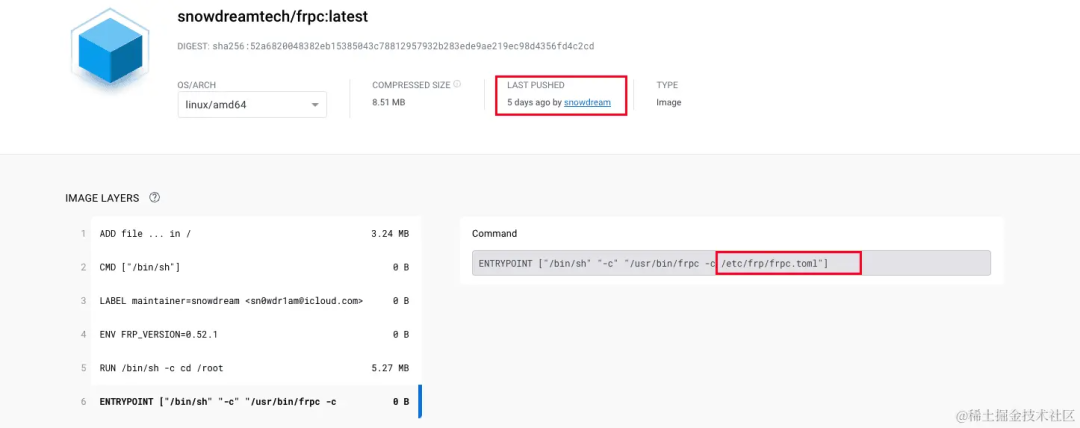
Then this section will introduce a deployment of frpc . The docker mirror used here is snowdreamtech/frpc. It should be noted that this article uses It is the latest version, so the configuration file is different from most tutorials on the Internet!!!
As shown below, from the detailed information of the docker image, you can see a release time of the image, as well as the configuration file path used. The specific information of the configuration file can be found on the frp official website
The formal deployment will begin frpc Service...
3.1 Add configuration file
It’s still the same, we need to find a location first and add a configuration file frpc.toml, the full path of my configuration file is /Users/qianyin/frp/frpc.toml, the configuration file is the simplest The content is as follows. Please refer to the comments for each configuration item. For more configurations, please visit the frp official website
serverPort = 7000serverAddr = "www.kunlunxu.cc"log.to = "console"auth.token = "password"

3.2 Docker container deployment
The configuration file is complete, let’s start deployment docker!!!
-
First pull down the latest
dockerimage snowdreamtech/frpc
docker pull snowdreamtech/frpcThe image is pulled in advance here. The main purpose is to confirm whether the version of the snowdreamtech/frpc image pulled down is the latest. Here I simply check the creation time of the image (no way, the latest version on different docker sources may be There is a difference, I was fooled this time!!!)

-
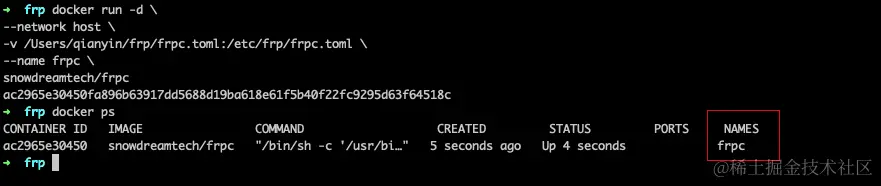
dockerRun: Run the following commandsnowdreamtech/frpc, the only thing to adjust here is-v /Users/qianyin/frp/frpc.toml:/etc/frp/frpc.toml, you need to change the path of my local configuration file to your own
docker run -d \--network host \-v /Users/qianyin/frp/frpc.toml:/etc/frp/frpc.toml \--name frpc \snowdreamtech/frpc
-
Similarly, here we can view the startup log through
docker logs frpc

-
Of course, we can also determine the connection status of by checking the number of client connections in the
frpsdashboardfrpc
3.3 Expose the local html service on the intranet to the public network (tcp version)
-
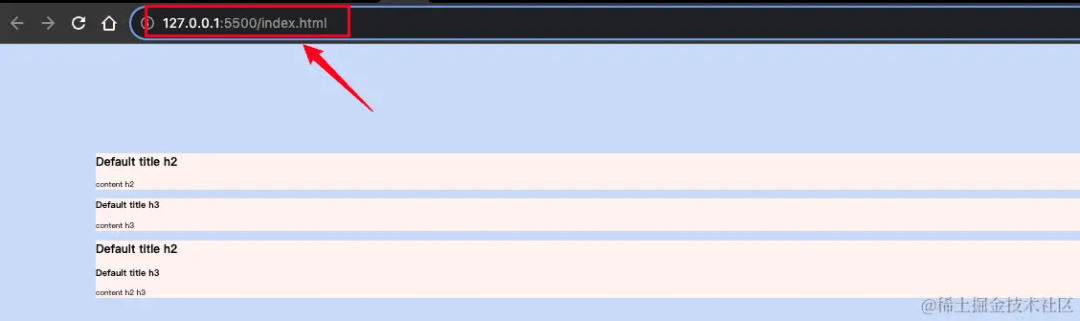
First of all, we start a service locally. I directly use the
vscodeplug-in Live Server to start a static service
-
Next we modify the
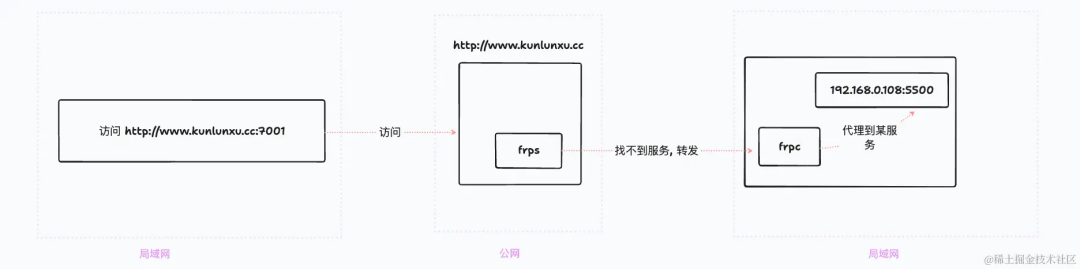
frpcconfiguration file and add a proxy configuration. What we hope is that when accessing the public networkip/域名:7001can pass < a i=3> is forwarded to the service on the intranet, and then forwarded to the service on the intranet through ; configuration The complete content is as follows. See the comments for parameter introduction. The main thing is to add configuration:frpsfrpcfprc192.168.0.108:5500[[proxies]]
# frpc.tomlserverPort = 7000 # [必选] 要连接的 frps 端口serverAddr = "www.kunlunxu.cc" # [必选] 要连接的 frps 地址log.to = "console" # [可选] 日志配置, 通过打印的方式输出日志auth.token = "password" # [可选] token 设置, frps 设置的 token, 其实就是密码+ [[proxies]]+ name = "web" # 代理名称(随便填)+ type = "tcp" # 代理类型+ localIP = "192.168.0.108" # 代理地址, 要转发到哪个地址+ localPort = 5500 # 代理端口, 要转发到哪个端口+ remotePort = 7001 # 远程端口(和远程 frps 哪个端口绑定在一起, 访问对应端口将使用该代理)
Restart frpc: In fact, it means restarting docker container
docker stop frpcdocker start frpc
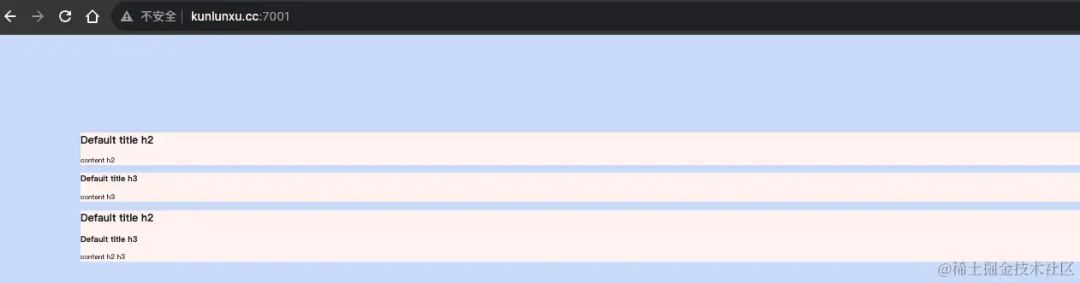
Access http://www.kunlunxu.cc:7001 will display local items on the intranet normally:
Here is a simple flow chart:
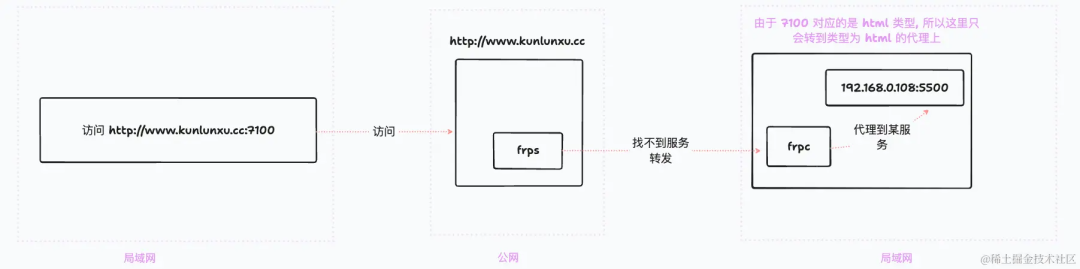
3.4 Expose the local html service on the intranet to the public network (html version)
Let’s change the configuration method. The complete configuration content is as follows. Please see the comments for parameter introduction; because we set on frps then When we access the public server port , the configuration of will be taken after forwarding to : vhostHTTPPort = 71007100frpctype = "http"
# frpc.tomlserverPort = 7000 # [必选] 要连接的 frps 端口serverAddr = "www.kunlunxu.cc" # [必选] 要连接的 frps 地址log.to = "console" # [可选] 日志配置, 通过打印的方式输出日志auth.token = "password" # [可选] token 设置, frps 设置的 token, 其实就是密码[[proxies]]name = "web - tcp" # 代理名称(随便填)type = "tcp" # 代理类型localIP = "192.168.0.108" # 代理地址, 要转发到哪个地址localPort = 5500 # 代理端口, 要转发到哪个端口remotePort = 7001 # 远程端口(和远程 frps 哪个端口绑定在一起, 访问对应端口将使用该代理)+ [[proxies]]+ name = "web - html" # 代理名称(随便填)+ type = "http" # 代理类型+ localIP = "192.168.0.108" # 代理地址, 要转发到哪个地址+ localPort = 5500 # 代理端口, 要转发到哪个端口+ customDomains = ["www.kunlunxu.cc"] # 限制公网地址, 只有对应地址上
frps 转发了 html 才会走到这里
Restart frpc: In fact, it means restarting docker container
docker stop frpcdocker start frpc
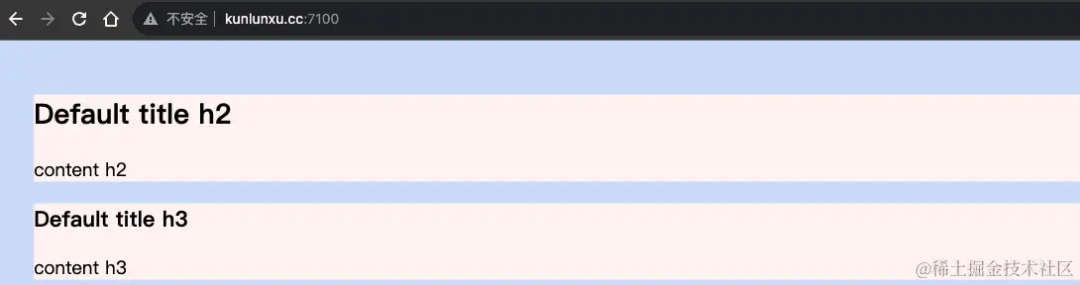
Access http://www.kunlunxu.cc:7100 will display local items on the intranet normally:

Here is a simple flow chart:
4. Encountering problems
1. Version problem: At present, the configuration files of most articles on the Internet are still frps.ini or frpc.ini, and the writing method is also old, so if you are here If you are installing the latest version, please refer to the frp official website
2. How to determine Docker which configuration file the container uses? The answer is to directly check the container information to confirm

How to view the log? As above, you can set log.to = "console" in the configuration file and cooperate with docker logs to view the log output by the service
-
webServer.addris set"0.0.0.0"above, because by default the value is127.0.0.1, during the test process I found that if I keep the default value, I cannot access the dashboard page!!! -
At the beginning, I ran a
Reactproject, and then tried to expose the project infrpc, but finally found that the proxy could not be successful!! ! After investigation, it was found that the project cannot be accessed through the intranetIP. Of course, the relative solution is to adjust the configuration inwebpack!! Later, it will save convenience. Directly use thevscodeplug-in Live Server to set up a static service for testing!! So the main thing here is to remind you that before testing, please make sure that your local service can pass through the intranet normallyIPfor access, and try not to write directly in the configuration127.0.0.1, try to use a specific intranetIP
-
On Alibaba Cloud, when pulling the snowdreamtech/frps image, it was always found that the latest version was not compatible with
hub.docker. After investigation, it was found that the problem wasDockerRegarding the source of the configuration, since I use the Alibaba Cloud accelerator, but due to the limitation ofDocker Hub, I cannot obtain the latest official image after using the image accelerator. The temporary solution is to remove the accelerator configuration. Direct connectionDocker Hubto obtain:
rm /etc/docker/daemon.jsonsudo systemctl daemon-reloadsudo systemctl restart docker
Link: https://juejin.cn/post/7293392480452247562
(Copyright belongs to the original author, any infringement or deletion)