This column will start from the basics, step by step, and use actual combat as a clue to gradually deepen the knowledge related to SpringSecurity, create a complete SpringSecurity learning step, improve engineering coding ability and thinking ability, and write high-quality code. I hope everyone can gain something from it, and please support me.
Column address:SpringSecurity column
The code involved in this article has been placed on gitee:gitee address
If there are any mistakes in the knowledge points of the article, please correct them! Let’s learn together and make progress together.
Column summary:Column summary
Article directory
-
- 5.1 Understanding AuthenticationProvider
- 5.2 Using SecurityContext
-
- 5.2.1 Applying a persistence policy to a security context
- 5.2.2 Using a hold strategy for asynchronous calls
- 5.2.3 Using retention strategies for stand-alone applications
- 5.2.4 Use DelegatingSecurityContextRunnable to forward security context
- 5.2.5 Use DelegatingSecurityContextExecutorService to forward security context
- 5.3 Understand HTTP Basic and form-based login authentication
This chapter includes
- Use custom AuthenticationProvider to implement authentication logic
- Using HTTP Basic and form-based login authentication methods
- Understand and manage SecurityContext components
In Chapters 3 and 4, we introduced some of the components that play a role in the certification process. We discussed UserDetails and how to define prototypes to describe users in Spring Security. Then we used UserDetails in the example, where you learned how the UserDetailsService and UserDetailsManager contracts work and how you implement these contracts. We also discuss the main implementations of these interfaces and use them in examples. Finally, you learned how the PasswordEncoder manages passwords and how to use it, as well as the Spring Security Cryptographic Module (SSCM) and its encryptors and key generators.
However, the AuthenticationProvider layer is responsible for the authentication logic. The AuthenticationProvider is where you find the conditions and directives that determine whether a request should be authenticated or not. The component that delegates this responsibility to the AuthenticationProvider is the AuthenticationManager, which receives requests from the HTTP filter layer. We will discuss filter layers in detail in Chapter 9. In this chapter, we look at the authentication process, which has only two possible outcomes:
- The requesting entity is not authenticated. The user is not authenticated and the application denies the request without delegating to the authorization process. Typically, in this case, the response status sent back to the client is HTTP 401 Unauthorized.
- The requesting entity is authenticated. Details about the requester are stored so that the application can use this information for authorization. As you will discover in this chapter, the SecurityContext interface is an instance that stores the details of the current authentication request.
To remind you of the actors and their connections, Figure 5.1 provides the diagram you also saw in Chapter 2.
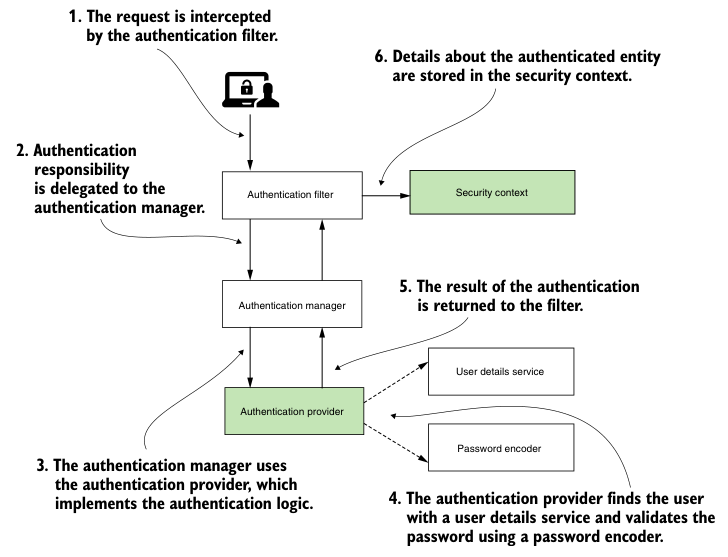
Figure 5.1 Authentication process in Spring Security. This process defines how the application identifies the person making the request. In the diagram, the components discussed in this chapter are shaded. Here, AuthenticationProvider implements the authentication logic in this process, and SecurityContext stores details about the authentication request.
This chapter covers the rest of the certification process (shaded box in Figure 5.1). Then, in Chapters 7 and 8, you'll learn how authorization works, which is the process that follows authentication in an HTTP request. First, we need to discuss how to implement the AuthenticationProvider interface. You need to know how Spring Security understands requests during the authentication process.
To give you a clear idea of how to represent a request, we'll start with the Authentication interface. Once we've discussed this, we can further observe what happens to the details of the request after successful authentication. Once authentication is successful, we can discuss the SecurityContext interface and how Spring Security manages it. Near the end of this chapter, you will learn how to customize the HTTP Basic authentication method. We will also discuss another authentication option we can use in our application – form-based login.
5.1 Understanding AuthenticationProvider
In enterprise applications, you may find yourself in a situation where the default implementation of username and password based authentication is not suitable. Additionally, there are several scenarios your application may need to implement when it comes to authentication (Figure 5.2). For example, you might want users to be able to prove who they are by using a code received in a text message or displayed by a specific app. Alternatively, you may need to implement an authentication scenario where the user must provide some kind of key stored in a file. You may even need to use a fingerprint representation of the user to implement authentication logic. The purpose of a framework is to be flexible enough to enable you to implement any of these desired scenarios.
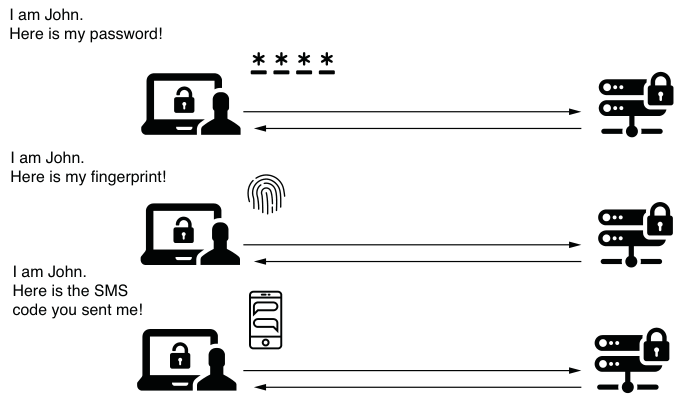
Figure 5.2 For an application, you may need to implement authentication in different ways. While in most cases a username and password are sufficient, in some cases user authentication can be more complex.
A framework will usually provide a set of the most commonly used implementations, but it certainly cannot cover every possible option. In the case of Spring Security, you can use the AuthenticationProvider contract to define any custom authentication logic. In this section, you will learn to represent authentication events by implementing the Authentication interface, and then use an AuthenticationProvider to create your custom authentication logic. To achieve our goals:
- In Section 5.1.1, we analyzed how Spring Security represents authentication events.
- In Section 5.1.2, we discussed the AuthenticationProvider contract that is responsible for authentication logic.
- In Section 5.1.3, you wrote custom authentication logic by implementing the AuthenticationProvider contract in an example.
5.1.1 Expressing requests during the authentication process
In this section, we will discuss how Spring Security represents a request during the authentication process. It's important to understand this before diving into implementing the client authentication logic. As you will learn in Section 5.1.2, to implement a custom AuthenticationProvider, you first need to understand how to represent the authentication event itself. In this section, we look at the contract that represents authentication and discuss the methods you need to know.
Authentication is one of the basic interfaces involved in the process of the same name. The authentication interface represents authentication request events and holds the details of the entity requesting access to the application. You can use information related to authentication request events during and after authentication. The user requesting access to the application is called the principal. If you have ever used Java Security API in any application, you will know that in Java Security API, an interface called Principal represents the same concept. Spring Security's Authentication interface extends this contract (Figure 5.3).
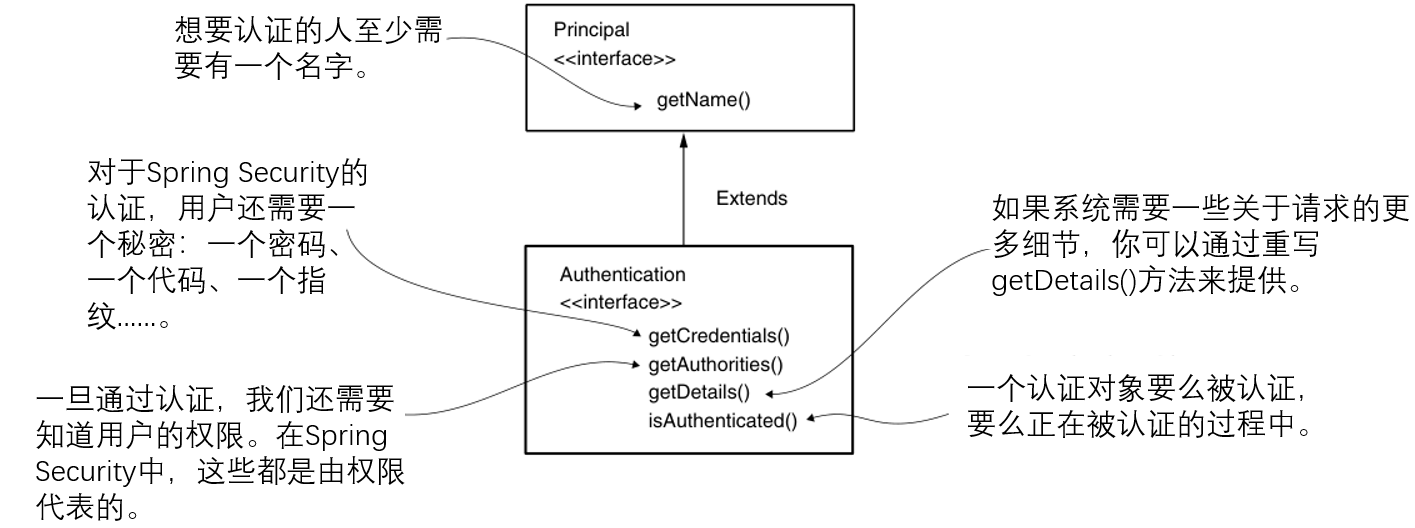
Figure 5.3 Authentication inherits from Principal. Authentication adds some requirements, such as requiring a password or allowing you to specify more details about the authentication request. Some of these details, such as the authorization list, are specific to Spring Security.
The Authentication contract in Spring Security not only represents a principal, it also adds information about whether the authentication process is completed, and a set of authorizations. This contract is designed to extend the Principal contract in the Java Security API, which is an advantage in terms of compatibility with implementations of other frameworks and applications. This flexibility allows for easier migration to Spring Security from applications that implement authentication in other ways.
Let’s learn more about authentication interface design in the list below.
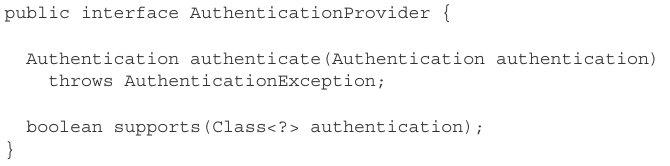
Listing 5.1 Authentication interface declared in Spring Security
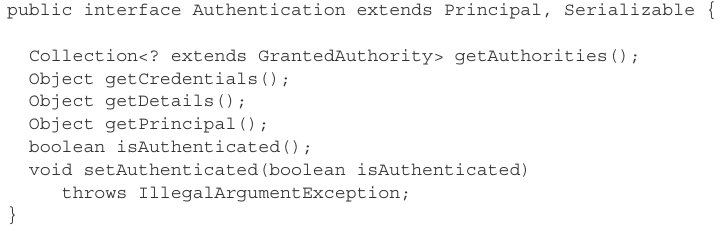
Currently, the only ways you need to learn this contract are these:
-
isAuthenticated()-If the authentication process ends, returns true; if the authentication process is still in progress, returns false.
-
getCredentials() - Returns the password or any secret keys used in the authentication process.
-
getAuthorities()-Returns the authorization collection for the authentication request.
We will discuss other methods of authenticating contracts in later chapters, and where appropriate we will look at implementations at the time.
5.1.2 Implement custom authentication logic
In this section, we will discuss implementing custom authentication logic. We analyzed the Spring Security contract related to this responsibility to understand its definition. With these details, you can implement custom authentication logic using one of the code examples in Section 5.1.3.
The AuthenticationProvider in Spring Security is responsible for handling authentication logic. The default implementation of the AuthenticationProvider interface places the responsibility of finding system users on UserDetailsService. During the authentication process, it also uses PasswordEncoder for password management. The following list gives the definitions of authentication providers that you need to implement to define a custom authentication provider for your application.
Listing 5.2 AuthenticationProvider interface
The AuthenticationProvider responsibility is closely tied to the Authentication contract. The authenticate() method receives an Authentication object as a parameter and returns an Authentication object. We implement the authenticate() method to define authentication logic. We can quickly summarize the way you should implement the authenticate() method in three main points:
-
If authentication fails, this method should throw an AuthenticationException.
-
If the authentication object received by this method is not supported by your AuthenticationProvider implementation, then this method should return null. This way we have the possibility to use multiple separate authentication types at the HTTP-filter level. We will discuss this issue further in Chapter 9. You'll also find an example of having multiple AuthorizationProvider classes in Chapter 11, the second practical chapter of the book.
-
This method should return an Authentication instance, representing a fully authenticated object. For this instance, the isAuthenticated() method returns true, which contains all necessary details about the authenticated entity. Typically, the application also removes sensitive data, such as passwords, from this instance. Once implemented, passwords are no longer required and retaining these details risks exposing them to unwanted parties.
The second method of the AuthenticationProvider interface is supports(Class<?> authentication). You can implement this method to return true if the current AuthenticationProvider supports the type provided as an Authentication object. Note that even if this method returns true for an object, it is still possible for the authenticate() method to return null and reject the request. Spring Security is designed this way to be more flexible, allowing you to implement an AuthenticationProvider that can reject authentication requests based on the details of the request rather than just its type.
An analogy for how authentication managers and authentication providers work together to validate or invalidate authentication requests is to put a more complex lock on your door. You can open this lock by using a card or an old-fashioned physical key (Figure 5.4). The lock itself is the authentication manager that decides whether to open the door or not. To make this decision, it delegates to two authentication providers: one that knows how to authenticate the card, and the other that knows how to authenticate the physical key. If you present your card to open the door, an authentication provider that only uses physical keys will complain that it doesn't know about this authentication method. But another provider supports this authentication and verifies that the card is valid for the door. This is actually the purpose of the supports() method.
In addition to testing authentication types, Spring Security adds a layer of flexibility. The door's lock can recognize a variety of cards. In this case, when you present a card, one of the authentication providers can say, "I understand this is a card. But it's not the type of card I can verify!" When supports() returns true, But this happens when authenticate() returns null.
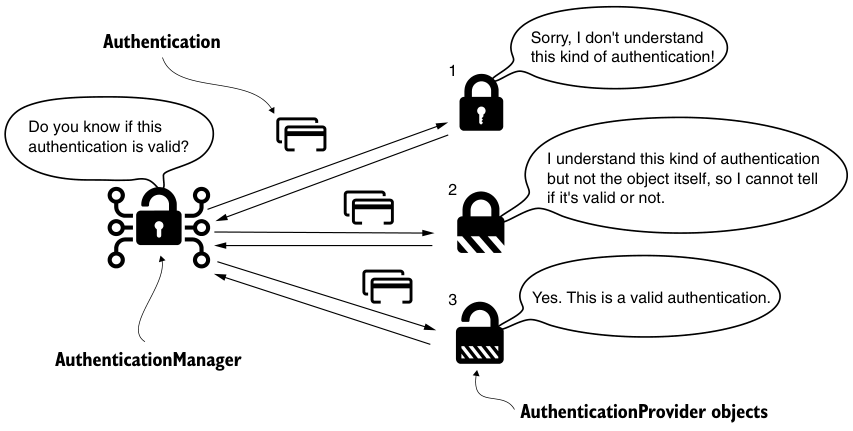
Figure 5.4 The AuthenticationManager delegates to an available authentication provider. The AuthenticationProvider may not support the authentication type provided. On the other hand, if it does support that object type, it may not know how to validate that particular object. Authentication is evaluated and an AuthenticationProvider responds to the AuthenticationManager indicating whether the request was correct.
5.1.3 Apply custom authentication logic
In this section, we implement custom authentication logic. You can find this example in project ssia-ch5-ex1. With this example, you can apply what you learned in Sections 5.1.1 and 5.1.2 about the Authentication and AuthenticationProvider interfaces. In Listings 5.3 and 5.4, we build a step-by-step example of how to implement a custom AuthenticationProvider. These steps, also shown in Figure 5.5, are as follows:
- Declare a class that implements the AuthenticationProvider contract.
- Determine which types of authentication objects the new AuthenticationProvider supports:
Override the supports(Class<?> c) method to specify which types of authentication the AuthenticationProvider we define supports.
Override the authenticate(Authentication a) method to implement authentication logic. - Register an instance of a new AuthenticationProvider implementation with Spring Security.
Listing 5.3 Overriding the supports() method of AuthenticationProvider
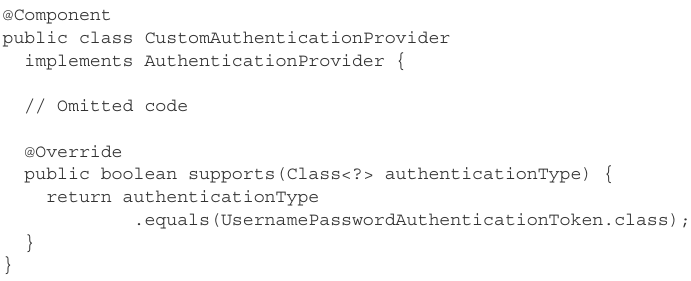
In Listing 5.3, we define a new class that implements the AuthenticationProvider interface. We mark this class with @Component to have an instance of its type in a Spring-managed context. Then, we must decide what authentication interface implementation this AuthenticationProvider supports. It depends on what type we expect to provide as argument to the authenticate() method. If we don't customize anything at the authentication filter level (which is our case, but we'll do that when we get to Chapter 9), then the UsernamePasswordAuthenticationToken class defines this type. This class is an implementation of the authentication interface and represents a standard authentication request with username and password.
With this definition, we make the AuthenticationProvider support a specific key. Once we specify the scope of our AuthenticationProvider, we implement the authentication logic by overriding the authenticate() method, as shown in the following listing.
Listing 5.4 Implementing authentication logic
package com.laurentiuspilca.ssia.security;

import org.springframework.beans.factory.annotation.Autowired;
import org.springframework.security.authentication.AuthenticationProvider;
import org.springframework.security.authentication.BadCredentialsException;
import org.springframework.security.authentication.UsernamePasswordAuthenticationToken;
import org.springframework.security.core.Authentication;
import org.springframework.security.core.userdetails.UserDetails;
import org.springframework.security.core.userdetails.UserDetailsService;
import org.springframework.security.crypto.password.PasswordEncoder;
import org.springframework.stereotype.Component;

@Component
public class CustomAuthenticationProvider implements AuthenticationProvider {


    @Autowired
    private UserDetailsService userDetailsService;

    @Autowired
    private PasswordEncoder passwordEncoder;

    @Override
    public Authentication authenticate(Authentication authentication) {


        String username = authentication.getName();
        String password = authentication.getCredentials().toString();

        UserDetails u = userDetailsService.loadUserByUsername(username);
        if (passwordEncoder.matches(password, u.getPassword())) {


            //如果密码匹配,则返回一个具有必要细节的认证契约的实现。
            return new UsernamePasswordAuthenticationToken(username, password, u.getAuthorities());
        } else {


            //如果密码不匹配,抛出一个AuthenticationException类型的异常。BadCredentialsException继承自AuthenticationException。
            throw new BadCredentialsException("Something went wrong!");
        }
    }

    @Override
    public boolean supports(Class<?> authenticationType) {


        return authenticationType.equals(UsernamePasswordAuthenticationToken.class);
    }
}
The logic in Listing 5.4 is simple, and Figure 5.5 shows this logic visually. We use the implementation of UserDetailsService to obtain UserDetails. If the user does not exist, the loadUserByUsername() method should throw an AuthenticationException. In this case, the authentication process stops and the HTTP filter sets the response status to HTTP 401 Unauthorized. If the username exists, we can further check the user's password via the matches() method of the PasswordEncoder in the context. If the passwords don't match, then an AuthenticationException should be thrown again. If the password is correct, the AuthenticationProvider returns an Authentication instance marked "authenticated" that contains details about the request.
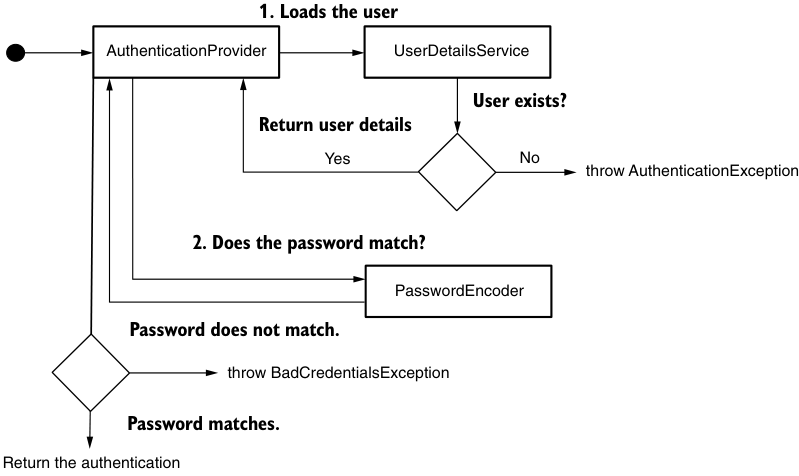
Figure 5.5 Custom authentication process implemented by AuthenticationProvider. To validate the authentication request, the AuthenticationProvider loads the user details with the provided implementation of UserDetailsService and, if the passwords match, validates the password with a PasswordEncoder. If the user does not exist or the password is incorrect, the AuthenticationProvider will throw an AuthenticationException.
To insert a new implementation of AuthenticationProvider, override the configure(AuthenticationManagerBuilder auth) method of the WebSecurityConfigurerAdapter class in your project's configuration class. This is demonstrated in the list below.
package com.laurentiuspilca.ssia.config;

import org.springframework.beans.factory.annotation.Autowired;
import org.springframework.context.annotation.Bean;
import org.springframework.context.annotation.Configuration;
import org.springframework.security.authentication.AuthenticationProvider;
import org.springframework.security.config.annotation.authentication.builders.AuthenticationManagerBuilder;
import org.springframework.security.config.annotation.web.configuration.WebSecurityConfigurerAdapter;
import org.springframework.security.core.userdetails.UserDetailsService;
import org.springframework.security.crypto.password.NoOpPasswordEncoder;
import org.springframework.security.crypto.password.PasswordEncoder;
import org.springframework.security.provisioning.JdbcUserDetailsManager;

import javax.sql.DataSource;

@Configuration
public class ProjectConfig extends WebSecurityConfigurerAdapter {


    @Autowired
    private AuthenticationProvider authenticationProvider;

    //omitted

    @Override
    protected void configure(AuthenticationManagerBuilder auth) {


        auth.authenticationProvider(authenticationProvider);
    }
}
Note In Listing 5.5, I used the @Autowired annotation on a field declared as an AuthenticationProvider. Spring recognizes Authentication-Provider as an interface (it is an abstraction). But Spring knows that it needs to find an implementation instance of that specific interface in its context. In our case, this implementation is an instance of Custo AuthenticationProvider, which is the only instance of this type that we declare using the @Component annotation and add to the Spring context.
That’s it! You have successfully customized your authentication provider implementation. Now you can customize authentication logic for your application where you need it.
How to fail in application design
Improper application of a framework can lead to reduced maintainability of the application. What's worse is that sometimes people who fail with a framework think it's the framework's fault. Let me tell you a story.One winter, the head of development at a company where I was working as a consultant called me and asked me to help them implement a new feature. They needed to apply a custom authentication method to a component in an early system developed with Spring. Unfortunately, developers did not properly rely on Spring Security's backbone architecture when implementing the application's class design.
They rely only on filter chains, reimplementing the full functionality of Spring Security as custom code.
Developers have observed that customization becomes increasingly difficult over time. But no one has taken action to redesign the components to use contracts as Spring Security intended. Much of the difficulty comes from not understanding Spring's capabilities. One major developer said: "This is all Spring Security's fault! The framework is difficult to apply, and it doesn't work for us. The framework is difficult to apply, and it is difficult to use any customization." I was a little shocked by his observation. I know Spring Security can be difficult to understand at times, and the framework is known for not having a gentle learning curve. But I've never been in a situation where I couldn't find a way to design an easily customizable class with Spring Security! ".
We investigated together and I realized that application developers were probably only using 10% of the functionality provided by Spring Security. I then presented a two-day workshop on Spring Security that focused on what (and how) we could do for the specific system components they needed to change.
It all culminated in the decision to completely rewrite a large amount of custom code to properly rely on Spring Security, making the application more easily scalable to meet their security implementation concerns. We also found some other issues not related to Spring Security, but that's another story. From this story, you can learn some lessons:
A framework, especially one that is widely used in applications, is written by many smart people. Even so, it's hard to believe it could have been implemented poorly. Always analyze your application before concluding that any problem is the fault of the framework.
When deciding to use a framework, make sure you understand at least its basics well.
Be careful about the resources you use to learn the framework. Sometimes the articles you find online will tell you how to make a quick workaround, but not necessarily how to implement a class design correctly.
Use multiple sources in your research. To clear up your misunderstandings, write a proof of concept when you're not sure how to use something.
If you decide to use a framework, use it for its intended purpose whenever possible. For example, let's say you use Spring Security and you observe that for security implementations, you tend to write more custom code instead of relying on what the framework provides. You should ask a question why this is happening.
When we rely on the functionality implemented by a framework, we can enjoy some benefits. We know these features are tested and have fewer changes, including bugs. Additionally, a good framework relies on abstractions, which help you create maintainable applications. Keep in mind that when you write your own implementation, you are more susceptible to vulnerabilities.
5.2 Using SecurityContext
This section discusses security context. We analyze how it works, how data is accessed from it, and how applications manage it in different thread-related situations. Once you complete this section, you will know how to configure security context for various situations. This way, you can use the details stored by the security context about the authenticated user when configuring authorization in Chapters 7 and 8.
At the end of the authorization process, you will most likely need details about the authenticated entity. For example, you may need to reference the username or permissions of the currently authenticated user. Can this information still be accessed after the authentication process is complete? Once the AuthenticationManager successfully completes the authentication process, it stores the Authentication instance for the rest of the request. The instance in which the Authentication object is stored is called the security context.
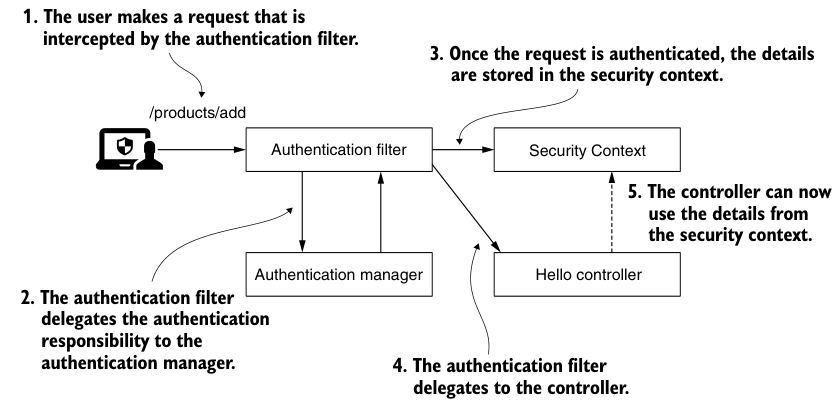
Figure 5.6 After successful authentication, the authentication filter stores the details of the authenticated entity in the security context. There, the controller implementing the action corresponding to the request can access these details when needed.
The security context of Spring Security is described by the SecurityContext interface. The following list defines this interface.
Listing 5.6 SecurityContext interface

As can be seen from the interface definition, the main responsibility of SecurityContext is to store Authentication objects. But how is the SecurityContext itself managed? Spring Security provides three strategies to manage SecurityContext, one of which plays the role of a manager. It is named SecurityContextHolder:
- MODE_THREADLOCAL—Allows each thread to store its own details in the security context. This is a common approach in a thread-by-request web application, since there is a separate thread for each request.
- MODE_INHERITABLETHREADLOCAL — Similar to MODE_THREADLOCAL, but also instructs Spring Security to copy the security context to the next thread in the case of an asynchronous method. In this way, we can say that the new thread running the @Async method inherits the security context.
- MODE_GLOBAL—Makes all threads of the application see the same security context instance.
In addition to these three strategies for managing the security context provided by Spring Security, in this section we also discuss the situation when you define your own threads without them being known to Spring. As you will learn, for these cases you need to explicitly copy the details from the security context into the new thread. Spring Security cannot automatically manage objects that are not in the Spring context, but it provides some great utility classes for this.
5.2.1 Applying a persistence policy to a security context
The first policy that manages security context is the MODE_THREADLOCAL policy. This strategy is also the default strategy used by Spring Security to manage security contexts. Under this strategy, Spring Security uses ThreadLocal to manage the context. ThreadLocal is an implementation provided by JDK. This implementation works as a collection of data, but ensures that each thread of the application only sees the data stored in the collection. This way, each request has access to its security context. No thread can access another thread's ThreadLocal. This means that in a web application, each request can only see its own security context. We can say that this is also what you usually want for a backend web application.
Figure 5.7 provides an overview of this functionality. Each request (A, B and C) has its own allocation thread (T1, T2 and T3). This way, each request only sees the details stored in its security context. But this also means that if a new thread is created (for example, when an asynchronous method is called), the new thread will also have its own security context. Details from the parent thread (the original thread of the request) are not copied to the new thread's security context.

Figure 5.7 Each request has its own thread, represented by an arrow. Each thread can only access its own security context details. When a new thread is created (for example, via an @Async method), the details of the parent thread are not copied.
As the default policy for managing security contexts, this process does not require explicit configuration. As long as the authentication process is completed, use the static getContext() method to request the security context from the holder wherever a security context is required. In Listing 5.7, you can find an example of obtaining the security context in one of the endpoints of the application. From the security context, you can further obtain the Authentication object, which stores detailed information about the authenticated entity. You can find the examples we discuss in this section as part of the project sia-ch5-ex2.
Listing 5.7 Obtaining SecurityContext from SecurityContextHolder
package com.laurentiuspilca.ssia.controllers;

import com.laurentiuspilca.ssia.services.HelloService;
import org.springframework.beans.factory.annotation.Autowired;
import org.springframework.scheduling.annotation.Async;
import org.springframework.security.concurrent.DelegatingSecurityContextCallable;
import org.springframework.security.concurrent.DelegatingSecurityContextExecutorService;
import org.springframework.security.core.Authentication;
import org.springframework.security.core.context.SecurityContext;
import org.springframework.security.core.context.SecurityContextHolder;
import org.springframework.web.bind.annotation.GetMapping;
import org.springframework.web.bind.annotation.RestController;

import java.util.concurrent.Callable;
import java.util.concurrent.ExecutorService;
import java.util.concurrent.Executors;

@RestController
public class HelloController {


    @Autowired
    private HelloService helloService;

    @GetMapping("/hello")
    public String hello() {


        SecurityContext context = SecurityContextHolder.getContext();
        Authentication a = context.getAuthentication();

        return "Hello, " + a.getName() + "!";
    }

}
Getting the authentication from the context is even more comfortable at the endpoint level, since Spring knows to inject it directly into the method parameters. You don't need to explicitly reference the SecurityContextHolder class every time. This approach, like the one presented in the list below, is better.
 @GetMapping("/hello")
    public String hello(Authentication a) {


        return "Hello, " + a.getName() + "!";
    }
When the endpoint is called with a correct user, the response body contains the user name. For example:
curl -u user:99ff79e3-8ca0-401c-a396-0a8625ab3bad http://localhost:8080/hello
Hello, user!
5.2.2 Using a hold strategy for asynchronous calls
It's easy to stick with the default policies for managing your security environment. And in many cases, it's the only thing you need. MODE_THREADLOCAL gives you the ability to isolate security contexts for each thread, which makes security context understanding and management more natural. But there are some cases where this doesn't apply.
The situation becomes more complicated if we have to handle multiple threads per request. See what happens if you make the endpoint asynchronous. The thread executing the method is no longer the same thread that served the request. Think of the endpoints like the next one in the list.

In order to enable the functionality of the @Async annotation, I also created a configuration class and annotated it with @EnableAsync, as shown in the figure.
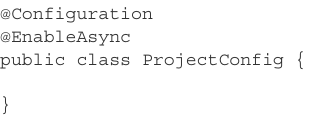
NOTE Sometimes in articles or forums you will find configuration annotations placed above the main class. For example, you may find that some examples use the @EnableAsync annotation directly on the main class. This approach is technically correct because we annotate the main class of the Spring Boot application with the @SpringBootApplication annotation, which includes the @Configuration attribute. But in real-world applications, we prefer to separate responsibilities, and we never use the main class as a configuration class. To make the examples in this book as clear as possible, I prefer to keep these annotations on top of the @Configuration class, similar to what you would have in a real-world scenario.
If you try the current code, it will throw a NullPointerException at the line where you get the name from the authentication, which is
String username = context.getAuthentication().getName()
This is because the method is now executed on another thread that does not inherit the security context. For this reason, the authorization object is null, which, in the context of the code shown, would cause a NullPointerException. In this case, you can solve this problem by using the MODE_INHERITABLETHREADLOCAL policy. This can be set by calling the SecurityContextHolder.setStrategyName() method or using the system property spring.security.strategy. By setting this policy, the framework knows to copy the details of the request's original thread into the newly created thread of the asynchronous method (Figure 5.8).
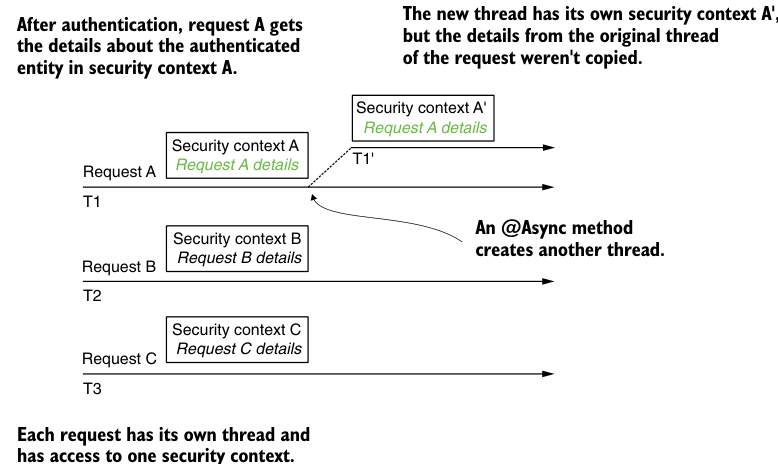
Figure 5.8 When using MODE_INHERITABLETHREADLOCAL, the framework copies the security context details from the request's original thread to the new thread's security context.
The next listing describes how to set the security context management policy by calling the setStrategyName() method.
package com.laurentiuspilca.ssia.config;

import org.springframework.beans.factory.InitializingBean;
import org.springframework.context.annotation.Bean;
import org.springframework.context.annotation.Configuration;
import org.springframework.scheduling.annotation.EnableAsync;
import org.springframework.security.core.context.SecurityContextHolder;

@Configuration
@EnableAsync
public class ProjectConfig {


    @Bean
    public InitializingBean initializingBean() {


        return () -> SecurityContextHolder.setStrategyName(SecurityContextHolder.MODE_INHERITABLETHREADLOCAL);
    }
}
After calling the endpoint, you will find that the security context is correctly propagated to the next thread by Spring. Additionally, Authentication is no longer empty.
Note this only works if the framework creates the thread itself (e.g. in the case of @Async methods). If your code creates threads, you will encounter the same problem even with the MODE _INHERITABLETHREADLOCAL policy. This happens because, in this case, the framework is not aware of the threads created by your code. We discuss how to resolve these situations in Sections 5.2.4 and 5.2.5.
5.2.3 Using retention strategies for stand-alone applications
If all you need is a security context shared by all threads in the application, you can change the policy to MODE_GLOBAL (Figure 5.9).
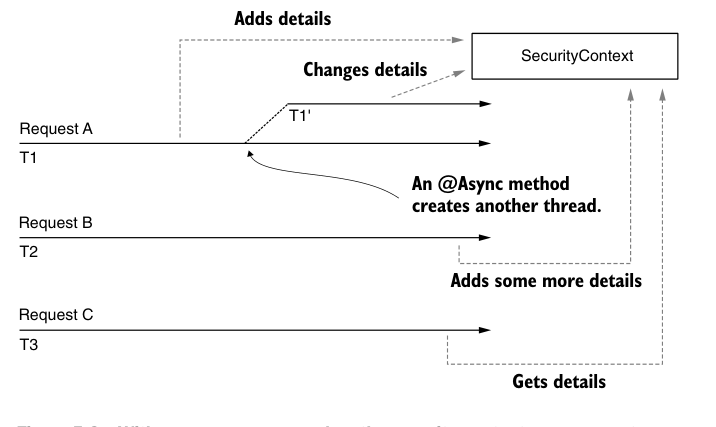
Figure 5.9 When using MODE_GLOBAL as the security context management strategy, all threads access the same security context. This means that these threads all have access to the same data and can change this information. Because of this, race conditions may occur and you must be aware of synchronization issues.
You wouldn't use this strategy with a web server because it doesn't fit the overall picture of the application. A backend web application manages the requests it receives independently, so it does make more sense to have the security context separate for each request, rather than having one context for all requests. But it can be a good use for a standalone application.
As the following code snippet shows, you can change the policy in the same way we did with MODE_INHERITABLETHREADLOCAL. You can use the method SecurityContextHolder.setStrategyName() or the system property spring.security .strategy().
@Bean
public InitializingBean initializingBean() {


    return () -> SecurityContextHolder.setStrategyName( SecurityContextHolder.MODE_GLOBAL);
}
Also, please note that SecurityContext is not thread-safe. Therefore, under this policy where all threads of the application can access the SecurityContext object, you need to take care of concurrent access.
5.2.4 Use DelegatingSecurityContextRunnable to forward security context
You have learned that you can manage security context using the three modes provided by Spring Security. MODE_THREADLOCAL, MODE_INHERITEDTHREADLOCAL, and MODE_GLOBAL. By default, the framework only ensures that a security context is provided for the requesting thread, and that this security context is only open to that thread. But the framework doesn't care about newly created threads (for example, in the case of async methods). You know, for this case, you have to explicitly set a different mode to manage the security context. But we still have a singularity: what happens when your code starts a new thread without the framework knowing about it? Sometimes we give these self-managing threads names because we are managing them, not the framework. In this section, we will apply some utilities provided by Spring Security to help you propagate security context to newly created threads.
No specific strategy for SecurityContextHolder gives you a solution for self-managed threads. In this case, you need to pay attention to the propagation of security context. One solution to this is to use DelegatingSecurityContextRunnable to decorate the tasks you want to execute on a separate thread. DelegatingSecurityContextRunnable extends Runnable. You can use it after the execution of the task when no value is expected. If you have a return value, then you can use Callable instead, which is DelegatingSecurityContextCallable. Both classes represent tasks that are executed asynchronously, just like any other Runnable or Callable. Additionally, these classes ensure that the current security context is replicated for the thread executing the task. As shown in Figure 5.10, these objects decorate the original task and copy the security context to the new thread.
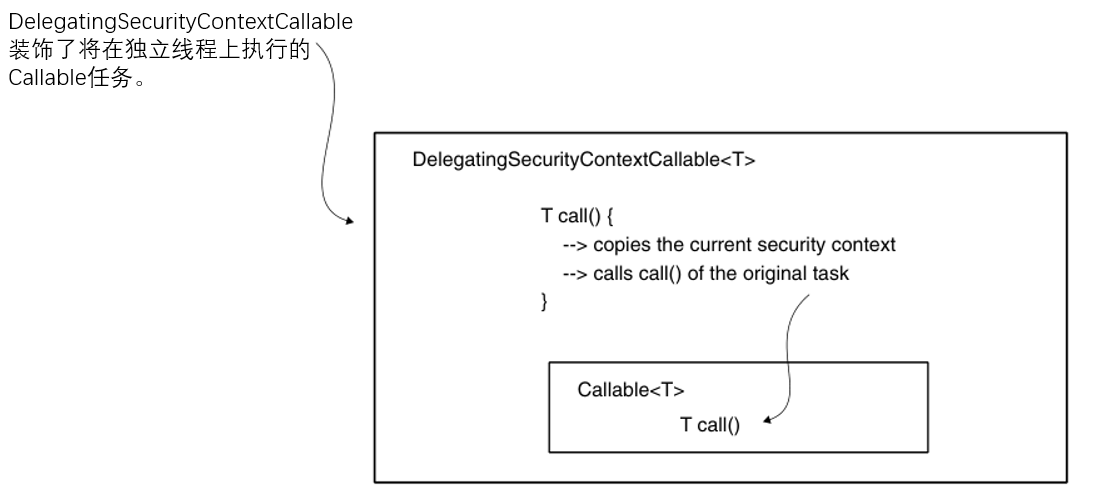
Figure 5.10 DelegatingSecurityContextCallable is designed as a decorator of the Callable object. When constructing such an object, you provide a callable task that the application executes asynchronously. DelegatingSecurityContextCallable copies details from the security context to a new thread and then performs the task.
Listing 5.11 introduces the use of DelegatingSecurityContextCallable. Let's first define a simple endpoint method and declare a Callable object. The Callable task returns the username from the current security context.
Listing 5.11 Defining a callable object and executing it as a task on a separate thread
@GetMapping("/ciao")
public String ciao() throws Exception {


    Callable<String> task = () -> {


        SecurityContext context = SecurityContextHolder.getContext();
        return context.getAuthentication().getName();
    };

   ...
}
Let's continue this example and submit the task to an ExecutorService. The execution response is retrieved and returned by the endpoint as the response body.
Listing 5.12 Define an ExecutorService and submit the task
@GetMapping("/ciao")
public String ciao() throws Exception {


    Callable<String> task = () -> {


        SecurityContext context = SecurityContextHolder.getContext();
        return context.getAuthentication().getName();
    };

    ...
}
If you run the application as is, you will just get a NullPointerException. In the newly created thread running the callable task, the authentication no longer exists and the security context is empty. To solve this problem, we decorate this task with DelegatingSecurityContextCallable, which provides the new thread with the current context, as provided in this listing.
Listing 5.13 Running a task decorated by DelegatingSecurityContextCallable
@GetMapping("/ciao")
public String ciao() throws Exception {


    Callable<String> task = () -> {


        SecurityContext context = SecurityContextHolder.getContext();
        return context.getAuthentication().getName();
    };

    ExecutorService e = Executors.newCachedThreadPool();
    try {


        var contextTask = new DelegatingSecurityContextCallable<>(task);
        return "Ciao, " + e.submit(contextTask).get() + "!";
    } finally {


        e.shutdown();
    }
}
Now calling the endpoint, you can observe that Spring propagates the security concept to the thread of task execution.
curl -u user:2eb3f2e8-debd-420c-9680-48159b2ff905 http://localhost:8080/ciao
The response is:
Ciao, user!
5.2.5 Use DelegatingSecurityContextExecutorService to forward security context
When dealing with threads that our code starts without letting the framework know about them, we have to manage the propagation of details from the security context to the next thread. In Section 5.2.4, you applied a technique to replicate details from the security context by leveraging the task itself. Spring Security provides some good utility classes such as DelegatingSecurityContextRunnable and DelegatingSecurityContextCallable. These classes decorate the tasks you execute asynchronously and are also responsible for copying details from the security context so that your implementation can access these details from the newly created thread. But we have a second option to handle the problem of security context propagation to new threads, and that is to manage the propagation from the thread pool rather than from the task itself. In this section, you will learn how to apply this technique by using more of the excellent utility classes provided by Spring Security.
Another way to decorate tasks is to use a special type of Executor. In the next example, you can see that the task is still a simple Callable, but the thread still manages the security context. Security context propagation occurs because an implementation called DelegatingSecurityContextExecutorService decorates the ExecutorService. DelegatingSecurityContextExecutorService is also responsible for the propagation of security context, as shown in Figure 5.11.
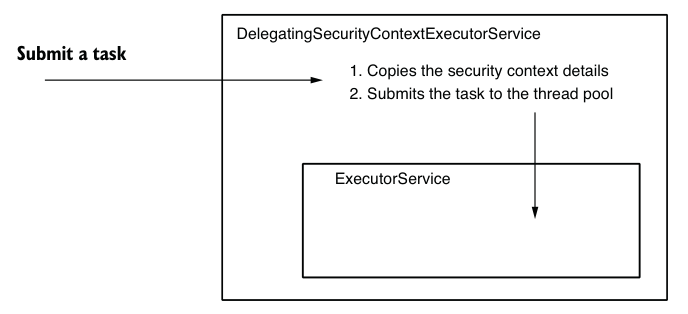
Figure 5.11 DelegatingSecurityContextExecutorService decorates an ExecutorService and propagates security context details to the next thread before submitting the task.
The code in Listing 5.14 shows how to use DelegatingSecurityContextExecutorService to decorate the ExecutorService so that when you submit a task, it takes care of the details of propagating the security context.
@GetMapping("/hola")
public String hola() throws Exception {


    Callable<String> task = () -> {


        SecurityContext context = SecurityContextHolder.getContext();
        return context.getAuthentication().getName();
    };

    ExecutorService e = Executors.newCachedThreadPool();
    e = new DelegatingSecurityContextExecutorService(e);
    try {


        return "Hola, " + e.submit(task).get() + "!";
    } finally {


        e.shutdown();
    }
}
Call the endpoint to test that the DelegatingSecurityContextExecutorService is delegating the security context correctly.
curl -u user:5a5124cc-060d-40b1-8aad-753d3da28dca http://localhost:8080/hola
Hola, user!
Note Among the classes related to concurrency support for security contexts, I recommend that you pay attention to those presented in Table 5.1.
Spring provides implementations of various utility classes that you can use in your application to manage the security context when creating your own threads. In Section 5.2.4, you implemented DelegatingSecurityContextCallable. In this section, we use DelegatingSecurityContextExecutorService. If you need to implement security context propagation for scheduled tasks, then you will be happy to hear that Spring Security also provides you with a decorator called DelegatingSecurityContextScheduledExecutorService. This mechanism is similar to the DelegatingSecurityContextExecutorService we introduced in this section, except that it decorates the ScheduledExecutorService, allowing you to work with scheduled tasks.
Additionally, to increase flexibility, Spring Security provides you with a more abstract version of the decorator called DelegatingSecurityContextExecutor. This class directly decorates an Executor, which is the most abstract contract in this level of thread pool. You can choose it when designing your application when you want to be able to replace the thread pool implementation with any choice provided by the language.
Table 5.1 Objects responsible for delegating security context to independent threads
| kind | describe |
|---|---|
| DelegatingSecurityContextExecutor | Implement the Executor interface to decorate the Executor object with the ability to forward security context to threads created by its pool. |
| DelegatingSecurityContextExecutorService | Implements the ExecutorService interface and aims to decorate the ExecutorService object with the ability to forward security context to threads created by its pool. |
| DelegatingSecurityContextScheduledExecutorService | Implements the ScheduledExecutorService interface and aims to decorate the ScheduledExecutorService object with the ability to forward security context to threads created by its pool. |
| DelegatingSecurityContextRunnable | Implement the Runnable interface, which represents a task executed on a different thread and does not return a response. Compared with ordinary Runnable, it is also able to propagate a security context for use on new threads. |
| DelegatingSecurityContextCallable | Executing the Callable interface represents a task executed on a different thread and will eventually return a response. Compared with ordinary Callable, it can also propagate a security context for use on new threads. |
5.3 Understand HTTP Basic and form-based login authentication
So far, we have only used HTTP Basic as the authentication method, but in this book, you will learn that there are other possibilities. The HTTP Basic authentication method is simple, which makes it an excellent choice for example and demonstration purposes or proof of concept. But by the same token, it may not be suitable for all real-world scenarios you need to implement.
In this section, you will learn more about the configuration related to HTTP Basic. At the same time, we also discovered a new authentication method called formLogin. In the remainder of this book, we discuss other authentication methods that match different types of architectures. We’ll compare these approaches so you understand best practices and anti-patterns for authentication methods.
5.3.1 Using and configuring HTTP Basic
You know that HTTP Basic is the default authentication method, and we have observed how it works in various examples in Chapter 3. In this section we will add more details about the configuration of this authentication method.
For theoretical scenarios, the defaults brought by HTTP Basic authentication are fine. But in a more complex application, you may find that you need to customize some of these settings. For example, you might want to implement a specific logic for the case where the authentication process fails. In this case, you might even need to set some values on the response sent back to the client. So let's consider these situations with practical examples to see how you can implement these. I want to point out again that you can set this method explicitly, as shown in the following list. You can find this example in project sia-ch5-ex3.
Listing 5.15 Setting up the HTTP Basic authentication method
@Configuration
public class ProjectConfig
        extends WebSecurityConfigurerAdapter {


    @Override
    protected void configure(HttpSecurity http)
            throws Exception {


        http.httpBasic();
    }
}
You can also call the httpBasic() method of an HttpSecurity instance with a parameter of type Customizer. This parameter allows you to set some configuration related to the authentication method, for example, the realm name, as shown in Listing 5.16. You can think of a realm as a protected space using a specific authentication method. For a complete description, please refer to RFC 2617 at https://tools.ietf.org/html/rfc2617.
Listing 5.16 Configuring the realm name for responses that fail validation
@Override
protected void configure(HttpSecurity http) throws Exception {


    http.httpBasic(c -> {


    	c.realmName("OTHER");
    });
    http.authorizeRequests().anyRequest().authenticated();
}
Listing 5.16 shows an example of changing the name of a Realm. The lambda expression used is actually an object of Customizer<HttpBasicConfigurer> type. The parameter of type HttpBasicConfigurer allows us to call the realmName() method to rename the realm. You can use cURL with the -v flag to get a lengthy HTTP response in which the realm name is actually changed. However, please note that you can only find the WWW-Authenticate header in the response when the HTTP response status is 401 Unauthorized, not when the HTTP response status is 200 OK. The following is a call to cURL: curl -v http://localhost:8080/hello The response to the call is
/
…
< WWW-Authenticate: Basic realm=“OTHER”
…
Realm in Spring Security refers to a security-specific domain, or a security-focused area, where authentication and authorization activities take place. It provides a unified way for systems to manage security-related information such as user credentials and roles, and serves as a bridge between applications and underlying security systems (such as LDAP, databases, or others). In other words, Realm serves as a source of authentication and authorization data, helping to establish trust between applications and security systems.
Additionally, by using a customizer, we can customize the response to authentication failure. You need to do this if the client of your system expects something specific in the response if authentication fails. You may need to add or remove one or more header files. Or you could have some logic to filter the body to ensure the application doesn't expose any sensitive data to the client.
NOTE Always be cautious about the data you expose outside your system. One of the most common mistakes (and part of the OWASP Top 10 Vulnerabilities) is exposing sensitive data. Handling the details that the application sends to the client when authentication fails is always a risk point for exposing confidential information.
In order to customize the response to authentication failure, we can implement an AuthenticationEntryPoint. Its commence() method receives HttpServletRequest, HttpServletResponse, and AuthenticationException that causes authentication failure. Listing 5.17 demonstrates one way to implement an AuthenticationEntryPoint that adds a header to the response and sets the HTTP status to 401 Unauthorized.
Listing 5.17 Implementing an AuthenticationEntryPoint
public class CustomEntryPoint
        implements AuthenticationEntryPoint {


    @Override
    public void commence(
            HttpServletRequest httpServletRequest,
            HttpServletResponse httpServletResponse,
            AuthenticationException e)
            throws IOException, ServletException {


        httpServletResponse
                .addHeader("message", "Luke, I am your father!");
        httpServletResponse
                .sendError(HttpStatus.UNAUTHORIZED.value());
    }
}
/**
这段代码定义了一个名为CustomEntryPoint的类,它实现了AuthenticationEntryPoint接口。它重写了AuthenticationEntryPoint中的 commence() 方法。这个方法在用户试图访问一个需要认证的资源时,如果认证失败,将会被调用。

该方法中的代码为 HTTP 响应添加了一个名为 "message" 的 header,并发送 401 Unauthorized 错误状态。这意味着,如果用户试图访问该资源,但未经认证,则将会收到带有 "message" header 和 401 Unauthorized 错误状态码的 HTTP 响应。
**/
Note that the name of the AuthenticationEntryPoint interface does not reflect its use when authentication fails, which is somewhat ambiguous. In the Spring Security architecture, it is used directly by a component called ExceptionTranslationManager, which handles any AccessDeniedException and AuthenticationException thrown in the filter chain.
You can think of ExceptionTranslationManager as a bridge between Java exceptions and HTTP responses.
Listing 5.18 Setting a custom AuthenticationEntryPoint
@Override
protected void configure(HttpSecurity http)
        throws Exception {


    http.httpBasic(c -> {


        c.realmName("OTHER");
        c.authenticationEntryPoint(new CustomEntryPoint());
    });
    http.authorizeRequests()
            .anyRequest()
            .authenticated();
}
If you now call an endpoint that fails authentication, you should find the newly added header in the response:
curl -v http://localhost:8080/hello
The response to the call is
...
< HTTP/1.1 401
< Set-Cookie: JSESSIONID=459BAFA7E0E6246A463AD19B07569C7B; Path=/; HttpOnly
< message: Luke, I am your father!
...
5.3.2 Authentication with form-based login
When developing a web application, you may want to present a user-friendly login form where users can enter their credentials. Likewise, you may want your authenticated users to be able to browse the web while logged in, and be able to log out. For a small web application, you can utilize a form-based login method. In this section, you will learn how to apply and configure this authentication method for your application. To achieve this, we wrote a small web application that uses form-based login. Figure 5.12 describes the process we want to implement. The examples in this section are part of the project sia-ch5-ex4.
Note I related this method to a small web application because, in this case, we use server-side sessions to manage the security context. For large applications that need to scale out, using server-side sessions to manage security context is not advisable. We will discuss these aspects in more detail when we deal with OAuth 2 in Chapters 12 to 15.
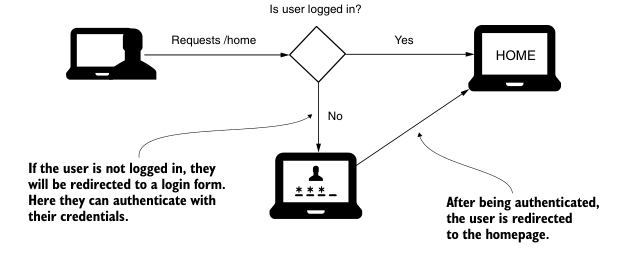
Figure 5.12 Using form-based login. An unauthenticated user is redirected to a form where they can authenticate using their credentials. Once the app verifies their identity, they are redirected to the app's homepage.
To change the authentication method to form-based login, in the configure (HttpSecurity http) method of the configuration class, do not use httpBasic(), but call the formLogin() method of the HttpSecurity parameter. The following list describes this change.
Listing 5.19 Changing the authentication method to form-based login
@Configuration
public class ProjectConfig
        extends WebSecurityConfigurerAdapter {


    @Override
    protected void configure(HttpSecurity http)
            throws Exception {


        http.formLogin();
        http.authorizeRequests().anyRequest().authenticated();
    }
}
Even with this minimal configuration, Spring Security has configured a login form and a logout page for your project. Launching the application and accessing it using a browser should redirect you to a login page (Figure 5.13).
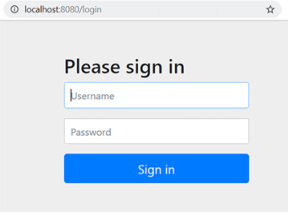
Figure 5.14 A simple representation of the Spring MVC process. The scheduler finds the controller action associated with a given path, in this case /home. After the controller action is executed, the view is rendered and the response is sent back to the client.
As long as you don't register your UserDetailsService, you can log in using the credentials provided by default. As we learned in Chapter 2, this is the username "user" and a UUID password, which will be printed in the console when the application starts. After successful login, you will be redirected to a default error page because no other pages are defined. The application relies on the same authentication architecture we encountered in the previous example. So, as shown in Figure 5.14, you need to implement a controller for the home page of your application. The difference is that we don't want to have a simple JSON-formatted response, but rather want the endpoint to return HTML that can be interpreted by the browser as our web page. Because of this, we chose to stick with the Spring MVC process, rendering the view from the file after executing the actions defined in the controller. Figure 5.14 shows the Spring MVC process for rendering the application's home page.
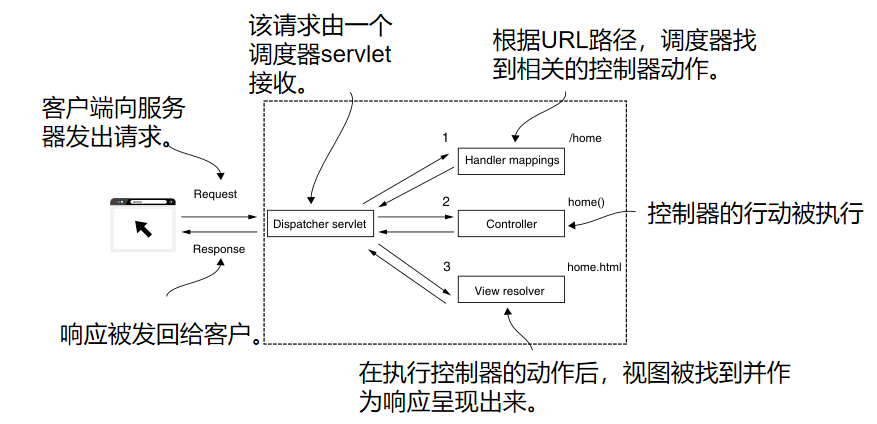
Figure 5.14 A simple representation of the Spring MVC process. The scheduler finds the controller action associated with a given path, in this case /home. After the controller action is executed, the view is rendered and the response is sent back to the client.
To add a simple page to your application, you first create an HTML file in your project's resources/static folder. I'll call this file home.html. Enter some text in it and you can find it in your browser. You can add just a title (for example, Welcome). After creating the HTML page, the controller needs to define the mapping from paths to views. Listed below are the definitions of the action methods of the home.html page in the controller class.
Listing 5.20 Defining the action method of the controller for the home.html page
@Controller
public class HelloController {


    @GetMapping("/home")
    public String home() {


        return "home.html";
    }
}
Note that this is not a @RestController, but a simple @Controller. Because of this, Spring does not send the value returned by this method in the HTTP response. Instead, it found and rendered the view named home.html.
Now try to access the /home path. You will first be asked if you want to log in. After successful login, you will be redirected to the homepage where a welcome message will appear. Now you can access the /logout path, which should redirect you to a logout page (Figure 5.15).
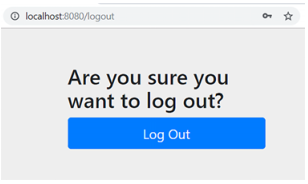
Figure 5.15 The logout page configured by Spring Security for the form-based login authentication method.
After trying to access a path without login, the user is automatically redirected to the login page. Upon successful login, the application redirects the user to the path they were originally trying to access.
If the path does not exist, the application displays a default error page. The formLogin() method returns an object of type FormLoginConfigurer, which allows us to perform customization work. For example, you can do this by calling the defaultSuccessUrl() method, as shown in the following list.
Listing 5.21 Setting a default success URL for the login form
@Override
protected void configure(HttpSecurity http)
throws Exception {


    http.formLogin().defaultSuccessUrl("/home", true);
    http.authorizeRequests().anyRequest().authenticated();
}
If you need to dig deeper into this, using the AuthenticationSuccessHandler and AuthenticationFailureHandler objects provides more detailed customization methods. These interfaces let you implement an object through which you can apply the logic performed for authentication. If you want to customize the logic of successful authentication, you can define an AuthenticationSuccessHandler. The onAuthenticationSuccess() method receives Servlet request, Servlet response and Authentication object as parameters. In Listing 5.22, you'll find an example of an implementation of the onAuthenticationSuccess() method that redirects differently based on the logged-in user's granted permissions.
Listing 5.22 Implementing an AuthenticationSuccessHandler
@Component
public class CustomAuthenticationSuccessHandler
        implements AuthenticationSuccessHandler {


    @Override
    public void onAuthenticationSuccess(
            HttpServletRequest httpServletRequest,
            HttpServletResponse httpServletResponse,
            Authentication authentication)
            throws IOException {


        var authorities = authentication.getAuthorities();
        var auth =
                authorities.stream()
                        .filter(a -> a.getAuthority().equals("read"))
            //如果 "读取 "权限不存在,返回一个空的Optional对象。
                        .findFirst();
        //如果 "读取 "权限存在,则重定向到/home
        if (auth.isPresent()) {


            httpServletResponse
                    .sendRedirect("/home");
        } else {


            httpServletResponse
                    .sendRedirect("/error");
        }
    }
}
In real-life scenarios, there are situations where clients expect a response in a certain format in case of authentication failure. They may expect a different HTTP status code than 401 Unauthorized, or provide additional information in the body of the response. The most typical situation I find in applications is sending a request identifier. This request identifier has a unique value that is used to track the request across multiple systems, and the application can send it in the body of the response in the event of authentication failure. Another situation is when you want to sanitize the response to ensure that the application does not expose sensitive data outside the system. You may want to define custom logic for failed authentication and simply log the event for further investigation.
If you want to customize the logic that your application performs when authentication fails, you can do so with an AuthenticationFailureHandler implementation. For example, if you wanted to add a specific header for any failed authentication, you could do as shown in Listing 5.23. Of course, you can implement any logic here. For AuthenticationFailureHandler, onAuthenticationFailure() receives the request, response and authentication objects.
Listing 5.23 Implementing an AuthenticationFailureHandler
@Component
public class CustomAuthenticationFailureHandler
        implements AuthenticationFailureHandler {


    @Override
    public void onAuthenticationFailure(
            HttpServletRequest httpServletRequest,
            HttpServletResponse httpServletResponse,
            AuthenticationException e) {


        httpServletResponse
                .setHeader("failed", LocalDateTime.now().toString());
    }
}
In order to use these two objects, you need to register them in the configure() method of the FormLoginConfigurer object returned by the formLogin() method. The list below shows how to do this.
Listing 5.24 Registering a handler object in the configuration class
@Configuration
public class ProjectConfig
        extends WebSecurityConfigurerAdapter {


    @Autowired
    private CustomAuthenticationSuccessHandler authenticationSuccessHandler;
    @Autowired
    private CustomAuthenticationFailureHandler authenticationFailureHandler;
    @Override
    protected void configure(HttpSecurity http)
            throws Exception {


        http.formLogin()
                .successHandler(authenticationSuccessHandler)
                .failureHandler(authenticationFailureHandler);
        http.authorizeRequests()
                .anyRequest().authenticated();
    }
}
Now, if you try to access the /home path using HTTP Basic with the appropriate username and password, you will get a response with a status of HTTP 302 Found.
This response status code is the application's way of telling you that it is attempting to redirect. Even if you provide the correct username and password, it will not consider these and will try to send you to the login form as required by the formLogin method. However, you can change the configuration to support both HTTP Basic and form-based login methods, as listed below.
Listing 5.25 Using form-based login with HTTP Basic
@Override
    protected void configure(HttpSecurity http)
            throws Exception {


        http.formLogin()
                .successHandler(authenticationSuccessHandler)
                .failureHandler(authenticationFailureHandler)
                .and()
                .httpBasic();
        http.authorizeRequests()
                .anyRequest().authenticated();
    }
Access to the /home path is now possible using form-based login and HTTP Basic authentication methods.
curl -u user:cdd430f6-8ebc-49a6-9769-b0f3ce571d19 http://localhost:8080/home
响应为:
<h1>Welcome</h1>
Summarize
- AuthenticationProvider is a component that allows you to implement custom authentication logic.
- When you implement custom authentication logic, it is a good practice to keep responsibilities decoupled. For user management, the authentication provider delegates to the UserDetailsService, and for password verification, the authentication provider delegates to PasswordEncoder.
- The SecurityContext retains detailed information about the authenticated entity after successful authentication.
- You can use three policies to manage security contexts: MODE_THREADLOCAL, MODE_INHERITABLETHREADLOCAL, and MODE_GLOBAL.
Accessing security context details from different threads works differently depending on the mode you choose.- Remember, when using shared thread native mode, it only works with threads managed by Spring. The framework does not copy security contexts for threads it does not manage.
- Spring Security provides you with great utility classes to manage threads created by your code, and now the framework is aware of this. To manage the security context of the thread you create, you can use - DelegatingSecurityContextRunnable DelegatingSecurityContextCallable DelegatingSecurityContextExecutor
- Spring Security automatically configures a form for login and an option for logout through the form-based login verification method formLogin(). It is used out of the box when developing small web applications.
- The formLogin authentication method is highly customizable. Additionally, you can use this authentication method with the HTTP Basic method.