Adapting Spring Security to the system, rather than adapting the system to Spring Security , is the consensus of developers and users of the Spring Security framework.
Next, we will use a custom database model to access Spring Security , the database is still MySQL , and the persistence layer framework is MyBatis (readers who tend to use JPA can also choose their own models, and their practice in the Spring Security part is the same). We will focus on the content related to Spring Security , so readers are expected to read the relevant information by themselves, or they can choose to skip it temporarily.
1. Authentication and authorization of custom database models:
1. Implement UserDetails:
In the previous article, we used two UserDetailsService implementation classes, InMemoryUserDetailsManager and JdbcUserDetailsManager . The way to take effect is also very simple. Just add Spring 's IoC container, and it will be automatically discovered and used by Spring Security . The custom database structure actually only needs to implement a custom UserDetailsService .
UserDetailsService only defines a loadUserByUsername method for obtaining a UserDetails object. The UserDetails object contains a series of information that will be used during authentication, including user name, password, permissions, and other information. Spring Security will determine whether the authentication is successful based on this information. The source code content of UserDetails is as follows:
public interface UserDetails extends Serializable {

    Collection<? extends GrantedAuthority> getAuthorities();

    String getPassword();

    String getUsername();

    boolean isAccountNonExpired();

    boolean isAccountNonLocked();

    boolean isCredentialsNonExpired();

    boolean isEnabled();

}
In other words, no matter how the database structure changes, as long as a UserDetails can be constructed , the process will be realized below.
1.1 Database preparation:
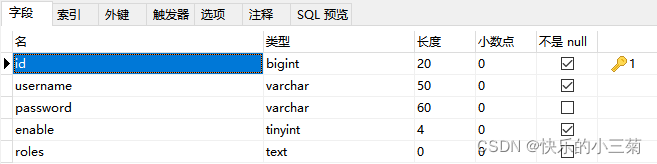
Design a custom database structure. The table creation statement is as follows:
create table users(
	id bigint(20) not null auto_increment primary key,
	username varchar(50) not null,
	password varchar(60),
	enable tinyint(4) not null default '1' comment '用户是否可用',
	roles text character set utf8 comment '用户角色,多个用户角色用逗号隔开',
	KEY ‘username‘ (username)
);
We put user information and roles in the same table, which is no longer the default separate form of Spring Security . The roles field is set to text type, and multiple roles are separated by commas. It is recommended to build an index on the username field to improve the search speed. The table structure is as follows:
Next, insert two records to facilitate our subsequent testing work:
insert into users(username,password,roles) values ("admin","123","ROLE_ADMIN,ROLE_USER");
insert into users(username,password,roles) values ("user","123","ROLE_USER");
1.2 Encoding implementation:
When the database structure and data are ready, the corresponding User entity can be written.
public class User {

	private Long id;

	private String username;

	private String password;

	private String roles;

	private boolean enable;

    // setter getter
}
Let the User entity inherit UserDetails , the code is as follows:
public class User implements UserDetails{

	private Long id;
	private String username;
	private String password;
	private String roles;
	private boolean enable;

	public Long getId() {
		return id;
	}
	public void setId(Long id) {
		this.id = id;
	}
	public String getUsername() {
		return username;
	}
	public void setUsername(String username) {
		this.username = username;
	}
	public String getPassword() {
		return password;
	}
	public void setPassword(String password) {
		this.password = password;
	}
	public String getRoles() {
		return roles;
	}
	public void setRoles(String roles) {
		this.roles = roles;
	}
	public boolean isEnable() {
		return enable;
	}
	public void setEnable(boolean enable) {
		this.enable = enable;
	}
	private List<GrantedAuthority> authorities;
	public void setAuthorities(List<GrantedAuthority> authorities) {
		this.authorities = authorities;
	}
	@Override
	public Collection<? extends GrantedAuthority> getAuthorities() {
		// TODO Auto-generated method stub
		return this.authorities;
	}
	@Override
	public boolean isAccountNonExpired() {
		// TODO Auto-generated method stub
		return true;
	}
	@Override
	public boolean isAccountNonLocked() {
		// TODO Auto-generated method stub
		return true;
	}
	@Override
	public boolean isCredentialsNonExpired() {
		// TODO Auto-generated method stub
		return true;
	}
	@Override
	public boolean isEnabled() {
		// TODO Auto-generated method stub
		return this.enable;
	}
}
Here you need to implement several methods defined by UserDetails . Among them, the isAccountNonExpired() , isAccountNonLocked() and isCredentialsNonExpired() methods are not used for the time being, and they return true uniformly , otherwise Spring Security will consider the account to be abnormal. isEnabled corresponds to the enable field, just substitute it. The getAuthorities() method itself corresponds to the roles field, but because the structure is inconsistent, create a new one here and fill it later.
2. Implement UserDetailsService:
2.1 Data persistence layer preparation:
When the UserDetails is ready , use the database persistence layer framework to read the data and populate the object. First introduce MyBatis .
<dependency>
    <groupId>org.mybatis.spring.boot</groupId>
    <artifactId>mybatis-spring-boot-starter</artifactId>
    <version>1.3.1</version>
</dependency>
The database-related configuration has been written in the configuration file before, and it can be used here.
spring.datasource.url = jdbc:mysql://localhost:3306/springDemo?useUnicode=true&characterEncoding=utf-8&useSSL=false
spring.datasource.username = root
spring.datasource.password = Rfid123456
Next, use @MapperScan in the entry class to specify the mapping file directory to be scanned by MyBatis .
@SpringBootApplication
@RestController
@MapperScan("com.mapper")
public class SpringDemoApplication {

	@GetMapping("/")
	public String hello() {
		return "hello spring security";
	}

	public static void main(String[] args) {
		SpringApplication.run(SpringDemoApplication.class,args);
	}
}
Of course, we also need to create the directory under com.mapper and write the corresponding mapping interface:
@Component
public interface UserMapper {

	@Select("SELECT * FROM  users where username=#{username}")
	User findByUserName(@Param("username") String username);
}
The content related to MyBatis will not be described in detail. Readers who have not been in contact with it and are interested can learn the relevant knowledge by themselves. Here is only a method to find users by username.
2.2 Encoding implementation:
When the data persistence layer is ready, we start writing UserDetailsService .
@Service
public class MyUserDetailsService implements UserDetailsService{

	@Autowired
	private UserMapper usermapper;

	@Override
	public UserDetails loadUserByUsername(String username) throws UsernameNotFoundException {
		// 从数据库尝试读取该用户
		User user = usermapper.findByUserName(username);
		// 用户不存在,抛出异常
		if(user == null) {
			throw new UsernameNotFoundException("用户名不存在");
		}
		// 将数据库形式的 roles 解析为 UserDetails 的权限集
		// AuthorityUtils.commaSeparatedStringToAuthorityList() 是Spring Security 提供的
		// 该方法用于将逗号隔开的权限集字符串切割成可用权限对象列表
		// 当然也可以自己实现,如用分号来隔开等,参考下面的generateAuthorities()方法
		user.setAuthorities(AuthorityUtils.commaSeparatedStringToAuthorityList(user.getRoles()));
		return user;
	}

	// 自行实现权限的转移
	private List<GrantedAuthority> generateAuthorities(String roles){
		List<GrantedAuthority> list = new ArrayList<>();
		String [] roleArray = roles.split(";");
		if(roles != null && !"".equals(roles)) {
			for(String role:roleArray) {
				list.add(new SimpleGrantedAuthority(role));
			}
		}
		return list;
	}
}
Among them, SimpleGrantedAuthority is an implementation class of GrantedAuthority . The permissions of Spring Security are almost generated with SimpleGrantedAuthority , just note that each role corresponds to a GrantedAuthority . In addition, you must add the @Service annotation to your UserDetailsService implementation class so that it can be automatically discovered by Spring Security .
So far, we have implemented Spring Security 's custom database structure authentication. Some readers may have doubts, why do roles in the database always have to be prefixed with "ROLE" , but there is no "ROLE" prefix in configuration ?
protected void configure(HttpSecurity http) throws Exception{
		http.authorizeRequests().
			antMatchers("/admin/api/**").hasRole("ADMIN").
			antMatchers("/user/api/**").hasRole("USER").
			antMatchers("/app/api/**").permitAll().
			anyRequest().authenticated().
		and().formLogin();
	}
You can find the answer by looking at the source code.
private static String hasRole(String role) {
		Assert.notNull(role, "role cannot be null");
		if (role.startsWith("ROLE_")) {
			throw new IllegalArgumentException(
					"role should not start with 'ROLE_' since it is automatically inserted. Got '"
							+ role + "'");
		}
		return "hasRole('ROLE_" + role + "')";
	}
If you don't want to match this prefix, just call the hasAuthority() method instead.
2.3 Effect test:
The code of WebSecurityConfig at this time is as follows:
@EnableWebSecurity
public class WebSecurityConfig extends WebSecurityConfigurerAdapter{

    protected void configure(HttpSecurity http) throws Exception{
		http.authorizeRequests().
			antMatchers("/admin/api/**").hasRole("ADMIN").
			antMatchers("/user/api/**").hasRole("USER").
			antMatchers("/app/api/**").permitAll().
			anyRequest().authenticated().
		and().formLogin();
	}
}
Start the program, use the user account to log in to localhost:8080/user/api/hello , and you can log in normally, as shown below:

Use the admin account to log in to localhost:8080/admin/api/hello , and you can log in normally, as shown below:

Use the user account to log in to localhost:8080/admin/api/hello , but cannot log in normally, as shown below:
