This article authorizes the official Amazon Cloud Technology article to forward and rewrite the rights, including but not limited to Amazon Cloud Technology official channels such as Amazon Cloud Technology Developer Community, Zhihu, self-media platforms, and third-party developer media.
(Global TMT, December 6, 2023) Amazon Cloud Technology announced the launch of five new Amazon SageMaker features at the 2023 re:Invent global conference to help customers accelerate the construction, training, and deployment of large language models and other basic models. Since its launch in 2017, Amazon SageMaker has added more than 380 new capabilities and features, giving customers everything they need to build, train, and deploy production-ready large-scale models at scale.
This includes a new feature that further enhances Amazon SageMaker’s model scaling capabilities and accelerates model training. In addition, another new feature introduced by Amazon SageMaker optimizes the management of managed machine learning infrastructure by reducing model deployment costs and latency. Amazon Cloud Technology also launched a new SageMaker Clarify feature that makes it easier for customers to select the right model based on quality parameters based on the responsible use of AI. To help customers apply these models enterprise-wide, Amazon Cloud Technology is also introducing new no-code capabilities in Amazon SageMaker Canvas to make it faster and easier for customers to prepare data using natural language instructions. At the same time, Amazon SageMaker Canvas continues to drive the popularity of model building and customization, making it easier for customers to use models to extract insights, make predictions, and generate content using enterprise proprietary data. These innovations are based on Amazon SageMaker's rich functionality to help customers achieve large-scale machine learning innovation.
1. Model training speed and effect
Some reviews show that Amazon SageMaker performs well in model training. It supports distributed training and uses elastic computing resources to significantly shorten training time. Users can choose to use built-in algorithms or custom scripts to choose the appropriate training method according to actual needs. In addition, the automatic model tuning function can help users optimize model performance and improve training results.
2. Convenience of deployment and management
Amazon SageMaker provides simple yet powerful model deployment capabilities. It supports one-click deployment and provides real-time and offline inference options for different application scenarios. In addition, SageMaker Studio, as an integrated integrated development environment, provides users with convenient model management and monitoring tools, making the entire deployment and management process more convenient.
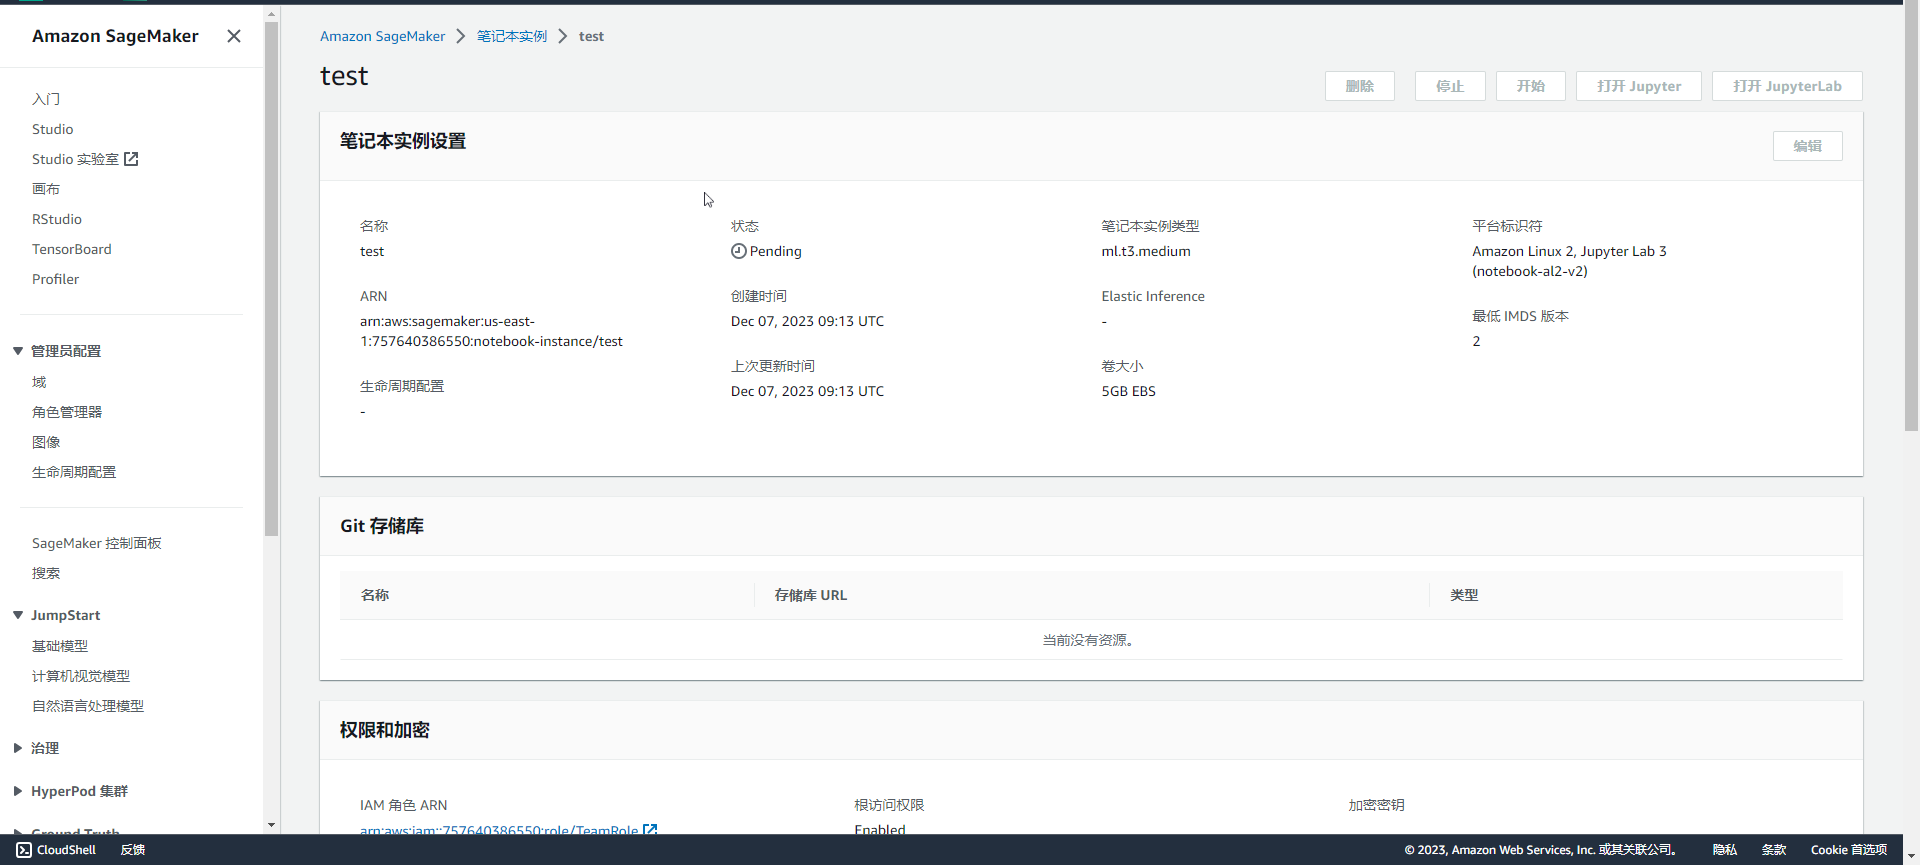
SageMaker pytorch Mnist
One difference between SageMaker and Kubeflow is:
In Kubeflow, we can mount the same PV volume for each component in the pipeline so that it runs in the same file system environment, or like Elyra, configure a Minio Bucket for the entire Pipeline as a common file system working environment;
In SageMaker, we will create a session and set the default bucket Bucket, and then upload the data set to be used for model training to the bucket;
Download, transform and upload data to S3
Set the default S3 bucket URI for the current SageMaker session, create a new folder prefix, and upload the dataset to that folder.
import sagemaker

sagemaker_session = sagemaker.Session()

bucket = sagemaker_session.default_bucket()
prefix = "sagemaker/DEMO-pytorch-mnist"

role = sagemaker.get_execution_role()

### 下载数据
from torchvision.datasets import MNIST
from torchvision import transforms

MNIST.mirrors = ["https://sagemaker-sample-files.s3.amazonaws.com/datasets/image/MNIST/"]

MNIST(
    "data",
    download=True,
    transform=transforms.Compose(
        [transforms.ToTensor(), transforms.Normalize((0.1307,), (0.3081,))]
    ),
)

### 上传数据至Amazon S3
inputs = sagemaker_session.upload_data(path="data", bucket=bucket, key_prefix=prefix)
print("input spec (in this case, just an S3 path): {}".format(inputs))
Training model script
Like Kubeflow, prepare a training model script that can be run directly:
### ------------------------   mnist.py   --------------------------

# Based on https://github.com/pytorch/examples/blob/master/mnist/main.py

import argparse
import json
import logging
import os
import sys

import torch
import torch.distributed as dist
import torch.nn as nn
import torch.nn.functional as F
import torch.optim as optim
import torch.utils.data
import torch.utils.data.distributed
from torchvision import datasets, transforms

logger = logging.getLogger(__name__)
logger.setLevel(logging.DEBUG)
logger.addHandler(logging.StreamHandler(sys.stdout))

class Net(nn.Module):
    def __init__(self):
        ...

    def forward(self, x):
        ...


def _get_train_data_loader(batch_size, training_dir, is_distributed, **kwargs):
    logger.info("Get train data loader")
    dataset = datasets.MNIST(
        training_dir,
        train=True,
        transform=transforms.Compose(
            [transforms.ToTensor(), transforms.Normalize((0.1307,), (0.3081,))]
        ),
    )
    train_sampler = (
        torch.utils.data.distributed.DistributedSampler(dataset) if is_distributed else None
    )
    return torch.utils.data.DataLoader(
        dataset,
        batch_size=batch_size,
        shuffle=train_sampler is None,
        sampler=train_sampler,
        **kwargs
    )


def _get_test_data_loader(test_batch_size, training_dir, **kwargs):
    logger.info("Get test data loader")
    return torch.utils.data.DataLoader(
        datasets.MNIST(
            training_dir,
            train=False,
            transform=transforms.Compose(
                [transforms.ToTensor(), transforms.Normalize((0.1307,), (0.3081,))]
            ),
        ),
        batch_size=test_batch_size,
        shuffle=True,
        **kwargs
    )


def _average_gradients(model):
    # Gradient averaging.
    size = float(dist.get_world_size())
    for param in model.parameters():
        dist.all_reduce(param.grad.data, op=dist.reduce_op.SUM)
        param.grad.data /= size


def train(args):
    is_distributed = len(args.hosts) > 1 and args.backend is not None
    logger.debug("Distributed training - {}".format(is_distributed))
    use_cuda = args.num_gpus > 0
    logger.debug("Number of gpus available - {}".format(args.num_gpus))
    kwargs = {

    "num_workers": 1, "pin_memory": True} if use_cuda else {

    }
    device = torch.device("cuda" if use_cuda else "cpu")

    if is_distributed:
        # Initialize the distributed environment.
        world_size = len(args.hosts)
        os.environ["WORLD_SIZE"] = str(world_size)
        host_rank = args.hosts.index(args.current_host)
        os.environ["RANK"] = str(host_rank)
        dist.init_process_group(backend=args.backend, rank=host_rank, world_size=world_size)
        logger.info(
            "Initialized the distributed environment: '{}' backend on {} nodes. ".format(
                args.backend, dist.get_world_size()
            )
            + "Current host rank is {}. Number of gpus: {}".format(dist.get_rank(), args.num_gpus)
        )

    # set the seed for generating random numbers
    torch.manual_seed(args.seed)
    if use_cuda:
        torch.cuda.manual_seed(args.seed)

    train_loader = _get_train_data_loader(args.batch_size, args.data_dir, is_distributed, **kwargs)
    test_loader = _get_test_data_loader(args.test_batch_size, args.data_dir, **kwargs)

    logger.debug(
        "Processes {}/{} ({:.0f}%) of train data".format(
            len(train_loader.sampler),
            len(train_loader.dataset),
            100.0 * len(train_loader.sampler) / len(train_loader.dataset),
        )
    )

    logger.debug(
        "Processes {}/{} ({:.0f}%) of test data".format(
            len(test_loader.sampler),
            len(test_loader.dataset),
            100.0 * len(test_loader.sampler) / len(test_loader.dataset),
        )
    )

    model = Net().to(device)
    if is_distributed and use_cuda:
        # multi-machine multi-gpu case
        model = torch.nn.parallel.DistributedDataParallel(model)
    else:
        # single-machine multi-gpu case or single-machine or multi-machine cpu case
        model = torch.nn.DataParallel(model)

    optimizer = optim.SGD(model.parameters(), lr=args.lr, momentum=args.momentum)

    for epoch in range(1, args.epochs + 1):
        model.train()
        for batch_idx, (data, target) in enumerate(train_loader, 1):
            data, target = data.to(device), target.to(device)
            optimizer.zero_grad()
            output = model(data)
            loss = F.nll_loss(output, target)
            loss.backward()
            if is_distributed and not use_cuda:
                # average gradients manually for multi-machine cpu case only
                _average_gradients(model)
            optimizer.step()
            if batch_idx % args.log_interval == 0:
                logger.info(
                    "Train Epoch: {} [{}/{} ({:.0f}%)] Loss: {:.6f}".format(
                        epoch,
                        batch_idx * len(data),
                        len(train_loader.sampler),
                        100.0 * batch_idx / len(train_loader),
                        loss.item(),
                    )
                )
        test(model, test_loader, device)
    save_model(model, args.model_dir)


def test(model, test_loader, device):
    model.eval()
    test_loss = 0
    correct = 0
    with torch.no_grad():
        for data, target in test_loader:
            data, target = data.to(device), target.to(device)
            output = model(data)
            test_loss += F.nll_loss(output, target, size_average=False).item()  # sum up batch loss
            pred = output.max(1, keepdim=True)[1]  # get the index of the max log-probability
            correct += pred.eq(target.view_as(pred)).sum().item()

    test_loss /= len(test_loader.dataset)
    logger.info(
        "Test set: Average loss: {:.4f}, Accuracy: {}/{} ({:.0f}%)\n".format(
            test_loss, correct, len(test_loader.dataset), 100.0 * correct / len(test_loader.dataset)
        )
    )

# 当estimator.deploy时,需要显式定义出model_fn方法
def model_fn(model_dir):
    device = torch.device("cuda" if torch.cuda.is_available() else "cpu")
    model = torch.nn.DataParallel(Net())
    with open(os.path.join(model_dir, "model.pth"), "rb") as f:
        model.load_state_dict(torch.load(f))
    return model.to(device)

# 部署函数的参数允许我们设置将用于端点的实例的数量和类型。这些值不需要与我们训练模型时设置的值相同。我们可以在一组基于 GPU 的实例上训练模型,然后在终端上部署基于CPU的模型实例;但这需要我们确保将模型返回或另存为 CPU 模型
# 因此,建议将模型返回或另存为CPU模型
def save_model(model, model_dir):
    logger.info("Saving the model.")
    path = os.path.join(model_dir, "model.pth")
    torch.save(model.cpu().state_dict(), path)


if __name__ == "__main__":
    parser = argparse.ArgumentParser()

    # 模型训练参数
    parser.add_argument(
        "--batch-size",
        type=int,
        default=64,
        metavar="N",
        help="input batch size for training (default: 64)",
    )
    parser.add_argument(
        "--test-batch-size",
        type=int,
        default=1000,
        metavar="N",
        help="input batch size for testing (default: 1000)",
    )
    parser.add_argument(
        "--epochs",
        type=int,
        default=10,
        metavar="N",
        help="number of epochs to train (default: 10)",
    )
    parser.add_argument(
        "--lr", type=float, default=0.01, metavar="LR", help="learning rate (default: 0.01)"
    )
    parser.add_argument(
        "--momentum", type=float, default=0.5, metavar="M", help="SGD momentum (default: 0.5)"
    )
    parser.add_argument("--seed", type=int, default=1, metavar="S", help="random seed (default: 1)")
    parser.add_argument(
        "--log-interval",
        type=int,
        default=100,
        metavar="N",
        help="how many batches to wait before logging training status",
    )
    parser.add_argument(
        "--backend",
        type=str,
        default=None,
        help="backend for distributed training (tcp, gloo on cpu and gloo, nccl on gpu)",
    )

    # 与SageMaker相关的环境参数
    parser.add_argument("--hosts", type=list, default=json.loads(os.environ["SM_HOSTS"]))
    parser.add_argument("--current-host", type=str, default=os.environ["SM_CURRENT_HOST"])
    parser.add_argument("--model-dir", type=str, default=os.environ["SM_MODEL_DIR"])
    parser.add_argument("--data-dir", type=str, default=os.environ["SM_CHANNEL_TRAINING"])
    parser.add_argument("--num-gpus", type=int, default=os.environ["SM_NUM_GPUS"])

    train(parser.parse_args())
But here, we also need to obtain some attributes about the training environment by accessing environment variables:
- SM_HOSTS: Contains a JSON-encoded list of all hosts; in Pytorch, the list length is equal to WORLD_SIZE;
- SM_CURRENT_HOST: Current container name; in Pytorch, the container serial number is equal to RANK;
- SM_MODEL_DIR: The saving path of the model; the model will be uploaded to S3 later;
- SM_NUM_GOUS: Number of GPUs available in the current container;
Note: During Pytorch distributed training, dist.init_process_group(backend, rank, world_size) requires WORLD_SIZE and RANK.
If the input channel named training is used when calling the fit() method of PyTorch Estimator, set it in the following format SM_CHANNEL_[channel_name]:
- SM_CHANNEL_TRAINING: Enter the storage path of data in channel training;
The training script loads data from the specified path of the input channel training, uses hyperparameters to configure training, trains the model, and saves the model to model_dir for later hosting. Hyperparameters are passed to the script as arguments and can be retrieved using an argparse.ArgumentParser instance.
Training in SageMaker
from sagemaker.pytorch import PyTorch

estimator = PyTorch(
    entry_point="mnist.py",
    role=role,
    py_version="py38",
    framework_version="1.11.0",
    instance_count=2,
    instance_type="ml.c5.2xlarge",
    hyperparameters={

    "epochs": 1, "backend": "gloo"},
)

estimator.fit({

    "training": inputs})
sagemaker.pytorch.estimator.PyTorch is an Estimator developed by sagemaker for Pytorch. It contains the following main parameters:
-
entry_point: The execution entry of the training script;
-
py_version, framework_version: python and pytorch versions; SageMaker will allocate computing resources that meet the requirements of this version;
-
instance_count, instance_type: The number and type of computing resources;
-
hyperparameters: Hyperparameters of the training script;
-
image_uri: If specified, Estimator will use this Image as the running environment for training and deployment, and py_version and framework_version will be invalid; image_uri must be an ECR url or dockerhub image; a>
Deploy and test the model
In mnist.py, the
model_fnmethod needs to be explicitly defined by us; whileinput_fn,predict_fn, < /span> by default. are already defined inoutput_fnandtransform_fmsagemaker-pytorch-containers### 部署该Predictor predictor = estimator.deploy(initial_instance_count=1, instance_type="ml.m4.xlarge") ### 生成测试数据 import gzip import numpy as np import random import os data_dir = "data/MNIST/raw" with gzip.open(os.path.join(data_dir, "t10k-images-idx3-ubyte.gz"), "rb") as f: images = np.frombuffer(f.read(), np.uint8, offset=16).reshape(-1, 28, 28).astype(np.float32) mask = random.sample(range(len(images)), 16) # randomly select some of the test images mask = np.array(mask, dtype=np.int) data = images[mask] ### 测试该Predictor response = predictor.predict(np.expand_dims(data, axis=1)) print("Raw prediction result:") print(response) print() labeled_predictions = list(zip(range(10), response[0])) print("Labeled predictions: ") print(labeled_predictions) print() labeled_predictions.sort(key=lambda label_and_prob: 1.0 - label_and_prob[1]) print("Most likely answer: {}".format(labeled_predictions[0])) ### 删除部署端点并释放资源 sagemaker_session.delete_endpoint(endpoint_name=predictor.endpoint_name)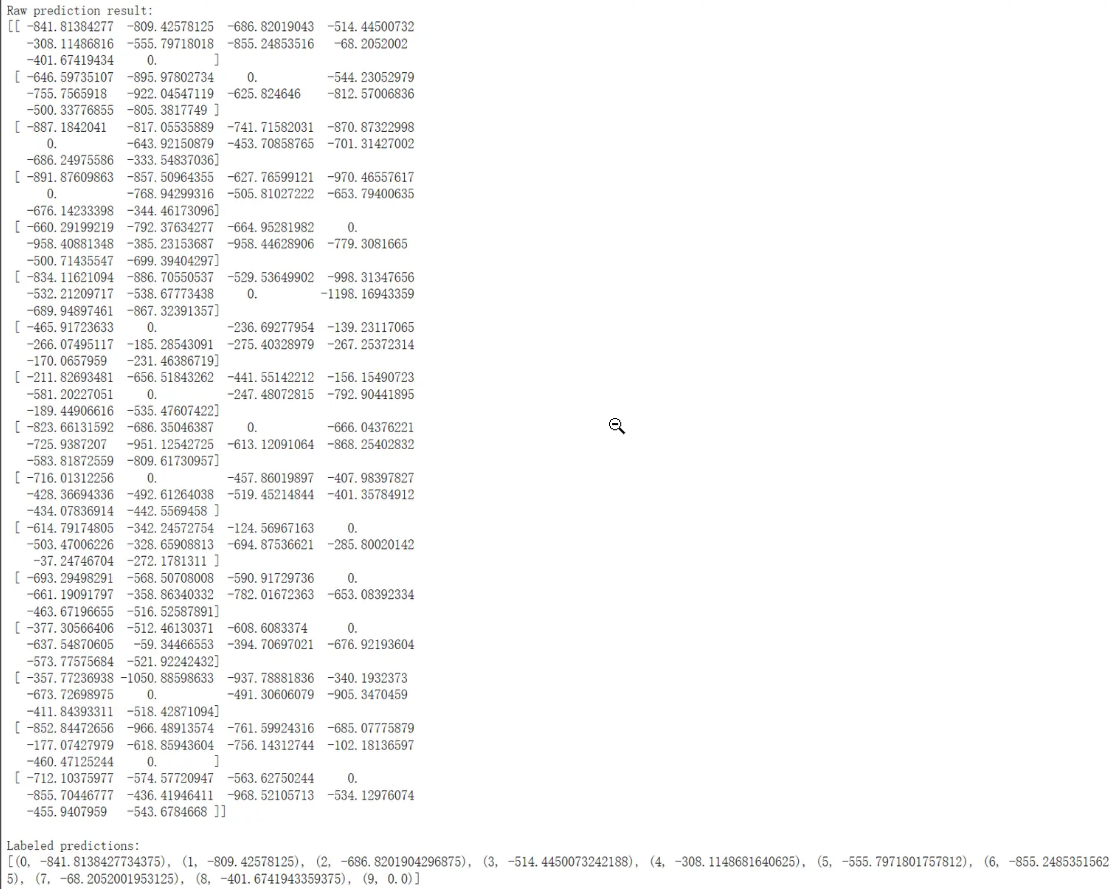
3. Increase productivity with Amazon SageMaker Studio, the first fully integrated development environment (IDE) for machine learning
Amazon SageMaker Studio provides a single visual web-based interface where you can perform all ML development steps. SageMaker Studio gives you complete access, control, and visibility into every step you need to build, train, and deploy your model. You can quickly upload data, create new notebooks, train and debug models, and move back and forth between steps to adjust experiments, compare results, and deploy models to production in one place, greatly increasing your productivity. All ML development activities can be performed within the unified SageMaker Studio visual interface, including notebooks, experiment management, automated model creation, debugging, and model deviation detection.

4. Use Amazon SageMaker notebooks to speed up builds and collaboration
Managing compute instances to view, run, or share notebooks is cumbersome. Amazon SageMaker Notebooks provide one-click Jupyter notebooks that allow you to start working immediately in seconds. The underlying computing resources are fully elastic, so you can easily turn available resources up or down, and the changes will be made automatically in the background without interrupting your work. SageMaker also supports sharing notebooks with one click. All code dependencies are captured automatically so you can collaborate easily with others. They'll get the exact same notebook saved in the same location.
5. Automatically build, train, and debug models with complete visibility and control with Amazon SageMaker Autopilot
Amazon SageMaker Autopilot is the industry's first automated machine learning tool that enables complete control and visibility of ML models. Typical automated machine learning methods don’t give you insight into the data used to create the model or the logic behind the model’s creation. Therefore, even ordinary models cannot evolve. Additionally, because typical automated ML solutions only offer one model to choose from, you don’t have the flexibility to trade off, such as sacrificing some accuracy for lower latency predictions.
SageMaker Autopilot automatically inspects raw data, applies featured processors, selects the best set of algorithms, trains and debugs multiple models, tracks their performance, and then ranks models based on performance, all with just a few clicks. The result is that deploying the best-performing model takes a fraction of the time it would typically take to train. How and what your models are created is fully visible to you, and SageMaker Autopilot is integrated with Amazon SageMaker Studio. In SageMaker Studio, you can explore up to 50 different models generated by SageMaker Autopilot and easily choose the best model for your use case. People without machine learning experience can use SageMaker Autopilot to easily generate models, while experienced developers can use it to quickly develop basic models for further iteration by the team.
6. Reduce data labeling costs by up to 70% with Amazon SageMaker Ground Truth
Successful machine learning models are built on large amounts of high-quality training data. However, the process of creating the training data required to build these models is often expensive, complex, and time-consuming. Amazon SageMaker Ground Truth helps you quickly build and manage highly accurate training data sets. Through Amazon Mechanical Turk, Ground Truth provides easy access to labelers and provides them with pre-built workflows and interfaces for performing common labeling tasks. You can also use your own labeling machine or use an Amazon-recommended supplier through the Amazon Marketplace. In addition, Ground Truth continuously learns labels produced by humans to produce high-quality automatic annotations, significantly reducing labeling costs.
7. Amazon SageMaker supports leading deep learning frameworks
Supported frameworks include: TensorFlow, PyTorch, Apache MXNet, Chainer, Keras, glion, Horovod, Scikit-learn, and Deep Graph Library.
User experience
Amazon SageMaker excels at model deployment, enabling great flexibility through a variety of deployment options, including cloud and edge computing. One-click deployment simplifies the process and enables users to quickly push models to production. Support for multi-model deployment improves resource utilization, while real-time and offline inference options meet the needs of different scenarios. SageMaker Studio, as an integrated development environment, provides convenient model management tools, making the entire deployment process more convenient. These features make SageMaker stand out in the field of machine learning model deployment, providing users with a full range of solutions that are flexible, simple, and adaptable to various scenarios.
Summarize
Taken together, Amazon SageMaker provides powerful functionality and flexibility at all stages of the machine learning life cycle. Its performance and convenience have been well received by users. However, some users also mentioned cost considerations, so there are various factors to weigh when choosing. Overall, Amazon SageMaker occupies an important position among cloud machine learning services, providing users with an integrated solution that helps simplify and optimize machine learning workflows.