Table of contents
1.egg project creation command
3. Basic information configuration of the backend server built by egg
2. Overall steps of ajax request
1. Initial version of GET request code
2. Improved version of GET request code
1. When the request method is GET, the client transmits data to the server
2. When the request method is POST, the client transmits data to the server.
3. Problems encountered when making ajax requests
1. When POST request, encounter 403 access forbidden
2. When making a POST request, 404 Not Found is encountered.
3. The error reported by ajax request: net::ERR_CONNECTION_TIMED_OUT
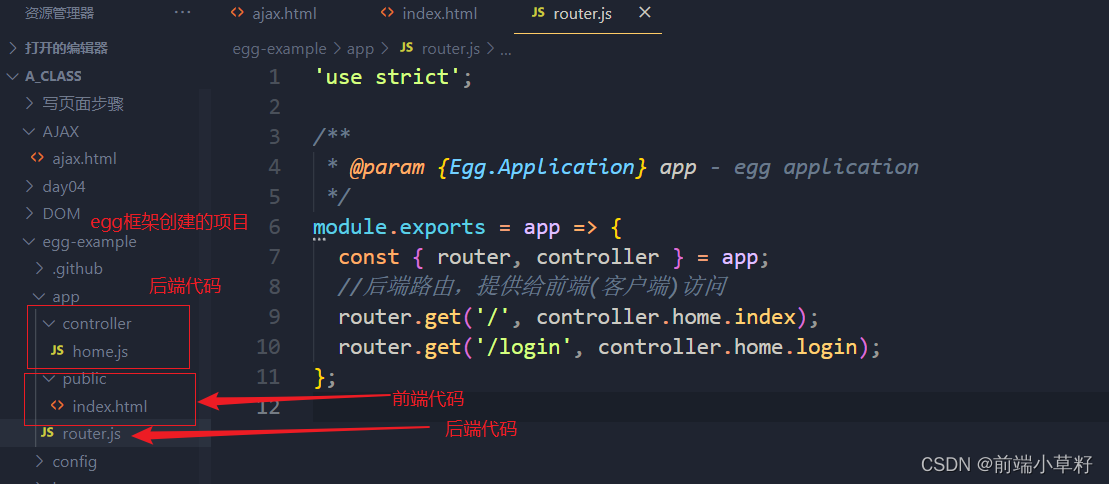
1.egg project construction
1.egg project creation command
Multiple egg projects can be created. Each creation requires the execution of the following three instructions, but the first instruction can be created manually:
01. Create a folder and enter the corresponding folder: mkdir egg-example && cd egg-example
02. Initialize the egg project: npm init egg --type=simple
03. Install dependency files (download the packages that the egg project depends on): npm i
Start the project: npm run dev
public under the app folder in the egg project: is used to place static resources
Once the egg project configuration file (the code in the config folder) is changed, the server must be restarted manually.
2.egg project introduction
Client (front-end page): html+css+js
Server : back-end server, the back-end code is placed in the back-end server egg. Front-end server: front-end code is placed in the front-end server.
The client can request the server
The project created by egg is both a back-end server and a front-end server. The back-end code is placed in this server, and the front-end code is also placed in this server.
3. Basic information configuration of the backend server built by egg
// 在config/config.default.js
// 配置服务器基本信息
  config.cluster = {
    listen: {
      path: '',
      port: 8000,
      hostname: '',//默认localhost和ip地址,上线时用0.0.0.0
    }
  };
Analysis: The default port of the back-end server built by the egg framework is 7001, here it is changed to 8000. That is, if multiple servers are turned on, in order to avoid port occupation, the port number can be modified .
2.AJAX
The address of the html page where the ajax request code is written must be the same as the address of the html file of the ajax request code on the server. You cannot directly use the page opened with vscode to make an ajax request.


You cannot directly use the page opened directly by vscode to make an ajax request: (This will report cross-domain)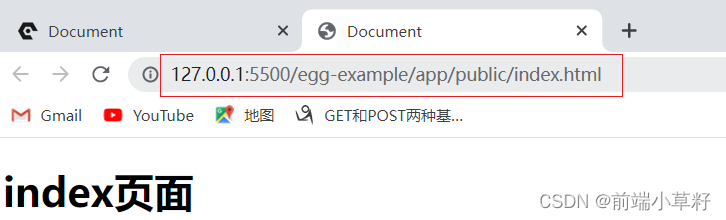
1.ajax overview
Note: Ajax code is written in the script tag in the html file .
01. ajax : Async JavaScript And Xml, that is, asynchronous Javascript and Xml
02. The core of ajax : Javascript, DOM, XMLHTTPRequest (a built-in object of js), initiate asynchronous requests through XMLHTTPRequest. After the request is successful, the data is obtained, the DOM is manipulated through JS, and the data is displayed on the page.
03.ajax is not a new technology, but a combination of a series of technologies.
Note: In other words, to initiate a network request, you can not only initiate it after entering the URL in the browser address bar (the obtained data may be directly displayed on the page), but you can also use XMLHTTPRequest (a built-in object of js ) , initiate an asynchronous request through XMLHTTPRequest (the data obtained can be processed and displayed on the page).
2. Overall steps of ajax request
1. Initial version of GET request code
    <script>
        //1.对象实例化 + 兼容性写法
        let xhr = new XMLHttpRequest()||new ActiveXObject("Micsoft.XMLHTTP");
        //2.和服务器建立连接  参数1:请求方式  参数2:要建立连接的服务器
        xhr.open('GET','http://localhost:8000/login');
        //3.发起请求
        xhr.send();
        //4.监听请求过程(请求过程状态:xhr.readyState一变就会调用这个函数)
        xhr.onreadystatechange = function(){
            if(xhr.readyState == 4){
                console.log('请求完成,数据:',xhr.response); //服务器响应的内容xhr.response
                // alert(xhr.response); //得到的是JSON格式字符串,转为对象 JSON.parse(xhr.response)
                alert(JSON.parse(xhr.response).data);
            }
        }
    </script>
2. Improved version of GET request code
Note 1: After xhr.responseType = 'json' is set, the JSON format data that the backend responds to the frontend will be automatically converted into object form. You don’t need to do the same as above. You also need to call JSON.parse() to convert the JSON data into object . However, if the data that the backend responds to the frontend is not in JSON format , xhr.responseType = 'json' will convert it to null, so the response data received by the frontend is null . And xhr.responseType = 'json' must be set before the request xhr.send(); occurs.
Note 2: Monitoring the request process: xhr.onreadystatechange is asynchronous and non-blocking code.
    <script>
        //1.对象实例化+兼容性写法
        let xhr = new XMLHttpRequest()||new ActiveXObject("Micsoft.XMLHTTP");
        //2.和服务器建立连接  参数1:请求方式  参数2:要建立连接的服务器
        xhr.open('GET','http://127.0.0.1:8000/login?admin=520250&pwd=123456');
        //设置后会自动让后端响应给前端的JSON格式数据转换成对象的形式  此时下面xhr.response保存的数据就是对象的形式
        xhr.responseType = 'json';   //要在xhr.send()之前写
        //3.发起请求
        xhr.send();
        //4.监听请求过程(请求过程状态:xhr.readyState一变化就会调用这个函数)
        xhr.onreadystatechange = function(){
            console.log(xhr.readyState);
            if(xhr.readyState == 4){
                console.log('请求过程状态为完成,此时状态码为:',xhr.status);
                if(xhr.status == 200){
                    console.log('请求过程完成,且状态码为200,表示请求数据成功,数据:',xhr.response);
                }
            }
        }
    </script>
3.POST request code
1. When making a post request, there will be security verification issues. The simple way to deal with it is to turn off security verification :
// config/config.default.js 文件中
// 配置安全验证 关闭post请求的安全验证
config.security = {
csrf: {
enable: false,
ignoreJSON: true,
}
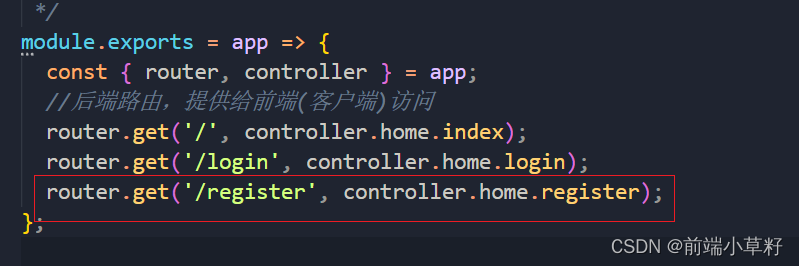
}2. The request method set by the backend must correspond to that of the frontend (the server must be restarted after closing)
router.post('/register', controller.home.register);
3. Post request can only be made after setting up the previous two steps.
<script>
    // 创建xhr实列化对象
    let xhr = new XMLHttpRequest();
    // 和服务器建立连接
    xhr.open('post', 'http://192.168.2.197:8888/loginsubmit');
    // 设置请求头  post请求需要设置请求头,不然后端接收不到数据
    xhr.setRequestHeader('Content-Type', 'application/x-www-form-urlencoded');
    // 设置响应数据类型
    xhr.responseType = 'json';
    // 向服务器发送数据
    xhr.send(`account=${account.value}&pwd=${pwd.value}`);
    // 监听请求状态
    xhr.onreadystatechange = function () {
        // console.log(xhr.readyState);
        if (xhr.readyState == 4) { //请求完成
            if (xhr.status == 200) { //请求成功
                console.log(xhr.response); //服务器响应的数据
            }
        }
    }
</script>
4. Note: Generally do not use 127.0.0.1 or localhost (local) when making ajax requests. IP is most suitable. (Because the ajax request is initiated in the client browser )
xhr.open('GET','http://127.0.0.1:8000/login?admin=520250&pwd=123456');Because when someone visits the HTML page where the ajax request code you wrote is located, they make an ajax request. If your ajax request code is like this: xhr.open('GET','http:// 127.0.0.1:8000/login ? admin=520250&pwd=123456');, then he will access the login route on his own computer, not the login route on your computer.
The best way is to write it as your IP
xhr.open('GET','http://192.168.0.107/login?admin=520250&pwd=123456');So you need to understand: Ajax requests are initiated in the client browser .
First load the html file with the ajax request code into the local browser, and then make the ajax request from the local browser. Therefore, if the IP is written as local ip127.0.0.1, the local computer will be accessed and the corresponding resource cannot be found, instead of accessing the resource address that really needs to be requested.
Therefore: the ajax request is to load the html file with the ajax code locally before the ajax request is made.
In this way, when someone accesses the HTML page where the ajax request code you wrote is located, and makes an ajax request, they will also access your back-end server instead of their own local computer.
3. When the ajax request method is GET or POST, the difference in the way the client transmits data to the server
1. When the request method is GET, the client transmits data to the server
Transmitted on the client side:

Received on the server side:
ctx.request.query 或者 ctx.query
  async login() {
    const { ctx } = this;
    //获取客户端传递过来的数据
    console.log(ctx.request.query);
    console.log(ctx.query);
  }
}
Analysis: The server-side code is executed in the dos window, so the results can be viewed in the dos window.

2. When the request method is POST, the client transmits data to the server.
1. When making a post request, there will be security verification problems. The simple way to deal with it is to turn off security verification : (restart the server after turning off)
	// config/config.default.js 文件中
	// 配置安全验证 关闭post请求的安全验证
	config.security = {
		csrf: {
      			enable: false,
      			ignoreJSON: true,
   		}
	}
2. The request method set by the backend must correspond to that of the frontend.
router.post('/register', controller.home.register);
3. Then when making a POST request, the client passes data to the server.
01. Request headers need to be set. Post requests need to set request headers, otherwise the backend cannot receive data.
 // 设置请求头  post请求需要设置请求头,不然后端接收不到数据
 xhr.setRequestHeader('Content-Type', 'application/x-www-form-urlencoded');
xhr.open('POST', 'http://127.0.0.1:8000/register');
xhr.responseType = 'json'; //要在xhr.send()之前写
// 设置请求头 post请求需要设置请求头,不然后端接收不到数据
xhr.setRequestHeader('Content-Type', 'application/x-www-form-urlencoded');
//3.发起请求
xhr.send(`admin=666&pwd=1233211234567`);02. The server uses ctx.request.body to obtain the data passed by the client. The result is in the form of an object.
  async register() {
    const { ctx } = this;
    //获取客户端传递过来的数据
    console.log(ctx.request.body);
  }
Analysis: The server-side code is executed in the dos window, so the results can be viewed in the dos window.
![]()
Successfully obtained the data sent from the client to the server.
3. Problems encountered when making ajax requests
1. When POST request, encounter 403 access forbidden
403: Access Forbidden (post requests will have security verification issues, and the backend must turn off security verification)

Solution: Turn off POST security verification on the backend
	// config/config.default.js 文件中
	// 配置安全验证 关闭post请求的安全验证
	config.security = {
		csrf: {
      			enable: false,
      			ignoreJSON: true,
   		}
	}
2. When making a POST request, 404 Not Found is encountered.

But the backend did write the register route
Analysis: Although the back-end has written a routing register, the request method it requires is get, so the front-end will definitely not be able to request the request using the post request method. This means that the request method is not decided by the front-end developer, but by the back-end developer. decided .
So: Solution: Change the request method to post on the backend (note that you need to restart the server if you change the backend code)
router.post('/register', controller.home.register);3. The error reported by ajax request: net::ERR_CONNECTION_TIMED_OUT
Analysis: Error reported by ajax request: The server requested by ajax is down (not started)
Maybe the ip address has changed.