Preamble
There are many ways to connect to a remote server. This article will introduce the SSH password-free login method based on VS Code. Before starting an SSH remote connection, you need to complete the following steps:
1.Windows configuration SSH:
1. Taking the Windows platform as an example, you need to enter in the cmd terminal (Win+R enter cmd):
ssh -vIf the message appears, it means that the SSH configuration on the Windows side is complete.
2. How Windows generates a public key:
ssh-keygenIf you can see the id_rsa and id_rsa.pub files in C:\Users\your username\.ssh ;
Please use Notepad to open id_rsa.pub, then Ctrl+A Ctrl+C . At this time, the content of the clipboard is the Windows public key.
 Please protect your private key!
2.VS Code side environment configuration:
1. Add extension: Remote Development
2. Remote Development contains three expansion packages, and we will need the plug-in Remote-SSH later .
as the picture shows:

3. Server-side configuration:
1. Check whether the SSH service is installed on the server:
ps -e | grep sshd
2. Please specify your server IP address:
1. Taking the cloud server CVM as an example, your IP address is your public IP , which you need to obtain from the cloud service official website control center.
2. Taking the local virtual machine as an example, you need to enter the following command to obtain the local IP address.
(The blogger uses CVM, and the remote link to the local virtual machine has not been verified in practice)
ip addr
text:
First time login settings
1. Please click the remote link symbol in the lower left corner of the VS Code homepage :

2. Select: Connect Current Window to Host

3. Please enter the user name and IP address (the user name is root as an example):
 The format is as follows:
ssh root@您的ip地址3.0 Select the first item: C:\User\hrwei\.ssh\config;
 3.1 Select Linux - Continue - Enter password
3.2 You need to enter your server SSH password when logging in for the first time. If you forget it, you can reset it on the server network.
3.3 If you can see the server in the VS Code terminal and can perform command operations, it proves that the remote connection is successful.
FAQ 1 (resolved):
VSCode remote connection server error: Could not establish connection to "your ip address"
The error message below prompts: The pipe the process is trying to write to does not exist.
At this point you need: Extension-Remote SSH-right-click Extensions Settings :

Please type your config path here
SSH password-free login:
Every time you connect to the server, you need to enter the SSH password, which is extremely inconvenient, so we use SSH password-free login.
Operation on the server side (Linux):
cd ~
ls -a
as the picture shows:
 Please make sure you have a .ssh folder. If not, please create a new ssh folder in your home directory:
mkdir .sshNext, please enter the following command:
vim ~/.ssh/authorized_keys
Please press i to enter the editing mode - copy the contents of id_rsa.pub on the Windows side CtrlA&Ctrl+C , shift+insert in Vim to paste the Windows public key into ~/.ssh/authorized_keys , press ESC , enter : wq to exit.
At this point, restart VS Code, click the remote connection symbol in the lower left corner or access the remote resource manager in the sidebar, and select the IP address of the server you need to access. After the connection is successful, please execute the command in the terminal.
FAQ 2 (resolved):
Every time you restart VS Code, the software will automatically connect to the server. But sometimes we don't need to access the remote server.
At this time, you need to click the remote connection symbol in the lower left corner of the homepage again and select Close Remote Connection .

Further reading:
About the principle of SSH password-free login:
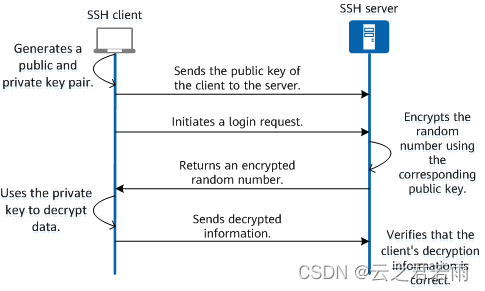
1. Generate the public key (content in id_rsa.pub) on the client (this article is Windows) and copy the public key to the server (my remote CVM). At this time, both the client and the remote server have the same public key.
2. The client carries the public key to initiate a login request. The server looks for the public key you uploaded in authorized_keys, and then compares it with the public key carried by the client. Once the comparison is successful, the server will randomly generate a string encrypted with the public key to challenge the client.
3. When the client receives the public key encrypted random string sent by the server, it will decrypt it with its own private key (id_rsa), and then return the random string to the server. The remote server compares the returned string with its own locally generated random string. If they are consistent, it proves that the user is trustworthy and allows direct access to the Shell without requiring a login password.
How to contact me? [email protected]