The picture above describes the requirements:
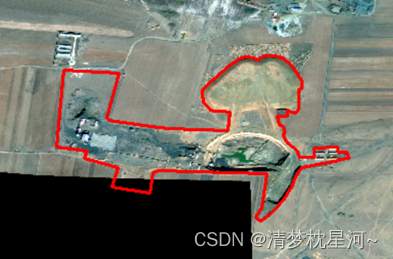
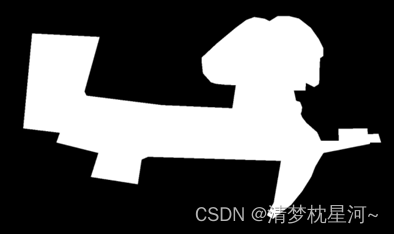
The goal is to generate a mask (i.e. white area) image based on the drawn polygon. The size of the generated image should be consistent with the size of the original image, and a mask will be generated at the corresponding position.
Processing method:
1. Read out the coordinates of each vertex of the drawn polygon. What is needed is the pixel coordinate in the image.
2. Generate a picture with all 0 or 1 consistent with the size of the original picture for subsequent use.
3. According to the cv2 library The fillPoly function fills the corresponding polygon position of the image with all 0s or all 1s.
4. Output the masked image cv2.imwrite after filling.
The above is the basic process, and the python code is ready to come out.
Issues to note:
There may be multiple polygon masks to be output on an image. Pay attention to traversing polygons to generate mask output in the same image.
Problems I encountered during this period:
opencv contains two functions that can fill polygon areas with pixels, namely cv2.fillConvexPoly() and cv2.fillPoly(). The two functions are slightly different, resulting in differences in the effects of the generated results: on the left is cv2.fillConvexPoly(
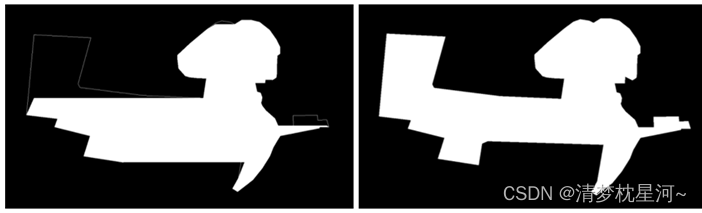
) The output result of , the right side is the output result of cv2.fillPoly().
It can be seen that the image on the left can accurately depict the edges of the polygon, but some areas inside the polygon cannot accurately fill the pixels, causing the mask generation to fail,
while the generation effect of the other function on the right perfectly matches the area of the polygon.
Regarding the two functions: (I will take a note after searching for information)
1. The cv2.fillConvexPoly() function can be used to fill convex polygons. It only needs to provide the vertices of the convex polygons.
img = np.zeros((1080, 1920, 3), np.uint8)
triangle = np.array([[0, 0], [1500, 800], [500, 400]])

cv2.fillConvexPoly(img, triangle, (255, 255, 255))

cv2.imwrite('./1.jpg',img)
2. The cv2.fillPoly() function can be used to fill graphics of any shape. It can be used to draw polygons. In work, many edges are often used to approximate a curve. The cv2.fillPoly() function can fill multiple shapes at one time. A graphic.
To input multiple areas, add "[ ]"
img = np.zeros((1080, 1920, 3), np.uint8)
area1 = np.array([[250, 200], [300, 100], [750, 800], [100, 1000]])
area2 = np.array([[1000, 200], [1500, 200], [1500, 400], [1000, 400]])

cv2.fillPoly(img, [area1, area2], (255, 255, 255))

cv2.imwrite('./2.jpg',img)
Translucent filling:
Sometimes you want to have a translucent filling effect, you can use the cv2.addWeighted method
alpha = 0.7
beta = 1-alpha
gamma = 0
img_add = cv2.addWeighted(img1, alpha,img2, beta, gamma)
cv2.imwrite('final ret.jpg',img_add)
cv2.imshow('img_add',img_add)
if cv2.waitKey(500) and 0xff == ord('q'):
    cv2.destroyAllWindows()