Implementing a simple message board based on php+MySql (super detailed!)
This article is a simple message board based on PHP and MySQL. The message board has functions such as user registration, login, posting messages, and viewing messages. First, users can create their own account through the registration function, and then use this account to log in. After successfully logging in, users can post messages and view messages posted by themselves and other users. In terms of message management, website administrators can review and delete messages. In addition, the article also introduces how to use the XAMPP toolkit to build a PHP running environment and a MySQL database environment, and provides detailed steps for code implementation and corresponding precautions. The simple message board introduced in this article can be used as a small project for beginners to learn PHP and MySQL, and can also provide some inspiration and reference for websites in need.
Web security and data security, implement a simple message board function module based on PHP.
(1) System functions: home page, registration, login, and message.
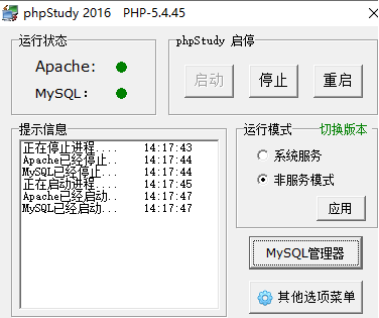
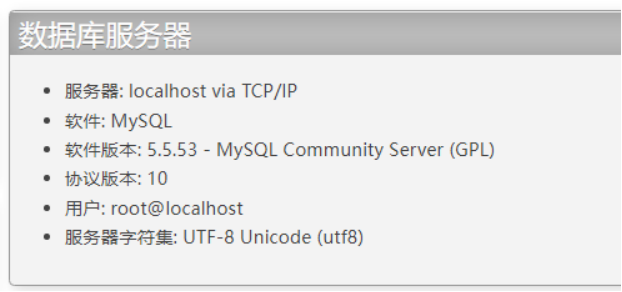
Message board environment and version: PHP (version: 5.4.45) + Mysql (version 5.5.53) + windows10 (virtual machine image)
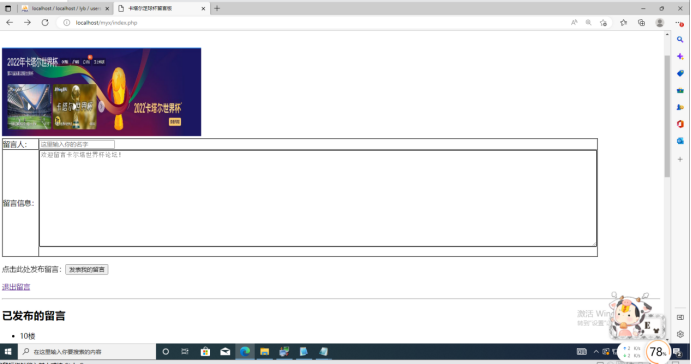
Message board name: "Qatar World Cup Message Board"
The specific environment parameters are shown in the figure below:

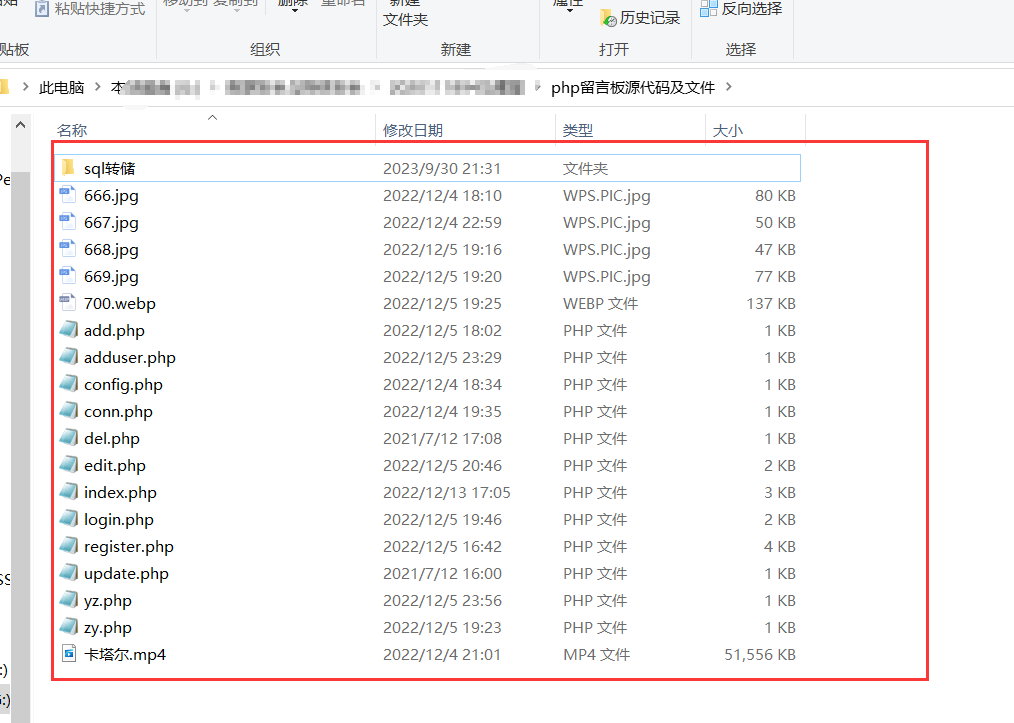
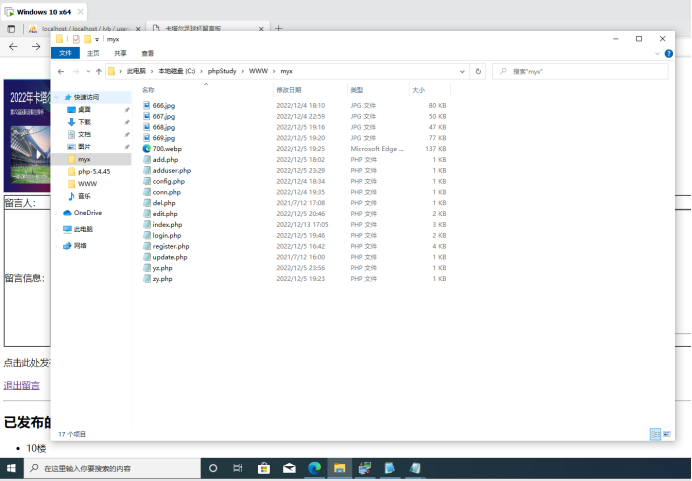
All files of the message board function:
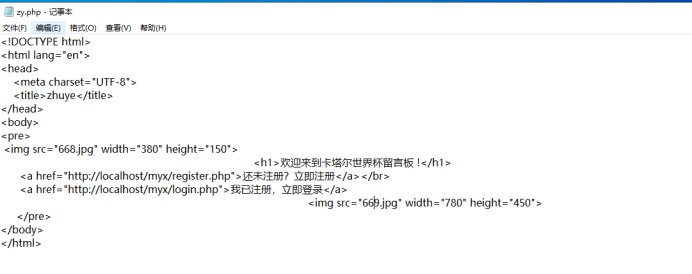
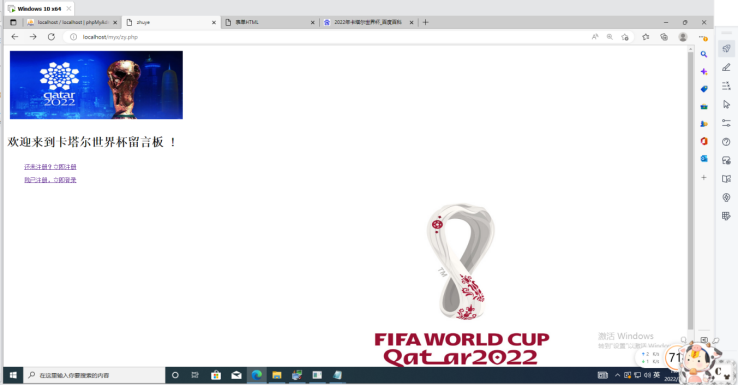
1. Home page file: zy.php
Code:
<!DOCTYPE html>
<html lang="en">
<head>
    <meta charset="UTF-8">
    <title>zhuye</title>
</head>
<body>
<pre>
 <img src="668.jpg" width="380" height="150">
                                                                               <h1>欢迎来到卡塔尔世界杯留言板 !</h1>
      <a href="http://localhost/myx/register.php">还未注册?立即注册</a></br>
      <a href="http://localhost/myx/login.php">我已注册,立即登录</a>
                                                                                                <img src="669.jpg" width="780" height="450">
     </pre>
</body>
</html>
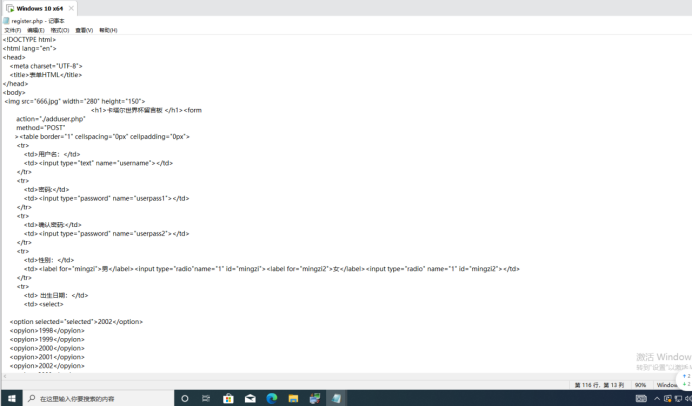
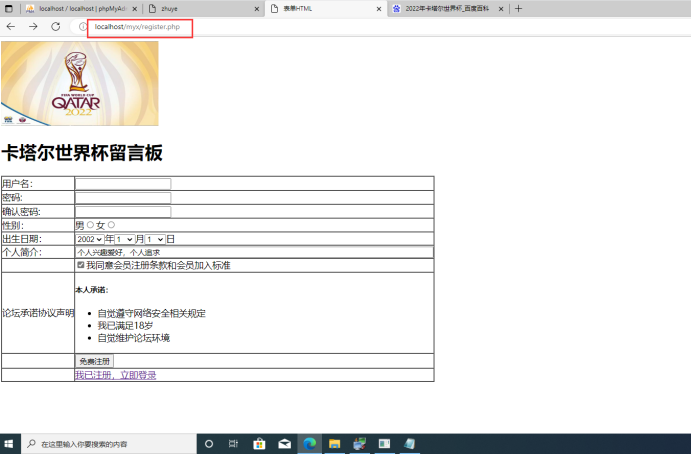
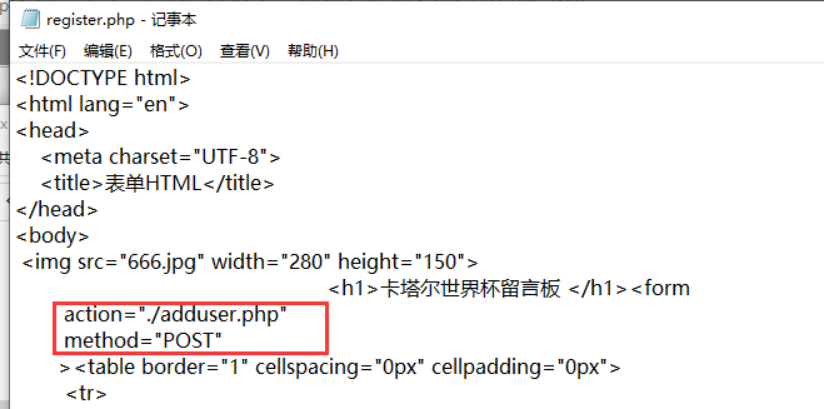
2. Registration function: register.php (message board user registration page)
Code:
<!DOCTYPE html>
<html lang="en">
<head>
    <meta charset="UTF-8">
    <title>表单HTML</title>
</head>
<body>
 <img src="666.jpg" width="280" height="150">
                                                  <h1>卡塔尔世界杯留言板 </h1><form
        action="./adduser.php"
        method="POST"
       ><table border="1" cellspacing="0px" cellpadding="0px">
        <tr>
            <td>用户名:</td>
            <td><input type="text" name="username"></td>
        </tr>
        <tr>
            <td>密码:</td>
            <td><input type="password" name="userpass1"></td>
        </tr>
        <tr>
            <td>确认密码:</td>
            <td><input type="password" name="userpass2"></td>
        </tr>
        <tr>
            <td>性别:</td>
            <td><label for="mingzi">男</label><input type="radio"name="1" id="mingzi"><label for="mingzi2">女</label><input type="radio" name="1" id="mingzi2"></td>
        </tr>
        <tr>
            <td> 出生日期:</td>
            <td><select>

    <option selected="selected">2002</option>
    <opyion>1998</opyion>
    <opyion>1999</opyion>
    <opyion>2000</opyion>
    <opyion>2001</opyion>
    <opyion>2002</opyion>
    <option>2003</option>
    <option>2004</option>
<opyion>2005</opyion>
</select>年<select>
        <option selected="selected">1</option>
        <option>2</option>
        <option>3</option>
        <option>4</option>
        <option>5</option>
        <option>6</option>
        <option>7</option>
        <option>8</option>
        <option>9</option>
        <option>10</option>
        <option>11</option>
        <option>12</option>
</select>月<select>
        <option selected="selected">1</option>
        <option>2</option>
        <option>3</option>
        <option>4</option>
        <option>5</option>
        <option>6</option>
        <option>7</option>
        <option>8</option>
        <option>9</option>
        <option>10</option>
        <option>11</option>
        <option>12</option>
<option>13</option>
<option>14</option>
<option>15</option>
<option>16</option>
<option>17</option>
<option>18</option>
<option>19</option>
<option>20</option>
<option>21</option>
<option>22</option>
<option>23</option>
<option>24</option>
<option>25</option>
<option>26</option>
<option>27</option>
<option>28</option>
<option>29</option>
<option>30</option>
<option>31</option>
    </select>日</td>
        </tr>
         <tr>
            <td> 个人简介:</td>
            <td><input type="t" value="个人兴趣爱好,个人追求" maxlength="300" size="90"></td>
        </tr>
        <tr>
            <td></td>
            <td><input type="checkbox" checked="checked">我同意会员注册条款和会员加入标准</td>
        </tr>
        <tr>
            <td>论坛承诺协议声明</td>
            <td>
        <h5>本人承诺:</h5>
             <ul>
                 <li>自觉遵守网络安全相关规定</li>
                 <li>我已满足18岁</li>
                 <li>自觉维护论坛环境</li>
             </ul>
            </td>
        </tr>
         <tr>
            <td></td>
            <h3><td><input type="submit" name="usersubmit" value="免费注册"></td><h3>
        </tr>
         <tr>
            <td></td>
            <td><a href="http://localhost/myx/login.php">我已注册,立即登录</td>
        </tr>
    </table>
</body>
</html>
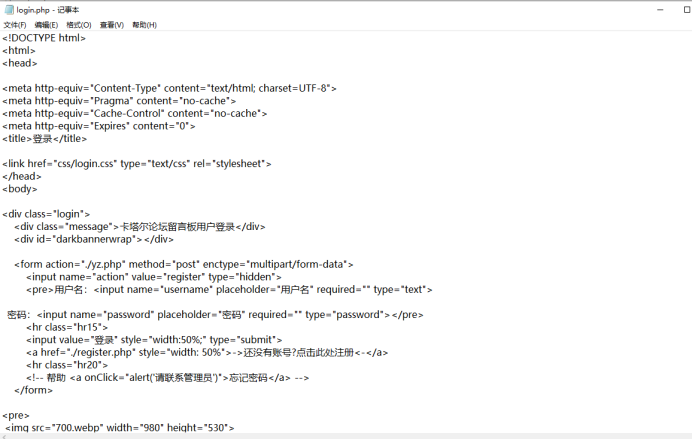
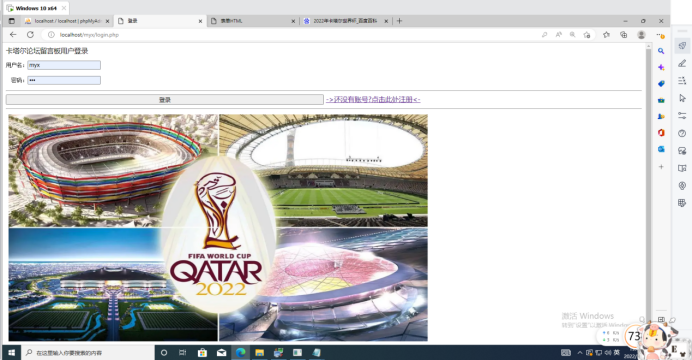
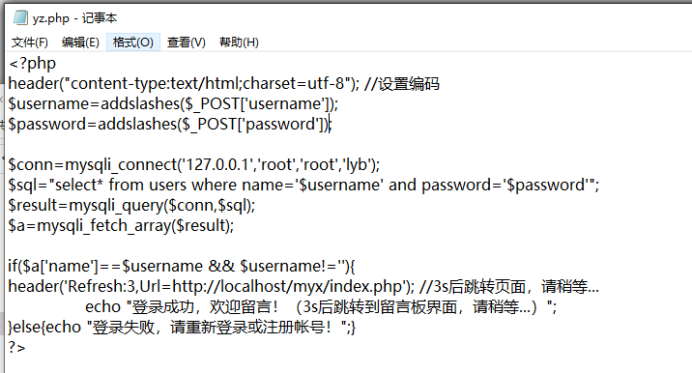
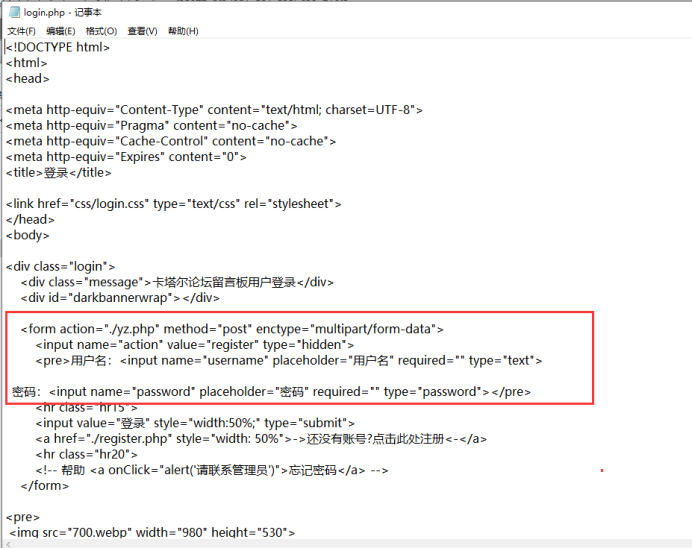
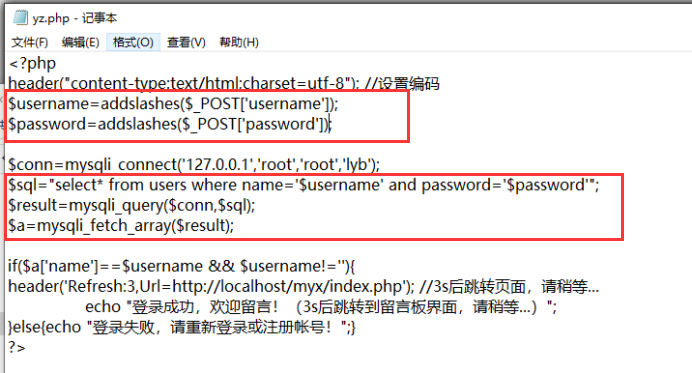
3. User login page file: login.php, back-end user data verification file: yz.php
Login.php:
<!DOCTYPE html>
<html>
<head>
<meta http-equiv="Content-Type" content="text/html; charset=UTF-8">
<meta http-equiv="Pragma" content="no-cache">
<meta http-equiv="Cache-Control" content="no-cache">
<meta http-equiv="Expires" content="0">
<title>登录</title>

<link href="css/login.css" type="text/css" rel="stylesheet">
</head>
<body>

<div class="login">
    <div class="message">卡塔尔论坛留言板用户登录</div>
    <div id="darkbannerwrap"></div>

    <form action="./yz.php" method="post" enctype="multipart/form-data">
        <input name="action" value="register" type="hidden">
        <pre>用户名:<input name="username" placeholder="用户名" required="" type="text">

  密码:<input name="password" placeholder="密码" required="" type="password"></pre>
        <hr class="hr15">
        <input value="登录" style="width:50%;" type="submit">
        <a href="./register.php" style="width: 50%">->还没有账号?点击此处注册<-</a>
        <hr class="hr20">
        <!-- 帮助 <a onClick="alert('请联系管理员')">忘记密码</a> -->
    </form>

<pre>
 <img src="700.webp" width="980" height="530">
</pre>
</div>
</body>
</html>
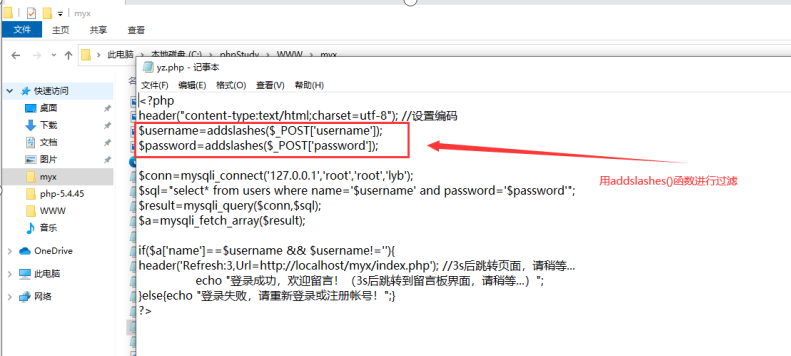
yz.php (verification data) code:
<?php
header("content-type:text/html;charset=utf-8"); //设置编码
$username=addslashes($_POST['username']);
$password=addslashes($_POST['password']);
$conn=mysqli_connect('127.0.0.1','root','root','lyb');
$sql="select* from users where name='$username' and password='$password'";
$result=mysqli_query($conn,$sql);
$a=mysqli_fetch_array($result);
if($a['name']==$username && $username!=''){
header('Refresh:3,Url=http://localhost/myx/index.php'); //3s后跳转页面,请稍等...
echo "登录成功,欢迎留言!(3s后跳转到留言板界面,请稍等...)";
}else{
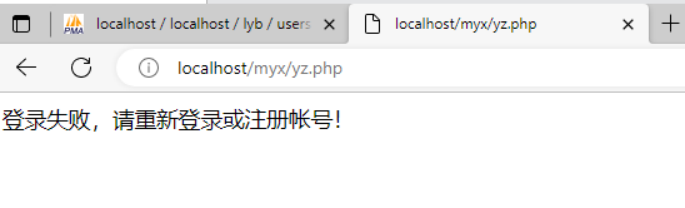
echo "登录失败,请重新登录或注册帐号!";}
?>
?>
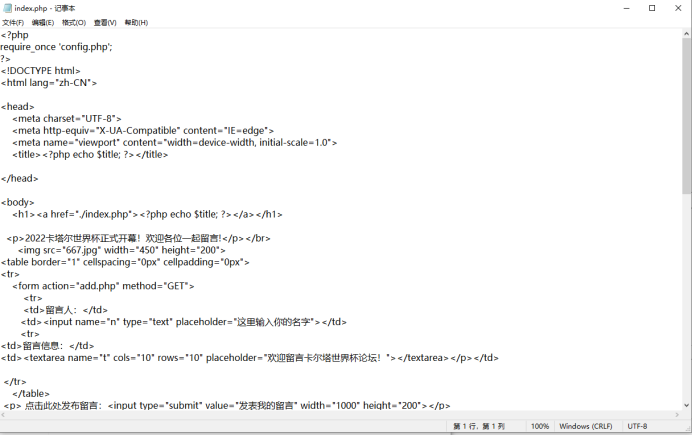
4. Message board function files: index.php (message board) add.php (used to transfer user message board content), edit.php (edit message board function), update.php (update message board), del.php ( delete message)
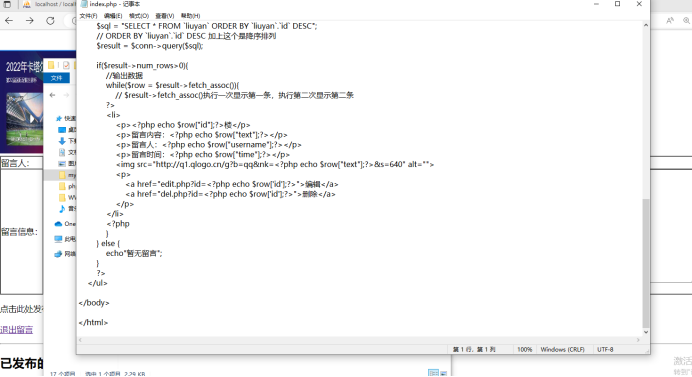
index.php (message board) code:
<?php
require_once 'config.php';
?>
<!DOCTYPE html>
<html lang="zh-CN">
<head>
<meta charset="UTF-8">
<meta http-equiv="X-UA-Compatible" content="IE=edge">
<meta name="viewport" content="width=device-width, initial-scale=1.0">
<title><?php echo $title; ?></title>
</head>
<body>
<h1><a href="./index.php"><?php echo $title; ?></a></h1>
<p>2022卡塔尔世界杯正式开幕!欢迎各位一起留言!</p></br>
<img src="667.jpg" width="450" height="200">
<table border="1" cellspacing="0px" cellpadding="0px">
<tr>
<form action="add.php" method="GET">
<tr>
<td>留言人:</td>
<td><input name="n" type="text" placeholder="这里输入你的名字"></td>
<tr>
<td>留言信息:</td>
<td><textarea name="t" cols="10" rows="10" placeholder="欢迎留言卡尔塔世界杯论坛!"></textarea></p></td>
</tr>
</table>
<p> 点击此处发布留言:<input type="submit" value="发表我的留言" width="1000" height="200"></p>
<p><a href='./login.php'>退出留言</a></p>
</form>
<hr>
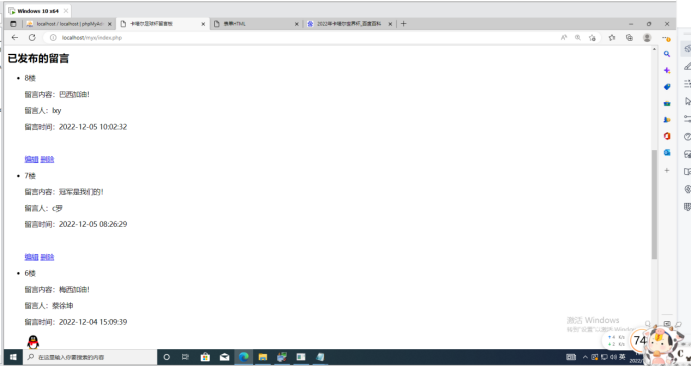
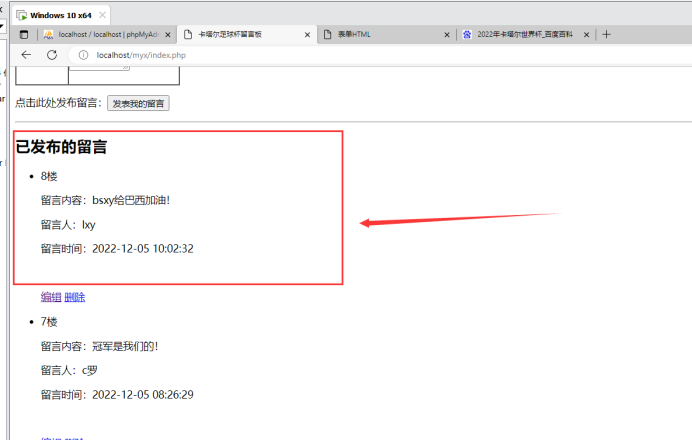
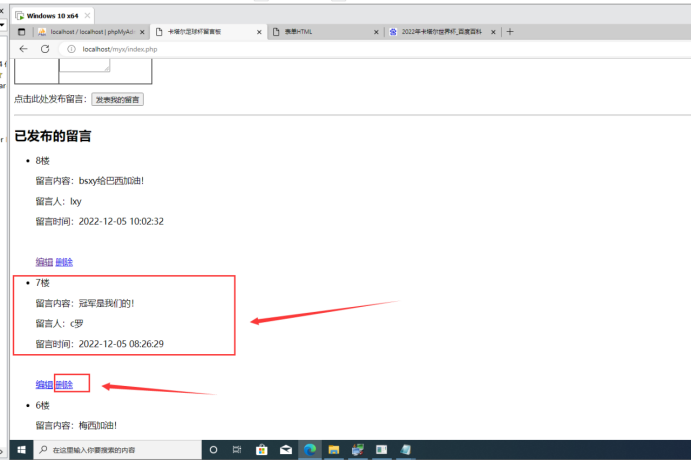
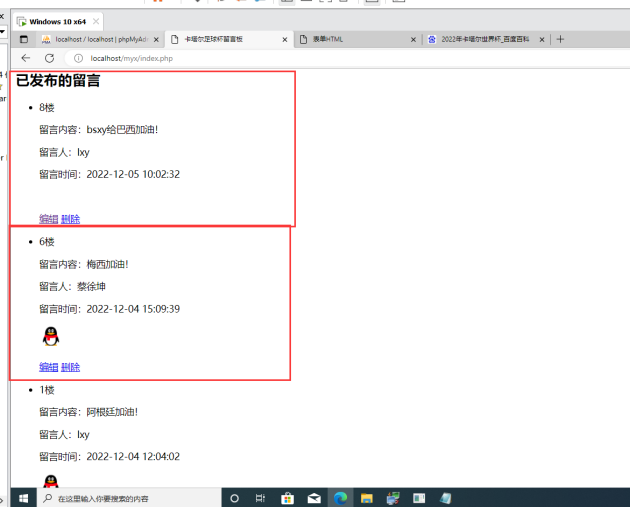
<h2>已发布的留言</h2>
<ul>
<?php
// 最新留言展示前面
$sql = "SELECT * FROM `liuyan` ORDER BY `liuyan`.`id` DESC";
// ORDER BY `liuyan`.`id` DESC 加上这个是降序排列
$result = $conn->query($sql);
if($result->num_rows>0){
//输出数据
while($row = $result->fetch_assoc()){
// $result->fetch_assoc()执行一次显示第一条,执行第二次显示第二条
?>
<li>
<p><?php echo $row["id"];?>楼</p>
<p>留言内容:<?php echo $row["text"];?></p>
<p>留言人:<?php echo $row["username"];?></p>
<p>留言时间:<?php echo $row["time"];?></p>
<img src="http://q1.qlogo.cn/g?b=qq&nk=<?php echo $row["text"];?>&s=640" alt="">
<p>
<a href="edit.php?id=<?php echo $row['id'];?>">编辑</a>
<a href="del.php?id=<?php echo $row['id'];?>">删除</a>
</p>
</li>
<?php
}
} else {
echo"暂无留言";
}
?>
</ul>
</body>
</html>
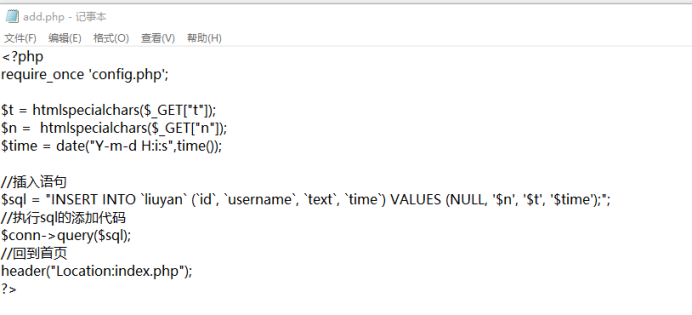
add.php (used to pass user message board content) code:
<?php
require_once 'config.php';

$t = htmlspecialchars($_GET["t"]);
$n =  htmlspecialchars($_GET["n"]);
$time = date("Y-m-d H:i:s",time());

//插入语句
$sql = "INSERT INTO `liuyan` (`id`, `username`, `text`, `time`) VALUES (NULL, '$n', '$t', '$time');";
//执行sql的添加代码
$conn->query($sql);
//回到首页
header("Location:index.php");
?>
edit.php (edit message board function) code:
<?php
//需要_一次 配置文件
require_once "config.php";
//点击之后传了个id过来
//这边php文件通过GET接受传过来的id
$id = $_GET['id'];
//根据id查到当前的具体信息
$sql = "SELECT * FROM `liuyan` WHERE `id` = $id";
//执行sql的查询代码 并把结果给到$result
$result = $conn->query($sql);
//得到当前id的具体信息
// var_dump($result);
if ($result->num_rows > 0) {
$res = $result->fetch_assoc();
$text = $res["text"];
}
else {
die("无此条留言");
}
?>
<!DOCTYPE html>
<html lang="zh-CN">
<head>
<meta charset="UTF-8">
<meta http-equiv="X-UA-Compatible" content="IE=edge">
<meta name="viewport" content="width=device-width, initial-scale=1.0">
<title>留言信息编辑</title>
</head>
<body>
<h1><?php echo $title; ?></h1>
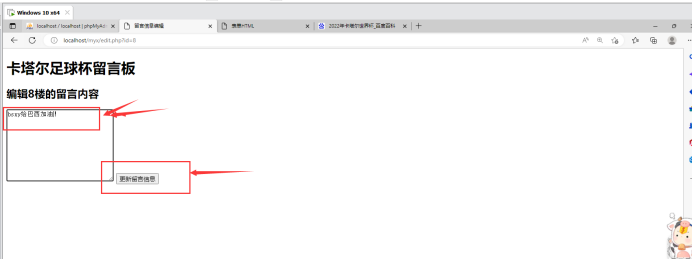
<h2>编辑<?php echo $id;?>楼的留言内容</h2>
<form action="update.php" method="GET">
<input hidden name="i" value="<?php echo $res['id'] ?>" type="text">
<textarea name="t" cols="30" rows="10"><?php echo $res["text"] ?></textarea>
<input type="submit" value="更新留言信息">
</form>
</body>
</html>
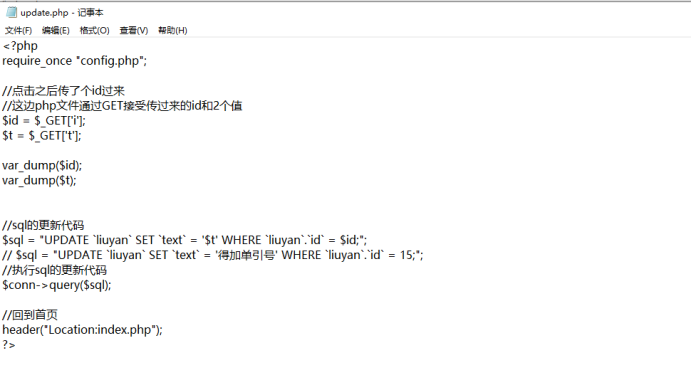
update.php (update message board) code:
<?php
require_once "config.php";

//点击之后传了个id过来
//这边php文件通过GET接受传过来的id和2个值
$id = $_GET['i'];
$t = $_GET['t'];

var_dump($id);
var_dump($t);


//sql的更新代码
$sql = "UPDATE `liuyan` SET `text` = '$t' WHERE `liuyan`.`id` = $id;";
// $sql = "UPDATE `liuyan` SET `text` = '得加单引号' WHERE `liuyan`.`id` = 15;";
//执行sql的更新代码
$conn->query($sql);

//回到首页
header("Location:index.php");
?>
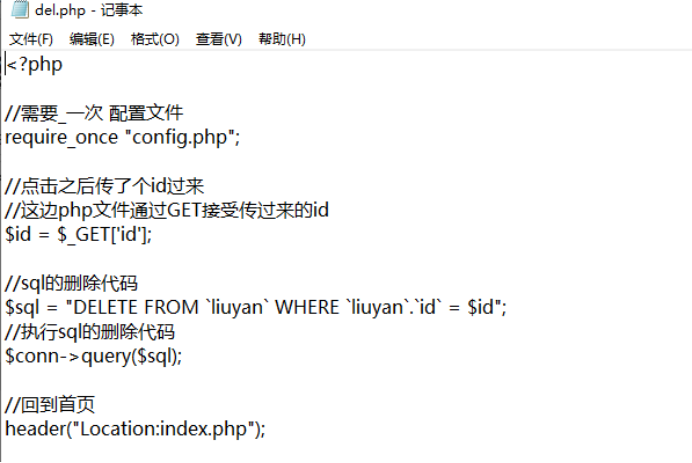
del.php (delete message) code:
<?php

//需要_一次 配置文件
require_once "config.php";

//点击之后传了个id过来
//这边php文件通过GET接受传过来的id
$id = $_GET['id'];

//sql的删除代码
$sql = "DELETE FROM `liuyan` WHERE `liuyan`.`id` = $id";
//执行sql的删除代码
$conn->query($sql);

//回到首页
header("Location:index.php");
The function of changing message content is set up:
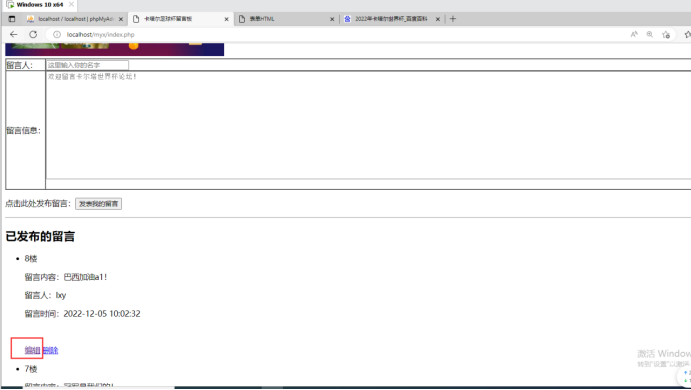
The message deletion function is set up:
The box is the message to be deleted:
After clicking delete, you find that the message has been deleted:
After leaving the message, you can choose to exit the message board. Personal login:

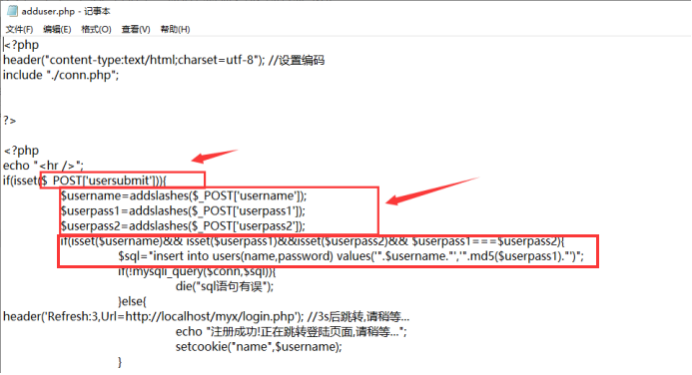
(1) Realize the connection with the database and submit data storage and data output through POST.
mysql database user: root, password: root
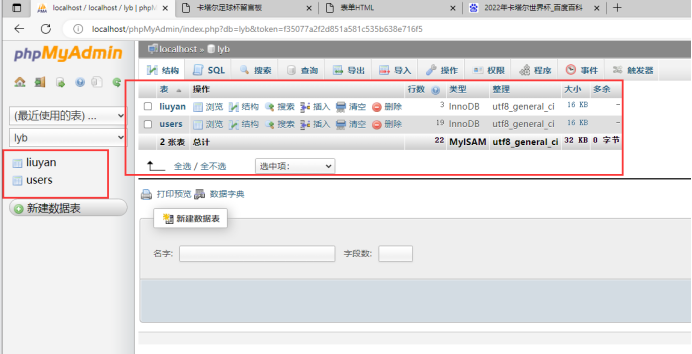
Message board database name: lyb
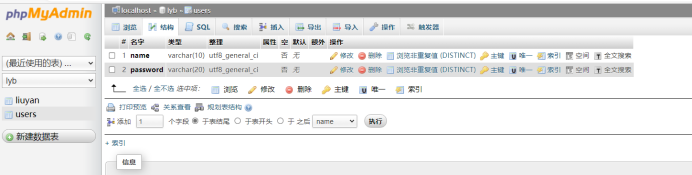
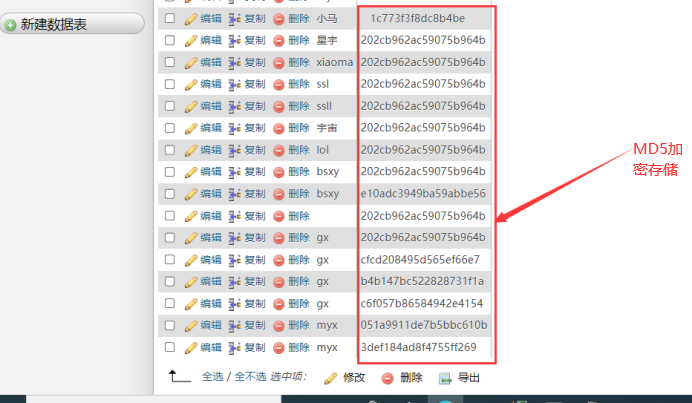
database lyb has two tables, one is the users table, which contains account passwords,
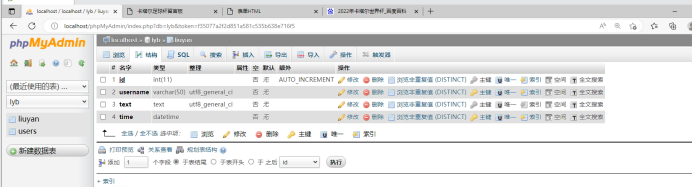
and the other table is liuyan, which is used to store data posted by users on the message board.

users table structure:
liuyan table structure:
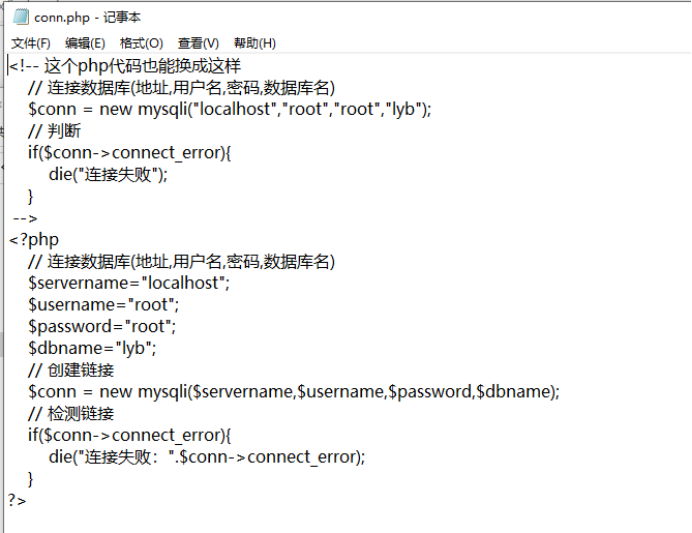
The two files conn.php and config.php implement the connection with the database:
coon.php code:
<?php
    // 连接数据库(地址,用户名,密码,数据库名)
    $servername="localhost";
    $username="root";
    $password="root";
    $dbname="lyb";
    // 创建链接
    $conn = new mysqli($servername,$username,$password,$dbname);
    // 检测链接
    if($conn->connect_error){


        die("连接失败:".$conn->connect_error);
    }
?>
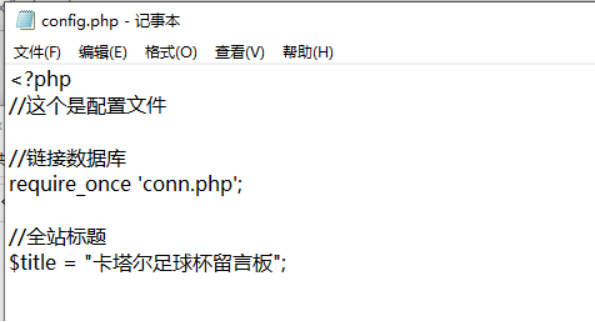
config.php code (this is the configuration file):
<?php
//链接数据库
require_once 'conn.php';
//全站标题
$title = "卡塔尔足球杯留言板";
Submit data storage and data output by submitting POST:
when logging in, pass the variables username and password parameters to the post through post to implement data verification. The back-end mysql database verifies whether the user exists. If it exists, you can log in to the message board. If it does not exist, you cannot log in. :
(2) Use encryption algorithms to achieve encrypted storage and master the knowledge of using cookies.
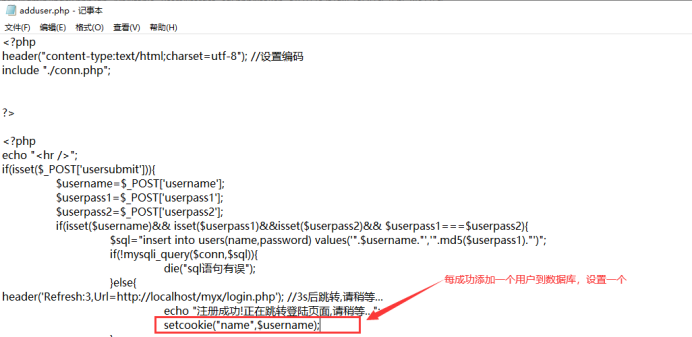
Use the MD5 encryption algorithm to implement encrypted storage:
Use MD5 encryption to store user passwords stored in the mysql database:

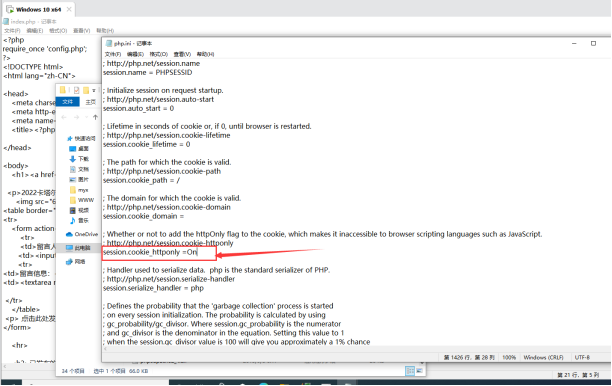
Cookies are generated by the server and sent to the client browser. The browser will store the sent cookies in a file. When a subsequent request is made, it will automatically request the server with the stored cookies.
Cookies in php can be used to automatically fill in the user's username and password, and determine whether it is the first time to log in. A cookie is a small file that the server leaves on the user's computer. When the same computer requests a page through the browser, the cookie will be sent by the computer.
Creating a cookie is very simple. As long as the user's browser supports the cookie function, you can use PHP's built-in function to create a new cookie. Cookies are created in PHP through the setcookie() function.
If the HttpOnly attribute is set in the cookie, the program (JS script, Applet, etc.) will not be able to read the cookie information. Turn on the
cookie read-only setting in the php.ini configuration file:
#Search session.cookie_httponly = session.cookie_httponly
= On
PHP code Open in:
<?php
  ini_set("session.cookie_httponly", 1);
 // or
  session_set_cookie_params(0, NULL, NULL, NULL, TRUE);
 ?>
(3) Understand the principle of vulnerabilities and use functions to filter relevant data.
SQL injection: By inserting SQL commands into Web form submissions or entering domain names or query strings for page requests, it ultimately deceives the server into executing malicious SQL commands.
Specifically, it is the ability to use existing applications to inject malicious SQL commands into the backend database engine for execution. It can obtain the database on a website with security vulnerabilities by entering (malicious) SQL statements in a web form. Instead of executing SQL statements according to the designer's intention.
By enabling the relevant options in the php.ini configuration file, you can keep out most hackers who want to exploit SQL injection vulnerabilities. Commonly used security functions include:
1、mysql_real_escape_string()
2、addslashes()
4、htmlspecialchars()过滤
 这些函数的作用:
  mysql_real_escape_string – 转义 SQL 语句中使用的字符串中的特殊字符,并考虑到      连接的当前字符集 !
The mysql_real_escape_string() and addslashes() functions both escape single quotes and double quotes in the data! That is to prevent sql injection!
If the current character set is single-byte, these two functions have the same effect and can both perform escape filtering.
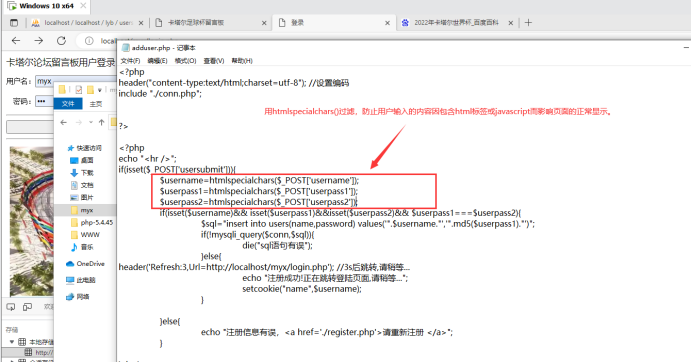
Use htmlspecialchars() to filter to prevent the content entered by the user from affecting the normal display of the page because it contains html tags or javascript.
You can use htmlspecialchars() to filter the & " < >, and use the htmlspecialchars() function when outputting. It can effectively deal with some XSS attacks. You can also convert the html code into entities, which is safer. On the other hand, it can also be used to a certain extent
. To deal with XSS attacks.
For example, PHP code:
$username=htmlspecialchars($_POST['username']);
$userpass1=htmlspecialchars($_POST['userpass1']);
$userpass2=htmlspecialchars($_POST['userpass2']);
In PHP, there is a built-in function specifically used for escaping, which is addslashes(). addslashes uses backslashes to quote strings; returns a string that is preceded by certain characters for the purpose of database query statements, etc. Backslash. These characters are single quote ('), double quote ("), backslash (\), and NUL (NULL character).
Do not use addslashes() on strings that have been escaped by magic_quotes_gpc, as this will result in double escaping. When encountering this situation, you can use the function get_magic_quotes_gpc() to detect it.
Magic quotes are the process by which the program automatically converts the data entered into the PHP script. When turned on, all ' (single quote), " (double quote), \ (backslash) and NULL characters will be automatically escaped with a backslash. It has the same effect as the addslashes() function.
Magic quotes were originally introduced to prevent SQL injection. They are good friends for developers, but they also cause a lot of inconvenience when using them. Now there are more and better alternatives, so if you are still using When developing PHP 5.3.0 or versions before PHP 5.3.0, you should try to avoid using magic quotes. They have been removed after PHP 5.4.0.
We use the addslashe() function to filter the account and password entered by the user. Syntax: string addslashes(string str); //str is a string containing characters that need to be escaped:
Dealing with SQL error injection:
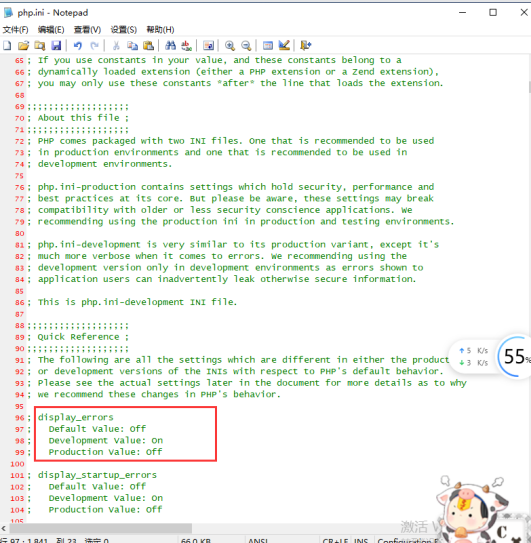
If the WEB website turns on error display, the attacker can repeatedly adjust the parameters sent and view the error information printed on the page to deduce important information such as the database and development language used by the WEB website. Error echo can expose a lot of sensitive information, which facilitates the attacker's next attack. To
prevent the error message from being directly seen by the attacker, set display_errors=Off:
The key step to prevent SQL injection is to find the place where the page interacts with the database.
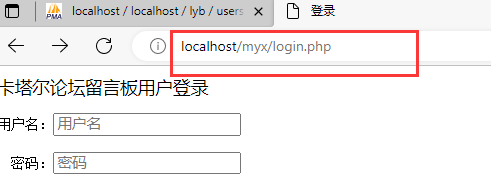
The url of the user login interface:
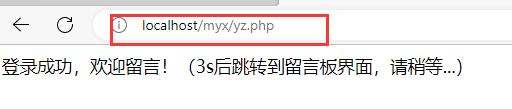
successful login and jump to the message board url:
What follows the url is that there is no such parameter as id=1, '?' ginseng. Generally speaking, the content of '?' is user-controllable. If there is no place that can interact with the database, then SQL injection will naturally have nowhere to start, so that some SQL injections can be prevented more effectively.
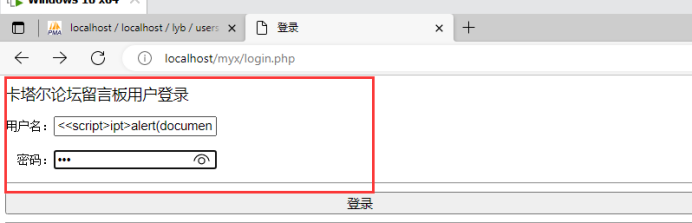
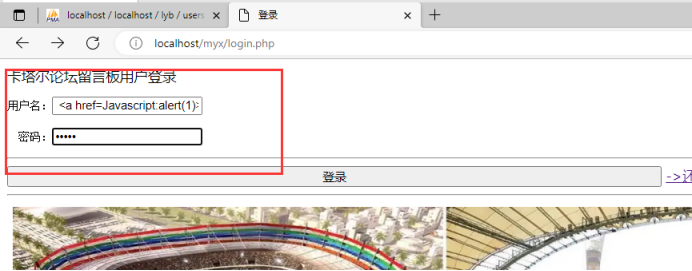
Let’s try some simple xss attacks again:
——Test whether there are common statements of XSS. If there is still a pop-up window after refreshing, it means stored XSS.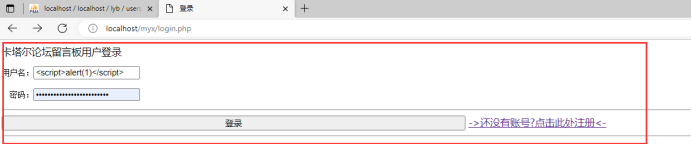
There is no alert pop-up window:
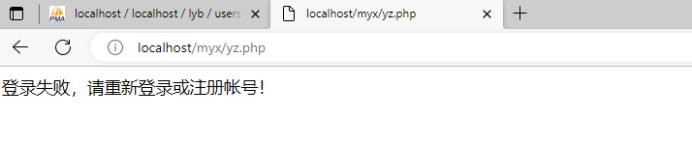
try these two:
<img src="javascript:alert(/xss/)">
<<script>ipt>alert(document.cookie)</scri<script>pt>

None of them work
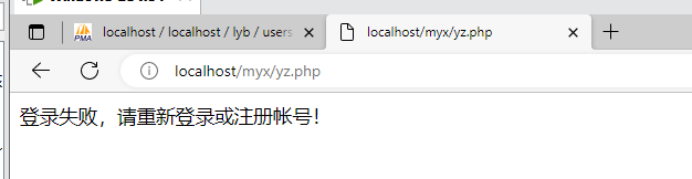
Try pseudo-protocol:
Pseudo-protocol: 123
still doesn't work, which shows that this message board is more effective against some SQL injection and XSS attacks.
This is about the basic implementation of a simple message board with php+MySql. Fans who need the source code can send me a private message. I hope it will be helpful to you.
Finally, I wish everyone a happy Mid-Autumn Festival and National Day!