Table of contents
I. Introduction
Learning objectives: Based on the relevant knowledge learned in the course, complete a simple calculator and realize certain functions.
Tool environment: Android studio, Java language
Implementation function:
1. Complete a simple page layout with basic buttons such as numbers, addition, subtraction, multiplication, division, delete, and clear.
2. Complete the basic implementation of relevant functions in the background
2. Design ideas
layout:
1. Create a new Android Studio project and create an Activity to display the UI interface of the calculator
2. Add TextView to the layout file to display expressions and calculation results entered by the user, and multiple Button controls for user operations.

1. Layout Use GridLayout to complete the layout:
1. Place a GridLayout in the overall layout, where:
(1) The first GridLayout puts two edit boxes as the result box and input process box of the calculator
 <GridLayout
        android:layout_width="match_parent"
        android:layout_height="wrap_content"
        android:orientation="vertical"
        >
        <EditText
            android:id="@+id/ed_input"
            android:layout_width="match_parent"
            android:layout_height="100dp"
            android:hint="输入框"
            />
        <EditText
            android:id="@+id/ed_output"
            android:layout_width="match_parent"
            android:layout_height="100dp"
            android:hint="输出口"
            />
    </GridLayout>
(2) The second GridLayout puts the action button
<GridLayout
        android:layout_width="match_parent"
        android:layout_height="304dp"
        android:columnCount="4"
        android:rowCount="4">

        <Button
            android:id="@+id/buttonc"
            android:layout_width="180dp"
            android:layout_height="60dp"
            android:layout_columnSpan="2"
            android:backgroundTint="#a6a6a6"
            android:text="c" />

        <Button
            android:id="@+id/buttondel"
            android:layout_width="90dp"
            android:layout_height="60dp"
            android:layout_columnSpan="1"
            android:backgroundTint="#a6a6a6"
            android:text="DEL" />

        <Button
            android:id="@+id/buttonchu"
            android:layout_width="90dp"
            android:layout_height="60dp"
            android:backgroundTint="#ff9500"
            android:text="/" />

        <Button
            android:id="@+id/button7"
            android:layout_width="90dp"
            android:layout_height="60dp"
            android:backgroundTint="#333333"
            android:text="7" />

        <Button
            android:id="@+id/button8"
            android:layout_width="90dp"
            android:layout_height="60dp"
            android:backgroundTint="#333333"
            android:text="8" />

        <Button
            android:id="@+id/button9"
            android:layout_width="90dp"
            android:layout_height="60dp"
            android:backgroundTint="#333333"
            android:text="9" />

        <Button
            android:id="@+id/buttoncheng"
            android:layout_width="90dp"
            android:layout_height="60dp"
            android:backgroundTint="#ff9500"
            android:text="*" />

        <Button
            android:id="@+id/button4"
            android:layout_width="90dp"
            android:layout_height="60dp"
            android:backgroundTint="#333333"
            android:text="4" />

        <Button
            android:id="@+id/button5"
            android:layout_width="90dp"
            android:layout_height="60dp"
            android:backgroundTint="#333333"
            android:text="5" />

        <Button
            android:id="@+id/button6"
            android:layout_width="90dp"
            android:layout_height="60dp"
            android:backgroundTint="#333333"
            android:text="6" />

        <Button
            android:id="@+id/buttonjian"
            android:layout_width="90dp"
            android:layout_height="60dp"
            android:backgroundTint="#ff9500"
            android:text="-" />

        <Button
            android:id="@+id/button1"
            android:layout_width="90dp"
            android:layout_height="60dp"
            android:backgroundTint="#333333"
            android:text="1" />

        <Button
            android:id="@+id/button2"
            android:layout_width="90dp"
            android:layout_height="60dp"
            android:backgroundTint="#333333"
            android:text="2" />

        <Button
            android:id="@+id/button3"
            android:layout_width="90dp"
            android:layout_height="60dp"
            android:backgroundTint="#333333"
            android:text="3" />

        <Button
            android:id="@+id/buttonjia"
            android:layout_width="90dp"
            android:layout_height="60dp"
            android:backgroundTint="#ff9500"
            android:text="+" />

        <Button
            android:id="@+id/buttonyuliu"
            android:layout_width="90dp"
            android:layout_height="60dp"
            android:backgroundTint="#333333"
            android:text="预留" />

        <Button
            android:id="@+id/button0"
            android:layout_width="90dp"
            android:layout_height="60dp"
            android:backgroundTint="#333333"
            android:text="0" />

        <Button
            android:id="@+id/buttondian"
            android:layout_width="90dp"
            android:layout_height="60dp"
            android:backgroundTint="#333333"
            android:text="." />

        <Button
            android:id="@+id/buttondeng"
            android:layout_width="90dp"
            android:layout_height="60dp"
            android:backgroundTint="#ff9500"
            android:text="=" />


    </GridLayout>
The layout style is roughly as shown in the figure:

2. Partial code explanation:
1. Add id to the corresponding button
2. Perfect the layout and make it beautiful
Backstage:
Relevant functions are implemented through layout binding id. In the Activity, add a click event listener for each Button control and write the corresponding logic code in it.
package com.example.wyn_0411;

import androidx.appcompat.app.AppCompatActivity;

import android.os.Bundle;
import android.view.View;
import android.widget.Button;
import android.widget.EditText;

public class MainActivity extends AppCompatActivity implements View.OnClickListener{

    private Button mbutton1,mbutton2,mbutton3,mbutton4,mbutton5,mbutton6,mbutton7,mbutton8,mbutton9,mbutton0,
                   mbuttonc,mbuttondel,mbuttonyuliu,mbuttonjia,mbuttonjian,
                   mbuttoncheng,mbuttonchu,mbuttondian,mbuttondeng;
    private EditText edinput,edoutput;
    private boolean deng_flag=false;

    @Override
    protected void onCreate(Bundle savedInstanceState) {
        super.onCreate(savedInstanceState);
        setContentView(R.layout.activity_main);
        //数字0-9
        mbutton1=findViewById(R.id.button1);
        mbutton2=findViewById(R.id.button2);
        mbutton3=findViewById(R.id.button3);
        mbutton4=findViewById(R.id.button4);
        mbutton5=findViewById(R.id.button5);
        mbutton6=findViewById(R.id.button6);
        mbutton7=findViewById(R.id.button7);
        mbutton8=findViewById(R.id.button8);
        mbutton9=findViewById(R.id.button9);
        mbutton0=findViewById(R.id.button0);
        //c、del、预留
        mbuttonc=findViewById(R.id.buttonc);
        mbuttondel=findViewById(R.id.buttondel);
        mbuttonyuliu=findViewById(R.id.buttonyuliu);
        //加减乘除、点、等号
        mbuttonjia=findViewById(R.id.buttonjia);
        mbuttonjian=findViewById(R.id.buttonjian);
        mbuttoncheng=findViewById(R.id.buttoncheng);
        mbuttonchu=findViewById(R.id.buttonchu);
        mbuttondeng=findViewById(R.id.buttondeng);
        mbuttondian=findViewById(R.id.buttondian);
        //输入输出
        edinput=findViewById(R.id.ed_input);
        edoutput=findViewById(R.id.ed_output);

        //设置按钮监听
        //0-9
        mbutton0.setOnClickListener(this);
        mbutton1.setOnClickListener(this);
        mbutton2.setOnClickListener(this);
        mbutton3.setOnClickListener(this);
        mbutton4.setOnClickListener(this);
        mbutton5.setOnClickListener(this);
        mbutton6.setOnClickListener(this);
        mbutton7.setOnClickListener(this);
        mbutton8.setOnClickListener(this);
        mbutton9.setOnClickListener(this);
        //c、del、预留
        mbuttonc.setOnClickListener(this);
        mbuttondel.setOnClickListener(this);
        mbuttonyuliu.setOnClickListener(this);
        //加减乘除、点、等号
        mbuttonjia.setOnClickListener(this);
        mbuttonjian.setOnClickListener(this);
        mbuttoncheng.setOnClickListener(this);
        mbuttonchu.setOnClickListener(this);
        mbuttondeng.setOnClickListener(this);
        mbuttondian.setOnClickListener(this);
    }

    @Override
    public void onClick(View view)
    {
        String input = edinput.getText().toString();
        String output = edoutput.getText().toString();
        switch (view.getId()){
            //0-9
            case R.id.button0:
            case R.id.button1:
            case R.id.button2:
            case R.id.button3:
            case R.id.button4:
            case R.id.button5:
            case R.id.button6:
            case R.id.button7:
            case R.id.button8:
            case R.id.button9:
            case R.id.buttondian:
                if(deng_flag){
                    deng_flag=false;
                    edinput.setText(null);
                    edinput.setText(((Button) view).getText());
                }else {
                    edinput.setText(input+((Button) view).getText());
                }
                edinput.setText(input+((Button) view).getText());
                break;
            //c
            case R.id.buttonc:
                edinput.setText(null);
                edoutput.setText(null);
                break;
            //del
            case R.id.buttondel:
                if (deng_flag){
                    deng_flag=false;
                    edinput.setText("");
                }else if(input !=null&&!input.equals("")){
                    edinput.setText(input.substring(0,input.length()-1));
                }
                break;
            //预留
            case R.id.buttonyuliu:
                break;
            //加减乘除
            case R.id.buttonjia:
            case R.id.buttonjian:
            case R.id.buttoncheng:
            case R.id.buttonchu:
                edinput.setText(input+" "+((Button) view).getText()+" ");
                break;
            //等号
            case R.id.buttondeng:
//                edinput.setText(input+((Button) view).getText());
//                break;
                getResult();

        }

    }

    private void getResult() {
        try{
            String input = edinput.getText().toString();
            int iResult=0;
            double dResult=0;
            String cw="错误";
            String s1,s2,op;//数字,数字,操作符 s1"4" op"*" s2"5"
            s1=input.substring(0,input.indexOf(" "));
            op=input.substring(input.indexOf(" ")+1,input.indexOf(" ")+2);
            s2=input.substring(input.indexOf(" ")+3);

            double d1,d2;
            d1=Double.parseDouble(s1);
            d2=Double.parseDouble(s2);

            if(op.equals("+")){//加
                dResult=d1+d2;
//                edoutput.setText(dResult+"");
            }else if(op.equals("-")){//减
                dResult=d1-d2;
            } else if (op.equals("*")){//乘
                dResult=d1*d2;
            } else if (op.equals("/")) {//除
                if(d2==0){
                    edoutput.setText(cw+"");
                } else if (d1==0) {
                    dResult=0;
                } else {
                    dResult=d1/d2;
                }
            }
            if(!input.equals(".")&&!input.equals("/")){
                iResult=(int)dResult;
                edoutput.setText(iResult+"");
        }
            edoutput.setText(dResult+"");

        }catch (Exception e){
            System.out.println(e);
        }
    }
}
Implement the logic code of the calculator, including processing user input numbers and operators, performing expression calculations, etc.
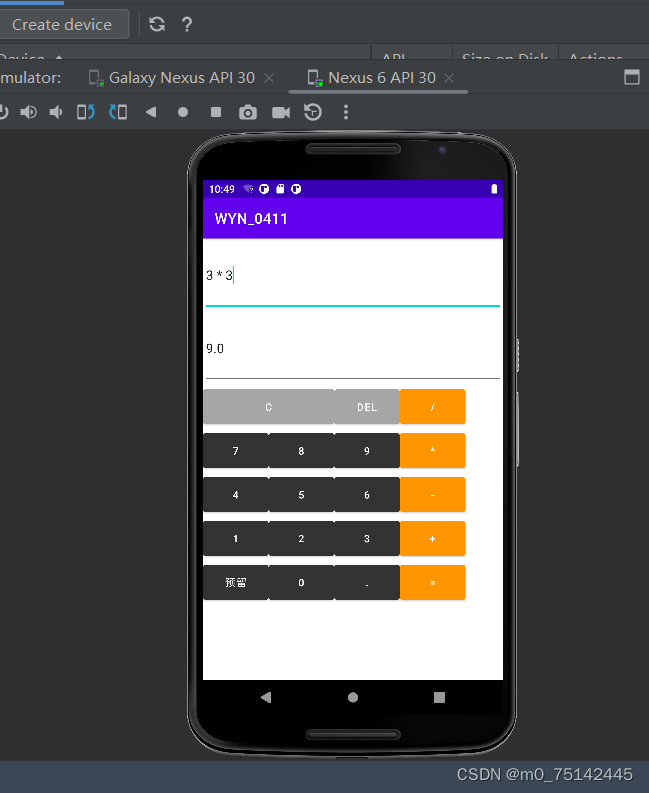
3. Demonstration:
Enter the calculation process in the input box, and the result box can display the calculation results.
as the picture shows:
4. Summary
In the process of using Android Studio and Java language to implement a simple calculator, I discovered the advantages and usage methods of these two powerful tools, Java language and Android Studio, and deeply realized the fun and challenge of software development.
First of all, the Java language can help developers quickly develop efficient and stable applications, with particular emphasis on object-oriented thinking and writing high-quality code. In this application, I used Java language to write logic code, and adopted object-oriented programming to encapsulate various calculation functions into functions, and combined with the instantiation of classes to realize the basic functions of the calculator, which greatly improved Improve the code quality and reusability of the program. In the process of writing code, I need to seriously think about the logic and completion of the code, etc., and I must solve the problem step by step. This process can exercise my logical thinking and problem-solving skills.
Secondly, Android Studio, as an advanced development tool, can effectively improve programmers' development efficiency, such as code prompts and automatic completion, debugging, and rich development libraries and plug-ins, etc. At the same time, Android Studio also provides some powerful tools, such as layout editor, debugger, generating APK, publishing applications, etc. These tools help developers develop high-quality applications quickly and efficiently. And in the design and interaction implementation of UI, it is necessary to design a convenient and practical interface based on the user's habits and needs, which exercised my UI design ability. During the debugging and optimization of the code, I need to carefully find and solve various possible problems, and strive for excellence to make the code more stable and efficient. This has exercised my patience and ability to pay attention to details
In general, I benefited a lot from the process of using Android Studio and Java language to implement a simple calculator. It not only gave me an in-depth understanding of the development process, design ideas and implementation skills of Java language and applications, but also gave me Realized the fun and difficulty of software development. I believe that through continuous hard work and learning, I will be able to write more excellent, practical and efficient applications.