Chip design, from the RTL code to the final tape-out GDSII file, are all text files. Therefore, mastering text analysis and processing language is an important basic skill in integrated circuit design. This public account has been committed to promoting the use of text analysis tools to improve simulation and comprehensive efficiency. For details, please see this public account album " Chip Design Courses and Related Experiments ". This article is an automated script for the joint simulation of Vivado and Modelsim implemented by Sun Yiwen in Python. It has been tested in actual projects for a long time and is open sourced today for everyone to learn from. You are welcome to leave a message to exchange your experiences and suggestions for improvement. At the same time, we will successively launch articles on intelligent analysis and processing of Verilog code based on Python in the future, so stay tuned.

When we use Vivado's default settings to call a third-party simulator such as ModelSim for simulation under the Windows system, the simulation software will load the top-level signal waveform of testbench in the waveform interface by default at the beginning, and simulate it by itself for 1000ns before stopping. When we want to view the waveform of the corresponding module, we need to manually add it ourselves. In order to prevent adding a new module or signal after running the simulation for a period of time but finding that the waveform is not recorded, we must manually execute log -r ./ on the console in advance. * command to record all signal waveforms. But every time we modify the code and close and restart the emulator to simulate again, we need to complete the previous operations (deleting and adding corresponding module signals, executing log -r ./*, etc.) again before we can continue to run out the signals we want to see. waveform. Although the module signals added during simulation can be saved as *.do files, and the previous waveform can be quickly added by executing do *.do for the next simulation; however, when the code is frequently modified and re-simulation is required frequently, each time The operation of adding signals manually will affect our emotions. So, can we use a scripting language such as Python to implement one-click simulation and automatically add the required module signals?
First, we need to analyze the process of implementing third-party simulation by Vivado software and figure out the steps.

Vivado software third-party simulation analysis
1.1 Vivado calls third-party software
Refer to the previous article: Use Modelsim to independently simulate a simulation project with Vivado IP core ,
https://mp.weixin.qq.com/s/6Q4H9PsHt60_xC1VXkBDOw , we can know that the Vivado software executes and generates simulation files in the project's simulation directory project name.sim/, and then we open the simulation directory of a sample project, such as As shown in the picture
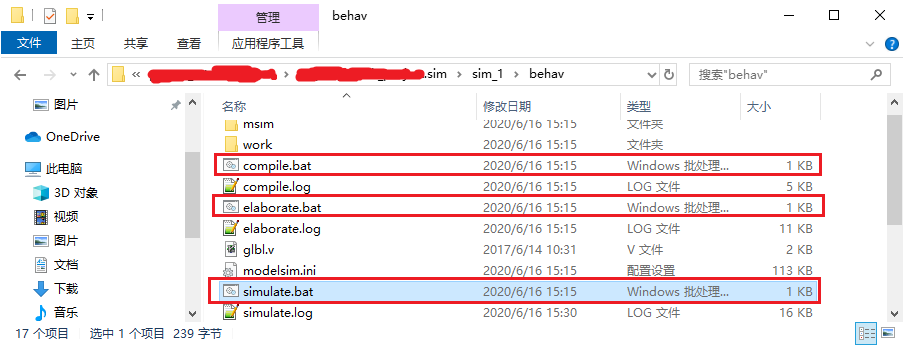
Combining the pictures and articles, we can see that the way Vivado software calls a third-party emulator is to generate a series of simulation results in the engineering simulation directory based on the emulator path and joint debugging library path parameters previously set in the project file. Tcl scripts and system batch scripts (shell under Linux) execute the above batch scripts through system commands (compile first, then elaborate, and finally simulate) to call third-party simulation software to implement the simulation function.
1.2 Vivado simulation script analysis
There are three batch processing scripts in the above picture: compile.bat, elaborate.bat, and simulate.bat. Three functions are implemented in turn: compile, elaborate, and simulate. Below we analyze the contents of each batch script separately.
1.2.1 compile related scripts
The entire contents of the compile.bat script are as follows:
@echo off
set bin_path=C:\questasim64_10.6c\win64
call %bin_path%/vsim -c -do "do {xxxxxxxx_compile.do}" -l compile.log
if "%errorlevel%"=="1" goto END
if "%errorlevel%"=="0" gotoSUCCESS
:END
exit 1
:SUCCESS
exit 0
The third-party simulator set up in this project is Quetasim. The specific functions in the script are implemented in lines 2 and 3:
Set binary file path bin_path;
Call the vsim program under this path to execute the do {xxxxxxxx_compile.do} command.
Among them, xxxxxxxx_compile.do is a Tcl script file in the same directory as the batch script. The content of the file is as follows (comments have been added):
######################################################################
#
# File name : xxxxxxxx_compile.do
# Created on: Fri Aug 14 16:40:09 +0800 2020
#
# Auto generated by Vivado for 'behavioral' simulation
#
######################################################################
#新建work库
vlib work
#新建msim库
vlib msim


#新建msim/xil_defaultlib库
vlib msim/xil_defaultlib


#将目前的逻辑工作库xil_defaultlib和实际工作库msim/xil_defaultlib映射对应
vmap xil_defaultlib msim/xil_defaultlib


#编译verilog代码文件(VHDL文件需要用vcom命令),编译到xil_defaultlib库下
vlog -64 -incr -work xil_defaultlib  \
#vivado的官方IP核提供的仿真代码文件
"../../../xxxxxxxxxxxx.srcs/sources_1/ip/xxxxxxxxxxxx/xxxxxxxxxxxx_sim_netlist.v" \
"../../../xxxxxxxxxxxx.srcs/sources_1/ip/xxxxxxxxxxxx/xxxxxxxxxxxx_sim_netlist.v" \
"../../../xxxxxxxxxxxx.srcs/sources_1/ip/xxxxxxxxxxxx/xxxxxxxxxxxx_sim_netlist.v" \
"../../../xxxxxxxxxxxx.srcs/sources_1/ip/xxxxxxxxxxxx/xxxxxxxxxxxx_sim_netlist.v" \
"../../../xxxxxxxxxxxx.srcs/sources_1/ip/xxxxxxxxxxxx/xxxxxxxxxxxx_sim_netlist.v" \
#工程中自行编写的代码文件
"../../../../rtl/xxx/xxxxxxx.v" \
"../../../../rtl/xxxx/xxxxxxx.v" \
以下省略若干行的代码文件........


# compile glbl module
vlog -work xil_defaultlib "glbl.v"


#强制退出
quit -force
After reading the above code and comments, we can understand that the compile script implements the compilation of the code files in the project by calling a third-party emulator to execute the corresponding Tcl script xxxxxxxx_compile.do, in which all project code files will be written in xxxxxxxx_compile.do path.
1.2.2 Elaborate script
The entire content of elaborate.bat script is as follows:
@echo off
set bin_path=C:\questasim64_10.6c\win64
call %bin_path%/vsim  -c -do "do {xxxxxxxx_elaborate.do}" -l elaborate.log
if "%errorlevel%"=="1" goto END
if "%errorlevel%"=="0" goto SUCCESS
:END
exit 1
:SUCCESS
exit 0
It can also be seen that the specific functions implemented in this script are:
Set binary file path bin_path;
Call the vsim program under this path to execute the do {xxxxxxxx_elaborate.do} command.
The content of the xxxxxxxx_elaborate.do script is as follows (annotated):
######################################################################
#
# File name : xxxxxxxx_elaborate.do
# Created on: Fri Aug 14 16:40:15 +0800 2020
#
# Auto generated by Vivado for 'behavioral' simulation
#
######################################################################
#vopt是在使用vcom或vlog编译设计后对其执行全局优化
vopt -64 +acc=npr -L xil_defaultlib -L unisims_ver -L unimacro_ver -L secureip -L xpm -work xil_defaultlib xil_defaultlib.xxxxxxxxx xil_defaultlib.glbl -o xxxxxxxxx_opt
#强制退出
quit -force
It can be seen that the main function of the above script is to globally optimize the design file after the code is compiled.
1.2.3 simulate script
The entire content of the simulate.bat script is as follows:
@echo off
set bin_path=C:\questasim64_10.6c\win64
call %bin_path%/vsim   -do "do {xxxxxxxx_simulate.do}" -l simulate.log
if "%errorlevel%"=="1" goto END
if "%errorlevel%"=="0" goto SUCCESS
:END
exit 1
:SUCCESS
exit 0
The specific functions implemented in this script are:
Set binary file path bin_path;
Call the vsim program under this path to execute the do {xxxxxxxx_simulate.do} command.
The content of the xxxxxxxx_simulate.do script is as follows (annotated):
######################################################################
#
# File name : xxxxxxxx_simulate.do
# Created on: Fri Aug 14 16:40:22 +0800 2020
#
# Auto generated by Vivado for 'behavioral' simulation
#
######################################################################
#指定vsim查找设计单元的默认工作库为xil_defaultlib,并对指定的优化后的设计开始仿真
vsim -lib xil_defaultlib xxxxxxxx_opt


#设置变量NumericStdNoWarnings为1,即禁用在加速的numeric_std和numeric_bit包中生成的警告
set NumericStdNoWarnings 1
#设置变量StdArithNoWarnings为1,即禁用在加速Synopsys标准软件包中生成的警告
set StdArithNoWarnings 1


#执行xxxxxxxx_wave.do文件中的tcl指令
do {xxxxxxxx_wave.do}


#打开wave窗口
view wave
#打开structure窗口
view structure
#打开signals窗口
view signals


#执行xxxxxxxx.udo文件中的tcl指令
do {xxxxxxxx.udo}


#仿真1000ns
run 1000ns
This script implements calling third-party simulation software to start simulating the optimized design, calling up the simulation interface, executing the xxxxxxxx_wave.do script, opening the simulation-related window, and continuing to execute the xxxxxxxx.udo script.
Next we will give the contents of the xxxxxxxx_wave.do script:
######################################################################
#
# File name : `xxxxxxxx_wave.do
# Created on: Fri Aug 14 16:40:22 +0800 2020
#
# Auto generated by Vivado for 'behavioral' simulation
#
######################################################################
#添加当前模块内(即仿真顶层模块)信号
add wave *
#添加GSR(全局复置位信号)
add wave /glbl/GSR
It can be seen that the main function of the xxxxxxxx_wave.do script file is to add simulation waveforms. And the other xxxxxxxx.udo script has no actual content:
######################################################################
#
# File name : xxxxxxxx.udo
# Created on: Wed Jun 10 16:36:49 +0800 2020
#
# Auto generated by Vivado for 'behavioral' simulation
#
######################################################################
Note that under default settings, Vivado does not execute commands through the xxxxxxxx.udo script.
1.2.4 Summary of simulation script
At this point, we have basically figured out the functions of these three scripts and their relationship with other script files:
The compile.bat script mainly implements the compilation of simulation code files;
The elaborate.bat script mainly performs global optimization on the compiled design and generates optimized results;
The simulate.bat script specifically calls up the simulation software interface to simulate the optimized design, and controls the display of simulation software-related windows, the addition of module signals, and other operations related to the final waveform simulation.
Therefore, if you want to automate simulation operations such as adding waveforms through python scripts, you need to make a fuss about the simulate.bat script and its related do script files.
1.3 Vivado simulation function options
Before further analyzing Vivado simulation operations and thinking about how to use python scripts to achieve the automation we want, we can first ask this question:
Does the Vivado software really not provide functions such as automatically adding custom waveforms to facilitate simulation operations?
Regarding this issue, we can first check the simulation options that come with the Vivado software simulation function, which is where the third-party emulator path and joint debugging library path are set, as shown in the figure:
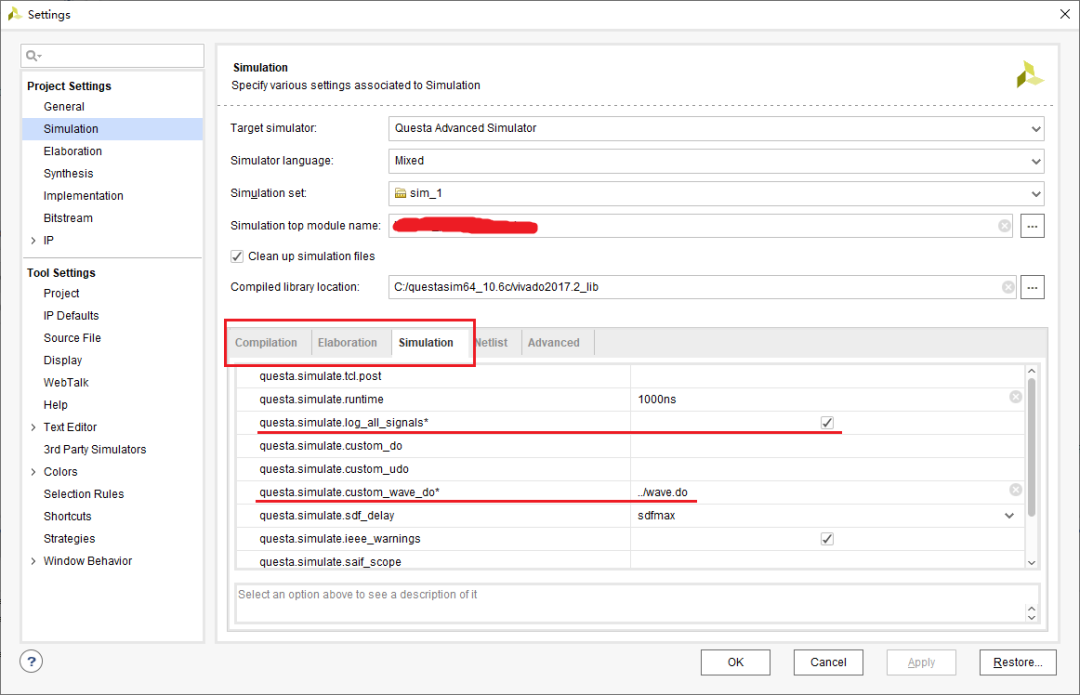
You can see that there are three tabs in the red box below: Compilation, Elaboration, and Simulation, which respectively correspond to the three steps of simulation and the related script files generated.
Open the Simulation tab, and we can see multiple lines of options below, including the runtime simulation time, which defaults to 1000ns. Then the content on the next red line is log_all_signals, "record all signals". Is this an option for the simulation to automatically execute the log -r ./* command? Let’s check this option first.
Then look down, there is an option of custom_wave_do. From the above script analysis, we know that the xxxxxxxx_wave.do script file implements the function of simulating and adding module signals. Is this an option for simulating and adding custom signals?
Here I copy the first version of the signal file wave.do saved by the previous simulation of the project to the directory above the behave directory where the simulation script is located:
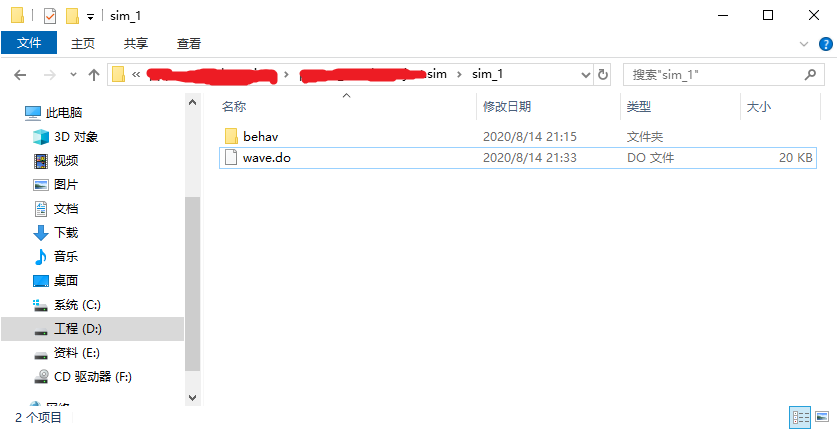
Then write the path to the custom_wave_do option as shown in the simulation options diagram above: ../wave.do, and then restart the simulation.
The simulation waveform interface appears as shown:
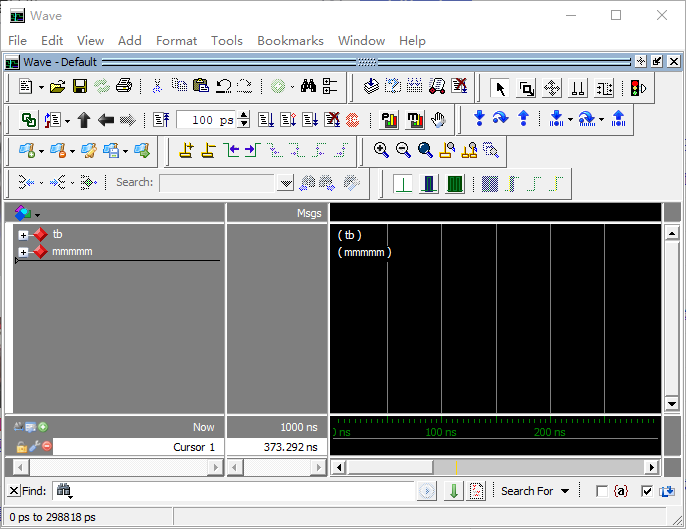
The signal grouping added in this interface is the same as the signal set in the ../wave.do file, indicating that the custom signal is automatically added here. Then we open the xxxxxxxx_simulate.do script in the simulation directory to view its content as follows:
######################################################################
#
# File name : xxxxxxxx_simulate.do
# Created on: Fri Aug 14 21:15:40 +0800 2020
#
# Auto generated by Vivado for 'behavioral' simulation
#
######################################################################
vsim -lib xil_defaultlib xxxxxxxx_opt


set NumericStdNoWarnings 1
set StdArithNoWarnings 1


do {../wave.do}


view wave
view structure
view signals


log -r /*


do {xxxxxxxx.udo}


run 1000ns
You can see that in lines 14 and 20 of the script generated by Vivado, the do {../wave.do} and log -r /* commands have been automatically added, indicating that automatic execution can indeed be achieved during simulation. Record all signal waveforms and automatically add custom signals.
Therefore, Vivado itself already provides such convenient simulation operation options. If you just want to automatically record all signal waveforms and automatically add saved custom signal waveform operations, we directly set and modify the two options log_all_signals and custom_wave_do in the simulation options. content.
But as a newbie, I didn't think of asking Vivado questions. Instead, I started tossing around with Python scripts according to my own ideas.

Python implementation of preliminary envisioned functions
In the analysis of the simulation script in Section 1.2, we learned that if we want to implement the function of automatically adding and recording signals in the simulation, we need to make corresponding modifications to the script related to simulate.bat, the last step of the simulation. But first, these scripts are automatically generated during Vivado simulation. So what if there is no script at the beginning, or the script needs to be updated after we add some code files? (There is no path to the newly added code file in the .do script related to compile.bat, so it is naturally impossible to compile new code.) Therefore, we need to first let Vivado generate the latest script related to simulation, and then implement changes to the script. .
2.1 Vivado software simulation script generation
Refer to this article by Zhang Zhongyu, a student in the laboratory
Introducing Vivado Batch Mode Tool, a self-developed laboratory tool!
https://mp.weixin.qq.com/s/EcrZl8iM0SZbpLrlXUJ6CA , we can learn that the Vivado software provides a batch mode during operation. Through the batch mode and Tcl script, the Vivado software can perform specific functions on specific projects. . Therefore, here you only need to use the batch mode to let the Vivado software generate simulation scripts for the current project. So how to find the corresponding instructions to generate simulation scripts? When we click the simulation button on the Vivado project GUI interface, the Tcl Console at the bottom of the interface will immediately display and execute the launch_simulation command, as shown in the figure:
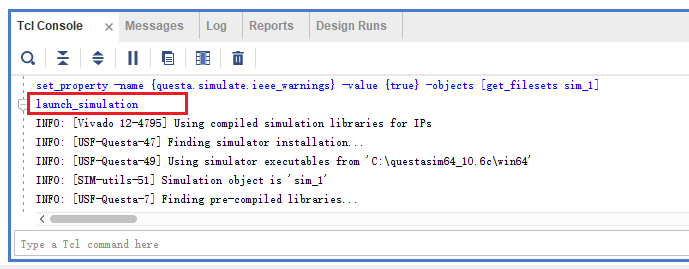
We open Vivado's Tcl command manual UG835 and find the launch_simulation command entry as follows:
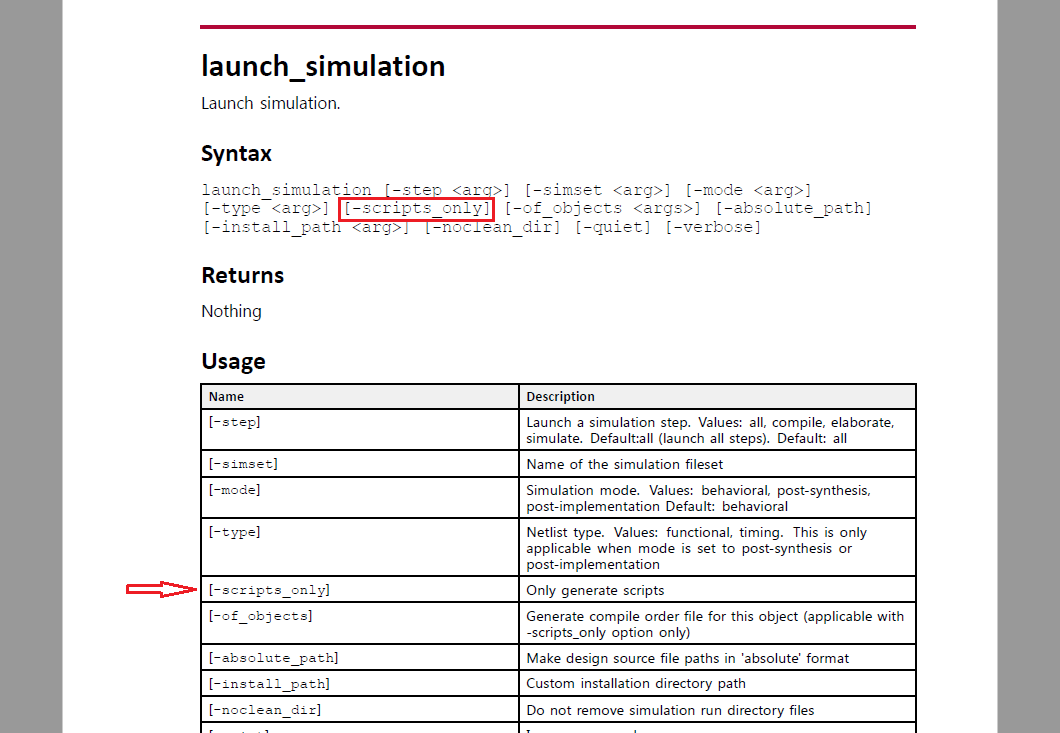
The launch_simulation command is a command to run simulation. You can see that there is a -scripts_only option in the syntax, and its description is: only generate scripts. The script here is naturally a related simulation script. As long as you use this command option, you can generate the engineering simulation script. Of course, what we want to achieve is functional simulation, so when executing this command, it is best to select behavioral in the -mode option above.
Then, the command to realize the function of generating functional simulation scripts should be: launch_simulation -mode behavioral -scripts_only. In order to verify the correctness of the command, we can use the GUI interface of Vivado project to test in advance. After deleting the files in the simulation directory, Enter and execute this command on the command console Tcl Console. After execution, check whether the relevant scripts are generated in the simulation directory. After verification, this command can generate simulation scripts.
2.2 Function implementation ideas
At this point, we summarize the functional implementation ideas as follows:
Use Python to call the batch mode batch mode of Vivado software to execute the launch_simulation -mode behavioral -scripts_only command to generate the functional simulation script of the current project;
You can use python to modify the script content related to the generated simulate.bat, add log -r ./* to automatically record all signal waveforms, add and execute the custom wave.do script command or replace the content of the signal file you want to add into In the xxxxxxxx_wave.do script generated by default, custom signals are automatically added when the simulation is completed;
Use the system function library in Python to execute the compile.bat, elaborate.bat, and simulate.bat scripts in sequence, and call up the simulation interface to perform simulation.
2.3 Specific implementation
2.3.1 Use Python to call Vivado software to generate simulation scripts
The specific implementation code and comments are as follows:
import os


# 指定工程xpr文件路径
XprFilePath = 'xxxxxxxx_project.xpr'
# 指定Tcl脚本路径
SimTclFilePath = 'sim.tcl'


# 命令-在使用命令行调用Vivado软件前需要运行的批处理文件
SourceSettingsFileCmd = 'call C:/Xilinx/Vivado/2017.2/settings64.bat'
# 命令-调用Vivado软件的batch mode打开当前工程文件并执行Tcl脚本中的生成仿真脚本命令
VivadoBatchModeScriptsCmd = 'vivado -mode batch -source ' + SimTclFilePath + ' -nojournal -nolog ' + XprFilePath


# 组合前两条命令并调用系统函数依次执行
os.system(SourceSettingsFileCmd + ' && ' + VivadoBatchModeScriptsCmd)
The content of the sim.tcl file used in the above code is:
#仅生成仿真脚本
launch_simulation -mode behavioral -scripts_only
Place the two scripts in the same directory of the project xpr file and execute them using Python3. After execution, the simulation directory results are as follows:
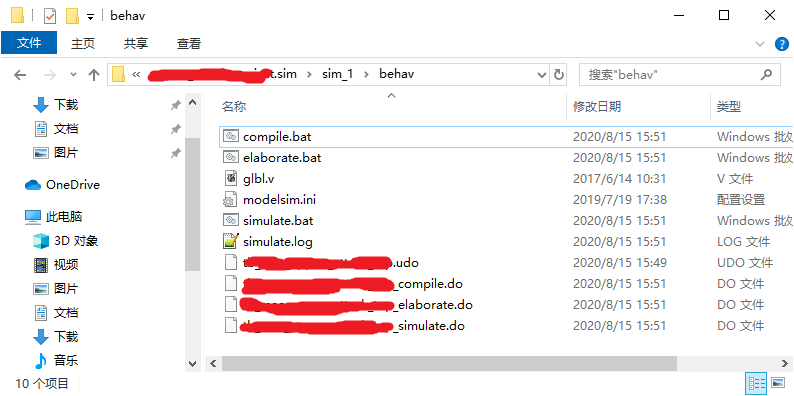
Next, we check the generated scripts in turn to see if there is any difference between the simulation script generated using Vivado's batch mode and the content of the script in Chapter 1.
After comparison, it was found that except for a slight difference between the xxxxxxxx_simulate.do file and the simulate.bat script, the contents of the other scripts are exactly the same. The contents of the scripts with differences are as follows
xxxxxxxx_simulate.do content:
######################################################################
#
# File name : xxxxxxxx_simulate.do
# Created on: Sat Aug 15 15:59:41 +0800 2020
#
# Auto generated by Vivado for 'behavioral' simulation
#
######################################################################
vsim -lib xil_defaultlib xxxxxxxx_opt


set NumericStdNoWarnings 1
set StdArithNoWarnings 1


do {xxxxxxxx_wave.do}


view wave
view structure
view signals


do {xxxxxxxx.udo}


run 1000ns


quit -force
The content difference is in the last line. Compared with the script generated by clicking the simulation button in the Vivado GUI interface, the script xxxxxxxx_simulate.do is generated using the simulation option -scripts_only in batch mode. The last line of the script xxxxxxxx_simulate.do has an additional command quit -force to force exit, which will cause The called simulation program will immediately close the interface and exit the program after executing all simulation commands. Therefore, during simulation, we need to delete the command before executing the script.
simulate.bat contents:
@echo off
set bin_path=C:\questasim64_10.6c\win64
call %bin_path%/vsim  -c -do "do {xxxxxxxx_simulate.do}" -l simulate.log
if "%errorlevel%"=="1" goto END
if "%errorlevel%"=="0" goto SUCCESS
:END
exit 1
:SUCCESS
exit 0
The content difference is in the third line. There is an additional -c option after the vsim command. Find the -c option description of the vsim entry in the QuestaSim command manual as shown in the figure:
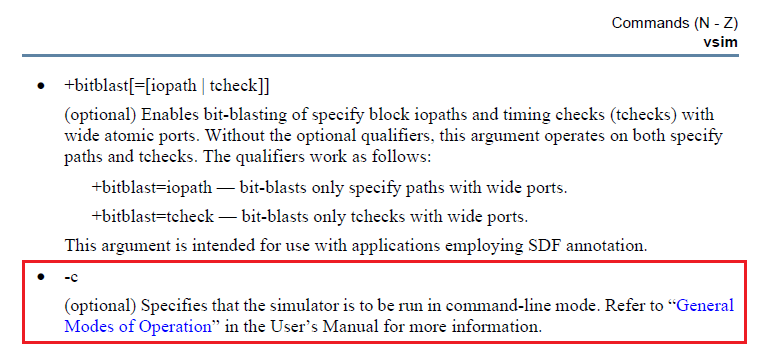
It can be seen that the -c option executes the vsim command in command-line mode. That is to say, after this option is executed, what opens is not the GUI interface of the simulation software, but a dark command line interface, which will cause us to The running simulation waveform cannot be viewed in real time, so during simulation, -c also needs to be deleted.
Summary of content differences
Therefore, in the subsequent processing of the script, in addition to adding the log -r ./* command and replacing the signals we want to add into the xxxxxxxx_wave.do script, we also need to additionally delete the quit -force in the last line of the script xxxxxxxx_simulate.do , and -c after the vsim command in the script simulate.bat.
2.3.2 Use Python to modify and execute the simulation script
The specific implementation code and comments are as follows:
import os


# 仿真目录路径
SimDirPath = 'xxxxxxxx.sim/sim_1/behav/'
# compile批处理脚本名称
CompileBatName = 'compile.bat'
# elaborate批处理脚本名称
ElaborateBatName = 'elaborate.bat'
# simulate批处理脚本名称
SimulateBatName = 'simulate.bat'
# 由于所执行的脚本内容里存在一些相对路径,所以在执行脚本前,需要将系统路径切换到所执行脚本所在的目录下
# 执行Compile脚本
os.system('cd ' + SimDirPath + ' && ' + 'call ' + CompileBatName)
# 执行Elaborate脚本
os.system('cd ' + SimDirPath + ' && ' + 'call ' + ElaborateBatName)


# 修改xxxxxxxx_simulate.do脚本,删除run 1000ns和quit -force,添加log -r ./*
SimulateDoFile = open(SimDirPath + 'xxxxxxxx_simulate.do', 'r')
SimulateDoFileAllLines = SimulateDoFile.readlines()
SimulateDoFile.close()
SimulateDoFile = open(SimDirPath + 'xxxxxxxx_simulate.do', 'w')
for EachLine in SimulateDoFileAllLines:
    if EachLine.find('run 1000ns') == -1 and EachLine.find('quit -force') == -1:
        SimulateDoFile.writelines(EachLine)
SimulateDoFile.writelines('\nlog -r ./*\n')
SimulateDoFile.close()


# 删除simulate.bat脚本中的-c选项内容
SimulateBatFile = open(SimDirPath + SimulateBatName, 'r')
SimulateBatFileAllLines = SimulateBatFile.readlines()
SimulateBatFile.close()
SimulateBatFile = open(SimDirPath + SimulateBatName, 'w')
for EachLine in SimulateBatFileAllLines:
    if EachLine.find('%bin_path%/vsim  -c -do') != -1:
        EachLine = EachLine.replace('%bin_path%/vsim  -c -do', '%bin_path%/vsim  -do')
    SimulateBatFile.writelines(EachLine)
SimulateBatFile.close()


# 将当前目录下信号文件wave.do中的内容覆写到仿真目录下的xxxxxxxx_wave.do文件中
SimWaveDoFile = open('wave.do', 'r')
SimWaveDoFileAllLines = SimWaveDoFile.readlines()
SimWaveDoFile.close()
SimWaveDoFile = open(SimDirPath + 'xxxxxxxx_wave.do', 'w')
SimWaveDoFile.writelines(SimWaveDoFileAllLines)
SimWaveDoFile.close()


# 执行Simulate脚本
os.system('cd ' + SimDirPath + ' && ' + 'call ' + SimulateBatName)
The signal file wave.do involved in the above code is still the file used when testing the simulation options in Section 1.3. Place it in the directory where the script is located, and then use Python3 to run the script. The screenshot of the running result is as follows:

It can be seen that the call to the simulation software and the automatic addition of waveforms have been successfully implemented, and there is no need to open the GUI interface of the Vivado project when using it.
2.4 Implementation Summary and Outlook
The specific implementation of the above code function is mainly divided into the following steps:
Use the Python system function to call Vivado's batch mode to execute the launch_simulation -mode behavioral -scripts_only command in the sim.tcl script of the current project to generate relevant scripts for functional simulation;
Use Python system functions to sequentially execute the generated compile.bat and elaborate.bat scripts in the simulation directory to achieve compilation of simulation code files and subsequent global optimization;
Read the contents of the generated xxxxxxxx_simulate.do script file, delete run 1000ns and quit -force, add log -r ./* and then rewrite the xxxxxxxx_simulate.do script;
Read the contents of the generated simulate.bat script file, delete the -c option after the vsim command, and rewrite the simulate.bat script;
Read the contents of the wave.do file in the directory where the Python script is located, and overwrite it into the xxxxxxxx_wave.do script file in the simulation directory to add custom signals during simulation;
Use Python's system function to execute the simulate.bat script in the simulation directory to bring up the simulation program interface.
At this point, we have achieved the original goal with a total of less than 60 lines of Python code and 1 line of Tcl code. However, such a script still has many crude flaws or areas for development:
The assignments of various variables in the code, such as project file path, software version path, simulation directory path, etc., are all fixed assignments. When migrating the script to another project for use, you need to modify it according to the environment such as version and project directory name. Scripts cannot be used in a fool-proof manner;
The code generates a simulation script from calling Vivado's batch mode, then to compile, elaborate, and finally to simulate. The total time is long. For simulation after simply modifying the code, it does not involve adding code files or adding IP cores. If there is no need to regenerate the simulation script, just start from compile; and for the case where there is no code modification, just execute the simulate script directly for the last step, and there is no need for the previous steps that take a long time;
In addition to the simulation function, when we usually develop Vivado, there are still many tedious operations that can be automated using scripts. These can be integrated into one or a group of scripts.

Python implementation of optimization function
The final summary of Chapter 2 gives the flaws and areas for development of the initial script. The second flaw can be solved easily by providing multiple condition options to implement multiple simulation steps. This chapter will mainly analyze and solve the first defect summarized in Chapter 2.
3.1 Optimization function analysis
We expect that when the script is copied to another version of the project, it can be run directly without modification. This requires that the script can automatically extract a series of parameters required for its operation to directly match the environment. First, let us summarize the specific flaws in the Python implementation of the preliminary functionality and which areas need to be modified after migrating to another project.
3.1.1 Parameter analysis
Here, in the form of a running account, all parameters used in the Python code of the preliminary function are listed and analyzed:
3.1.1.1 Specified project xpr file path
# 指定工程xpr文件路径
XprFilePath = 'xxxxxxxx.xpr'
The function of this parameter is to enable the Vivado software to implement specific functions for the currently specified project. Whenever the script is copied to a different project, this parameter will basically change, so it is best to automatically identify it. Each project has only one xpr file in its project directory by default, and Python also provides the function os.listdir that returns a list of file names in the specified system directory, which can easily obtain the name of a specific file by simply searching the file Name to determine whether it is an xpr file to achieve automatic identification.
3.1.1.2 Specified Tcl script path
# 指定Tcl脚本路径
SimTclFilePath = 'sim.tcl'
Since the specified Tcl script follows the Python script, it has nothing to do with which project is actually simulated. The name and location are fixed, so fixed assignment can continue to be used here.
3.1.1.3 System commands executed
# 命令-在使用命令行调用Vivado软件前需要运行的批处理文件
SourceSettingsFileCmd = 'call C:/Xilinx/Vivado/2017.2/settings64.bat'
# 命令-调用Vivado软件的batch mode打开当前工程文件并执行Tcl脚本中的生成仿真脚本命令
VivadoBatchModeScriptsCmd = 'vivado -mode batch -source ' + SimTclFilePath + ' -nojournal -nolog ' + XprFilePath
The newly used path in the executed system command can be decomposed into the following parts:
System execution script command: call
Xilinx software installation directory: C:/
Vivado project version: 2017.2
The settings script name that needs to be called: settings64.bat
The Tcl script path and project xpr file path involved in the second generated simulation script command VivadoBatchModeScriptsCmd have already been mentioned.
Only Windows system implementation is considered here for the time being, so what can be considered for automatic identification in the above decomposition part is: installation directory C:/ and project version 2017.2
The installation directories are fixed in the same system and do not need to be modified frequently, so here you only need to read the contents of the xpr project file to achieve automatic version identification.
3.1.1.4 Simulation directory path (Vivado 2017.2)
# 仿真目录路径
SimDirPath = 'xxxxxxxx.sim/sim_1/behav/'
Decompose the above path into:
Project name: xxxxxxxx
Simulation set name: sim_1
The directory where the simulation script is located (version 2017.2): behav
Also, since the project name is the same as the xpr project file name by default, and there is only one directory with the suffix .sim in the project directory by default, it is also easy to identify the directory name; for the simulation set name, since the same version Multiple different simulation sets can be set up in the project, but the currently valid simulation set has special parameter representation in the xpr file content, so the current simulation set name can be identified by parsing the xpr file content;
It is worth noting that different versions of Vivado have some differences in the paths to the simulation subdirectories. For example, the 2017.2 simulation scripts are all generated in the behav directory, but the 2018.2 version also has subdirectories for each emulator in the behav directory. , the directory name is the emulator name in lowercase, so we also need to read the xpr file content and identify the currently set target emulator, so that we can finally achieve the correct combination of simulation directories.
3.1.1.5 Batch script name
# compile批处理脚本名称
CompileBatName = 'compile.bat'
# elaborate批处理脚本名称
ElaborateBatName = 'elaborate.bat'
# simulate批处理脚本名称
SimulateBatName = 'simulate.bat'
Under the same type of system, the names of simulation-related batch scripts generated by Vivado software by default are fixed, so there is no need to modify them here.
3.1.1.6 Summary
Based on the initial functional code implementation, we must at least implement automatic identification of the following parameters:
Project xpr file path (mainly project name)
Project file version
Project valid simulation set name
Project current simulator name
3.1.2 xpr file analysis
3.1.2.1 Introduction to xpr file structure
The xpr file is a text file that contains the core configuration content of the Vivado project. It uses the xml content format. An example of the xpr file structure is given below:
<?xml version="1.0" encoding="UTF-8"?>
<!-- Product Version: Vivado v2017.2 (64-bit)              -->
<!--                                                         -->
<!-- Copyright 1986-2017 Xilinx, Inc. All Rights Reserved.   -->


<Project .............>
  <Configuration >
      .............
  </Configuration>

  <FileSets >
      .............
  </FileSets>

  <Simulators >
      .............
  </Simulators>

  <Runs >
      .............
  </Runs>
</Project>
It can be seen that the entire xpr file content is basically contained in a root node Project, and the root node contains four sub-nodes Configuration, FileSets, Simulators, and Runs. After analyzing the actual project xpr file content, we can learn that the main contents of the four sub-nodes are:
Configuration: a series of configuration parameters of the Vivado project, such as: FPGA chip model, simulation joint debugging library path, target emulator, etc.;
FileSets: All codes, IP cores or constraint file paths added to the project, and a series of related file attributes: the set top-level module name, whether the code is used for synthesis, implementation, simulation, etc.;
Simulators: Contains descriptions of simulators that can be used under the current type of system;
Runs: Contains a series of parameter configurations for IP core files and code design that require Synthesis and Implementation.
Next, we combine the conclusions of the optimization analysis in the previous section to further analyze and search the required xpr file content. The parameters that need to be obtained by parsing xpr are: project version, valid simulation set name, and current simulator name.
3.1.2.2 Project version
After some searching, no parameters related to the Vivado version were found in the root node Project. The only content related to the version only appeared in the second line of the content:
<?xml version="1.0" encoding="UTF-8"?>
<!-- Product Version: Vivado v2017.2 (64-bit)              -->
<!--                                                         -->
<!-- Copyright 1986-2017 Xilinx, Inc. All Rights Reserved.   -->
Therefore, we can only extract the content 2017.2 after Vivado v in this line as the version number.
3.1.2.3 Valid simulation set names
The parameter name representing the simulation set of the current project is ActiveSimSet. In the sub-node Configuration, the example content is as follows:
<Option Name="ActiveSimSet" Val="sim_1"/>3.1.2.4 Current emulator name
The parameter indicating the name of the current simulator in the content is called TargetSimulator. It is also in the sub-node Configuration. The example content is as follows:
<Option Name="TargetSimulator" Val="Questa"/>Specifically for the parsing of xml format files, Python provides an xml function library, and the parse function can be used to process xml text simply and efficiently.
3.2 Function implementation ideas
Based on the above analysis, the implementation ideas for the optimization function are summarized as follows:
Use Python's os library function to search for project files, especially xpr files, under a specific path;
After finding the xpr project file, read the file content to obtain the version number;
Use Python's xml library function to parse the text content of the found xpr file and extract the effective simulation set name and current simulator name;
Based on the information obtained in the above steps, combine the relevant parameters and continue to complete the functions implemented in Chapter 2.
3.3 Specific implementation
First, use the relevant functions in Python's os library to find the project file path. The relevant code and comments are as follows:
import os


# 获取并返回对应文件或目录路径名列表
def getProjFilePathList(Path = './', FilePartName = '.xpr'):
    # 判断传入参数是否为字符串
    if type(Path) != str or type(FilePartName) != str:
        print('Error: The type of parameter is wrong! Please ensure each input parameter is a string!')
        return []
    # 判断传入的路径参数是否存在
    if os.path.isdir(Path) == False:
        print('Error: The path does not exist!')
        return []
    # 查找目标文件,并将查找结果路径记录到FilePathList的列表中
    FilePathList = []
    for FileName in os.listdir(Path):
        if FileName.find(FilePartName) != -1:
            FilePathList.append(Path + FileName)
    # 判断是否查找到对应文件或目录路径
    if len(FilePathList) == 0:
        print('Error: Can not find any file or dir whose name including "' + FilePartName + '" in "' + Path + '"')
    return FilePathList


# 获取并返回对应文件或目录路径名列表中的第一个路径
def getProjFilePath(Path = './', FilePartName = '.xpr'):
    # 获取并返回对应文件或目录路径名列表
    FilePathList = getProjFilePathList(Path, FilePartName)
    # 返回列表中第一个元素
    if len(FilePathList) == 0:
        return ''
    else:
        return FilePathList[0]
Then according to the found xpr project file path, read the content and extract the version number from it:
# 获取并返回当前工程版本
def getProjVersion(XprFilePathName):
    VivadoProjVerLine = ''
    VivadoProjVer = ''
    VivadoProjVerLoc = -1
    # 打开工程文件查找版本号所在行
    XprFile = open(XprFilePathName, "r")
    for string in XprFile.readlines():
        if string.find('Product Version: Vivado v') != -1:
            VivadoProjVerLoc = string.find('Product Version: Vivado v') + len('Product Version: Vivado v')
            VivadoProjVerLine = string
            break
    XprFile.close()
    if VivadoProjVerLoc == -1:
        VivadoProjVer = ''
        print('Error: Can not find the version of proj, please ensure the xpr file is ok!')
        return VivadoProjVer
    # 判断查找到的版本号字符串是否合法
    for CharVer in VivadoProjVerLine[VivadoProjVerLoc :]:
        if CharVer == ' ' and VivadoProjVer != '':
            break
        elif CharVer >= '0' and CharVer <= '9':
            VivadoProjVer = VivadoProjVer + CharVer
        elif CharVer == '.':
            VivadoProjVer = VivadoProjVer + CharVer
        else:
            VivadoProjVer = ''
            print('Error: Can not identify the version of this xpr file!')
            return VivadoProjVer
    return VivadoProjVer
Use Python's xml library function to parse the xpr file and extract the effective simulation set name ActiveSimSet and the current simulator name TargetSimulator:
from xml.dom.minidom import parse


# 解析xpr工程文件
doc = parse(XprFilePath)
root = doc.documentElement
# 记录解析出的四个节点
Configuration = root.getElementsByTagName('Configuration')[0]
FileSets = root.getElementsByTagName('FileSets')[0]
Simulators = root.getElementsByTagName('Simulators')[0]
Runs = root.getElementsByTagName('Runs')[0]
# 创建节点Configuration中Option的关键词字典,初始化为空
ConfigurationOptionDict = {}
# 创建并初始化节点Configuration中Option的Name关键词集合
ConfigurationOptionNameSet = {'Part', 'CompiledLibDir', 'TargetSimulator', 'ActiveSimSet', 'DefaultLib'}
# 查找xpr工程文件中Configuration节点中的关键词并记录到关键词字典中
Options = Configuration.getElementsByTagName('Option')
for Option in Options:
    if Option.hasAttribute('Name') and Option.hasAttribute('Val'):
        for keyword in ConfigurationOptionNameSet:
            if Option.getAttribute('Name') == keyword:
                ConfigurationOptionDict[keyword] = Option.getAttribute('Val')
At this point, we have completed the implementation of the optimization function. By integrating it with the code in Chapter 2, we can automatically identify and simulate projects with different names in different versions.

postscript
The first, second, and third chapters mainly introduce in chronological order a series of learning and research processes when using Python scripts to realize automated simulation operation functions. The key points involved in the entire process are explained and analyzed. Of course, the script finally written according to the above process is still relatively rough, and the functions implemented are also very limited. In the subsequent study, the author reconstructed and iterated the script multiple times based on the usage experience, adding some new functions, broadening the usage scenarios, and enhancing the scalability. Of course, limited by the author's personal level, the script is still very rough so far, but it can already provide a simple auxiliary framework for the special needs of Vivado engineering development in the project, and can add some simple functions more freely. The author plans to combine it with subsequent project development We will continue to optimize it based on the problems and usage experience encountered in the process, and strive to make it a more reliable and good assistant.
Picture and text typesetting丨Gao Lu
Picture and text proofreading丨Gao Lu
Editor in charge丨Pan Weitao
I know you are watching