I. Introduction
In the above, we successfully transplanted into FreeRTOS, and then based on this, we moved into our LVGL graphical interface library.
2. LVGL
-
An open source library for drawing interface UI, allowing MCUs with fewer hardware resources to run interfaces with ideal display effects. For actual effects, you can refer to the official interface effects published by developers on video websites.
-
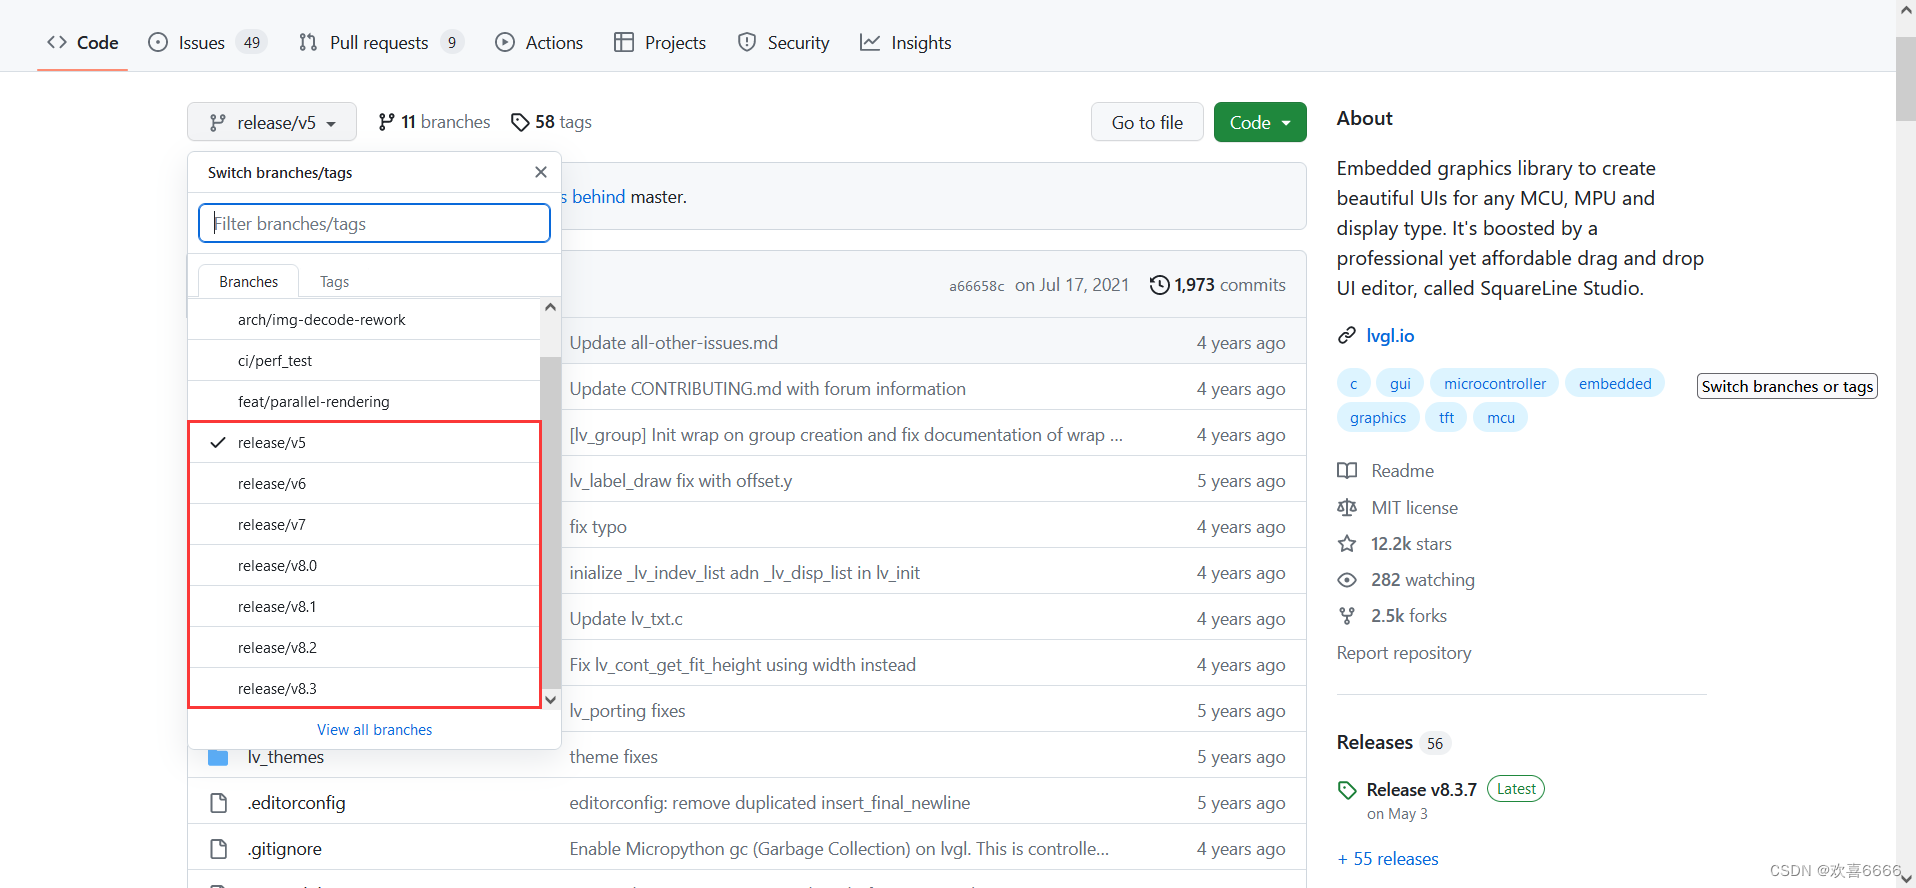
Judging from the official Github , the earliest version is the V5 version. The V6 and V7 versions have been determined not to be updated. Currently, the LVGL official team is still updating the V8 version. We can see that there are many small versions in V8.
-
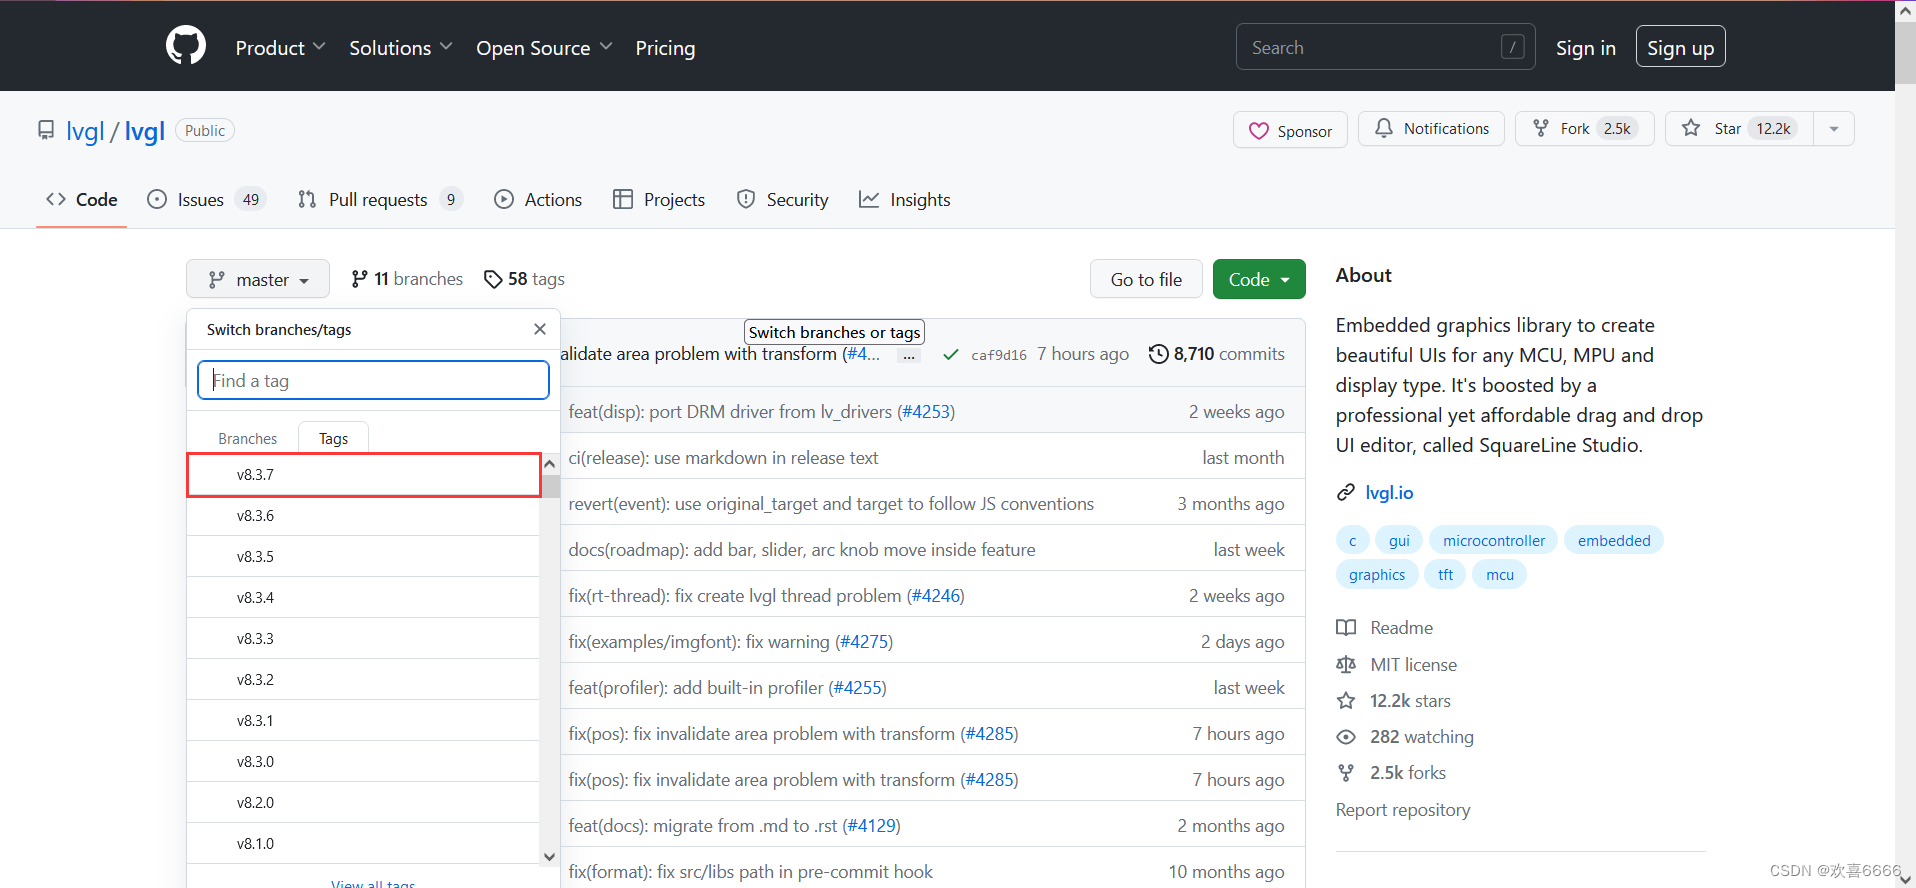
As of the writing and release of this article, the officially released version of LVGL has reached V8.3.7.
-
Since the V8 version, the LVGL official team has made great adjustments to the API, and it is not very compatible with V7 and previous versions. Here we make a distinction.
-
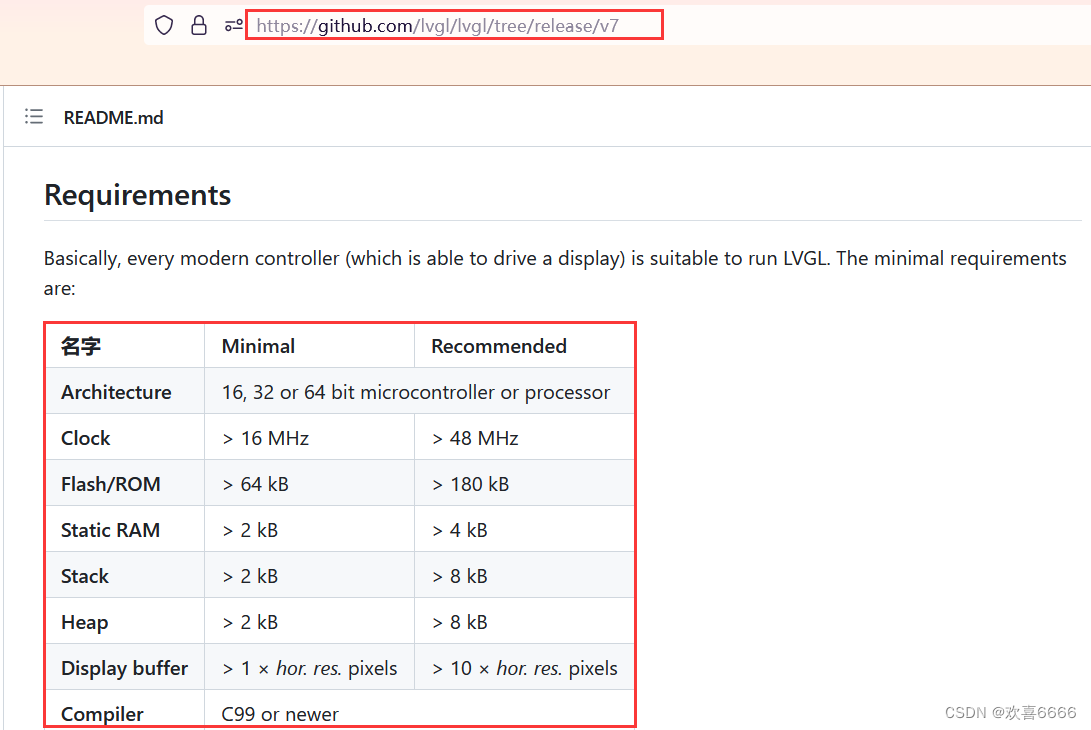
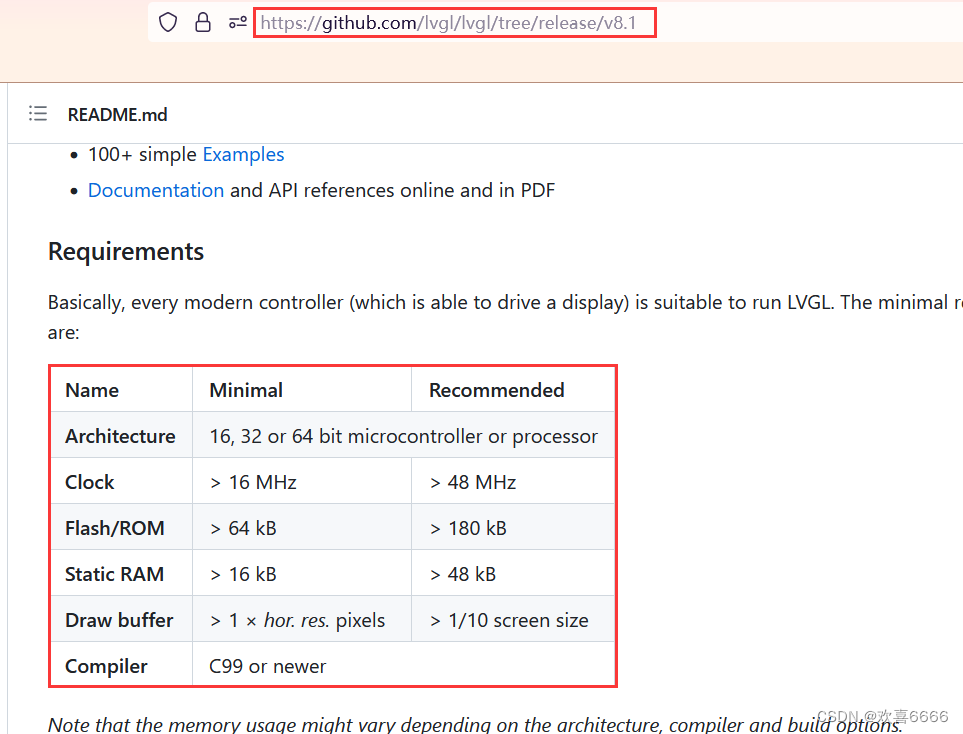
The newer version used means that LVGL comes with richer plug-ins, which also means that the requirements for hardware resources are getting higher and higher. You can take a look at the official recommended configuration of hardware resources under the V7 version and V8.1 version below.
-
The differences between different versions will not be described in detail here. You can read the official explanation of version differences by yourself. In order to allow MCUs with fewer resources to run LVGL, this article selects the V7 version as the transplanted source code of LVGL.
3. Transplantation preparation
Please prepare the following before transplantation:
- The keil project of GD32F303+FreeRTOS
can be created according to the FreeRTOS transplantation in GD32F303 Debugging Notes (9) . - LVGL source code
I am using V7.11, and the source code is on Github . - A hardware board controlled by GD32F303 and containing corresponding input and output controls.
4. Transplantation steps
1. LVGL source code is merged into the KEIL project
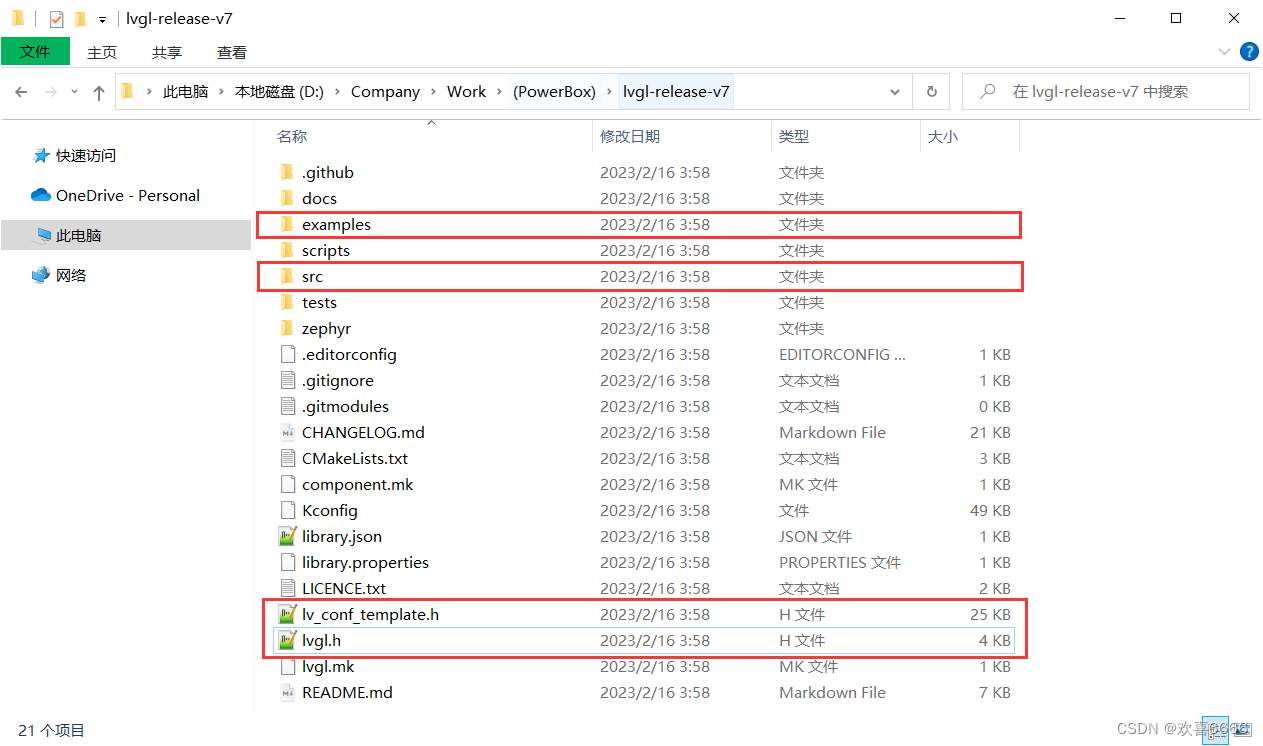
1. Unzip the document

2. In the decompressed folder, focus on the part selected in the red box. The examples folder is the external interface file of the lvgl library, the src folder is the core source code of the library itself, lv_conf_template.h is some configuration of the lvgl library, and lvgl. h is a description of the version.
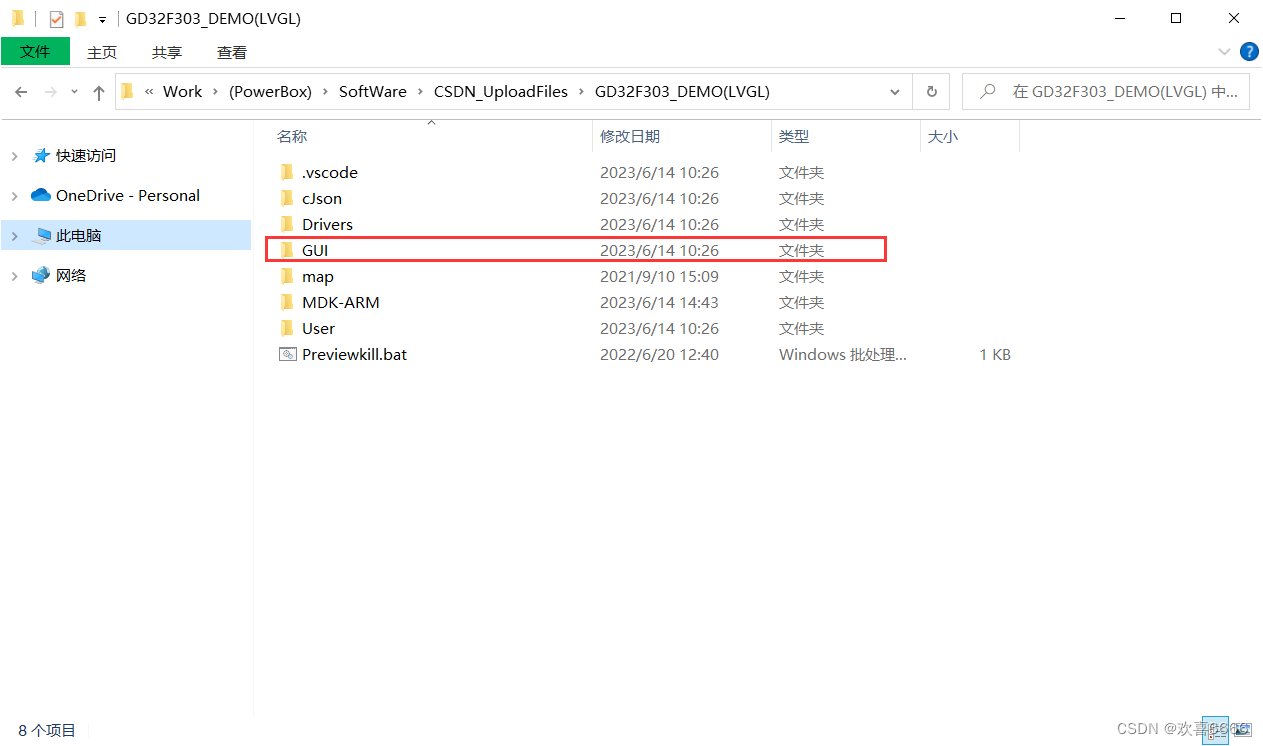
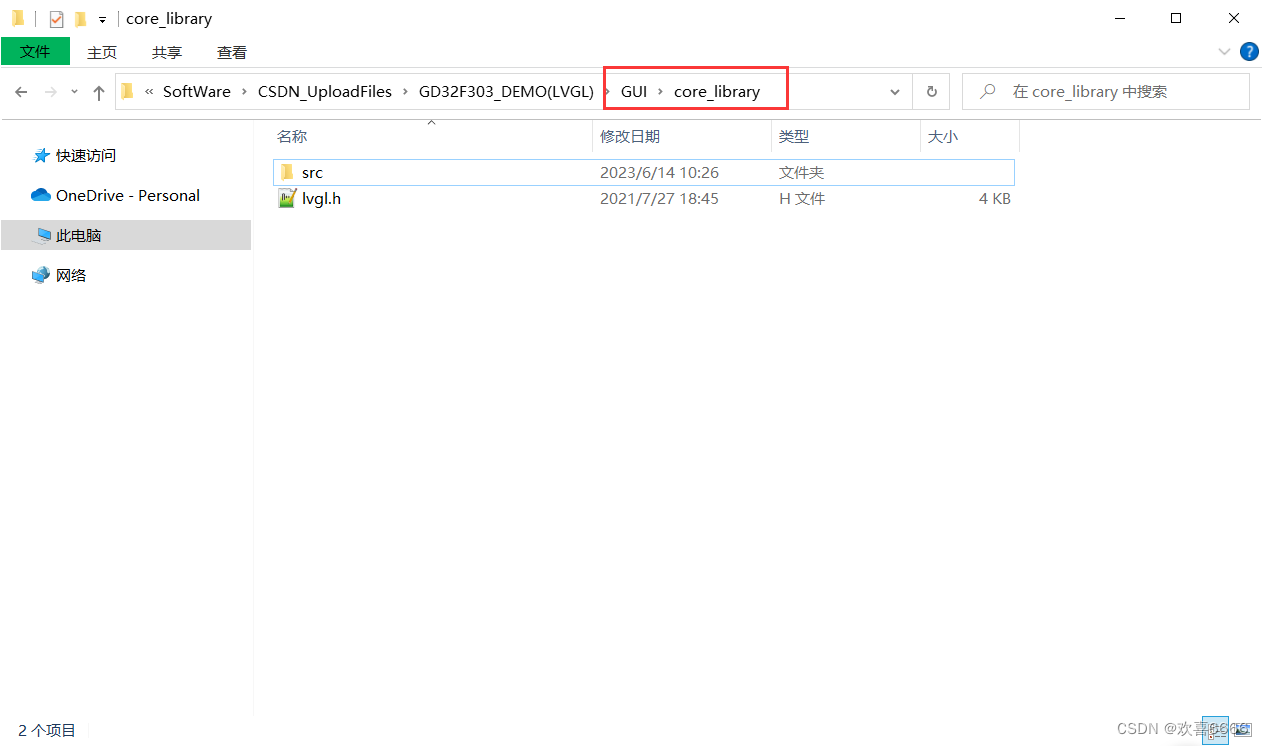
3. Create a new GUI folder in the project directory and classify it into categories
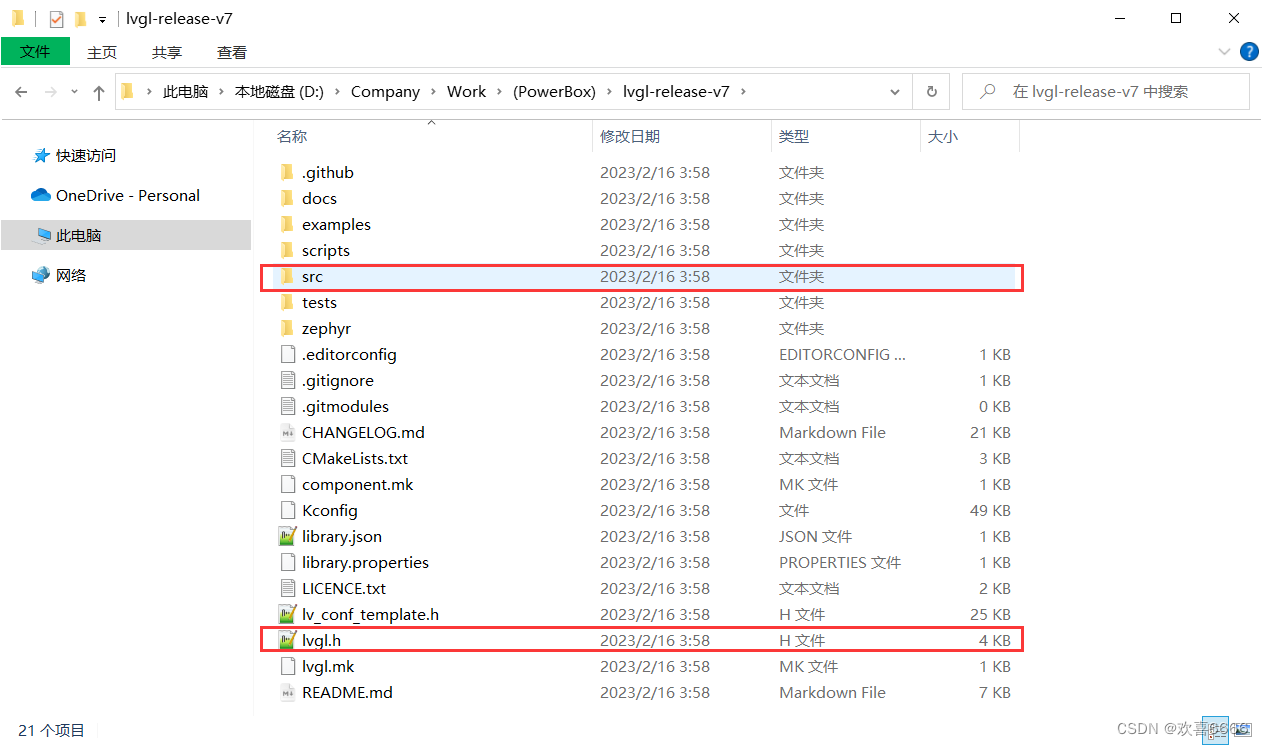
4. After classifying the categories, copy the src folder and the outermost lvgl.h file in the source code to the GUI->core_library folder in the project without any increase or decrease.
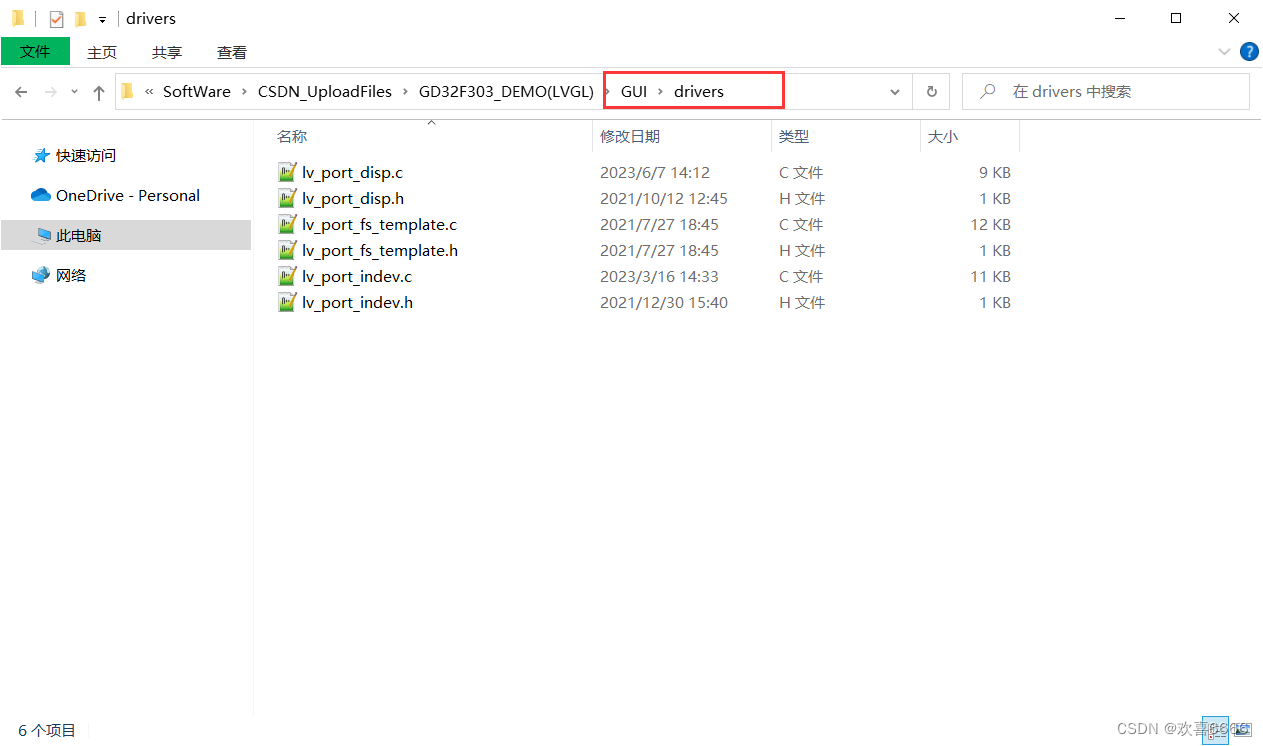
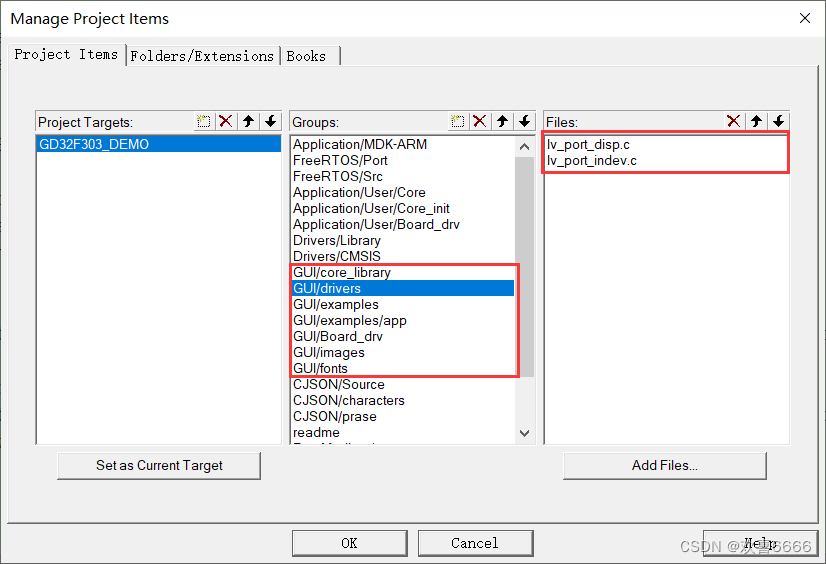
5. Copy the examples->porting folder in the source code to the GUI->deivers folder in the project without any increase or decrease.
- lv_port_display_template.c represents our display interface
- lv_port_fs_template.c represents the file system interface
- lv_port_indev_template.c represents the input device interface
- If the above files are useful, you need to remove the template in the file name, as follows:

6. Finally copy the lvgl-release-v7 -> lv_conf_template.h file to the GUI folder
- Remove template from the lv_conf_template.h file name and rename it to lv_conf.h. It is the macro management of the entire LVGL library, and it is necessary to use the LVGL library.

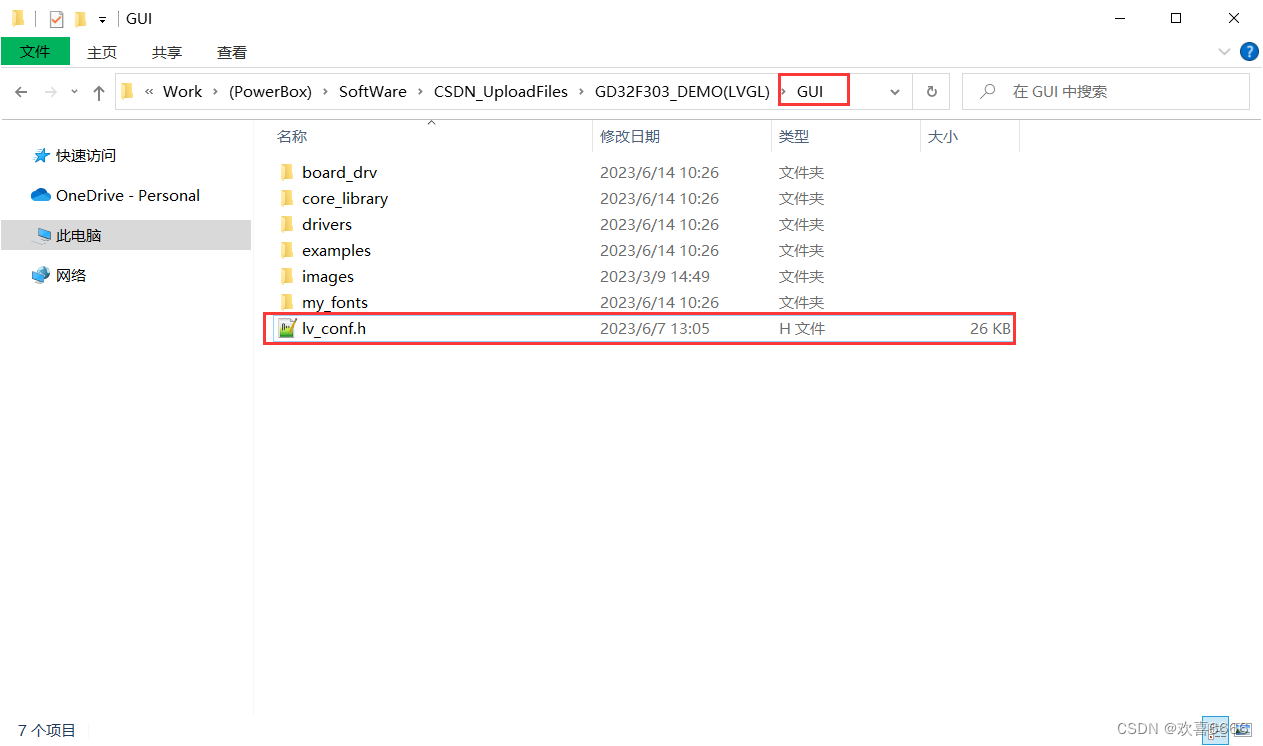
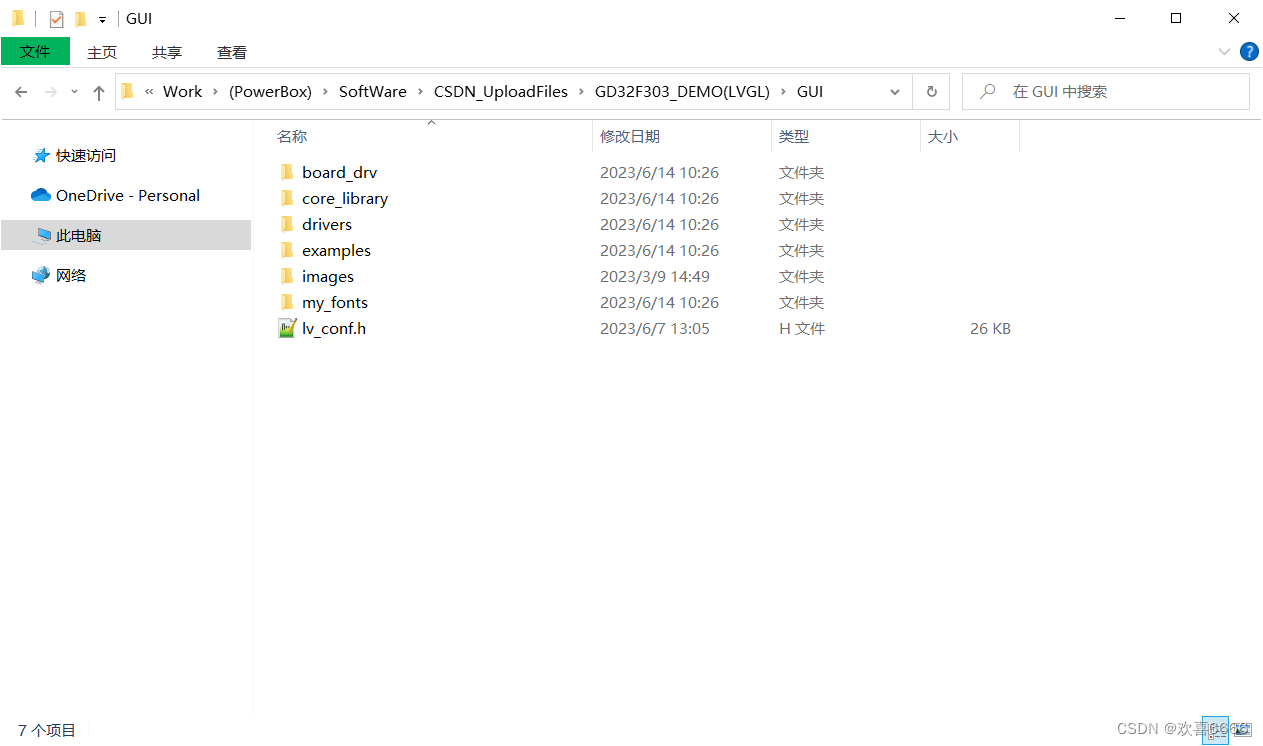
7. Introduction to other subfolders of GUI
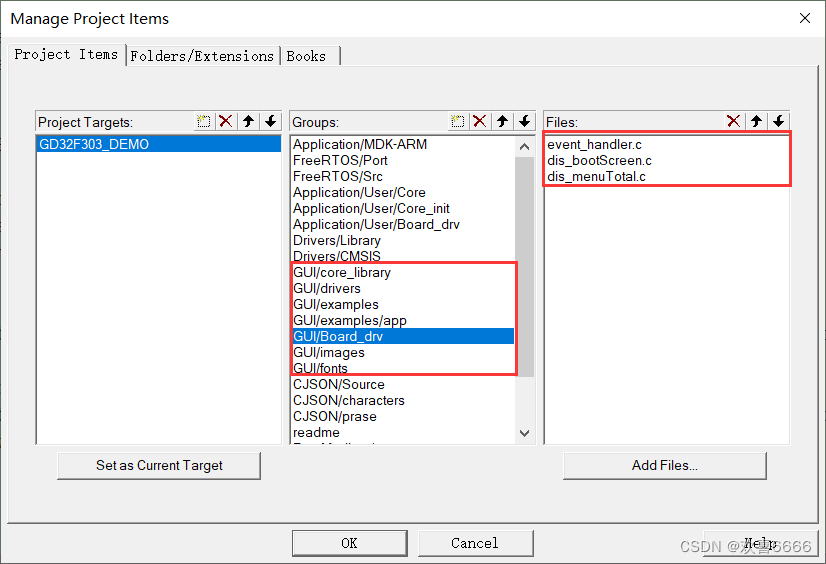
- The GUI->board_drv folder is used to place the .c files of each interface and the callback function .c files under all interfaces
- The GUI->examples folder is used to place the official reference example .c file
- The GUI->images folder is used to store the .c files corresponding to the images used on the interface.
- GUI->my_fonts folder is used to store font libraries added by yourself
- This part of the folder was created by me personally for the convenience of classification, and is not included with lvgl itself.
2. Configuration in KEIL project
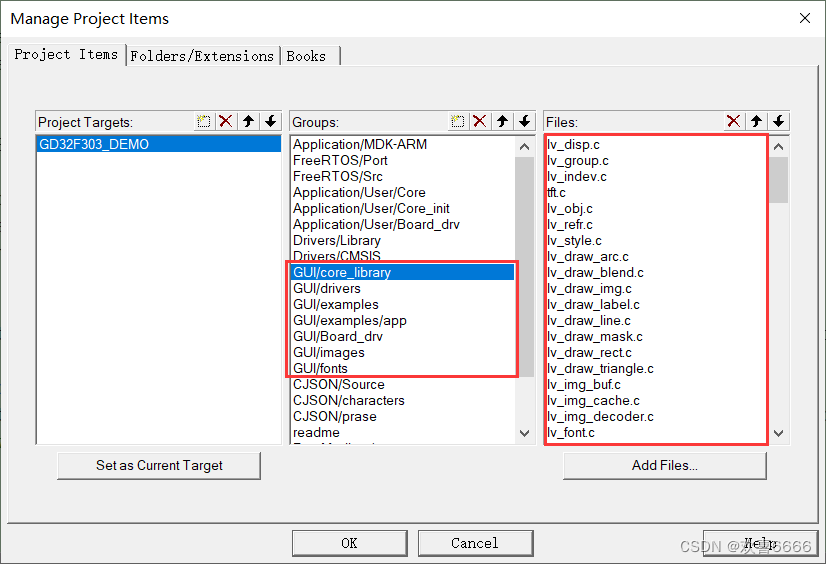
1. Add folders in the project
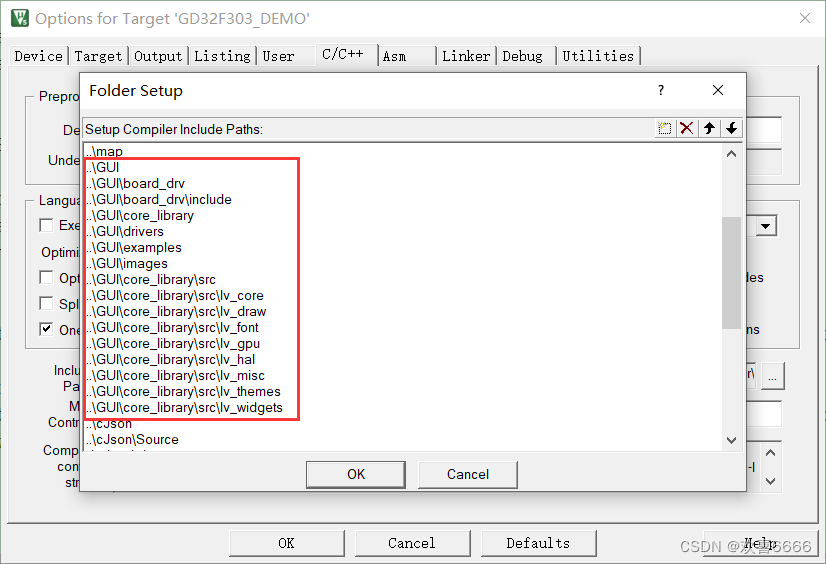
2. Add path
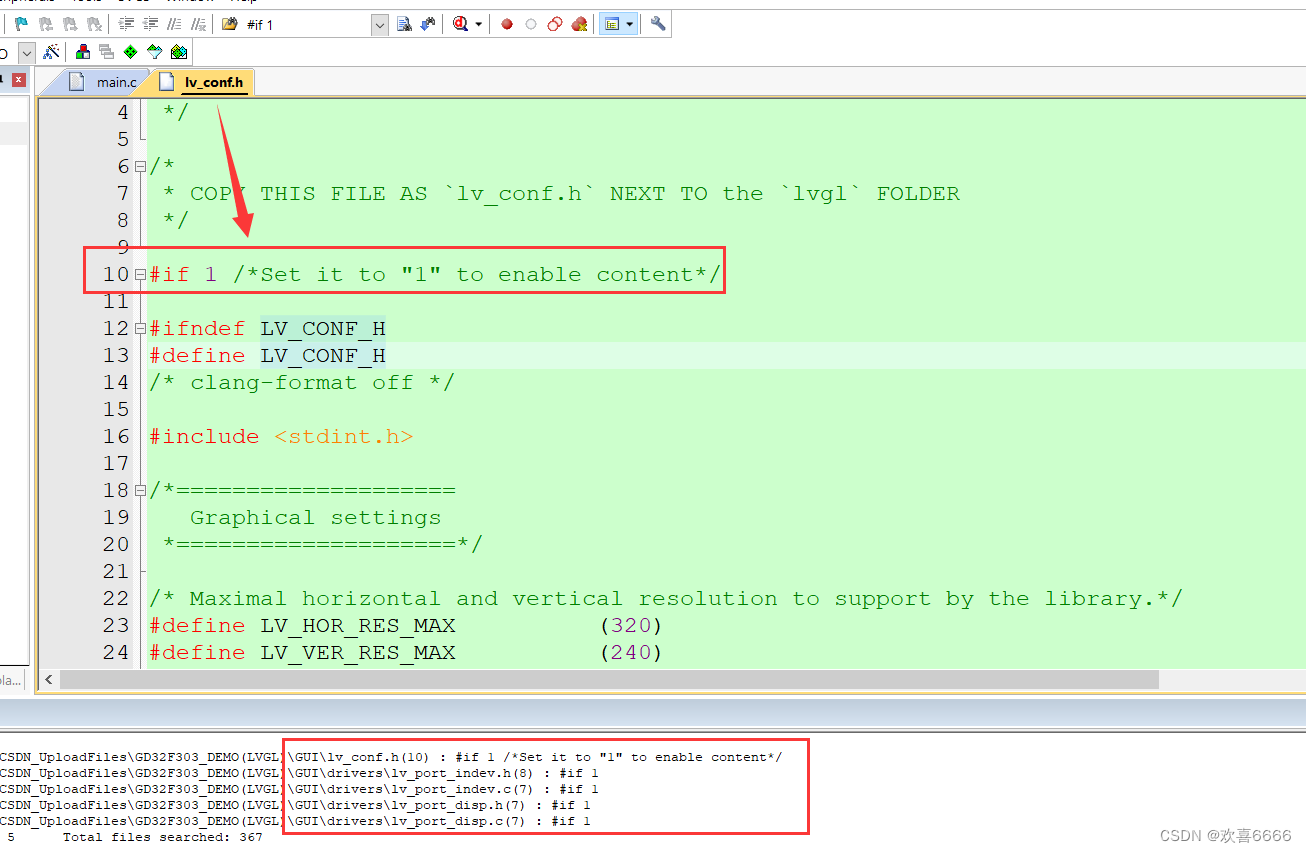
3. Header file enablement
- The official document uses #if 0 #endif to comment out the source code. Here we need to change it to #if 1 in the .c and .h files.
- Mainly the following files: lv_conf.h, lv_port_indev.h, lv_port_indev.c, lv_port_disp.h, lv_port_disp.c,
- If you use a file system, you must also modify the corresponding files.
4. Interface configuration
- There are two main files configured here: lv_port_display.c and lv_port_indev.c (lv_port_fs.c is similar)
- Let’s talk about lv_port_display.c first.
- You need to do the following things: register the BUF buffer of the display device, initialize your hardware device, and refresh the function corresponding to the display device buffer you defined.
1. Initialize your hardware device
- Just add your screen initialization function in the disp_init() function in lv_port_display.c, as follows
/* Initialize your display and the required peripherals. */
static void disp_init(void)
{


	/*You code here*/
	LCD_Init();

}
2. The refresh function corresponding to the display device buffer you defined
- Add your refresh function in the disp_flush() function in lv_port_display.c
- disp_flush() will pass in the device to be refreshed, the area size and the processed data on the screen
- Refresh function: When the data to be sent is processed, the content displayed on the screen is updated through this function.
- The lv_disp_flush_ready() function is very important. Here I am using the hardware SPI . You can call this directly after the screen refresh is completed. If you are using hardware SPI+DMA , then you need to call this function after each DMA transfer is completed.
/* Flush the content of the internal buffer the specific area on the display
 * You can use DMA or any hardware acceleration to do this operation in the background but
 * 'lv_disp_flush_ready()' has to be called when finished. */
static void disp_flush(lv_disp_drv_t * disp_drv, const lv_area_t * area, lv_color_t * color_p)
{


    /*The most simple case (but also the slowest) to put all pixels to the screen one-by-one*/
	LCD_Fill_Pointer(area->x1,area->y1,area->x2,area->y2,(uint16_t*)color_p,1);
    /* IMPORTANT!!!
     * Inform the graphics library that you are ready with the flushing*/
    lv_disp_flush_ready(disp_drv);
}
3. Register the BUF buffer of the display device
- Registered in lv_port_disp_init() function in lv_port_display.c
- lv_disp_t * disp_src is the display device object we registered
- lvgl provides us with 3 ways to cache areas. Here we can just choose the first and simplest one.
- Regarding the following two macros LV_HOR_RES_MAX and LV_VER_RES_MAX, they are defined in lv_conf.h and can be ignored here.
lv_disp_t * disp_src = NULL;

void lv_port_disp_init(void)
{


    /*-------------------------
     * Initialize your display
     * -----------------------*/
    disp_init();

    /*-----------------------------
     * Create a buffer for drawing
     *----------------------------*/

    /* LVGL requires a buffer where it internally draws the widgets.
     * Later this buffer will passed your display drivers `flush_cb` to copy its content to your display.
     * The buffer has to be greater than 1 display row
     *
     * There are three buffering configurations:
     * 1. Create ONE buffer with some rows:
     *      LVGL will draw the display's content here and writes it to your display
     *
     * 2. Create TWO buffer with some rows:
     *      LVGL will draw the display's content to a buffer and writes it your display.
     *      You should use DMA to write the buffer's content to the display.
     *      It will enable LVGL to draw the next part of the screen to the other buffer while
     *      the data is being sent form the first buffer. It makes rendering and flushing parallel.
     *
     * 3. Create TWO screen-sized buffer:
     *      Similar to 2) but the buffer have to be screen sized. When LVGL is ready it will give the
     *      whole frame to display. This way you only need to change the frame buffer's address instead of
     *      copying the pixels.
     * */

    /* Example for 1) */
    static lv_disp_buf_t draw_buf_dsc_1;
    static lv_color_t draw_buf_1[LV_HOR_RES_MAX * 10];                          /*A buffer for 10 rows*/
    lv_disp_buf_init(&draw_buf_dsc_1, draw_buf_1, NULL, LV_HOR_RES_MAX * 10);   /*Initialize the display buffer*/

    /* Example for 2) */
//    static lv_disp_buf_t draw_buf_dsc_2;
//    static lv_color_t draw_buf_2_1[LV_HOR_RES_MAX * 10];                        /*A buffer for 10 rows*/
//    static lv_color_t draw_buf_2_2[LV_HOR_RES_MAX * 10];                        /*An other buffer for 10 rows*/
//    lv_disp_buf_init(&draw_buf_dsc_2, draw_buf_2_1, draw_buf_2_2, LV_HOR_RES_MAX * 10);   /*Initialize the display buffer*/

//    /* Example for 3) */
//    static lv_disp_buf_t draw_buf_dsc_3;
//    static lv_color_t draw_buf_3_1[LV_HOR_RES_MAX * LV_VER_RES_MAX];            /*A screen sized buffer*/
//    static lv_color_t draw_buf_3_2[LV_HOR_RES_MAX * LV_VER_RES_MAX];            /*An other screen sized buffer*/
//    lv_disp_buf_init(&draw_buf_dsc_3, draw_buf_3_1, draw_buf_3_2, LV_HOR_RES_MAX * LV_VER_RES_MAX);   /*Initialize the display buffer*/

    /*-----------------------------------
     * Register the display in LVGL
     *----------------------------------*/

    lv_disp_drv_t disp_drv;                         /*Descriptor of a display driver*/
    lv_disp_drv_init(&disp_drv);                    /*Basic initialization*/
    /*Set up the functions to access to your display*/

    /*Set the resolution of the display*/
    disp_drv.hor_res = LV_HOR_RES_MAX;//LV_HOR_RES_MAX
    disp_drv.ver_res = LV_VER_RES_MAX;//LV_VER_RES_MAX
    /*Used to copy the buffer's content to the display*/
    disp_drv.flush_cb = disp_flush;

    /*Set a display buffer*/
    disp_drv.buffer = &draw_buf_dsc_1;

#if LV_USE_GPU
    /*Optionally add functions to access the GPU. (Only in buffered mode, LV_VDB_SIZE != 0)*/

    /*Blend two color array using opacity*/
    disp_drv.gpu_blend_cb = gpu_blend;

    /*Fill a memory array with a color*/
    disp_drv.gpu_fill_cb = gpu_fill;
#endif

    /*Finally register the driver*/
    disp_src = lv_disp_drv_register(&disp_drv);

	/* 设置默认的显示器对象为屏幕 */
	lv_disp_set_default(disp_src);
}
4. Input devices on hardware
-
The input device part requires two things: determination of the input device type, association of the input device, and initialization of the input device.
-
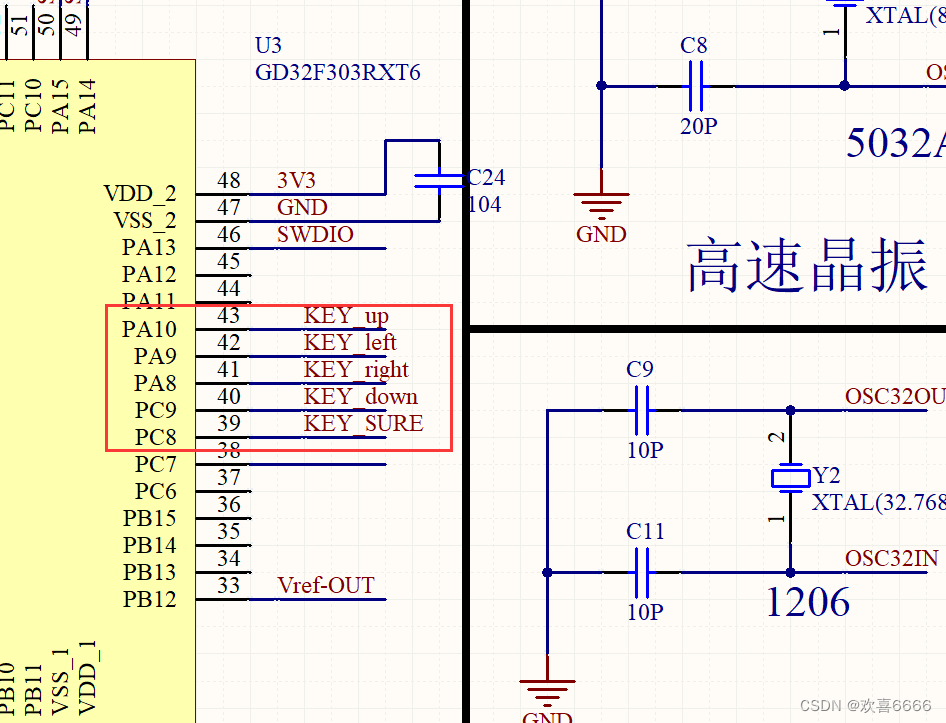
I use physical buttons, each of which is an independent button. The schematic diagram is as follows:

5. Determination of input device -
lvgl provides five input types: touchpad, mouse, keypad, encoder, and button.
-
According to our hardware design, we can set it to either keypad or button type
-
We use keypad to register
-
The corresponding IO can be initialized in the keypad_init() function
void GPIO_Init(void)
{


	/* 使用SWD下载,不使用JTAG下载,管脚用作其它功能 */
	gpio_pin_remap_config(GPIO_SWJ_SWDPENABLE_REMAP, ENABLE);

	/* demo board KEYn I/O */
	gpio_init(KEY_UP_PORT,GPIO_MODE_IPU,GPIO_OSPEED_50MHZ,KEY_UP_PIN);
	gpio_init(KEY_DOWN_PORT,GPIO_MODE_IPU,GPIO_OSPEED_50MHZ,KEY_DOWN_PIN);
	gpio_init(KEY_LEFT_PORT,GPIO_MODE_IPU,GPIO_OSPEED_50MHZ,KEY_LEFT_PIN);
	gpio_init(KEY_ENTER_PORT,GPIO_MODE_IPU,GPIO_OSPEED_50MHZ,KEY_ENTER_PIN);
	gpio_init(KEY_RIGHT_PORT,GPIO_MODE_IPU,GPIO_OSPEED_50MHZ,KEY_RIGHT_PIN);
}

/* Initialize your keypad */
static void keypad_init(void)
{


    /*Your code comes here*/
    GPIO_Init();
}
- The keypad_get_key() function is associated with our hardware function
- Reading key values is very convenient. We do not need to debounce the key values. lvgl comes with debouncing processing. For details, see the LV_INDEV_DEF_READ_PERIOD macro in lv_conf.h.
uint32_t Key_Flag_Event(void)
{


	if(!gpio_input_bit_get(KEY_UP_PORT,KEY_UP_PIN))
		return 1;

	if(!gpio_input_bit_get(KEY_DOWN_PORT,KEY_DOWN_PIN))
		return 2;

	if(!gpio_input_bit_get(KEY_LEFT_PORT,KEY_LEFT_PIN))
		return 3;

	if(!gpio_input_bit_get(KEY_RIGHT_PORT,KEY_RIGHT_PIN))
		return 4;

	if(!gpio_input_bit_get(KEY_ENTER_PORT,KEY_ENTER_PIN))
		return 5;
	return 0;
}

/*Get the currently being pressed key.  0 if no key is pressed*/
static uint32_t keypad_get_key(void)
{


    /*Your code comes here*/
	return Key_Flag_Event();
//    return 0;
}
- After getting the key value, we will associate the key value with the key event of lvgl
/* Will be called by the library to read the mouse */
static bool keypad_read(lv_indev_drv_t * indev_drv, lv_indev_data_t * data)
{


    static uint32_t last_key = 0;

    /*Get the current x and y coordinates*/
    mouse_get_xy(&data->point.x, &data->point.y);


	/*Get whether the a key is pressed and save the pressed key*/
	uint32_t act_key = keypad_get_key();
	if(act_key != 0) {


		data->state = LV_INDEV_STATE_PR;

		/*Translate the keys to LVGL control characters according to your key definitions*/
		switch(act_key) {


		case 1:
				act_key = LV_KEY_UP_PART;
				break;
		case 2:
				act_key = LV_KEY_DOWN_PART;
				break;
		case 3:
				act_key = LV_KEY_LEFT_PART;
				break;
		case 4:
				act_key = LV_KEY_RIGHT_PART;
				break;
		case 5:
				act_key = LV_KEY_ENTER_PART;
				break;
		default:
				break;
		}

		last_key = act_key;
	} else {


		data->state = LV_INDEV_STATE_REL;
	}


    data->key = last_key;

    /*Return `false` because we are not buffering and no more data to read*/
    return false;
}
- LV_KEY_UP_PART, LV_KEY_DOWN_PART, LV_KEY_LEFT_PART are customized by me. You can use the events that come with lvgl. The events are defined in lv_group.h
/*Predefined keys to control the focused object via lv_group_send(group, c)*/
/*For compatibility in signal function define the keys regardless to `LV_USE_GROUP`*/

enum {


    LV_KEY_UP        = 17,  /*0x11*/
    LV_KEY_DOWN      = 18,  /*0x12*/
    LV_KEY_RIGHT     = 19,  /*0x13*/
    LV_KEY_LEFT      = 20,  /*0x14*/
    LV_KEY_ESC       = 27,  /*0x1B*/
    LV_KEY_DEL       = 127, /*0x7F*/
    LV_KEY_BACKSPACE = 8,   /*0x08*/
    LV_KEY_ENTER     = 10,  /*0x0A, '\n'*/
    LV_KEY_NEXT      = 9,   /*0x09, '\t'*/
    LV_KEY_PREV      = 11,  /*0x0B, '*/
    LV_KEY_HOME      = 2,   /*0x02, STX*/
    LV_KEY_END       = 3,   /*0x03, ETX*/

	/* 自定义键值 */
	LV_KEY_UP_PART	  = 145,	/* 0x91 */
	LV_KEY_DOWN_PART  = 146,	/* 0x92 */
	LV_KEY_LEFT_PART  = 148,	/* 0x94 */
	LV_KEY_RIGHT_PART = 147,	/* 0x93 */
	LV_KEY_ENTER_PART = 130,	/* 0x82 */
};
typedef uint8_t lv_key_t;
6. Enter the registration of the device
- At this point, just comment out other input types in the lv_port_indev_init() function.
void lv_port_indev_init(void)
{


    /* Here you will find example implementation of input devices supported by LittelvGL:
     *  - Touchpad
     *  - Mouse (with cursor support)
     *  - Keypad (supports GUI usage only with key)
     *  - Encoder (supports GUI usage only with: left, right, push)
     *  - Button (external buttons to press points on the screen)
     *
     *  The `..._read()` function are only examples.
     *  You should shape them according to your hardware
     */

    lv_indev_drv_t indev_drv;

    /*------------------
     * Touchpad
     * -----------------*/

//    /*Initialize your touchpad if you have*/
//    touchpad_init();

//    /*Register a touchpad input device*/
//    lv_indev_drv_init(&indev_drv);
//    indev_drv.type = LV_INDEV_TYPE_POINTER;
//    indev_drv.read_cb = touchpad_read;
//    indev_touchpad = lv_indev_drv_register(&indev_drv);

    /*------------------
     * Mouse
     * -----------------*/

//    /*Initialize your touchpad if you have*/
//    mouse_init();

//    /*Register a mouse input device*/
//    lv_indev_drv_init(&indev_drv);
//    indev_drv.type = LV_INDEV_TYPE_POINTER;
//    indev_drv.read_cb = mouse_read;
//    indev_mouse = lv_indev_drv_register(&indev_drv);

//    /*Set cursor. For simplicity set a HOME symbol now.*/
//    lv_obj_t * mouse_cursor = lv_img_create(lv_disp_get_scr_act(NULL), NULL);
//    lv_img_set_src(mouse_cursor, LV_SYMBOL_HOME);
//    lv_indev_set_cursor(indev_mouse, mouse_cursor);

    /*------------------
     * Keypad
     * -----------------*/

    /*Initialize your keypad or keyboard if you have*/
    keypad_init();

    /*Register a keypad input device*/
    lv_indev_drv_init(&indev_drv);
    indev_drv.type = LV_INDEV_TYPE_KEYPAD;
    indev_drv.read_cb = keypad_read;
    indev_keypad = lv_indev_drv_register(&indev_drv);

    /* Later you should create group(s) with `lv_group_t * group = lv_group_create()`,
     * add objects to the group with `lv_group_add_obj(group, obj)`
     * and assign this input device to group to navigate in it:
     * `lv_indev_set_group(indev_keypad, group);` */

    /*------------------
     * Encoder
     * -----------------*/

//    /*Initialize your encoder if you have*/
//    encoder_init();

//    /*Register a encoder input device*/
//    lv_indev_drv_init(&indev_drv);
//    indev_drv.type = LV_INDEV_TYPE_ENCODER;
//    indev_drv.read_cb = encoder_read;
//    indev_encoder = lv_indev_drv_register(&indev_drv);

    /* Later you should create group(s) with `lv_group_t * group = lv_group_create()`,
     * add objects to the group with `lv_group_add_obj(group, obj)`
     * and assign this input device to group to navigate in it:
     * `lv_indev_set_group(indev_encoder, group);` */

    /*------------------
     * Button
     * -----------------*/

//    /*Initialize your button if you have*/
//    button_init();

//    /*Register a button input device*/
//    lv_indev_drv_init(&indev_drv);
//    indev_drv.type = LV_INDEV_TYPE_BUTTON;
//    indev_drv.read_cb = button_read;
//    indev_button = lv_indev_drv_register(&indev_drv);

    /*Assign buttons to points on the screen*/
//    static const lv_point_t btn_points[2] = {


//            {10, 10},   /*Button 0 -> x:10; y:10*/
//            {40, 100},  /*Button 1 -> x:40; y:100*/
//    };
//    lv_indev_set_button_points(indev_button, btn_points);
}
5. LVGL configuration header file
- The configuration function of lvgl is mainly in lv_conf.h. Here we mainly mention a few important macros.
1. LV_HOR_RES_MAX and LV_VER_RES_MAX
- When registering a display device, we have used these two macros. Their main purpose is to define the size of our display device. For example, I use 320x240
/* Maximal horizontal and vertical resolution to support by the library.*/
#define LV_HOR_RES_MAX          (320)
#define LV_VER_RES_MAX          (240)
2. LV_COLOR_DEPTH
- This macro defines the color depth of each of our pixels, which depends on which color depths our display device supports and the size of the data we transmit.
- For example, my screen supports 65k color (RGB565) and 262k color (RGB666). The former only requires 2 bytes to transmit the color depth of 1 pixel, while the latter requires at least 3 bytes (mostly 4 bytes). , way of ARGB8888)
- Then 320x240x2 is the total number of bytes I sent, which is equivalent to sending 150kB of data each time to completely refresh a screen. If I use ARGB, it will be doubled.
- Of course, graphics libraries like lvgl will definitely be optimized. It is impossible to refresh the entire screen if there is a slight change in the interface.
/* Color depth:
 * - 1:  1 byte per pixel
 * - 8:  RGB332
 * - 16: RGB565
 * - 32: ARGB8888
 */
#define LV_COLOR_DEPTH     16
3. LV_MEM_SIZE
- This is also the key to whether our lvgl can run successfully. Since lvgl comes with its own memory management, we need to set a large array for it. I set it to 20k
/* Size of the memory used by `lv_mem_alloc` in bytes (>= 2kB)*/
#  define LV_MEM_SIZE    (20U * 1024U)
4. LV_FONT_MONTSERRAT_nn
- This is the font setting. lvgl itself provides some fonts. You can add the fonts you want according to actual needs.
- It is not recommended to enable them all, because the font itself takes up a lot of our hardware resources. Only add what we need here.
/* The built-in fonts contains the ASCII range and some Symbols with 4 bit-per-pixel.
 * The symbols are available via `LV_SYMBOL_...` defines
 * More info about fonts: https://docs.lvgl.io/v7/en/html/overview/font.html
 * To create a new font go to: https://lvgl.com/ttf-font-to-c-array
 */

/* Montserrat fonts with bpp = 4
 * https://fonts.google.com/specimen/Montserrat  */
#define LV_FONT_MONTSERRAT_8     0
#define LV_FONT_MONTSERRAT_10    0
#define LV_FONT_MONTSERRAT_12    1
#define LV_FONT_MONTSERRAT_14    1
#define LV_FONT_MONTSERRAT_16    0
#define LV_FONT_MONTSERRAT_18    1
#define LV_FONT_MONTSERRAT_20    0
#define LV_FONT_MONTSERRAT_22    0
#define LV_FONT_MONTSERRAT_24    1
#define LV_FONT_MONTSERRAT_26    0
#define LV_FONT_MONTSERRAT_28    0
#define LV_FONT_MONTSERRAT_30    0
#define LV_FONT_MONTSERRAT_32    0
#define LV_FONT_MONTSERRAT_34    0
#define LV_FONT_MONTSERRAT_36    0
#define LV_FONT_MONTSERRAT_38    0
#define LV_FONT_MONTSERRAT_40    0
#define LV_FONT_MONTSERRAT_42    0
#define LV_FONT_MONTSERRAT_44    0
#define LV_FONT_MONTSERRAT_46    0
#define LV_FONT_MONTSERRAT_48    0

/* Demonstrate special features */
#define LV_FONT_MONTSERRAT_12_SUBPX      0
#define LV_FONT_MONTSERRAT_28_COMPRESSED 0  /*bpp = 3*/
#define LV_FONT_DEJAVU_16_PERSIAN_HEBREW 0  /*Hebrew, Arabic, PErisan letters and all their forms*/
#define LV_FONT_SIMSUN_16_CJK            0  /*1000 most common CJK radicals*/
5. LV_THEME_DEFAULT_xx
- lvgl also reserves a default setting function, which is equivalent to what the default is when we do not set the screen background theme color, component color, font, etc.
/*================
 *  THEME USAGE
 *================*/

/*Always enable at least on theme*/

/* No theme, you can apply your styles as you need
 * No flags. Set LV_THEME_DEFAULT_FLAG 0 */
#define LV_USE_THEME_EMPTY       1

/*Simple to the create your theme based on it
 * No flags. Set LV_THEME_DEFAULT_FLAG 0 */
#define LV_USE_THEME_TEMPLATE    1

/* A fast and impressive theme.
 * Flags:
 * LV_THEME_MATERIAL_FLAG_LIGHT: light theme
 * LV_THEME_MATERIAL_FLAG_DARK: dark theme
 * LV_THEME_MATERIAL_FLAG_NO_TRANSITION: disable transitions (state change animations)
 * LV_THEME_MATERIAL_FLAG_NO_FOCUS: disable indication of focused state)
 * */
#define LV_USE_THEME_MATERIAL    1

/* Mono-color theme for monochrome displays.
 * If LV_THEME_DEFAULT_COLOR_PRIMARY is LV_COLOR_BLACK the
 * texts and borders will be black and the background will be
 * white. Else the colors are inverted.
 * No flags. Set LV_THEME_DEFAULT_FLAG 0 */
#define LV_USE_THEME_MONO        1

#define LV_THEME_DEFAULT_INCLUDE            <stdint.h>      /*Include a header for the init. function*/
#define LV_THEME_DEFAULT_INIT               lv_theme_material_init
#define LV_THEME_DEFAULT_COLOR_PRIMARY      lv_color_hex(0xff7e05) // lv_color_hex(0x01a2b1)
#define LV_THEME_DEFAULT_COLOR_SECONDARY    lv_color_hex(0xff7e05) // lv_color_hex(0x44d1b6)
#define LV_THEME_DEFAULT_FLAG               LV_THEME_MATERIAL_FLAG_LIGHT	//LV_THEME_MATERIAL_FLAG_DARK  LV_THEME_MATERIAL_FLAG_LIGHT
#define LV_THEME_DEFAULT_FONT_SMALL         &lv_font_montserrat_14
#define LV_THEME_DEFAULT_FONT_NORMAL        &lv_font_montserrat_14
#define LV_THEME_DEFAULT_FONT_SUBTITLE      &lv_font_montserrat_14
#define LV_THEME_DEFAULT_FONT_TITLE         &lv_font_montserrat_14
6. Others
- Other parts are similar, including whether to enable animation functions, enable certain controls to achieve a certain degree of functional tailoring, etc.
5. Debugging and Application in FreeRTOS
- Since we are using FreeRTOS, we can add lvgl as a task
- The main five functions used in lvgl are: lv_tick_inc(), lv_task_handler(), lv_init(), lv_port_disp_init(), lv_port_indev_init()
1. lv_tick_inc()
- Similar to FreeRTOS, lvgl also needs a tick heartbeat to perform its own internal corresponding tasks. We can put this function into the hook function in FreeRTOS.
#define configUSE_TICK_HOOK			1

void vApplicationTickHook(void)
{


	lv_tick_inc(1);
}
2. lv_task_handler()
- All updated content of lvgl is processed in this function. It was called lv_task_handler() in the V7 version and before. After the V8 version, it became lv_timer_handler(), and the internal logic has also been changed.
- In FreeRTOS, we can treat it as a separate task. It is strongly recommended to set the stack size of this task to no less than 512.
- Since the lvgl thread is not safe, that is, the function cannot be reentrant, we add a lock to this task, and the lvgl task priority does not need to be adjusted to the highest
#define LCD_TASK_PRIO						( tskIDLE_PRIORITY + 1 )

void lcd_refresh_task(void * pvParameters)
{


	const TickType_t xDelay10ms = pdMS_TO_TICKS( 10UL );
	TickType_t xLastWakeTime = xTaskGetTickCount();

	for(;;)
	{


		if(pdTRUE == xSemaphoreTake(xMutex,portMAX_DELAY))
		{


			lv_task_handler();
			xSemaphoreGive(xMutex);
		}
		xTaskDelayUntil(&xLastWakeTime,xDelay10ms);
	}
}
3. lv_init()、lv_port_disp_init()、lv_port_indev_init()
- lv_init() is an initialization function configured according to the various macros we mentioned in lv_conf.h
- lv_port_disp_init() and lv_port_indev_init() are the display and key input interfaces we mentioned above.
- Just put these in our main.c
int main()
{


	/* 变量初始化(一些设定值的初始化) */
	Variables_Init();

	SystemTick_Init();
	SystemClock_Reconfig();

	SetUpHareWare();

 	lv_init();
	lv_port_disp_init();
	lv_port_indev_init();
//	lv_log_register_print_cb((lv_log_print_g_cb_t )put_string);

	//下面的代码省略

}
4. lvgl_bootScreen()
- After completing the above steps, you can create the LVGL control
- The objects of lvgl are all of type lv_obj_t *. Whether it is the entire interface or individual controls in each interface, we can also associate them at will. In the code, parent and child are usually used to determine the relationship between them.
- Define a structure that contains all our interfaces, including the following 3 interfaces
typedef struct
{


	lv_obj_t * BootScreen;		/* 启动界面 */
	lv_obj_t * MainScreen;		/* 主界面 */
	lv_obj_t * SetScreen;		/* 设置界面 */
}lv_ui;

/* 所有界面的对象结构体 */
lv_ui Gui={

    .BootScreen=NULL};
- Write a function specifically for drawing the first interface
lv_obj_t * time1_label = NULL;
lv_obj_t * btn_label = NULL;
lv_obj_t * time2_label = NULL;
lv_group_t * group_boot = NULL;

void lv_obj_set_style_local_set(lv_obj_t * obj,uint8_t part,lv_state_t state,lv_color_t color,lv_style_int_t value)
{


	lv_obj_set_style_local_radius(obj,part,state,8);
	lv_obj_set_style_local_border_color(obj,part,state,color);
	lv_obj_set_style_local_border_width(obj,part,state,value);
	lv_obj_set_style_local_outline_color(obj,part,state,lv_color_make(0xd4, 0xd7, 0xd9));
	lv_obj_set_style_local_outline_width(obj,part,state,0);
}

void lvgl_bootScreen(lv_ui * ui)
{


	lv_obj_t * btn_left  = NULL;
	lv_obj_t * btn_mid   = NULL;
	lv_obj_t * btn_right = NULL;

	lv_obj_t * boot_bar = NULL;

	if( (lv_scr_act()==ui->BootScreen) && (ui->BootScreen != NULL) )
		lv_obj_clean(ui->BootScreen);
	else
		ui->BootScreen = lv_obj_create(NULL, NULL);

	lv_obj_set_size(ui->BootScreen, LV_HOR_RES, LV_VER_RES);
	lv_scr_load(ui->BootScreen);


	time1_label = lv_label_create(ui->BootScreen,NULL);
	lv_label_set_text_fmt(time1_label,"timer1:%5d",ScheduleExe_Task_Count);		//
	lv_obj_set_style_local_text_font(time1_label, LV_OBJ_PART_MAIN, LV_STATE_DEFAULT, &lv_font_montserrat_18);
	lv_obj_set_style_local_text_color(time1_label, LV_OBJ_PART_MAIN, LV_STATE_DEFAULT,LV_COLOR_PURPLE);
	lv_obj_set_pos(time1_label, 2, 0);


	time2_label = lv_label_create(ui->BootScreen,NULL);
	lv_label_set_text_fmt(time2_label,"timer2:%5d",65535-ScheduleExe_Task_Count);		//
	lv_obj_set_style_local_text_font(time2_label, LV_OBJ_PART_MAIN, LV_STATE_DEFAULT, &lv_font_montserrat_18);
	lv_obj_set_style_local_text_color(time2_label, LV_OBJ_PART_MAIN, LV_STATE_DEFAULT,LV_COLOR_PURPLE);
	lv_obj_set_pos(time2_label, 200, 0);

	btn_label = lv_label_create(ui->BootScreen,NULL);
	lv_label_set_text(btn_label,"KeyValue:0");
	lv_obj_set_pos(btn_label,120,60);

	/*****************************************************************/
	btn_left = lv_btn_create(ui->BootScreen,NULL);

	lv_obj_set_style_local_set(btn_left,LV_OBJ_PART_MAIN,LV_STATE_DEFAULT,LV_COLOR_ORANGE,1);
	lv_obj_set_style_local_set(btn_left,LV_OBJ_PART_MAIN,LV_STATE_FOCUSED,LV_COLOR_ORANGE,3);

	//设置位置
	lv_obj_set_pos(btn_left, 15, 135);
	lv_obj_set_size(btn_left, 90, 40);

	lv_obj_t * btn_left_label = lv_label_create(btn_left,NULL);
	lv_label_set_text(btn_left_label,"btn_left");

	/*****************************************************************/
	/*****************************************************************/
	btn_mid = lv_btn_create(ui->BootScreen,NULL);

	lv_obj_set_style_local_set(btn_mid,LV_OBJ_PART_MAIN,LV_STATE_DEFAULT,LV_COLOR_RED,1);
	lv_obj_set_style_local_set(btn_mid,LV_OBJ_PART_MAIN,LV_STATE_FOCUSED,LV_COLOR_RED,3);

	//设置位置
	lv_obj_set_pos(btn_mid, 115, 135);
	lv_obj_set_size(btn_mid, 90, 40);

	lv_obj_t * btn_mid_label = lv_label_create(btn_mid,NULL);
	lv_label_set_text(btn_mid_label,"btn_mid");

	/*****************************************************************/
	/*****************************************************************/
	btn_right = lv_btn_create(ui->BootScreen,NULL);

	lv_obj_set_style_local_set(btn_right,LV_OBJ_PART_MAIN,LV_STATE_DEFAULT,LV_COLOR_LIME,1);
	lv_obj_set_style_local_set(btn_right,LV_OBJ_PART_MAIN,LV_STATE_FOCUSED,LV_COLOR_LIME,3);

	//设置位置
	lv_obj_set_pos(btn_right, 215, 135);
	lv_obj_set_size(btn_right, 90, 40);

	lv_obj_t * btn_right_label = lv_label_create(btn_right,NULL);
	lv_label_set_text(btn_right_label,"btn_right");
	/*****************************************************************/

	/* 子级 boot_scr下的boot_bar */
	boot_bar = lv_bar_create(ui->BootScreen, NULL);

	/* boot_bar的半径、不透明度与颜色等 */
	lv_obj_set_style_local_radius(boot_bar,LV_OBJ_PART_MAIN,LV_STATE_DEFAULT,30);
	lv_obj_set_style_local_bg_color(boot_bar,LV_BAR_PART_BG,LV_STATE_DEFAULT,LV_COLOR_GRAY);
	lv_obj_set_style_local_bg_color(boot_bar,LV_BAR_PART_INDIC,LV_STATE_DEFAULT,lv_color_make(0x57,0x7D,0xF2));
//	lv_obj_set_style_local_bg_grad_color(boot_bar,LV_OBJ_PART_MAIN,LV_STATE_DEFAULT,LV_COLOR_GRAY);
	lv_obj_set_style_local_bg_opa(boot_bar,LV_OBJ_PART_MAIN,LV_STATE_DEFAULT,255);
	lv_obj_set_style_local_bg_grad_dir(boot_bar,LV_OBJ_PART_MAIN,LV_STATE_DEFAULT,LV_GRAD_DIR_HOR);
	lv_obj_set_style_local_border_color(boot_bar,LV_OBJ_PART_MAIN,LV_STATE_DEFAULT,LV_COLOR_GRAY);
	lv_obj_set_style_local_border_width(boot_bar,LV_OBJ_PART_MAIN,LV_STATE_DEFAULT,1);
	lv_obj_set_style_local_border_opa(boot_bar,LV_OBJ_PART_MAIN,LV_STATE_DEFAULT,255);
	lv_obj_set_style_local_outline_width(boot_bar,LV_OBJ_PART_MAIN,LV_STATE_DEFAULT,1);
	lv_obj_set_style_local_outline_color(boot_bar,LV_OBJ_PART_MAIN,LV_STATE_DEFAULT,LV_COLOR_GRAY);
	lv_obj_set_style_local_outline_opa(boot_bar,LV_OBJ_PART_MAIN,LV_STATE_DEFAULT,0);

	/* boot_bar的位置 */
	lv_obj_set_pos(boot_bar, 38, 222);
	lv_obj_set_size(boot_bar, 245, 7);
	/* boot_bar的动画 */
	lv_bar_set_anim_time(boot_bar,1200);
	lv_bar_set_value(boot_bar,100,LV_ANIM_ON);
	lv_bar_set_range(boot_bar,0,100);

	/*****************************************************************/
	/*****************************************************************/
	/*****************************************************************/

	lv_obj_set_event_cb(btn_left, lv_task_event_cb[MENU_BOOT]);
	lv_obj_set_event_cb(btn_mid, 	lv_task_event_cb[MENU_BOOT]);
	lv_obj_set_event_cb(btn_right,lv_task_event_cb[MENU_BOOT]);

	group_boot = lv_group_create();
	lv_group_add_obj(group_boot, btn_left);
	lv_group_add_obj(group_boot, btn_mid);
	lv_group_add_obj(group_boot, btn_right);
	lv_indev_set_group(indev_keypad, group_boot);

	lv_group_focus_obj(btn_left);
}
- The callback function under the first interface
static void Boot_screen_btn_enterevent_handler(lv_obj_t * obj,lv_event_t event);

/* 回调函数指针数组*/
void (*lv_task_event_cb[])(lv_obj_t * obj, lv_event_t e) = \
	{

     \
	  Boot_screen_btn_enterevent_handler,Menu_total_btnm_event_handler,\
	};

	/* 开机动画回调 */
static void Boot_screen_btn_enterevent_handler(lv_obj_t * obj,lv_event_t event)
{


	const uint32_t * BootKeyValue = lv_event_get_data();


	if(	*BootKeyValue==LV_KEY_LEFT_PART )
	{


		lv_group_focus_prev(group_boot);
	}
	else if( *BootKeyValue==LV_KEY_RIGHT_PART )
	{


		lv_group_focus_next(group_boot);
	}

	lv_label_set_text_fmt(btn_label,"KeyValue:%d",(uint8_t)(*BootKeyValue));
//	lv_label_set_text_fmt(btn_label,"state:%d",(uint8_t)(lv_obj_get_state(lv_obj_get_focused_obj(obj), LV_OBJ_PART_MAIN)));
}
5. Creation of tasks in FreeRTOS
- In FreeRTOS, we create two tasks, one is used to process lv_task_handler(), and the other is used to process content that is not refreshed through the lvgl callback function.
- Tasks used to handle lv_task_handler()
void lcd_refresh_task(void * pvParameters)
{


	const TickType_t xDelay10ms = pdMS_TO_TICKS( 10UL );
	TickType_t xLastWakeTime = xTaskGetTickCount();

	for(;;)
	{


		if(pdTRUE == xSemaphoreTake(xMutex,portMAX_DELAY))
		{


			lv_task_handler();
			xSemaphoreGive(xMutex);
		}
		xTaskDelayUntil(&xLastWakeTime,xDelay10ms);
	}
}
- Used to handle the task of updating some components by yourself
void lvgl_refresh_task(void * pvParameters)
{


	const TickType_t xDelay1000ms = pdMS_TO_TICKS( 1000UL );
	TickType_t xLastWakeTime = xTaskGetTickCount();

	for(;;)
	{


		if(pdTRUE ==  xSemaphoreTake(xMutex_LVGL,portMAX_DELAY))
		{


			if(lv_scr_act()==Gui.BootScreen)
			{


				lv_label_set_text_fmt(time1_label,"timer1:%5d",ScheduleExe_Task_Count);
				lv_label_set_text_fmt(time2_label,"timer2:%5d",65535-ScheduleExe_Task_Count);
			}
			else if(lv_scr_act()==Gui.MainScreen)
			{


			}
			else if(lv_scr_act()==Gui.SetScreen)
			{


			}
			xSemaphoreGive(xMutex_LVGL);
		}
		xTaskDelayUntil(&xLastWakeTime,xDelay1000ms);
	}
}
- Other FreeRTOS tasks mainly include a backlight task and a task of sending data regularly and feeding the dog.
- Backlight task
void LCD_BG_task(void * pvParameters)
{


	const TickType_t xTicksToWait = pdMS_TO_TICKS( 1UL );

	for(;;)
	{


		if(pdTRUE == lcd_backlight_breathe())
			vTaskDelete(LCDBGTask_Handle);
		vTaskDelay(xTicksToWait);
	}
}
- Scheduled sending and dog feeding tasks
void Scheduled_Execute_task(void * pvParameters)
{


	const TickType_t xDelay50ms = pdMS_TO_TICKS( 50UL );
	TickType_t xLastWakeTime;
	BaseType_t xStatus;
	/* 获得当前的Tick Count */
	xLastWakeTime = xTaskGetTickCount();
	while(1)
	{


		if(SET == dma_flag_get(DMA0, DMA_CH6, DMA_FLAG_FTF))
		{


			dma_flag_clear(DMA0,DMA_CH6,DMA_FLAG_FTF);
			Usartx_Transmit_DMA(USART1,(uint8_t *)"FreeRTOS_1S_Task!\n",18);
			ScheduleExe_Task_Count++;
		}
		/* uncock fwdgt write protect*/
		fwdgt_write_enable();
		/* feed fwdgt */
		fwdgt_counter_reload();

		vTaskDelay(1000);
	}
}
6. The complete code of the main function part
- After introducing the above four tasks, the overall code logic of the main function part is as follows
#include "gd32f30x.h"
#include "gd32f30x_libopt.h"
#include "main.h"

FLAG_BIT Module;
ADCx_enum ADCx;
uint16_t ScheduleExe_Task_Count=0;
extern uint32_t delay;

void Variables_Init(void);
void put_string(lv_log_level_t level, const char *file, uint32_t line, const char *dsc);

#define LCDBG_TASK_PRIO   			( tskIDLE_PRIORITY + 3 )
#define ScheduleExe_TASK_PRIO		( tskIDLE_PRIORITY + 1 )
#define LCD_TASK_PRIO				( tskIDLE_PRIORITY + 1 )
#define LVGL_TASK_PRIO				( tskIDLE_PRIORITY + 1 )

TaskHandle_t LCDBGTask_Handle;

void LCD_BG_task(void * pvParameters);
void Scheduled_Execute_task(void * pvParameters);
void lcd_refresh_task(void * pvParameters);
void lvgl_refresh_task(void * pvParameters);

/* 互斥量句柄 */
SemaphoreHandle_t xMutex;
SemaphoreHandle_t xMutex_LVGL;

int main()
{


	/* 变量初始化(一些设定值的初始化) */
	Variables_Init();

	SystemTick_Init();
	SystemClock_Reconfig();

	SetUpHareWare();

	lv_init();
	lv_port_disp_init();
	lv_port_indev_init();
//	lv_log_register_print_cb((lv_log_print_g_cb_t )put_string);

	lvgl_bootScreen(&Gui);

	Usartx_Transmit_DMA(USART1,(uint8_t *)"FreeRTOS_1S_Task!\n",18);

	/* 创建互斥量 */
	xMutex = xSemaphoreCreateMutex( );
	/* 创建互斥量 */
	xMutex_LVGL = xSemaphoreCreateMutex( );

	xTaskCreate(LCD_BG_task, 			"LCD_BG_Task", 				configMINIMAL_STACK_SIZE, 	NULL,
				LCDBG_TASK_PRIO,		(TaskHandle_t*  )&LCDBGTask_Handle);
	xTaskCreate(Scheduled_Execute_task, "Scheduled_Execute_Task",	configMINIMAL_STACK_SIZE, 	NULL,
				ScheduleExe_TASK_PRIO,	NULL);
	xTaskCreate(lcd_refresh_task, 		"LCD_Task", 				configMINIMAL_STACK_SIZE*4, NULL,
				LCD_TASK_PRIO, 			NULL);
	xTaskCreate(lvgl_refresh_task, 		"Lvgl_Task", 				configMINIMAL_STACK_SIZE*2, NULL,
				LVGL_TASK_PRIO, 		NULL);

	vTaskStartScheduler();

	while(1){

    }

}

void put_string(lv_log_level_t level, const char *file, uint32_t line, const char *dsc)
{


	static char buf[150];
	sprintf(buf,"level:%d,file:%s,line:%d,dsc:%s\r",level,file,line,dsc);
//	Usartx_Transmit_DMA(USART1,buf,sizeof(buf));

}
6. Final effect demonstration
-
The final effect is as follows
video -
The project source code of this article is also provided here. It is not provided for free. You can download it if you need it.
