Article directory
1. Introduction to wxpython
wxpython is a relatively simple tool for making front-end interfaces in Python. It is often used to generate some basic interfaces, which include buttons, sliders, text blocks and other practical components. It is an extremely easy-to-use front-end tool.
1. Text
2. Text box (status bar)
wx.Textctrl()
3. Buttons
wx.Button()
4. Slide button
2. Effective combination of Mediapipe and wxpython
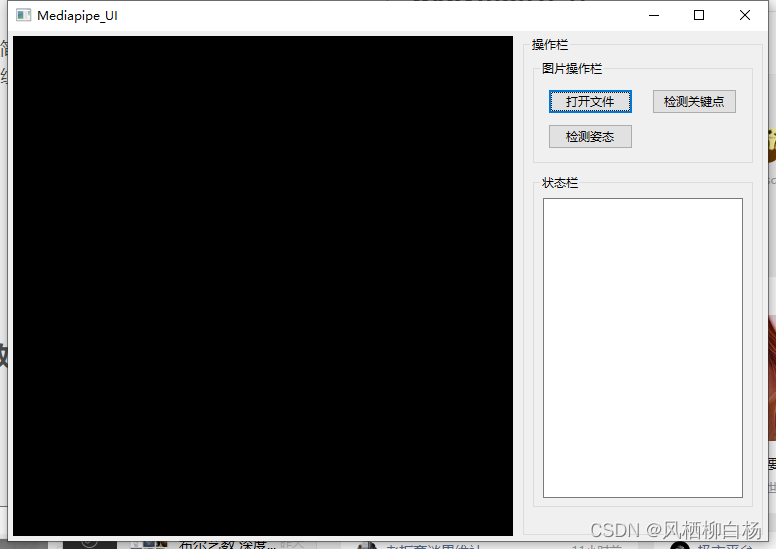
1. Operation effect
The effect after running the code is as follows: on the left is the image box, used to display images;
on the right is the status bar, used to open files and perform the detection process.
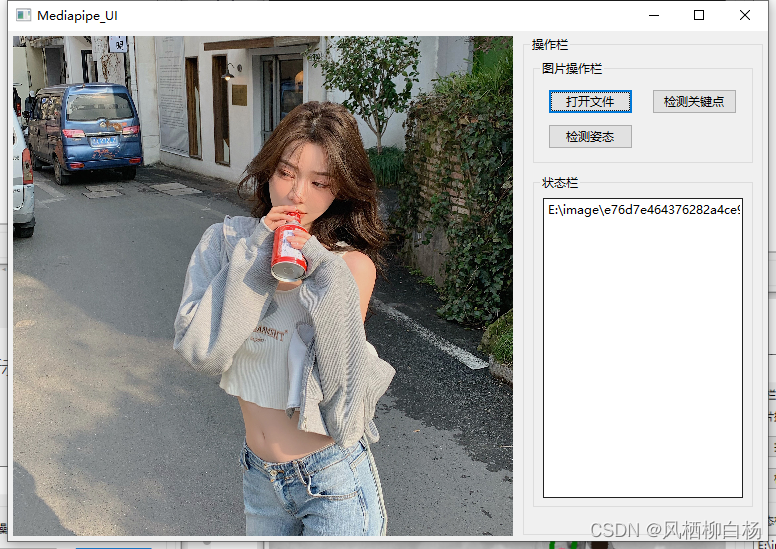
After opening the file, the image will be displayed in the image box, as shown below:
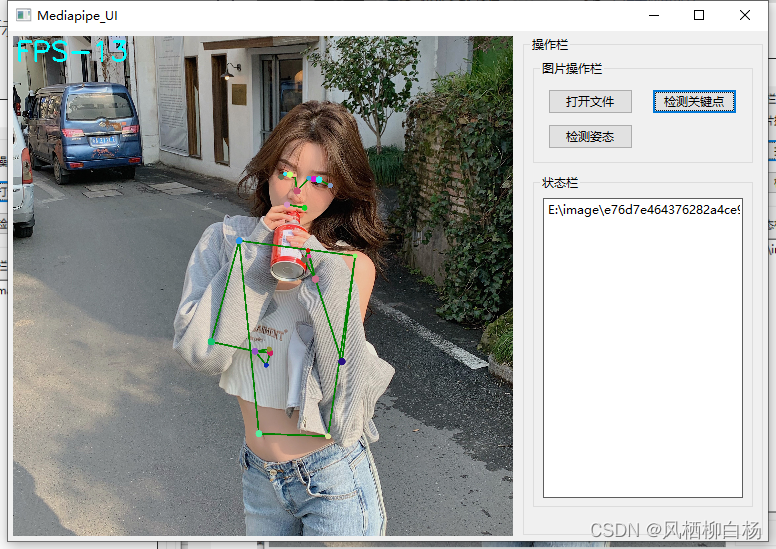
After clicking "Detect Key Points", you can detect the key points of the human body.
2. Code explanation
Next, let’s talk about how the code is implemented in detail.
(1) Key point detection function
In the previous explanation of mediapipe, the functions of key point detection and detection behavior recognition have been implemented. Then we can encapsulate it into a function specifically for keystroke calls in the wxpython front-end interface.
The functions encapsulated here are as follows:
def pre_image(image_path):
    print(image_path)
    #image = cv2.imread(image_path)
    image = cv2.imdecode(np.fromfile(image_path, dtype=np.uint8), -1)
    img = image.copy()
    frame = process_frame(img)
    return frame
    # 先不显示
cv2.imdecode()is used because images containing Chinese paths cannot be cv2.imread()opened.
process_frame()The function of the function is to input the original image and output the detected key point image.
Here's what process_frame()the function is all about:
def process_frame(img):
    start_time = time.time()
    h, w = img.shape[0], img.shape[1]               # 高和宽
    # 调整字体
    tl = round(0.005 * (img.shape[0] + img.shape[1]) / 2) + 1
    tf = max(tl-1, 1)
    # BRG-->RGB
    img_RGB = cv2.cvtColor(img, cv2.COLOR_BGR2RGB)
    # 将RGB图像输入模型,获取 关键点 预测结果
    results = pose.process(img_RGB)
    keypoints = ['' for i in range(33)]
    if results.pose_landmarks:
        mp_drawing.draw_landmarks(img, results.pose_landmarks, mp_pose.POSE_CONNECTIONS)
        for i in range(33):
            cx = int(results.pose_landmarks.landmark[i].x * w)
            cy = int(results.pose_landmarks.landmark[i].y * h)
            keypoints[i] = (cx, cy)                                 # 得到最终的33个关键点
    else:
        print("NO PERSON")
        struction = "NO PERSON"
        img = cv2.putText(img, struction, (25, 100), cv2.FONT_HERSHEY_SIMPLEX, 1.25, (255, 255, 0),
                          6)
    end_time = time.time()
    process_time = end_time - start_time            # 图片关键点预测时间
    fps = 1 / process_time                          # 帧率
    colors = [[random.randint(0,255) for _ in range(3)] for _ in range(33)]
    radius = [random.randint(8,15) for _ in range(33)]
    for i in range(33):
        cx, cy = keypoints[i]
        #if i in range(33):
        img = cv2.circle(img, (cx, cy), radius[i], colors[i], -1)
    '''str_pose = get_pos(keypoints)            #获取姿态
    cv2.putText(img, "POSE-{}".format(str_pose), (12, 100), cv2.FONT_HERSHEY_TRIPLEX,
                tl / 3, (255, 0, 0), thickness=tf)'''
    cv2.putText(img, "FPS-{}".format(str(int(fps))), (12, 100), cv2.FONT_HERSHEY_SIMPLEX,
                tl/3, (255, 255, 0),thickness=tf)
    return img
This function actually appeared in the previous explanation.
With these two functions, you can bind them to keys to implement callback use.
(2) Specific operations of wxpython
The main framework part is actually in wxpython, which connects all the functions you want to achieve.
Here I define a class specifically used to place front-end code calls.
Here is the annotated wxpython code:
class mediapipeApp(wx.App):
    def __init__(self):
    	'''UI界面的设计'''
        wx.App.__init__(self)
        self.frame = wx.Frame(None, title="Mediapipe_UI")
        self.panel = wx.Panel(self.frame)
        # -------------------------
        # 新建控件位置变量
        # -------------------------
        VERTICAL = wx.BoxSizer(wx.VERTICAL)
        HORIZONTAL = wx.BoxSizer(wx.HORIZONTAL)
        # ------------------------------------
        # 新建控件
        # ------------------------------------
        # 图片框
        image = wx.EmptyImage(500,500)
        self.image = wx.StaticBitmap(self.panel, wx.ID_ANY,   # 设置图片控件
                                       wx.BitmapFromImage(image))
        self.opare = wx.StaticBoxSizer(wx.StaticBox(self.panel, wx.ID_ANY, "操作栏"),
                                       wx.VERTICAL)
        # 图片操作栏
        self.image_op = wx.StaticBoxSizer(wx.StaticBox(self.opare.GetStaticBox(), wx.ID_ANY, "图片操作栏"),
                                       wx.VERTICAL)
        grider = wx.GridSizer(0, 2, 0, 9)
        btn_open = wx.Button(self.image_op.GetStaticBox(), label="打开文件")
        btn_points = wx.Button(self.image_op.GetStaticBox(), label="检测关键点")
        btn_pose = wx.Button(self.image_op.GetStaticBox(), label="检测姿态")
        # 状态栏,文本输入框
        self.sympol = wx.StaticBoxSizer(wx.StaticBox(self.opare.GetStaticBox(), wx.ID_ANY, "状态栏"),
                                          wx.HORIZONTAL)
        self.text_ctrl = wx.TextCtrl(self.sympol.GetStaticBox(), size=(200,300))

        # -----------------------------------
        #   设置控件 : 按钮、文本输入框等
        # -----------------------------------
        btn_open.Bind(wx.EVT_BUTTON, self.openfile)
        btn_points.Bind(wx.EVT_BUTTON, self.points)
        # ------------------------------------
        # 控件分布
        # ------------------------------------
        grider.Add(btn_open, 0, wx.ALL|wx.EXPAND, 5)
        grider.Add(btn_points, 0, wx.ALL|wx.EXPAND, 5)
        grider.Add(btn_pose, 0, wx.ALL|wx.EXPAND, 5)
        self.opare.Add(self.image_op, 0, wx.ALL|wx.EXPAND, 5)
        self.opare.Add(self.sympol, 0, wx.ALL|wx.EXPAND, 5)
        self.image_op.Add(grider, 0, wx.ALL|wx.EXPAND, 5)
        self.sympol.Add(self.text_ctrl, 0, wx.ALL|wx.EXPAND, 5)
        HORIZONTAL.Add(self.image, 0, wx.ALL|wx.EXPAND, 5)
        HORIZONTAL.Add(self.opare, 0, wx.ALL|wx.EXPAND, 5)
        VERTICAL.Add(HORIZONTAL)
        # ------------------------------------
        # 最终设置
        # ------------------------------------
        self.panel.SetSizer(VERTICAL)
        self.panel.Layout()
        HORIZONTAL.Fit(self.frame)
        self.frame.Show()
        self.PhotoMaxSize = 500
        self.filepath = ""
    def points(self, event):
    	'''检测关键点函数'''
    	# 如果路径是空的,那么就在状态栏中报错
        if self.filepath == "":
            struction = "错误,请先导入原始图片"
            self.text_ctrl.SetValue(struction)
            self.text_ctrl.GetValue()
        # 如果路径不为空,则执行检测操作,并把检测过后的图片显示在图片框中
        else:
            # 返回的image是cv2格式
            image = pre_image(self.filepath)
            image = cv2.resize(image, (500,500))
            image = cv2.cvtColor(image, cv2.COLOR_BGR2RGB)
            pic = wx.Bitmap.FromBuffer(image.shape[1], image.shape[0], image)
            self.image.SetBitmap(pic)
            self.panel.Refresh()


    def openfile(self, event):
    	'''打开文件函数:点击打开文件后,可以打开以jpg格式的图片'''
        wildcard = "JPEG files (*.jpg)|*.jpg"
        dialog = wx.FileDialog(None, "choose a file",
                               wildcard=wildcard,
                               style=wx.FD_CHANGE_DIR)
        if dialog.ShowModal() == wx.ID_OK:
            self.text_ctrl.SetValue(dialog.GetPath())
        dialog.Destroy()
        self.onView()
    def onView(self):
    	'''在状态栏中显示所需内容'''
        self.filepath = self.text_ctrl.GetValue()
        self.showImage(self.filepath)
    def showImage(self, filepath):
    	'''调整图片的宽高,并在图片框中显示图片'''
        img = wx.Image(filepath, wx.BITMAP_TYPE_ANY)
        W = img.GetWidth()
        H = img.GetHeight()
        # 让显示的美观一点。
        if W > H:
            NewW = self.PhotoMaxSize
            NewH = self.PhotoMaxSize * H / W
        else:
            NewH = self.PhotoMaxSize
            NewW = self.PhotoMaxSize * H / W
        self.W = NewW
        self.H = NewH
        img = img.Scale(NewW, NewH)

        self.image.SetBitmap(wx.BitmapFromImage(img))
        self.panel.Refresh()
The most complicated part of the entire code may be the distribution settings of the controls, which needs to be understood carefully.
Summarize
wxpython
wxpython+Mediapipe
The overall code is the same as the Mediapipe mentioned earlier, except that there is an additional visual UI interface of wxpython. I have also placed the wxpython code in the Mediapipe chapter mentioned earlier, and you can read it yourself.