
Lean In: The Ultimate Guide to Android App Size Optimization
1 Introduction
In today's mobile application ecosystem, the size optimization of Android applications is one of the key aspects that developers need to pay great attention to. A large application size will not only have a negative impact on the user experience, but also lead to the following problems:
- Download speed delays : Users need to wait longer to download and install apps, which can lead to user churn.
- Storage usage : Larger apps take up limited storage space on a user's device and may impact the performance of other apps.
- Decreased device performance : Large app size can lead to slower app startup and response times, which can leave a bad impression on users.
Therefore, it is crucial to carefully optimize the size of Android applications. This article will explore a series of effective optimization strategies and best practices to ensure that your app reaches the optimal level in terms of size and provides a better user experience.
In the following sections, we'll detail how to estimate your app's size, perform resource and code optimizations, employ lazy loading and dynamic modules, clean up invalid resources, compress and split APKs, optimize data storage, and other key optimization strategies. Let’s get started!
2. Evaluate application volume
App size is very important for users to download, install and use it. Larger apps can cause long download times, take up device storage space, and increase resource consumption. Therefore, assessing the size of your application is a critical step in the development process. In this section, we'll cover how to use Android Studio's tools to assess app size and identify the biggest contributors to your app's size.
2.1 Use Android Studio tools to evaluate application size
Android Studio provides some powerful tools for estimating application size. Below are two main tools that can help you analyze your application's volume situation.
2.1.1 APK Analyzer
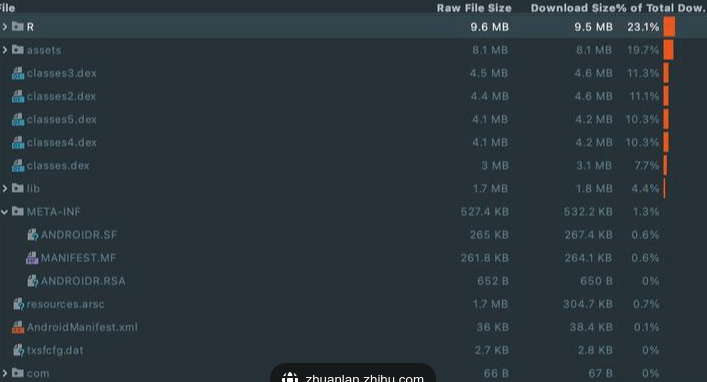
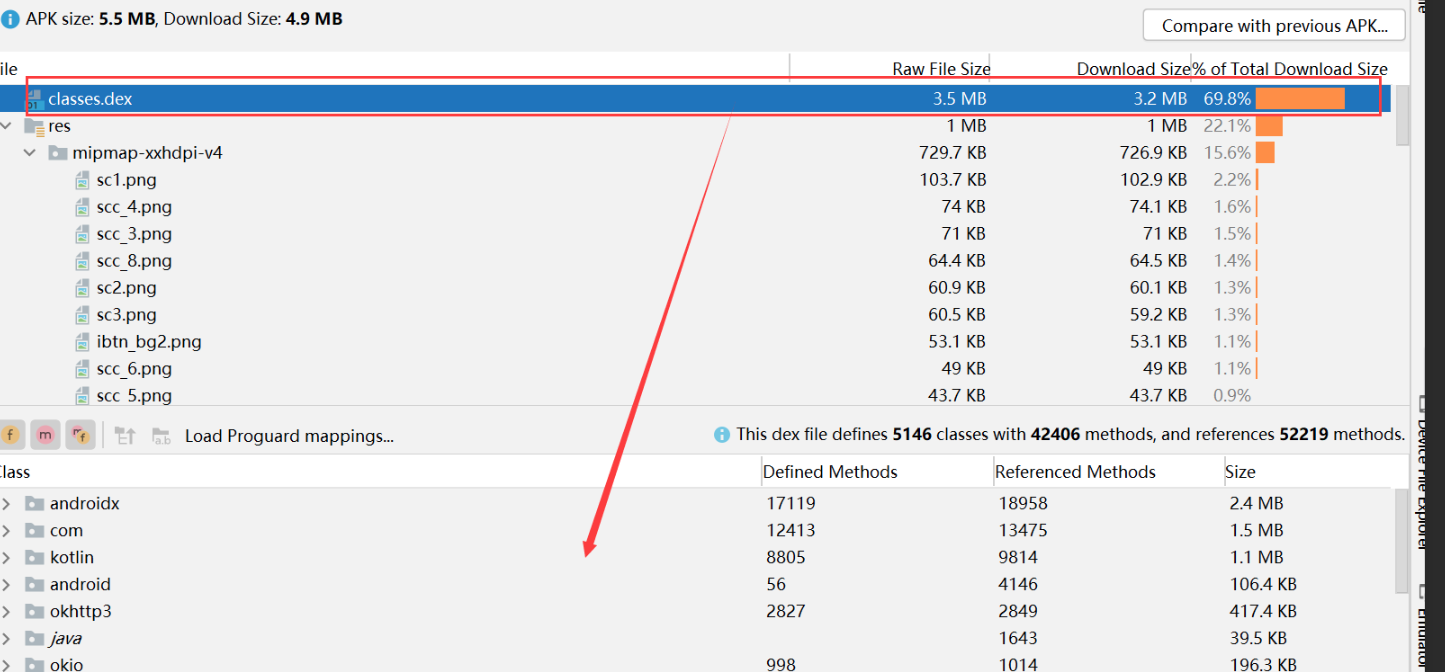
APK Analyzer is a powerful tool that comes with Android Studio, which can help you analyze and inspect the contents of APK files. Using APK Analyzer, you can view the overall size of your application, including the size of various resource files and library files.
To use APK Analyzer, follow these steps:
- Open the project in Android Studio.
- Click "Build" in the menu bar.
- Select "Build Bundle(s) / APK(s)".
- Select "Analyze APK…".
- Select the APK file you want to analyze.
APK Analyzer will open a new window showing the contents of the APK file. You can view and analyze various components in the APK, such as AndroidManifest.xml, resource files, library files, and resource folder sizes. By analyzing this information, you can quickly understand the volume distribution of your application.
2.1.2 Change Set Analyzer (Delta Intellij Google Diff Tool)
Change Set Analyzer is a plug-in integrated with IntelliJ IDEA that can help you analyze incremental changes in the volume of your application. Using the changeset analyzer, you can compare differences between different versions of your app or builds and find specific factors that contribute to volume changes.
To use the changeset analyzer, follow these steps:
- Open the project in Android Studio.
- Click "Analyze" in the menu bar.
- Select "Compare with Snapshot…".
- Select the version or build you want to compare.
Changeset Analyzer will open a new window showing the differences between the two versions. You can see which files have been added, deleted or modified, and see how each file has changed in size. By analyzing these changes, you can see how your app's size has increased between versions or builds.
2.2 Identify the big players in the application
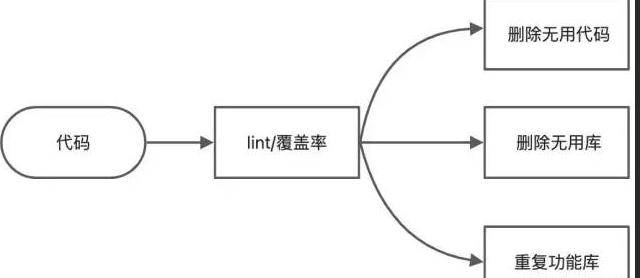
Once you understand the overall size of your application, the next step is to identify the biggest contributors in your application. These size hogs can take up a large portion of your application's size, so optimizing them can significantly reduce your application's overall size.
Here are some common factors that can cause your app to become too large:
-
Image assets: Image assets are often one of the most space-consuming parts of an app. Checking and compressing image resources can effectively reduce the size of the application. You can use Android Studio's tools to analyze and identify larger image resources.
-
Third-party libraries: Some third-party libraries may contain unused code or resource files, causing the application size to increase. Careful review and selection of third-party libraries that contain only the functionality you need can reduce unnecessary bulk.
-
Resource files: Other types of resource files, such as layout files, animation files, etc., may also cause the size to increase. Check these resource files and try to reduce unnecessary content.
By using APK Analyzer and Change Set Analyzer, you can quickly identify the bulk users in your application and take appropriate optimization measures to reduce the overall size of your application.
Here is an example Kotlin code that demonstrates how to use APK Analyzer to analyze the size of your app:
import com.android.tools.apk.analyzer.ApkAnalyzer

fun main() {


    val apkAnalyzer = ApkAnalyzer()
    val apkFile = "/path/to/your/apk/file.apk"

    val analysisResult = apkAnalyzer.analyze(apkFile)
    val apkSize = analysisResult.packageSize
    println("APK size: $apkSize")

    val resourceFiles = analysisResult.resourceFiles
    for (file in resourceFiles) {


        val fileSize = file.size
        println("Resource file: ${

      file.name}, size: $fileSize")
    }
}
Please note that the above code is a simplified example and you need to make appropriate adjustments and error handling according to your actual situation.
Overall, assessing application volume is an important step in the development process. By using the tools provided by Android Studio, such as APK Analyzer and Change Set Analyzer, you can understand the overall size of the application and identify the largest users in the application. Optimizing these bulk users can help reduce the overall size of the application and improve user experience and efficiency.
3. Resource optimization
When developing mobile applications, the size and usage of resources are critical to the performance and user experience of the application. Optimizing your application's resources can reduce your application's size, increase loading speed, and save device resources. In this section, we'll cover three common resource optimization techniques: image compression and use of the WebP format, removing unused resources, and using vector icons instead of bitmap icons.
3.1 Image compression and use of WebP format
Image assets are often one of the largest space-consuming parts of an application. It's important to use high-quality images to provide the best possible appearance, but this can also result in larger file sizes. Through image compression and the use of the WebP format, the size of image resources can be reduced to a minimum while maintaining good visual quality.
Here are some ways to optimize your image assets:
-
Compress image resources : Use tools such as
pngquantorTinyPNGto compress PNG image resources. These tools reduce the number of colors in an image and optimize the compression algorithm, thereby reducing file size. -
Use WebP format : WebP is an image format that supports lossless and lossy compression, developed by Google. Compared to JPEG and PNG, WebP images can achieve smaller file sizes while maintaining better visual quality. In Android development, you can use Android Studio tools or third-party libraries to convert images to WebP format.
Here's a sample Kotlin code that demonstrates how to use Android Studio's resource optimization tools to convert an image to WebP format:
import com.android.tools.r8.utils.ZipUtils
import java.io.File

fun convertImageToWebP(imageFile: File) {


    val tempDir = File("temp")
    tempDir.mkdir()

    // 使用Android Studio的WebP转换工具
    val convertedImageFile = File(tempDir, "converted_image.webp")
    ZipUtils.convertToWebP(imageFile.absolutePath, convertedImageFile.absolutePath)

    // 将转换后的图像替换原始图像
    if (convertedImageFile.exists()) {


        imageFile.delete()
        convertedImageFile.renameTo(imageFile)
    }

    // 删除临时目录
    tempDir.deleteRecursively()
}
Please note that the above code uses the WebP conversion tool provided by Android Studio ZipUtils.convertToWebPto convert the image to WebP format. You need to introduce corresponding dependencies into your project and make appropriate adjustments according to the actual situation.
3.2 Delete unused resources
There are often some unused resources in mobile applications, such as layout files, pictures, audio files, etc. These unused resources take up valuable storage space and can increase your app's load time. Therefore, timely deletion of unused resources is an important step in optimizing applications.
In Android development, you can use the Lint tool to detect and delete unused resources. Lint can help you find unused resources and provide corresponding operations to delete these resources.
Here is a sample Kotlin code that demonstrates how to use the Lint tool to detect and remove unused resources:
import com.android.tools.lint.LintCliClient
import com.android.tools.lint.checks.UnusedResourceDetector
import java.io.File

fun removeUnusedResources(projectDir: File) {


    val client = LintCliClient()
    val detector = UnusedResourceDetector()
    detector.setProject(client, projectDir)

    // 执行资源检测
    detector.run()

    // 获取未使用的资源文件列表
    val unusedResources = detector.unused
    for (resource in unusedResources) {


        // 删除未使用的资源文件
        resource.file.delete()
    }
}
Please note that the above code uses the Lint tool UnusedResourceDetectorto detect and remove unused resources. You need to introduce corresponding dependencies into your project and make appropriate adjustments according to the actual situation.
3.3 Use vector icons instead of bitmap icons
Using vector icons instead of bitmap icons is another effective resource optimization method. Vector icons are described using vector graphics, which offer unlimited scalability and smaller file sizes compared to bitmap icons. By using vector icons, you can reduce the size of your app and improve the quality of your icons.
In Android development, vector icons can be used instead of bitmap icons. You can use Android Studio's vector icon tool or use a third-party library such as to AndroidSVGload and display vector icons.
Here is a sample Kotlin code that demonstrates how to use AndroidSVGthe library to load and display vector icons:
import com.caverock.androidsvg.SVG
import com.caverock.androidsvg.SVGBuilder
import java.io.File

fun loadSvgIcon(iconFile: File) {


    val svg: SVG = SVGBuilder().readFromFile(iconFile).build()

    // 在你的UI组件中显示矢量图标
    // ...
}
Note that the above code uses AndroidSVGa library to load and display vector icons. You need to introduce corresponding dependencies into your project and make appropriate adjustments according to the actual situation.
In short, resource optimization is an essential part of developing mobile applications. By compressing images and using the WebP format, deleting unused resources, and using vector icons instead of bitmap icons, you can reduce the size of your application, increase loading speed, and save device resources. Developers can use the tools provided by Android Studio or third-party libraries to perform these optimization operations and make appropriate adjustments according to the actual situation. Optimizing resources can improve application performance and user experience, while also saving users' traffic and device storage space.
4. Code optimization
When developing mobile apps, code optimization can improve the performance of your app, reduce bundle size, and improve user experience. This section will introduce three common code optimization techniques: obfuscation and code reduction, removing useless dependencies, and using Proguard/R8 for code optimization.
4.1 Obfuscation and code reduction
Obfuscation and code reduction are common code optimization techniques that can help reduce an application's bundle size and protect its code security.
- Obfuscation : Obfuscation refers to making the code difficult to read and understand by renaming the names of code elements such as classes, methods, fields, etc. Obfuscation can reduce the size of the package and increase the security of the code, because it is difficult for an attacker to understand and modify the obfuscated code through reverse engineering. In Android development, you can use Proguard for code obfuscation.
The following is a sample Proguard configuration file that demonstrates how to obfuscate code:
# 保持类名、方法名、字段名的混淆
-keepnames class * {
    *;
}

# 保持特定的类不被混淆
-keep public class com.example.MyClass

# 删除不使用的代码
-assumenosideeffects class android.util.Log {
    *;
}
Note that the configuration file in the example above uses -keepnamesdirectives to keep class, method, and field names from being obfuscated, directives -keepto keep specific classes from being obfuscated, and -assumenosideeffectsdirectives to remove unused code. You can configure it accordingly according to your needs.
- Code reduction : Code reduction refers to reducing the package size of the application by removing unused code and resources. Removing unused code and resources helps reduce bundle size and improve application performance. In Android development, you can use Proguard or R8 to reduce code.
The following is an example Proguard configuration file demonstrating how to perform code reduction:
# 删除未使用的代码和资源
-dontshrink
-dontoptimize
-dontwarn

# 保持特定的类和方法不被删除
-keep class com.example.MyClass
-keepclassmembers class com.example.MyClass {
    *;
}

# 删除不使用的资源
-assumenosideeffects class android.R$* {
    public static ***[] $VALUES;
}
Note that the configuration file in the example above uses -dontshrinkdirectives to disable code minification, -keepdirectives to keep specific classes and methods from being removed, and -assumenosideeffectsdirectives to remove unused resources. You can configure it accordingly according to your needs.
4.2 Remove useless dependencies
Removing unused dependencies is another common code optimization technique that can reduce your application's bundle size and improve loading speed.
During the development process, some unused libraries or dependencies may be introduced that increase the application's package size and reduce the application's performance. Therefore, it is important to check and remove useless dependencies in a timely manner.
In Android development, you can use Android Studio's "Gradle Dependencies" tool to view application dependencies and identify and remove unused dependencies. You can open build.gradlethe file, browse the dependencies defined by keywords such as implementation, compileOnly, and so on, and then perform appropriate deletion operations based on the actual situation.api
The following is an example build.gradlefile that demonstrates how to view and remove useless dependencies:
dependencies {


    implementation 'com.example:library1:1.0.0'
    implementation 'com.example:library2:1.0.0'
    implementation 'com.example:library3:1.0.0'

    // 其他依赖项...
}
In the above example, you can use Android Studio's "Gradle Dependencies" tool to check if these dependencies are all required, and if there are unnecessary dependencies, you can remove them from the file build.gradle. This reduces your app's bundle size and improves loading speed.
4.3 Use Proguard/R8 for code optimization
Proguard and R8 are tools for code optimization. They can perform operations such as obfuscation, code reduction, optimization and pre-verification. Use Proguard or R8 to reduce your application's bundle size, increase loading speed, and protect your application's code security.
In Android development, you can build.gradleuse Proguard or R8 for code optimization by configuring the corresponding plug-in in the file. The following is a sample build.gradlefile that demonstrates how to use Proguard for code optimization:
android {


    // ...

    buildTypes {


        release {


            minifyEnabled true
            shrinkResources true
            proguardFiles getDefaultProguardFile('proguard-android-optimize.txt'), 'proguard-rules.pro'
        }
    }
}
In the above example, minifyEnabledand shrinkResourcesare used to enable code reduction and resource reduction respectively. proguardFilesUsed to specify the Proguard configuration file, which getDefaultProguardFile('proguard-android-optimize.txt')means using the default configuration file provided by the Android SDK, and 'proguard-rules.pro'means using a customized configuration file. You can configure it appropriately according to your needs.
All in all, code optimization is an important aspect to focus on when developing mobile apps. By obfuscating and reducing code, removing useless dependencies, and using Proguard/R8 for code optimization, you can reduce your application's package size, improve loading speed, and protect your application's code security. Developers can use relevant tools and configuration files to perform these optimization operations and make appropriate adjustments based on actual conditions. Code optimization can improve application performance and user experience, while also saving users' traffic and device storage space.
5. Lazy loading and dynamic modules
In mobile application development, lazy loading and dynamic modules are two common techniques that can improve the performance and user experience of the application. This section will introduce how to implement lazy loading to reduce the initial load when the application starts, and use Android App Bundle to create dynamic modules to load functions on demand.
5.1 Implement lazy loading
Lazy loading is a lazy loading technology that loads and initializes related resources only when needed, thereby reducing the initial burden when the application starts. Lazy loading speeds up application startup and saves system resources.
In Android development, you can use lazyattribute delegation to implement lazy loading. lazyProperty delegates perform initialization on first access and return cached values on subsequent accesses.
Here is an example where we use lazyproperty delegation to lazy load a resource:
class MyActivity : AppCompatActivity() {


    private val data: List<String> by lazy {


        // 执行初始化逻辑
        loadDataFromNetwork()
    }

    // 加载数据的方法
    private fun loadDataFromNetwork(): List<String> {


        // 执行网络请求等操作
        return listOf("data1", "data2", "data3")
    }

    override fun onCreate(savedInstanceState: Bundle?) {


        super.onCreate(savedInstanceState)
        setContentView(R.layout.activity_my)

        // 使用懒加载的数据
        val firstData = data.first()
        Log.d(TAG, "First data: $firstData")
    }
}
In the above example, datathe property uses lazyproperty delegation and performs initialization logic on first access. When we onCreateaccess datathe property in the method, it will return the initialized cached value.
Through lazy loading technology, we can defer time-consuming initialization operations until the data is actually needed, thereby reducing the initial burden when the application starts.
5.2 Use Android App Bundle to create dynamic modules
Android App Bundle is a new way to build and deliver Android apps by splitting the app into multiple dynamic modules, which are then downloaded and installed on demand. By using dynamic modules, your app's features and content can be loaded and updated on-demand based on user needs, thereby reducing your app's installation package size and speeding up your app's download and installation speeds.
Here is an example that demonstrates how to create a dynamic module using the Android App Bundle:
-
First, split the application into a main module and one or more dynamic modules. You can make some functions or resources as independent dynamic modules and load them when needed.
-
In the main module's
build.gradlefile, configureandroid.dynamicFeaturesto specify the name and path of the dynamic module:android { // ... dynamicFeatures = [':feature1', ':feature2'] } -
In the dynamic module's
build.gradlefile, configureandroid.dynamicAppto specify the application ID and version:android { // ... dynamicApp { applicationId = "com.example.myapp" versionCode = 1 versionName = "1.0" } } -
Build Android App Bundle:
$ ./gradlew bundle -
Use
bundletooltools to convert Android App Bundle to APK files:$ bundletool build-apks --bundle=app.aab --output=app.apks -
Install the APK file and load dynamic modules on demand:
val splitInstallManager = SplitInstallManagerFactory.create(context)
val request = SplitInstallRequest.newBuilder()
    .addModule("feature1")
    .addModule("feature2")
    .build()

splitInstallManager.startInstall(request)
By using Android App Bundle and dynamic modules, we can dynamically load and install the functions and content of the application according to the actual needs of the user, thereby providing a better user experience and higher application performance.
In short, lazy loading and dynamic modules are two common code optimization techniques that can improve application performance and user experience. By implementing lazy loading, time-consuming initialization operations can be postponed until needed, thereby reducing the initial burden when the application starts. By using Android App Bundle and dynamic modules, the functions and content of the application can be loaded and updated on demand, thereby reducing the size of the application's installation package and speeding up the download and installation of the application. Developers can choose a suitable solution according to the needs of the application, and configure and adjust it accordingly based on the actual situation.
6. Clean up invalid resources
In mobile application development, as the application iterates and functions are updated, a large number of unused resources and layout files may be generated. These invalid resources will not only increase the size of the application's installation package, but also occupy valuable memory space and affect the performance of the application. Therefore, cleaning up invalid resources in a timely manner is an important optimization task. This section will introduce how to clean up unused resources and layouts, and use the Lint tool to detect unused resources.
6.1 Clean up unused resources and layouts
Unused resources and layout files may be generated due to application iteration, requirement changes, or refactoring. In order to reduce the size of the application's installation package and improve the performance of the application, we need to clean up these invalid resources regularly.
Here are some common unused resources and layout files:
- Picture resources: such as picture files, icon files, etc.
- Layout files: such as Activity layout, Fragment layout, list item layout, etc.
- String resources: such as display text, button text, etc.
In order to clean up these invalid resources, we can follow the following steps:
-
First, back up the entire project to prevent accidental deletion of valid resources.
-
Use a version control tool (such as Git) to view recent code submission records and check whether there are related resource references to the deleted records.
-
Iterate through all layout files in the project and check if there are any unused layouts.
-
Use Lint tools to detect unused resources and layouts.
-
For unused resources and layouts, decide whether to delete or further optimize them based on the actual situation.
In Android Studio, you can use the Lint tool to detect unused resources by following these steps:
-
Open Android Studio and open the project you want to detect.
-
Click "Analyze" on the menu bar and select "Inspect Code".
-
In the pop-up dialog box, select the scope to check (the entire project or the specified module).
-
In "Inspection Profile", check the "Unused resources" option.
-
Click "OK" to start code inspection.
The Lint tool will scan the resources and layout files in the project and give warnings or tips for unused resources and layouts.
6.2 Use the Lint tool to detect unused resources
In addition to manual inspection, we can also use the Lint tool to automatically detect unused resources. Lint is a static code analysis tool provided by the Android SDK, which can help us discover potential problems and optimization suggestions.
Here is an example of using the Lint tool to detect unused resources:
-
Open Android Studio and open the project you want to detect.
-
In the project view, right-click the module to be inspected and select "Analyze" -> "Run Inspection by Name".
-
In the pop-up dialog box, enter "Unused resources" and select the corresponding check item.
-
Click "OK" to start code inspection.
After the check is completed, the Lint tool will generate a report containing a list of unused resources and layouts. We can further decide whether to delete or optimize based on the information in the report.
// Kotlin示例代码(清理未使用的字符串资源)
class MyActivity : AppCompatActivity() {


    override fun onCreate(savedInstanceState: Bundle?) {


        super.onCreate(savedInstanceState)

        setContentView(R.layout.activity_my)
        val textView = findViewById<TextView>(R.id.textView)
        textView.text = getString(R.string.app_name) // 使用字符串资源

        // ...

        // 删除未使用的字符串资源
        // getString(R.string.unused_string)
    }
}
In the above example, we used getString(R.string.app_name)to obtain the string resource and displayed in TextView. If there are unused string resources, we can delete or comment out these invalid resources according to the actual situation.
In summary, cleaning up unused resources and layouts is an important optimization task that can reduce the size of the application's installation package and improve the performance of the application. By manually inspecting and using the Lint tool, we can find and clean up invalid resources in our projects. In order to avoid accidentally deleting valid resources, be sure to back up the entire project before operation, and decide whether to delete or further optimize based on the actual situation. This ensures that the code quality and resource utilization of the application are improved.

7. Compress and split APK
As application functions are added and optimized, the APK file size will gradually increase. Large APK files will not only occupy the user's storage space, but also affect the download, installation and startup speed of the application. Therefore, in order to provide a better user experience, we need to use APK compression tools to reduce APK file size, as well as split APK to provide on-demand download and update capabilities. This article will introduce how to use APK compression tools to reduce APK file size, and discuss how to split APKs to provide on-demand downloads and updates.
7.1 Use APK compression tools to reduce APK file size
APK compression tools can help us reduce the size of APK files to increase the download and installation speed of applications and reduce the storage space occupied on user devices. Common APK compression tools include the APK compression tool provided by Google and third-party APK compression tools, such as ProGuard, DexGuard, Androguard, etc.
Here are some commonly used APK compression techniques:
- Delete useless resources: Delete unused code, resources, layouts, etc. in the project to reduce the APK file size.
- Disable debugging information: Disabling debugging information can reduce the APK file size, but will make the debugging process more difficult.
- Compress resources: Use resource compression tools to compress resource files to reduce the size of the APK file.
- Optimize code: Use code optimization tools to obfuscate, optimize, reduce and other operations on the code to reduce the size of the APK file and increase the running speed of the application.
You can use the following steps to compress APK in Android Studio:
- Open Android Studio and open the project you want to compile.
- Click "Build" on the menu bar and select "Generate Signed Bundle/APK".
- In the pop-up dialog box, select "APK" and click "Next".
- Select the variant to build in "Build Variants".
- Select the APK type you want to compress (such as Release or Debug) in "APK Information".
- Select the signature version in "Signature Versions".
- Click "Finish" to start compilation.
After the compilation is completed, we can evaluate the code and resource usage and optimization effect by the size of the APK file. If further compression is needed, we can try to use a third-party APK compression tool to further optimize the APK file size.
7.2 Split APK to provide on-demand downloads and updates
Split APKs provide on-demand downloads and updates. Typically, we can use the main part of the application as a base APK file, and then split other resources into multiple additional APK files. When a user launches the app, the main APK file is downloaded and installed, while additional APK files are downloaded and installed only when needed.
Here is an example using the APK splitting feature:
-
Open Android Studio and open the project you want to split.
-
Configure APK splitting parameters in "build.gradle".
android {
  // ...
  splits {
    // 根据ABI拆分APK文件
    abi {
      enable true
      // 拆分所有ABI类型的APK文件
      universalApk true
    }
    // 根据语言拆分APK文件
    language {
      enable true
      // 指定要拆分的语言
      include "en", "fr"
    }
  }
  // ...
}
In the above example, we used abithe and languagetwo dimensions for APK splitting. abiDimension refers to splitting APK files according to the device's processor architecture, and languagedimension refers to splitting APK files according to the device's language settings. Using these dimensions can better target different devices and provide a better user experience.
- Use split resources in your code.
// Kotlin示例代码(使用拆分后的资源)
val resources = getResourcesForLocale("en")
val drawable = resources.getDrawable(R.drawable.ic_logo)
In the above example, we used getResourcesForLocale()a method to get the resources for the current language of the device. This ensures that the application displays the correct resources in different locales.
In short, using APK compression tools and splitting APKs can improve the download, installation and startup speed of applications, and reduce the storage space occupied by users. APK file size can be reduced by deleting useless resources, disabling debugging information, compressing resources, and optimizing code. At the same time, using the APK splitting function can provide on-demand downloading and updating functions, thereby providing a better user experience. When using the APK compression and splitting functions, we need to weigh the pros and cons and configure and use them according to the actual situation.
8. Data storage optimization
In mobile applications, data storage is an important aspect. As the amount of data increases, we need to find ways to optimize the storage and management of data to reduce the application footprint and improve performance. This article will introduce two commonly used data storage optimization methods: using SQLite database for data compression and compressing cached data within the application.
8.1 Data compression using SQLite database
SQLite is a lightweight relational database that is widely used for data storage in mobile applications. By using a SQLite database, we can effectively organize and manage data in applications, and we can use some techniques to reduce the size of database files to achieve data compression.
The following are some commonly used SQLite database data compression techniques:
- Compress table structure: Optimize the structure of database tables, including deleting unnecessary fields, merging redundant fields, etc., to reduce the size of database files.
- Use integer fields instead of string fields: When storing some fixed-length data, using integer fields instead of string fields can reduce the size of the database file.
- Use database indexes: Creating appropriate database indexes can improve query performance and reduce database file size.
- Delete useless data: Regularly clean and delete data that is no longer needed to reduce the size of the database file.
Here is an example of data compression using a SQLite database:
- Create a SQLite database.
// Kotlin示例代码(创建SQLite数据库)
val dbHelper = MyDatabaseHelper(context)
val db = dbHelper.writableDatabase
In the above example, we used MyDatabaseHelperclasses to create a SQLite database and obtain a writable database instance.
- Compress database table structure.
// Kotlin示例代码(优化数据库表结构)
val sql = "ALTER TABLE table_name DROP COLUMN column_name"
db.execSQL(sql)
In the above example, we used SQL statements to delete a field in the database table to reduce the size of the database file.
- Use integer fields instead of string fields.
// Kotlin示例代码(使用整数型字段替代字符串字段)
val sql = "CREATE TABLE table_name (" +
            "id INTEGER PRIMARY KEY, " +
            "name TEXT, " +
            "age INTEGER)"
db.execSQL(sql)
In the above example, we changed the original namefield type from string type to integer type to reduce the size of the database file.
- Use database indexes.
// Kotlin示例代码(使用数据库索引)
val sql = "CREATE INDEX index_name ON table_name (column_name)"
db.execSQL(sql)
In the above example, we created an index_nameindex named based on the fields table_namein the table column_name.
- Delete useless data.
// Kotlin示例代码(删除无用的数据)
val sql = "DELETE FROM table_name WHERE condition"
db.execSQL(sql)
In the above example, we used SQL statements to delete data that meets specific conditions in the table, thereby reducing the size of the database file.
8.2 Compressing in-app cache data
In-app caching is a mechanism for temporarily storing data to improve the performance and responsiveness of your application. However, over time, the in-app cache can grow large and take up a lot of storage space. To optimize data storage, we can compress the in-app cache data.
Here are some commonly used in-app cache data compression techniques:
- Delete expired cache data: Clean expired cache data regularly to reduce cache file size.
- Use compression algorithm: Use a compression algorithm, such as Gzip or LZ4, on cached data to reduce cache file size.
- Limit the maximum size of cached data: Set the maximum size of cached data. When the size is exceeded, old cached data will be automatically deleted.
The following is an example of using in-app cache data compression:
- Delete expired cached data.
// Kotlin示例代码(删除过期的缓存数据)
val cacheDir = context.cacheDir
val files = cacheDir.listFiles()
for (file in files) {


    if (isExpired(file)) {


        file.delete()
    }
}

private fun isExpired(file: File): Boolean {


    // 判断缓存文件是否过期
    // 返回true表示过期,返回false表示未过期
}
In the above example, we get the app's cache directory and iterate through the files in it. By judging whether the file is expired, if it is expired, delete the file.
- Use compression algorithm.
// Kotlin示例代码(使用LZ4算法压缩缓存数据)
val cacheFile = File(context.cacheDir, "cache_data")
val outputStream = FileOutputStream(cacheFile)
val lz4OutputStream = Lz4OutputStream(outputStream)
lz4OutputStream.write(data)
lz4OutputStream.close()
In the above example, we used the LZ4 algorithm to compress the cached data. First, we create a file output stream and an Lz4OutputStream object, then write data to the Lz4OutputStream, and finally close the Lz4OutputStream.
- Limit the maximum size of cached data.
// Kotlin示例代码(限制缓存数据的最大大小)
val maxSize = 10 * 1024 * 1024 // 最大大小为10MB
val cacheDir = context.cacheDir
val totalSize = getCacheDirSize(cacheDir)
if (totalSize > maxSize) {


    deleteOldestCacheFiles(cacheDir, totalSize - maxSize)
}

private fun getCacheDirSize(cacheDir: File): Long {


    var size: Long = 0
    val files = cacheDir.listFiles()
    for (file in files) {


        size += file.length()
    }
    return size
}

private fun deleteOldestCacheFiles(cacheDir: File, sizeToDelete: Long) {


    val files = cacheDir.listFiles()
    Arrays.sort(files) {

     file1, file2 -> file1.lastModified().compareTo(file2.lastModified()) }
    var deletedSize: Long = 0
    for (file in files) {


        val fileSize = file.length()
        if (file.delete()) {


            deletedSize += fileSize
        }
        if (deletedSize >= sizeToDelete) {


            break
        }
    }
}
In the above example, we first define the maximum size of the cached data and then by iterating through the files in the cache directory and sorting the files in ascending order of last modification time. Then delete old cache files one by one until the total deleted size reaches the set maximum size.
In short, data storage optimization is an important part of mobile application development. By using SQLite database for data compression and compressing the cached data within the application, we can reduce the storage space of the data and improve the performance of the application. By optimizing the database table structure, using integer fields instead of string fields, using database indexes and deleting useless data, we can reduce the file size of the SQLite database. By deleting expired cached data, using compression algorithms, and limiting the maximum size of cached data, we can reduce the space occupied by in-app cached data. In actual development, we need to select an appropriate optimization method based on specific needs and data characteristics, and make reasonable adjustments and tests to obtain the best storage optimization effect.
9. Third-party library optimization
Third-party libraries play an important role in mobile application development and can help us quickly implement various functions. However, some third-party libraries may introduce a large number of dependencies and occupy a large space, affecting the size and performance of the application. In order to optimize the size of the application, we need to evaluate the size of third-party libraries and select lightweight alternatives or custom libraries to reduce the size of the application.
9.1 Evaluate the size of third-party libraries
Before optimizing third-party libraries, we first need to evaluate the introduced third-party libraries to understand their contribution to the application volume. Here are some ways to estimate the size of third-party libraries:
-
Use build tools: Modern build tools such as Gradle provide dependency analysis functions that can help us analyze the size of each third-party library. We can get the size information of each library by looking at the build log or using related plugins.
-
Use APK analysis tools: You can use some APK analysis tools to analyze the application's APK file and obtain the volume information of each library. These tools can usually provide detailed library size, resource file size, and other information.
-
Reference documentation: The documentation or official website of some third-party libraries will provide library volume information. We can check the relevant documentation to understand the size of the library.
Through the above methods, we can evaluate the introduced third-party libraries and understand their contribution to the application volume.
9.2 Choose lightweight alternatives or custom libraries to reduce size
Once we evaluate the size of third-party libraries, we can consider choosing lightweight alternatives or custom libraries to reduce the size of our application. Here are some ways to optimize third-party libraries:
-
Find lightweight alternatives: Sometimes, we can find third-party libraries with similar functions but smaller size to replace the original library. When choosing a replacement library, you need to ensure that the new library provides the necessary functionality and does not introduce too many dependencies.
-
Custom libraries: Some third-party libraries may provide a complete version with all functions, but we actually only need some of them. In this case, we can reduce the size of the application by customizing the library. There are two specific methods:
-
Remove unused functionality: You can reduce the size of your library by removing unused functionality code and resource files. This can be achieved by removing the relevant files from the library or using code obfuscation tools.
-
Build libraries on demand: Some libraries provide the option of building on demand, where we can choose to build only the required functional modules according to our needs. This can reduce the size of the library and avoid introducing unnecessary dependencies.
-
Here are examples of choosing lightweight alternatives or custom libraries:
- Choose lightweight alternatives:
// Kotlin示例代码(使用轻量级替代品库)
implementation 'com.example:lightweight-library:1.0.0'
In the above example, we used a lightweight-librarylightweight replacement library called . This replacement library provides similar functionality to the original library, but in a smaller size.
- Custom library:
// Kotlin示例代码(定制库的移除未使用的功能)
implementation 'com.example:custom-library:1.0.0'

// 移除未使用的功能的混淆配置
-keep class com.example.customlibrary.feature1** {

     *; }
-keep class com.example.customlibrary.feature2** {

     *; }
In the above example, we used a custom-librarycustom library called and removed unused functionality by obfuscating the configuration. This can reduce the size of the library.
By evaluating the size of third-party libraries and choosing lightweight alternatives or custom libraries, we can reduce the size of our applications and improve performance. However, before making changes, we need to ensure that the new library meets the application's needs and is properly tested and verified.
10. Application package size test
The package size of an application is one of the important factors that affects users' downloading and installation of the application. Larger application packages will not only occupy users' storage space, but may also cause long download times or consume users' data traffic. Therefore, we need to test the application package size and optimize based on the test results. Here are some ways to test and optimize:
10.1 Test your app’s download size using different test devices and network speeds
When conducting app bundle size testing, we should simulate users using different devices and network speeds to ensure that the app provides a good user experience in various environments. Here are some testing strategies:
-
Test equipment: Use multiple models and configurations of equipment for testing, including low-end equipment, mid-range equipment, and high-end equipment. This allows you to confirm how your app performs on various devices.
-
Network speed: Test using different network speeds, including a faster Wi-Fi network and a slower mobile data network. This allows you to evaluate your app's download size and download time in different network environments.
-
Testing tools: Use professional application performance testing tools, such as the application analyzer that comes with Android Studio or third-party monitoring tools to test the download size of the application. These tools can provide detailed app package size information, including APK file size and resource file size.
By testing your app's download size using different test devices and network speeds, we can fully evaluate how your app performs under a variety of circumstances.
10.2 Continuously monitor the size of application packages and optimize them at any time
Application package size is not a one-time solution, but a process that requires continuous monitoring and optimization. Here are some ways to continually optimize:
-
Periodic analysis: Regularly check the size of the app package and record which files and libraries are included. In this way, the reasons for the increase of application packages can be discovered in time and corresponding optimization measures can be taken.
-
Remove unused resources: Find and remove unused resource files in the application, such as pictures, audio, videos, etc. This can be achieved through static analysis tools or IDE plug-ins.
-
Code obfuscation: Use code obfuscation tools to reduce your application's bundle size. Code obfuscation can reduce the size of your application by removing unused classes and methods. In Kotlin, we can use ProGuard as a code obfuscation tool.
-
Optimize image resources: Optimize image resources in the application, including compressing image size, using WebP format instead of PNG or JPEG, etc. This can reduce the size of the application bundle without affecting the quality of the image.
-
Use dynamic feature delivery: Deliver certain functions or features of your app as dynamic modules that users can download and install as needed. This reduces the initial bundle size of your application.
Here is a Kotlin example using ProGuard for code obfuscation:
// app/build.gradle

android {


    // ...

    buildTypes {


        release {


            minifyEnabled true
            proguardFiles getDefaultProguardFile('proguard-android-optimize.txt'), 'proguard-rules.pro'
        }
    }
}
In the above example, we enabled code obfuscation and specified the obfuscation rules file proguard-rules.pro. By using code obfuscation tools, we can reduce the bundle size of our application.
By continuously monitoring the size of the app package and taking appropriate optimization measures, we can continuously improve the user experience of the app and ensure that the size of the app package is within an acceptable range. At the same time, we also need to conduct appropriate testing and verification before optimizing to ensure that the functionality and performance of the application will not be affected.

11. User feedback and iteration
User feedback is an important basis for improving Android application experience. By collecting and analyzing user feedback, we can understand the problems and needs that users encounter when using the application and make corresponding optimizations. Here are some ways to collect user feedback and iterate:
-
Feedback channels: Provide multiple feedback channels for users to choose from, such as in-app feedback forms, emails, social media, etc. Make sure feedback channels are easy to use for users to express their opinions and suggestions.
-
User surveys: Conduct regular user surveys to understand user satisfaction, functional requirements and improvement opinions on the application. This can be done through an online survey tool or an in-app survey module.
-
Analytics: Track user behavior, app performance, and crashes with analytics tools like Google Analytics or Firebase Analytics. By analyzing this data, we can identify potential problems and opportunities for improvement.
-
User testing: Organize user testing activities, invite real users to use the application in specific scenarios, and collect their feedback and suggestions. User testing can help us verify the usability and ease of use of the application and identify potential problems.
Based on user feedback, we can formulate corresponding optimization plans and conduct iterative development. When iterating, you need to pay attention to the following points:
-
Prioritization: Prioritize issues and needs based on the importance and urgency of user feedback. Ensure that the most critical problems are solved and the most important needs of users are met.
-
Iterate in small steps: Break down the optimization work into small steps and introduce improvements gradually. Goals within each iteration should be achievable to ensure smooth progress and timely validation of user feedback.
-
Testing and verification: Before releasing a new version, conduct sufficient testing and verification to ensure that fixes or new features will not introduce new problems. This includes unit testing, integration testing, user testing, etc.
12. Conclusion
Android application size optimization is a crucial part of the development process. By following these key steps and best practices, we can build smaller, more efficient applications:
-
In-depth understanding of application requirements and target users, and rational design of application functions and interfaces.
-
Use resource optimization techniques such as image compression, code obfuscation, and resource cleanup to reduce app bundle size.
-
Lazy loading and delayed initialization only load necessary components and resources when needed, improving application operating efficiency.
-
Use dynamic feature delivery to deliver certain features of the application as dynamic modules, reducing the initial package size.
-
Collect user feedback to improve the experience and regularly check for new optimization opportunities.
By constantly pursuing optimization of application size, we can improve user experience, reduce user churn rate, and provide users with better application quality. In order to maintain the competitiveness of applications, developers are encouraged to focus on size optimization during application development and maintain close communication and feedback loops with users.